springboot jpaRepository为何一定要对Entity序列化
目录
- springboot jpaRepository对Entity序列化
- 1. 问题
- 2. 写个基本的JpaRepository的使用
- 最后一个简单的测试
- springboot 使用JpaRepository
springboot jpaRepository对Entity序列化
1. 问题
一开始,我没有对实体类Inventory序列化,导致在使用内嵌数据库H2的JPA时,它直接安装字母序列把表Inventory的字段生成。
举例,原来我按照
inventory(id, name, quantity, type, comment)
顺序写的数据库导入表,但是因为没有序列化,导致表结构变成
inventory(id, comment,name, quantity, type )
所以后面JPA处理失败。
2. 写个基本的JpaRepository的使用
顺便记录一下写spring cloud 基于和H2 database的jpa简单restful 程序。
实体类Inventory
package com.example.demo;
import java.io.Serializable;
import javax.persistence.Column;
import javax.persistence.Entity;
import javax.persistence.GeneratedValue;
import javax.persistence.Id;
import javax.persistence.SequenceGenerator;

@Entity
public class Inventory implements Serializable{
    private static final long serialVersionUID = 1L;
    @Id
    @SequenceGenerator(name="inventory_generator", sequenceName="inventory_sequence", initialValue = 2)
    @GeneratedValue(generator = "inventory_generator")
    private Integer id;
    @Column(nullable = false)
    private String name;
    @Column(nullable = false)
    private Integer quantity;
    @Column(nullable = false)
    private Integer type;
    @Column(nullable = false)
    private String comment;
    public Inventory(Integer id, String name, Integer quantity, Integer type, String comment) {
        super();
        this.id = id;
        this.name = name;
        this.quantity = quantity;
        this.type = type;
        this.comment = comment;
    }
    public Inventory() {
        super();
    }
    public Integer getId() {
        return id;
    }
    public void setId(Integer id) {
        this.id = id;
    }
    public String getName() {
        return name;
    }
    public void setName(String name) {
        this.name = name;
    }
    public Integer getQuantity() {
        return quantity;
    }
    public void setQuantity(Integer quantity) {
        this.quantity = quantity;
    }
    public Integer getType() {
        return type;
    }
    public void setType(Integer type) {
        this.type = type;
    }
    public String getComment() {
        return comment;
    }
    public void setComment(String comment) {
        this.comment = comment;
    }
    @Override
    public String toString() {
        return "Inventory [id=" + id + ", name=" + name + ", quantity=" + quantity + ", type=" + type + ", comment="
                + comment + "]";
    }
}
下面使用JpaRepository简化开发流程,非常舒服地定义简单的service 接口即可,会自动实现,大赞。
package com.example.demo;
import org.springframework.data.jpa.repository.JpaRepository;
public interface InventoryRepository extends JpaRepository<Inventory, Integer> {
    Inventory findById(Integer id);
}
我把controller方法放到了springboot启动类里面,这又是一个大问题,因为我的项目只有放在这才能被dispatcher转发,简直了。
这里的@EnableDiscoveryClient 是因为我在做spring cloud的eureka 服务发现,需要这个注解让注册中心发现这个服务。
package com.example.demo;
import java.time.LocalTime;
import org.springframework.beans.factory.annotation.Autowired;
import org.springframework.beans.factory.annotation.Value;
import org.springframework.boot.SpringApplication;
import org.springframework.boot.autoconfigure.SpringBootApplication;
import org.springframework.cloud.client.discovery.EnableDiscoveryClient;
import org.springframework.transaction.annotation.Transactional;
import org.springframework.web.bind.annotation.GetMapping;
import org.springframework.web.bind.annotation.PathVariable;
import org.springframework.web.bind.annotation.RequestMapping;
import org.springframework.web.bind.annotation.ResponseBody;
import org.springframework.web.bind.annotation.RestController;

@SpringBootApplication
@EnableDiscoveryClient
@RestController
public class InventoryApplication {
    public static void main(String[] args) {
        SpringApplication.run(InventoryApplication.class, args);
    }
    @Autowired
    private InventoryRepository inventoryRepository;

    @Value("${server.port}")
    private Integer port;
    @RequestMapping("/info")
    public String info(){
        inventoryRepository.save(new Inventory(1, "火锅底料", 10000, 1, "你吃火锅,我吃底料"));
        inventoryRepository.save(new Inventory(2, "微服务架构", 100, 2, "微服务还是要考虑 一波"));
        return "{Inventory[port:"+port+", info:库存微服务"+"]}";
    }

    @GetMapping("/get/{id}")
    @ResponseBody
    @Transactional
    public String getById(@PathVariable("id")Integer id){
        return inventoryRepository.findById(id).toString();
    }

    @GetMapping("/")
    @ResponseBody
    @Transactional
    public String re(){
        return inventoryRepository.findAll().toString();
    }

    @GetMapping("/delete/{id}")
    @ResponseBody
    @Transactional
    public String delete(@PathVariable("id")Integer id){
        inventoryRepository.delete(id);
        return "delete successfully";
    }

    @GetMapping("/save/id={id}&name={name}&quantity={quantity}&type={type}&comment={comment}")
/*  @ResponseBody
    @Transactional*/
    public String save(@PathVariable("id")Integer id,@PathVariable("name")String name,
            @PathVariable("quantity")Integer quantity,@PathVariable("type")Integer type,
            @PathVariable("comment")String comment){
        inventoryRepository.save(new Inventory(id,name,quantity,type,comment));
        System.out.println(new Inventory(id,name,quantity,type,comment));
        //强调一下identity和auto
        return "save successfully";
    }

    @GetMapping("/update/id={id}&name={name}&quantity={quantity}&type={type}&comment={comment}")
    @ResponseBody
    @Transactional
    public String update(@PathVariable("id")Integer id,@PathVariable("name")String name,
            @PathVariable("quantity")Integer quantity,@PathVariable("type")Integer type,
            @PathVariable("comment")String comment){
        Inventory inventory=inventoryRepository.findById(id);
        if(inventory.getComment().length()<LocalTime.now().toString().length()){
            inventory.setComment(inventory.getComment()+LocalTime.now());
        }else{
            inventory.setComment(inventory.getComment().substring(0,inventory.getComment().length()-
                    LocalTime.now().toString().length())+LocalTime.now());
        }
        inventoryRepository.save(inventory);
        inventoryRepository.flush();
        return "update successfully";
    }
}
application.properties的配置很关键,搜了不少教程。
spring.jpa.show-sql=true
logging.pattern.level=trace
server.port=8765
spring.application.name=inventory
server.tomcat.max-threads=1000
eureka.instance.leaseRenewalIntervalInSeconds= 10
eureka.client.registryFetchIntervalSeconds= 5
eureka.client.serviceUrl.defaultZone=http://localhost:8889/eureka
#eureka.client.service-url.defaultZone=http://${eureka.instance.hostname}:${eureka.instance.server.port}/eureka

#spring.thymeleaf.prefix=classpath:/templates/
#spring.thymeleaf.suffix=.html
#spring.thymeleaf.mode=HTML5
#spring.thymeleaf.encoding=UTF-8
# ;charset=<encoding> is added
#spring.thymeleaf.content-type=text/html
# set to false for hot refresh
spring.h2.console.enabled=true
spring.thymeleaf.cache=false
spring.jpa.hibernate.ddl-auto=update
#这里是把h2持久化到本地文件夹,这可以保持数据
spring.datasource.url=jdbc:h2:file:C\:/h2/h2cache;AUTO_SERVER=TRUE;DB_CLOSE_DELAY=-1
logging.file=c\:/h2/logging.log
logging.level.org.hibernate=debug
#spring.datasource.data=classpath:import.sql
数据库是自动导入的,只要命名方式是import.sql, 放在src/main/resources下面就可以
insert into inventory(id, name, quantity, type, comment) values (1, "火锅底料", 10000, 1, "你吃火锅,我吃底料")
insert into inventory(id, name, quantity, type, comment) values (2, "微服务架构", 100, 2, "微服务还是要考虑 一波")
最后一个简单的测试
junit测试一波
package com.example.demo;
import org.junit.Test;
import org.junit.runner.RunWith;
import org.springframework.beans.factory.annotation.Autowired;
import org.springframework.boot.test.context.SpringBootTest;
import org.springframework.test.context.junit4.SpringRunner;
@RunWith(SpringRunner.class)
@SpringBootTest
public class InventoryApplicationTests {

    @Autowired
    private InventoryRepository inventoriRepository;

    @Test
    public void test2() {
        System.out.println(inventoriRepository.findAll());
    }
}
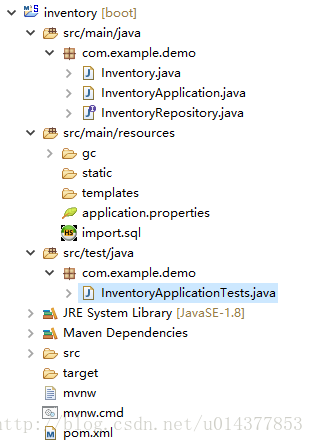
上图是项目结构图
springboot 使用JpaRepository
在对数据库操作时使用 MissionInfoRepository,对应的实体类必须用下面两个注解修饰
@Entity
@Table(name = "mission_info")
主键用下面修饰
 @Id
 @GeneratedValue(strategy = IDENTITY)
 @Column(name = "id", nullable = false)
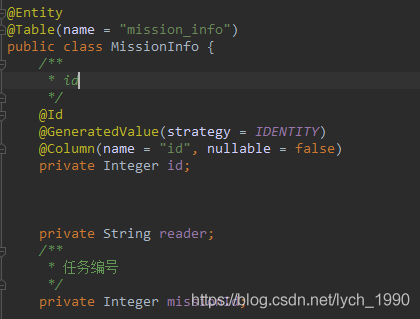
属性命名如果使用驼峰,例如missionId,表中字段对应mission_id,否则对数据库操作的时候会报错,所以在表字段定义的时候,方便代码里使用JPA的话,表字段定义多个词之间用“_”隔开,而不是驼峰定义表字段。
以上为个人经验,希望能给大家一个参考,也希望大家多多支持我们。
相关推荐
-

基于Spring Boot使用JpaRepository删除数据时的注意事项
问题: 在Spring Boot中使用JpaRepository的deleteById(ID id)方法删除数据时,首先要使用existsById(ID id)方法判断数据是否存在.如果存在,再删除. 否则,删除一个id不存在的数据会抛出org.springframework.dao.EmptyResultDataAccessException异常: 2019-01-02 15:57:24.122 WARN org.springframework.boot.autoconfigure.orm.j
-
springboot整合JPA过程解析
这篇文章主要介绍了springboot整合JPA过程解析,文中通过示例代码介绍的非常详细,对大家的学习或者工作具有一定的参考学习价值,需要的朋友可以参考下 接下来具体看看是怎么弄的. 1.新建一个springboot项目,选择web.data jdbc.data jpa.mysql driver. 2.建立以下目录及结构: pom.xml <?xml version="1.0" encoding="UTF-8"?> <project xmlns=&
-
Spring Boot JPA中使用@Entity和@Table的实现
本文中我们会讲解如何在Spring Boot JPA中实现class和数据表格的映射. 默认实现 Spring Boot JPA底层是用Hibernate实现的,默认情况下,数据库表格的名字是相应的class名字的首字母大写.命名的定义是通过接口ImplicitNamingStrategy来定义的: /** * Determine the implicit name of an entity's primary table. * * @param source The source inform
-
解决springboot无法注入JpaRepository的问题
使用内置服务器启动springboot项目时,会从@SpringBootApplication修饰类所在的包开始,加载当前包和所有子包下的类,将由@Component @Repository @Service @Controller修饰的类交由spring进行管理. package com.facade; import org.springframework.boot.SpringApplication; import org.springframework.boot.autoconfigure
-
springboot jpaRepository为何一定要对Entity序列化
目录 springboot jpaRepository对Entity序列化 1. 问题 2. 写个基本的JpaRepository的使用 最后一个简单的测试 springboot 使用JpaRepository springboot jpaRepository对Entity序列化 1. 问题 一开始,我没有对实体类Inventory序列化,导致在使用内嵌数据库H2的JPA时,它直接安装字母序列把表Inventory的字段生成. 举例,原来我按照 inventory(id, name, quant
-
springboot整合shiro登录失败次数限制功能的实现代码
这次讲讲如何限制用户登录尝试次数,防止坏人多次尝试,恶意暴力破解密码的情况出现,要限制用户登录尝试次数,必然要对用户名密码验证失败做记录,Shiro中用户名密码的验证交给了CredentialsMatcher 所以在CredentialsMatcher里面检查,记录登录次数是最简单的做法.当登录失败次数达到限制,修改数据库中的状态字段,并返回前台错误信息. 因为之前的博客都是用的明文,这里就不对密码进行加密了,如果有需要加密,将自定义密码比较器从SimpleCredentialsMatcher
-
SpringBoot通过redisTemplate调用lua脚本并打印调试信息到redis log(方法步骤详解)
第一次写Lua脚本,并通过springboot的redisTemplate调用脚本,进行脚本与应用的交互.不熟悉真的折腾了好久,现在总结一下学习过程: 第一次写完lua时,想到的就是如何在应用调用脚本的时候,去调试脚本.在网上海搜了一把,能找到的有点相关的寥寥无几. 有一种方法是通过执行redis命令,调用redis客户端,加载lua脚本,然后出现基于命令行调试的交互界面,输入调试命令去调试脚本.如下: 在终端输入命令:redis-cli.exe --ldb --eval LimitLoadTi
-
springboot使用shiro-整合redis作为缓存的操作
说在前面 本来的整合过程是顺着博客的顺序来的,越往下,集成的越多,由于之前是使用ehcache缓存,现在改为redis,限制登录人数 以及 限制登录次数等 都需要改动,本篇为了简单,目前先将这两个功能下线,配置暂时是注销的,原类保存,在下篇博客中改. 还有之前是使用SessionListener监听session创建来统计在线人数,在本篇中也将改为统计redis中的key数目. 如果是单机,使用ehcache是最快的,项目一般都不是单节点,为了方便之后使用sso单点登录,以及多节点部署,所以使用
-
SpringBoot + JPA @ManyToMany的操作要点说明
目录 SpringBoot + JPA @ManyToMany 要点 对应的Entity的建立 Junit的测试 JPA中ManyToMany关系问题 解决办法 SpringBoot + JPA @ManyToMany 要点 这里主要时记录下此种方法的注意事项. 环境 :mysql 引擎为innoDB ,否则没有事务的说法的. #不加这句则默认为myisam引擎 spring.jpa.database-platform=org.hibernate.dialect.MySQL5InnoDBDial
-
Springboot集成ProtoBuf的实例
目录 Springboot集成ProtoBuf 1.pom.xml引入相关依赖 2.新建序列化工具类ProtoBufUtil.java 3.新建实体类User.java 4.使用方式 ProtoBuf+Java+Springboot+IDEA应用 什么是Protobuf 应用环境 开发环境 Springboot集成ProtoBuf ProtoBuf是一种序列化和解析速度远高于JSON和XML的数据格式,项目中使用了CouchBase作为缓存服务器,从数据库中拿到数据后通过protobuf序列化后
-
Springboot整合Redis与数据持久化
目录 Springboot整合Redis 使用json方式存储 序列化方式存储数据 MySQL与Redis一致性解决同步问题 Redis持久化机制 全量同步与增量同步 RDB与AOF RDB AOF Springboot整合Redis 有两种存储数据的方式: 方案1:在Redis存放一个对象 使用json序列化与反序列化 方案2:直接使用redis自带序列化方式存储对象 maven依赖 <parent> <groupId>org.springframework.boot</g
-
Springboot微服务项目整合Kafka实现文章上下架功能
目录 前言: 一:Kafka消息发送快速入门 1.传递字符串消息 (1)发送消息 (2)监听消息 (3)测试结果 2.传递对象消息 (1)修改生产者代码 (2)结果测试 二:功能引入 1.需求分析 2.逻辑分析 三:前期准备 1.引入依赖 2.定义常量 3.Kafka配置信息 四:代码实现 1.自媒体端 2.移动端 前言: 1.前面基于Springboot的单体项目介绍已经完结了,至于项目中的其他功能实现我这里就不打算介绍了,因为涉及的知识点不难,而且都是简单的CRUD操作,假如有兴趣的话可以私
-
@Transactional注解异常报错之多数据源详解
目录 @Transactional注解报错之多数据源 1.在配置数据源的同时 2.一定要在需要使用事物注解的数据源配置里 @Transactional 错误使用的几种场景 @Transactional注解报错之多数据源 如果在加上@Transactional注解之后报错,先查看程序是否为多数据源,之前专门有一章讲解springboot的多数据源实现.多数据源的情况下加事物注解,有可能会出现问题,以下是解决方案. 1.在配置数据源的同时 一定到在其中一个配置上加上@Primary注解,其他的不要加
-
Spring boot2+jpa+thymeleaf实现增删改查
一.pom.xml引入相关模块web.jpa.thymeleaf.oracle: <dependency> <groupId>org.springframework.boot</groupId> <artifactId>spring-boot-starter-web</artifactId> </dependency> <dependency> <groupId>org.springframework.boot