vue+高德地图实现地图搜索及点击定位操作
首先需要在index.html中引入高德地图的js链接,key需要换成你自己的key
最近有个需求是实现一个使用地图搜索定位的功能,在网上参考了下其他的文章,感觉不是很完善,自己整理了一下,可以实现点击定位,搜索列表定位等功能,可能有些地方是多余的,需要的自己看着改下
<script type="text/javascript" src="https://webapi.amap.com/maps?v=1.4.14&key=你的key"></script>
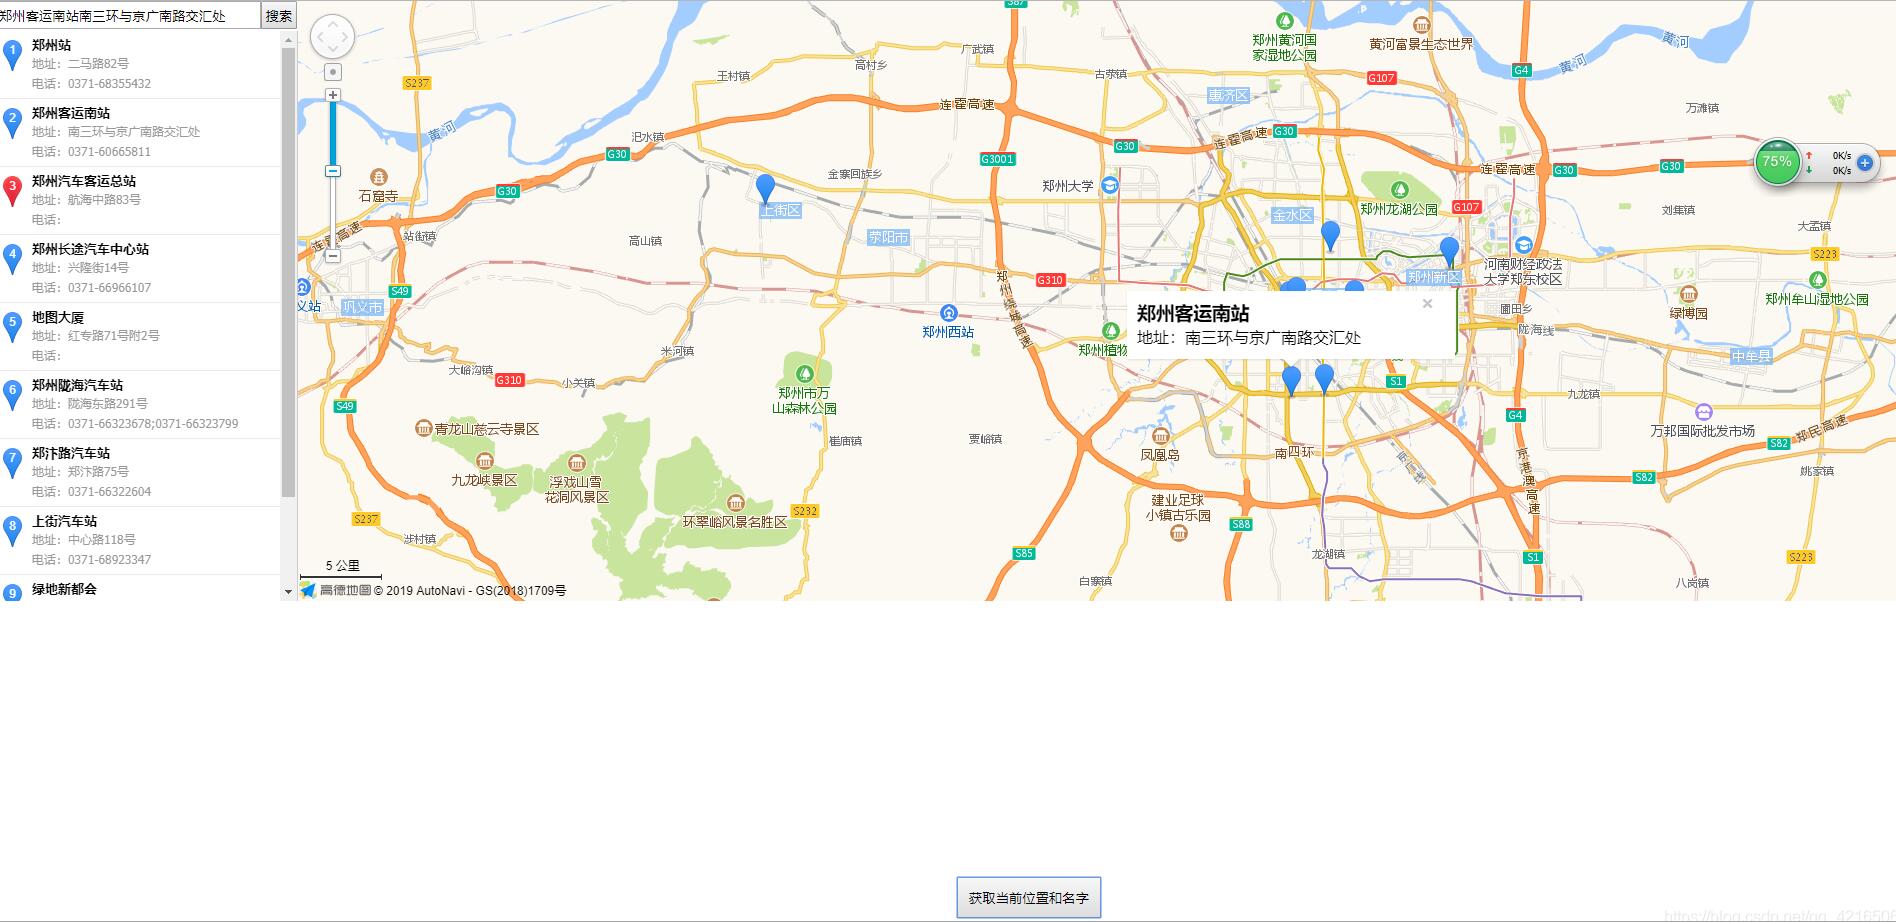
效果图如下

下边就是实现过程
html部分
<template>
<div id="wrap">
<div id="searchWrap">
<div class="searchWrap">
<input type="text" v-model="address" @input="search"><button @click="search">搜索</button>
</div>
<div id="result" class="amap_lib_placeSearch" v-show="hide">
<div class="amap_lib_placeSearch_list amap-pl-pc" v-for="(item,index) in poiArr"
@click="openMarkerTipById(index,$event)"
@mouseout="onmouseout_MarkerStyle(index+1,$event)"
:key="index">
<div class="poibox" style="border-bottom: 1px solid #eaeaea">
<div class="amap_lib_placeSearch_poi poibox-icon" :class="index==selectedIndex?'selected':''">{{index+1}}</div>
<div class="poi-img" v-if="item.url" :style="'background-image:url('+item.url+'?operate=merge&w=90&h=56&position=5)'"
></div>
<h3 class="poi-title" >
<span class="poi-name">{{item.name}}</span>
</h3>
<div class="poi-info">
<p class="poi-addr">地址:{{item.address}}</p>
<p class="poi-tel">电话:{{item.tel}}</p>
</div>
<div class="clear"></div>
</div>
</div>
</div>
</div>
<div id="iCenter"></div>
<button class="btn" @click="fetAddressName">获取当前位置和名字</button>
</div>
</template>
js部分
<script>
 export default {
  props:['newAddress','dataObj'],// 父组件传过来的地址和地址经纬度信息,
  data() {
   return {
    address:this.newAddress ? this.newAddress : '郑州',//保存地址的汉字名字
    map1: '',
    map:'',//保存地址的经纬度
    poiArr: [],//左边搜索出来的数组
    windowsArr: [],//信息窗口的数组
    marker: [],
    mapObj: "",//地图对象
    selectedIndex: -1,
    hide: false,
    clickType: 1,
    location:{
     P:this.dataObj.lat,
     Q:this.dataObj.lng,
    }
   };
  },
  mounted() {
   console.log(333,this.dataObj,this.location)
   this.mapInit()
   this.placeSearch(this.address)

  },
  methods: {
   showToast(address){
    this.placeSearch(address.address)
    console.log(444,address)
    this.location.P =address.lat
    this.location.Q =address.lng
    this.address = address.address
    let that = this;
    new AMap.InfoWindow({
     content:"<h3>" + '当前选中地址' + "</h3>" + that.address,
     size: new AMap.Size(300, 0),
     autoMove: true,
     offset: new AMap.Pixel(-4, -10)
    }).open(that.mapObj,that.location)
   },
   cancelSave(){
    eventBus.$emit('cancelSave')
   },
   saveAddress(){
    let addressName,location;
    if(this.clickType==1){
     let address = this.poiArr[this.selectedIndex]
     addressName = address.name+address.address;
     location = address.location
     console.log(address.name+address.address,address.location)

    }else if(this.clickType==2){
     console.log(this.address,this.map)
     addressName = this.address;
     location = this.map;
    }else if(this.clickType==3){
     console.log(this.address,this.map1)
     addressName = this.address;
     location = this.map1;
    }
    eventBus.$emit('saveAddress',[addressName,location])
   },
   // 经纬度转化为详细地址
   getAddress(){
    let that = this;
    AMap.plugin('AMap.Geocoder',function(){
     let geocoder = new AMap.Geocoder({
      radius: 100,
      extensions: "all"
     });
     geocoder.getAddress([that.map1.lng,that.map1.lat], function(status, result) {
      if (status === 'complete' && result.info === 'OK') {
       let address = result.regeocode.formattedAddress;
       console.log(result.regeocode);
       that.address = result.regeocode.formattedAddress;
       // that.placeSearch(that.address)
      }
     });
    })
   },
   // 地图点击事件
   testevent(){
    let that = this;
    this.clickType = 3
    // var map=new AMap.Map('iCenter');//重新new出一个对象,传入参数是div的id
    AMap.event.addListener(this.mapObj,'click',function (e) { //添加点击事件,传入对象名,事件名,回调函数
     that.map1 = e.lnglat;
     that.getAddress();
     setTimeout(()=>{
      new AMap.InfoWindow({
       content:"<h3>" + '当前选中地址' + "</h3>" + that.address,
       size: new AMap.Size(300, 0),
       autoMove: true,
       offset: new AMap.Pixel(-4, -10)
      }).open(that.mapObj,e.lnglat)
     },100)
    })
   },
   //创建一个map
   mapInit() {
    this.mapObj = new AMap.Map("iCenter", {
     resizeEnable: true,
     zoom: 10,
    })
    this.testevent();
   },
   //根据名字地址去搜索结果
   placeSearch(name) {
    let that = this;
    this.hide = true
    var MSearch;
    this.mapObj.plugin(
     ["AMap.PlaceSearch", "AMap.ToolBar", "AMap.Scale"],
     () => {
      this.mapObj.addControl(new AMap.ToolBar())
      this.mapObj.addControl(new AMap.Scale())
      MSearch = new AMap.PlaceSearch({
       //构造地点查询类
       city: that.address //城市
      });
      AMap.event.addListener(MSearch,"complete",this.keywordSearch_CallBack) //返回地点查询结果
      MSearch.search(name); //关键字查询
     }
    );
   },
   //结果的回调
   keywordSearch_CallBack(data) {
    console.log(111,data)
    var poiArr = data.poiList.pois
    var resultCount = poiArr.length
    this.poiArr = poiArr; //左边要渲染的数据
    for (var i = 0; i < resultCount; i++) {
     this.addmarker(i, poiArr[i])
     console.log(poiArr[i])
     this.poiArr[i].url = this.poiArr[i].photos? this.poiArr[i].photos[0]? this.poiArr[i].photos[0].url: "": ""
    }
    this.mapObj.setFitView()
   },
   //添加marker&infowindow
   addmarker(i, d) {
    var lngX = d.location.getLng();
    var latY = d.location.getLat();
    console.log(lngX,latY)
    var markerOption = {
     map: this.mapObj,
     position: new AMap.LngLat(lngX, latY)
    };
    var mar = new AMap.Marker(markerOption);
    this.marker.push(new AMap.LngLat(lngX, latY));
    var infoWindow = new AMap.InfoWindow({
     content: "<h3>" +'当前选中位置:'+ d.name + "</h3>" + this.TipContents(d.name, d.address),
     size: new AMap.Size(300, 0),
     autoMove: true,
     offset: new AMap.Pixel(0, -30)
    });
    console.log()
    this.windowsArr.push(infoWindow);
    var _this = this;
    var aa = (e) => {
     this.clickType = 2
     var obj = mar.getPosition();
     this.map = obj //这里保存的地址经纬度
     this.address = d.name + d.address //这里保存的是地址名字
     infoWindow.open(_this.mapObj, obj);
    }
    AMap.event.addListener(mar, "click", aa)
   },
   TipContents(name, address) {
    //窗体内容
    if (
     name == "" ||
     name == "undefined" ||
     name == null ||
     name == " undefined" ||
     typeof name == "undefined"
    ) {
     type = "暂无";
    }
    if (
     address == "" ||
     address == "undefined" ||
     address == null ||
     address == " undefined" ||
     typeof address == "undefined"
    ) {
     address = "暂无";
    }
    var str = `地址:${address}`
    return str
   },
   openMarkerTipById(pointid, event) {
    //根据id 打开搜索结果点tip
    this.clickType = 1
    event.currentTarget.style.background = "#CAE1FF";
    this.selectedIndex = pointid
    // this.map = this.marker[pointid]
    this.map1 = this.poiArr[pointid].location
    console.log(222,this.mapObj, this.marker[pointid])
    console.log(this.marker[pointid],this.poiArr[pointid])
    this.address = this.poiArr[pointid].address + this.poiArr[pointid].name
    this.windowsArr[pointid].open(this.mapObj, this.marker[pointid])

   },
   onmouseout_MarkerStyle(pointid, event) {
    //鼠标移开后点样式恢复
    event.currentTarget.style.background = ""
   },
   search() {
    this.windowsArr = []
    this.marker = []

    this.mapObj=''
    this.mapInit()
    this.placeSearch(this.address)
   }
  },
 };
</script>
css部分
<style lang="scss">
  #wrap{
    width:100%;
    display: flex;
    #iCenter {
      height: 600px;
      position: relative;
      display: flex;
      flex: 1;
    }
    #searchWrap{
      width:300px;
      position: relative;
      height:600px;
      .searchWrap{
        position: absolute;
        width:300px;
        z-index: 9;
        display: flex;
        align-items: center;
        input{
          width:260px;
          height:24px;
        }
        button{
          width:36px;
          height:28px;
        }
      }
      #result {
        width: 300px;
        position: absolute;
        top:30px;
        height: 570px;
        z-index: 8;
        overflow-y: scroll;
        border-right: 1px solid #ccc;
      }
    }
    .amap_lib_placeSearch {
      height: 100%;
      overflow-y: scroll;
      .poibox {
        border-bottom: 1px solid #eaeaea;
        cursor: pointer;
        padding: 5px 0 5px 10px;
        position: relative;
        min-height: 35px;
        .selected {
          background-image: url(https://webapi.amap.com/theme/v1.3/markers/n/mark_r.png) !important;
        }
        &:hover {
          background: #f6f6f6;
        }
        .poi-img {
          float: right;
          margin: 3px 8px 0;
          width: 90px;
          height: 56px;
          overflow: hidden;
        }
        .poi-title {
          margin-left: 25px;
          font-size: 13px;
          overflow: hidden;
        }
        .poi-info {
          word-break: break-all;
          margin: 0 0 0 25px;
          overflow: hidden;
          p {
            color: #999;
            font-family: Tahoma;
            line-height: 20px;
            font-size: 12px;
          }
        }
        .poibox-icon {
          margin-left: 7px;
          margin-top: 4px;
        }
        .amap_lib_placeSearch_poi {
          background: url(https://webapi.amap.com/theme/v1.3/markers/n/mark_b.png)
          no-repeat;
          height: 31px;
          width: 19px;
          cursor: pointer;
          left: -1px;
          text-align: center;
          color: #fff;
          font: 12px arial, simsun, sans-serif;
          padding-top: 3px;
          position: absolute;
        }
      }
    }
    .btn{
      position: fixed;
      bottom:20px;
      left:50%;
      padding:10px;
    }
  }
</style>
补充知识:vue-amap 高德地图定位 点击获取经纬度和具体地址的使用
官方文档地址: 点这里!!

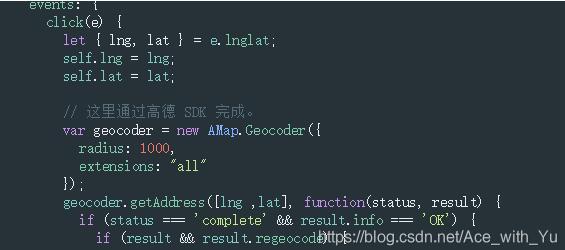
经纬度获取只要通过点击事件就可以通过e.lnglat来获取,然后就是插件Geocoder使用了。在main.js中initAMapApiLoader中写入:AMap.Geocoder,注意 官方文档中有提示:

所以插件中使用的依然是AMap,与导入名无关

不然会报错,Geocoder无法使用。
定位文档 照着文档写就行 注意在main.js中注册AMap.Geolocation插件,
另外使用到地图的.vue页面 不能使用scoped对样式进行局域化。
以上这篇vue+高德地图实现地图搜索及点击定位操作就是小编分享给大家的全部内容了,希望能给大家一个参考,也希望大家多多支持我们。
赞 (0)

