Linux输入子系统框架原理解析
input输入子系统框架
linux输入子系统(linux input subsystem)从上到下由三层实现,分别为:输入子系统事件处理层(EventHandler)、输入子系统核心层(InputCore)和输入子系统设备驱动层。
一个输入事件,如鼠标移动,键盘按键按下,joystick的移动等等通过 input driver -> Input core -> Event handler -> userspace 到达用户空间传给应用程序。
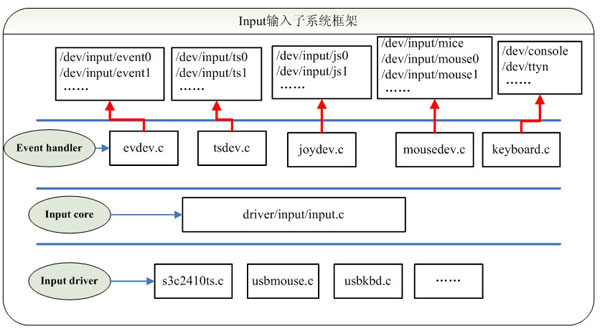
【注意】keyboard.c不会在/dev/input下产生节点,而是作为ttyn终端(不包括串口终端)的输入。
驱动层
对于输入子系统设备驱动层而言,主要实现对硬件设备的读写访问,中断设置,并把硬件产生的事件转换为核心层定义的规范提交给事件处理层。将底层的硬件输入转化为统一事件形式,想输入核心(Input Core)汇报。
输入子系统核心层
对于核心层而言,为设备驱动层提供了规范和接口。设备驱动层只要关心如何驱动硬件并获得硬件数据(例如按下的按键数据),然后调用核心层提供的接口,核心层会自动把数据提交给事件处理层。它承上启下为驱动层提供输入设备注册与操作接口,如:input_register_device;通知事件处理层对事件进行处理;在/Proc下产生相应的设备信息。
事件处理层
对于事件处理层而言,则是用户编程的接口(设备节点),并处理驱动层提交的数据处理。主要是和用户空间交互(Linux中在用户空间将所有的设备都当作文件来处理,由于在一般的驱动程序中都有提供fops接口,以及在/dev下生成相应的设备文件nod,这些操作在输入子系统中由事件处理层完成)。
/dev/input目录下显示的是已经注册在内核中的设备编程接口,用户通过open这些设备文件来打开不同的输入设备进行硬件操作。
事件处理层为不同硬件类型提供了用户访问及处理接口。例如当我们打开设备/dev/input/mice时,会调用到事件处理层的Mouse Handler来处理输入事件,这也使得设备驱动层无需关心设备文件的操作,因为Mouse Handler已经有了对应事件处理的方法。
输入子系统由内核代码drivers/input/input.c构成,它的存在屏蔽了用户到设备驱动的交互细节,为设备驱动层和事件处理层提供了相互通信的统一界面。
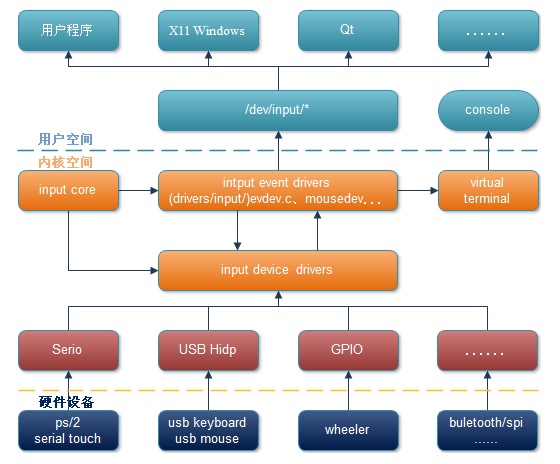
由上图可知输入子系统核心层提供的支持以及如何上报事件到input event drivers。
作为输入设备的驱动开发者,需要做以下几步:
- 在驱动加载模块中,设置你的input设备支持的事件类型
- 注册中断处理函数,例如键盘设备需要编写按键的抬起、放下,触摸屏设备需要编写按下、抬起、绝对移动,鼠标设备需要编写单击、抬起、相对移动,并且需要在必要的时候提交硬件数据(键值/坐标/状态等等)
- 将输入设备注册到输入子系统中
///////////////////////////////////////////////////////////////////分割线/////////////////////////////////////////////////////////////////////////////////
输入核心提供了底层输入设备驱动程序所需的API,如分配/释放一个输入设备:
struct input_dev *input_allocate_device(void);
void input_free_device(struct input_dev *dev);
/**
 * input_allocate_device - allocate memory for new input device
 *
 * Returns prepared struct input_dev or NULL.
 *
 * NOTE: Use input_free_device() to free devices that have not been
 * registered; input_unregister_device() should be used for already
 * registered devices.
 */
struct input_dev *input_allocate_device(void)
{
  struct input_dev *dev;
     /*分配一个input_dev结构体,并初始化为0*/
  dev = kzalloc(sizeof(struct input_dev), GFP_KERNEL);
  if (dev) {
    dev->dev.type = &input_dev_type;/*初始化设备的类型*/
    dev->dev.class = &input_class; /*设置为输入设备类*/
    device_initialize(&dev->dev);/*初始化device结构*/
    mutex_init(&dev->mutex); /*初始化互斥锁*/
    spin_lock_init(&dev->event_lock); /*初始化事件自旋锁*/
    INIT_LIST_HEAD(&dev->h_list);/*初始化链表*/
    INIT_LIST_HEAD(&dev->node); /*初始化链表*/

    __module_get(THIS_MODULE);/*模块引用技术加1*/
  }

  return dev;
}
注册/注销输入设备用的接口如下:
int __must_check input_register_device(struct input_dev *);
void input_unregister_device(struct input_dev *);
/**
 * input_register_device - register device with input core
 * @dev: device to be registered
 *
 * This function registers device with input core. The device must be
 * allocated with input_allocate_device() and all it's capabilities
 * set up before registering.
 * If function fails the device must be freed with input_free_device().
 * Once device has been successfully registered it can be unregistered
 * with input_unregister_device(); input_free_device() should not be
 * called in this case.
 */
int input_register_device(struct input_dev *dev)
{
    //定义一些函数中将用到的局部变量
  static atomic_t input_no = ATOMIC_INIT(0);
  struct input_handler *handler;
  const char *path;
  int error;
  //设置 input_dev 所支持的事件类型,由 evbit 成员来表示。具体类型在后面归纳。
  /* Every input device generates EV_SYN/SYN_REPORT events. */
  __set_bit(EV_SYN, dev->evbit);

  /* KEY_RESERVED is not supposed to be transmitted to userspace. */
  __clear_bit(KEY_RESERVED, dev->keybit);

  /* Make sure that bitmasks not mentioned in dev->evbit are clean. */
  input_cleanse_bitmasks(dev);

   //初始化 timer 定时器,用来处理重复点击按键。(去抖)
  /*
   * If delay and period are pre-set by the driver, then autorepeating
   * is handled by the driver itself and we don't do it in input.c.
   */
  init_timer(&dev->timer);
    //如果 rep[REP_DELAY] 和 [REP_PERIOD] 没有设值,则赋默认值。为了去抖。
  if (!dev->rep[REP_DELAY] && !dev->rep[REP_PERIOD]) {
    dev->timer.data = (long) dev;
    dev->timer.function = input_repeat_key;
    dev->rep[REP_DELAY] = 250;
    dev->rep[REP_PERIOD] = 33;
  }
   //检查下列两个函数是否被定义,没有被定义则赋默认值。
  if (!dev->getkeycode)
    dev->getkeycode = input_default_getkeycode;//得到指定位置键值

  if (!dev->setkeycode)
    dev->setkeycode = input_default_setkeycode;//设置指定位置键值
    //设置 input_dev 中 device 的名字为 inputN
    //将如 input0 input1 input2 出现在 sysfs 文件系统中
  dev_set_name(&dev->dev, "input%ld",
       (unsigned long) atomic_inc_return(&input_no) - 1);
    //将 input->dev 包含的 device 结构注册到 Linux 设备模型中。
  error = device_add(&dev->dev);
  if (error)
    return error;
  //打印设备的路径并输出调试信息
  path = kobject_get_path(&dev->dev.kobj, GFP_KERNEL);
  printk(KERN_INFO "input: %s as %s\n",
    dev->name ? dev->name : "Unspecified device", path ? path : "N/A");
  kfree(path);

  error = mutex_lock_interruptible(&input_mutex);
  if (error) {
    device_del(&dev->dev);
    return error;
  }
    //将 input_dev 加入 input_dev_list 链表中(这个链表中包含有所有 input 设备)
  list_add_tail(&dev->node, &input_dev_list);

  list_for_each_entry(handler, &input_handler_list, node)
   //调用 input_attatch_handler()函数匹配 handler 和 input_dev。
    //这个函数很重要,在后面单独分析。
    input_attach_handler(dev, handler);

  input_wakeup_procfs_readers();

  mutex_unlock(&input_mutex);

  return 0;
}
而对于所有的输入事件,内核都用统一的数据结构来描述,这个数据结构是input_event
/*
 * The event structure itself
 */

struct input_event {
  struct timeval time; //<输入事件发生的时间
  __u16 type;     //<输入事件的类型
  __u16 code;     //<在输入事件类型下的编码
  __s32 value;     //<code的值
};
输入事件的类型--input_event.type
/*
 * Event types
 */

#define EV_SYN      0x00 //< 同步事件
#define EV_KEY      0x01 //< 按键事件
#define EV_REL      0x02 //<相对坐标(如:鼠标移动,报告相对最后一次位置的偏移)
#define EV_ABS      0x03 //< 绝对坐标(如:触摸屏或操作杆,报告绝对的坐标位置)
#define EV_MSC      0x04 //< 其它
#define EV_SW       0x05 //<开关
#define EV_LED      0x11 //<按键/设备灯
#define EV_SND      0x12 //<声音/警报
#define EV_REP      0x14 //<重复
#define EV_FF       0x15 //<力反馈
#define EV_PWR      0x16 //<电源
#define EV_FF_STATUS   0x17 //<力反馈状态
#define EV_MAX      0x1f //< 事件类型最大个数和提供位掩码支持
#define EV_CNT      (EV_MAX+1)
Linux输入子系统提供了设备驱动层上报输入事件的函数
报告输入事件用的接口如下:
/* 报告指定type、code的输入事件 */
void input_event(struct input_dev *dev, unsigned int type, unsigned int code, int value);
/* 报告键值 */
static inline void input_report_key(struct input_dev *dev, unsigned int code, int value)
{
  input_event(dev, EV_KEY, code, !!value);
}
/* 报告相对坐标 */
static inline void input_report_rel(struct input_dev *dev, unsigned int code, int value)
{
  input_event(dev, EV_REL, code, value);
}
/* 报告绝对坐标 */
static inline void input_report_abs(struct input_dev *dev, unsigned int code, int value)
{
  input_event(dev, EV_ABS, code, value);
}
...
当提交输入设备产生的输入事件之后,需要调用下面的函数来通知输入子系统,以处理设备产生的完整事件:
void input_sync(struct input_dev *dev);
【例子】驱动实现——报告结束input_sync()同步用于告诉input core子系统报告结束,触摸屏设备驱动中,一次点击的整个报告过程如下:
input_reprot_abs(input_dev,ABS_X,x); //x坐标
input_reprot_abs(input_dev,ABS_Y,y); // y坐标
input_reprot_abs(input_dev,ABS_PRESSURE,1);
input_sync(input_dev);//同步结束
【例子】按键中断程序
//按键初始化
static int __init button_init(void)
{//申请中断
  if(request_irq(BUTTON_IRQ,button_interrupt,0,”button”,NUll))
    return –EBUSY;
  set_bit(EV_KEY,button_dev.evbit); //支持EV_KEY事件
  set_bit(BTN_0,button_dev.keybit); //支持设备两个键
  set_bit(BTN_1,button_dev.keybit); //
  input_register_device(&button_dev);//注册input设备
}
/*在按键中断中报告事件*/
Static void button_interrupt(int irq,void *dummy,struct pt_regs *fp)
{
  input_report_key(&button_dev,BTN_0,inb(BUTTON_PORT0));//读取寄存器BUTTON_PORT0的值
  input_report_key(&button_dev,BTN_1,inb(BUTTON_PORT1));
  input_sync(&button_dev);
}
【小结】input子系统仍然是字符设备驱动程序,但是代码量减少很多,input子系统只需要完成两个工作:初始化和事件报告(这里在linux中是通过中断来实现的)。
Event Handler层解析
Input输入子系统数据结构关系图
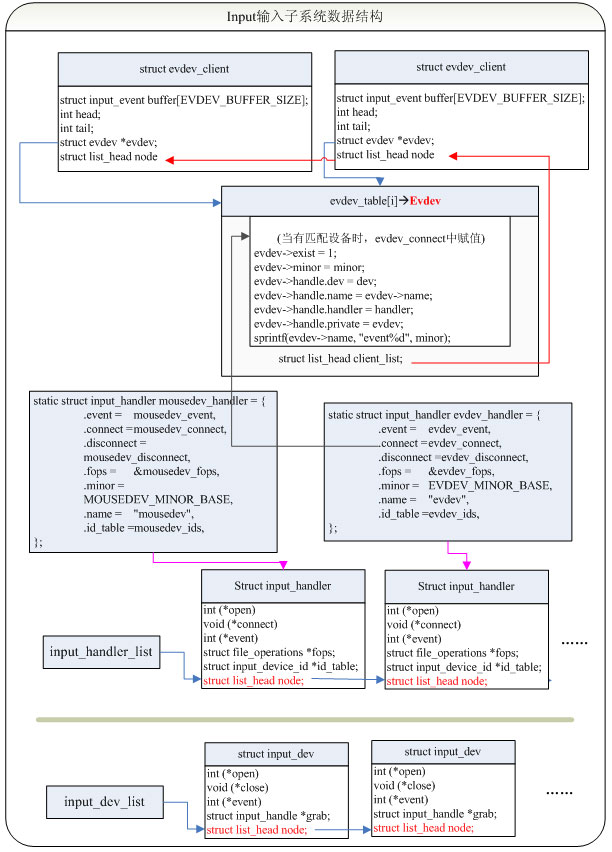
input_handler结构体
struct input_handle;

/**
 * struct input_handler - implements one of interfaces for input devices
 * @private: driver-specific data
 * @event: event handler. This method is being called by input core with
 *  interrupts disabled and dev->event_lock spinlock held and so
 *  it may not sleep
 * @filter: similar to @event; separates normal event handlers from
 *  "filters".
 * @match: called after comparing device's id with handler's id_table
 *  to perform fine-grained matching between device and handler
 * @connect: called when attaching a handler to an input device
 * @disconnect: disconnects a handler from input device
 * @start: starts handler for given handle. This function is called by
 *  input core right after connect() method and also when a process
 *  that "grabbed" a device releases it
 * @fops: file operations this driver implements
 * @minor: beginning of range of 32 minors for devices this driver
 *  can provide
 * @name: name of the handler, to be shown in /proc/bus/input/handlers
 * @id_table: pointer to a table of input_device_ids this driver can
 *  handle
 * @h_list: list of input handles associated with the handler
 * @node: for placing the driver onto input_handler_list
 *
 * Input handlers attach to input devices and create input handles. There
 * are likely several handlers attached to any given input device at the
 * same time. All of them will get their copy of input event generated by
 * the device.
 *
 * The very same structure is used to implement input filters. Input core
 * allows filters to run first and will not pass event to regular handlers
 * if any of the filters indicate that the event should be filtered (by
 * returning %true from their filter() method).
 *
 * Note that input core serializes calls to connect() and disconnect()
 * methods.
 */
struct input_handler {

  void *private;

  void (*event)(struct input_handle *handle, unsigned int type, unsigned int code, int value);
  bool (*filter)(struct input_handle *handle, unsigned int type, unsigned int code, int value);
  bool (*match)(struct input_handler *handler, struct input_dev *dev);
  int (*connect)(struct input_handler *handler, struct input_dev *dev, const struct input_device_id *id);
  void (*disconnect)(struct input_handle *handle);
  void (*start)(struct input_handle *handle);

  const struct file_operations *fops;
  int minor;
  const char *name;

  const struct input_device_id *id_table;

  struct list_head  h_list;
  struct list_head  node;
};
【例子】以evdev.c中的evdev_handler为例:
static struct input_handler evdev_handler = {
        .event = evdev_event, //<向系统报告input事件,系统通过read方法读取
        .connect = evdev_connect, //<和input_dev匹配后调用connect构建
        .disconnect = evdev_disconnect,
        .fops = &evdev_fops, //<event设备文件的操作方法
        .minor = EVDEV_MINOR_BASE, //<次设备号基准值
        .name = "evdev",
        .id_table = evdev_ids, //<匹配规则
    };
输入设备驱动的简单案例
documentation/input/input-programming.txt文件,讲解了编写输入设备驱动程序的核心步骤。
Programming input drivers
~~~~~~~~~~~~~~~~~~~~~~~~~

1. Creating an input device driver
~~~~~~~~~~~~~~~~~~~~~~~~~~~~~~~~~~

1.0 The simplest example
~~~~~~~~~~~~~~~~~~~~~~~~

Here comes a very simple example of an input device driver. The device has
just one button and the button is accessible at i/o port BUTTON_PORT. When
pressed or released a BUTTON_IRQ happens. The driver could look like:

#include <linux/input.h>
#include <linux/module.h>
#include <linux/init.h>

#include <asm/irq.h>
#include <asm/io.h>

static struct input_dev *button_dev;

static irqreturn_t button_interrupt(int irq, void *dummy)
{
  input_report_key(button_dev, BTN_0, inb(BUTTON_PORT) & 1);
  input_sync(button_dev);
  return IRQ_HANDLED;
}

static int __init button_init(void)
{
  int error;

  if (request_irq(BUTTON_IRQ, button_interrupt, 0, "button", NULL)) {
        printk(KERN_ERR "button.c: Can't allocate irq %d\n", button_irq);
        return -EBUSY;
    }

  button_dev = input_allocate_device();
  if (!button_dev) {
    printk(KERN_ERR "button.c: Not enough memory\n");
    error = -ENOMEM;
    goto err_free_irq;
  }

  button_dev->evbit[0] = BIT_MASK(EV_KEY);
  button_dev->keybit[BIT_WORD(BTN_0)] = BIT_MASK(BTN_0);

  error = input_register_device(button_dev);
  if (error) {
    printk(KERN_ERR "button.c: Failed to register device\n");
    goto err_free_dev;
  }

  return 0;

 err_free_dev:
  input_free_device(button_dev);
 err_free_irq:
  free_irq(BUTTON_IRQ, button_interrupt);
  return error;
}

static void __exit button_exit(void)
{
    input_unregister_device(button_dev);
  free_irq(BUTTON_IRQ, button_interrupt);
}

module_init(button_init);
module_exit(button_exit);

1.1 What the example does
~~~~~~~~~~~~~~~~~~~~~~~~~

First it has to include the <linux/input.h> file, which interfaces to the
input subsystem. This provides all the definitions needed.

In the _init function, which is called either upon module load or when
booting the kernel, it grabs the required resources (it should also check
for the presence of the device).

Then it allocates a new input device structure with input_allocate_device()
and sets up input bitfields. This way the device driver tells the other
parts of the input systems what it is - what events can be generated or
accepted by this input device. Our example device can only generate EV_KEY
type events, and from those only BTN_0 event code. Thus we only set these
two bits. We could have used

  set_bit(EV_KEY, button_dev.evbit);
  set_bit(BTN_0, button_dev.keybit);

as well, but with more than single bits the first approach tends to be
shorter.

Then the example driver registers the input device structure by calling

  input_register_device(&button_dev);

This adds the button_dev structure to linked lists of the input driver and
calls device handler modules _connect functions to tell them a new input
device has appeared. input_register_device() may sleep and therefore must
not be called from an interrupt or with a spinlock held.

While in use, the only used function of the driver is

  button_interrupt()

which upon every interrupt from the button checks its state and reports it
via the

  input_report_key()

call to the input system. There is no need to check whether the interrupt
routine isn't reporting two same value events (press, press for example) to
the input system, because the input_report_* functions check that
themselves.

Then there is the

  input_sync()

call to tell those who receive the events that we've sent a complete report.
This doesn't seem important in the one button case, but is quite important
for for example mouse movement, where you don't want the X and Y values
to be interpreted separately, because that'd result in a different movement.

1.2 dev->open() and dev->close()
~~~~~~~~~~~~~~~~~~~~~~~~~~~~~~~~

In case the driver has to repeatedly poll the device, because it doesn't
have an interrupt coming from it and the polling is too expensive to be done
all the time, or if the device uses a valuable resource (eg. interrupt), it
can use the open and close callback to know when it can stop polling or
release the interrupt and when it must resume polling or grab the interrupt
again. To do that, we would add this to our example driver:

static int button_open(struct input_dev *dev)
{
  if (request_irq(BUTTON_IRQ, button_interrupt, 0, "button", NULL)) {
        printk(KERN_ERR "button.c: Can't allocate irq %d\n", button_irq);
        return -EBUSY;
    }

    return 0;
}

static void button_close(struct input_dev *dev)
{
    free_irq(IRQ_AMIGA_VERTB, button_interrupt);
}

static int __init button_init(void)
{
  ...
  button_dev->open = button_open;
  button_dev->close = button_close;
  ...
}

Note that input core keeps track of number of users for the device and
makes sure that dev->open() is called only when the first user connects
to the device and that dev->close() is called when the very last user
disconnects. Calls to both callbacks are serialized.

The open() callback should return a 0 in case of success or any nonzero value
in case of failure. The close() callback (which is void) must always succeed.

1.3 Basic event types
~~~~~~~~~~~~~~~~~~~~~

The most simple event type is EV_KEY, which is used for keys and buttons.
It's reported to the input system via:

  input_report_key(struct input_dev *dev, int code, int value)

See linux/input.h for the allowable values of code (from 0 to KEY_MAX).
Value is interpreted as a truth value, ie any nonzero value means key
pressed, zero value means key released. The input code generates events only
in case the value is different from before.

In addition to EV_KEY, there are two more basic event types: EV_REL and
EV_ABS. They are used for relative and absolute values supplied by the
device. A relative value may be for example a mouse movement in the X axis.
The mouse reports it as a relative difference from the last position,
because it doesn't have any absolute coordinate system to work in. Absolute
events are namely for joysticks and digitizers - devices that do work in an
absolute coordinate systems.

Having the device report EV_REL buttons is as simple as with EV_KEY, simply
set the corresponding bits and call the

  input_report_rel(struct input_dev *dev, int code, int value)

function. Events are generated only for nonzero value.

However EV_ABS requires a little special care. Before calling
input_register_device, you have to fill additional fields in the input_dev
struct for each absolute axis your device has. If our button device had also
the ABS_X axis:

  button_dev.absmin[ABS_X] = 0;
  button_dev.absmax[ABS_X] = 255;
  button_dev.absfuzz[ABS_X] = 4;
  button_dev.absflat[ABS_X] = 8;

Or, you can just say:

  input_set_abs_params(button_dev, ABS_X, 0, 255, 4, 8);

This setting would be appropriate for a joystick X axis, with the minimum of
0, maximum of 255 (which the joystick *must* be able to reach, no problem if
it sometimes reports more, but it must be able to always reach the min and
max values), with noise in the data up to +- 4, and with a center flat
position of size 8.

If you don't need absfuzz and absflat, you can set them to zero, which mean
that the thing is precise and always returns to exactly the center position
(if it has any).

1.4 BITS_TO_LONGS(), BIT_WORD(), BIT_MASK()
~~~~~~~~~~~~~~~~~~~~~~~~~~

These three macros from bitops.h help some bitfield computations:

  BITS_TO_LONGS(x) - returns the length of a bitfield array in longs for
        x bits
  BIT_WORD(x)   - returns the index in the array in longs for bit x
  BIT_MASK(x)   - returns the index in a long for bit x

1.5 The id* and name fields
~~~~~~~~~~~~~~~~~~~~~~~~~~~~~~~~~~~

The dev->name should be set before registering the input device by the input
device driver. It's a string like 'Generic button device' containing a
user friendly name of the device.

The id* fields contain the bus ID (PCI, USB, ...), vendor ID and device ID
of the device. The bus IDs are defined in input.h. The vendor and device ids
are defined in pci_ids.h, usb_ids.h and similar include files. These fields
should be set by the input device driver before registering it.

The idtype field can be used for specific information for the input device
driver.

The id and name fields can be passed to userland via the evdev interface.

1.6 The keycode, keycodemax, keycodesize fields
~~~~~~~~~~~~~~~~~~~~~~~~~~~~~~~~~~~~~~~~~~~~~~~~

These three fields should be used by input devices that have dense keymaps.
The keycode is an array used to map from scancodes to input system keycodes.
The keycode max should contain the size of the array and keycodesize the
size of each entry in it (in bytes).

Userspace can query and alter current scancode to keycode mappings using
EVIOCGKEYCODE and EVIOCSKEYCODE ioctls on corresponding evdev interface.
When a device has all 3 aforementioned fields filled in, the driver may
rely on kernel's default implementation of setting and querying keycode
mappings.

1.7 dev->getkeycode() and dev->setkeycode()
~~~~~~~~~~~~~~~~~~~~~~~~~~~~~~~~~~~~~~~~~~~~~~~~
getkeycode() and setkeycode() callbacks allow drivers to override default
keycode/keycodesize/keycodemax mapping mechanism provided by input core
and implement sparse keycode maps.

1.8 Key autorepeat
~~~~~~~~~~~~~~~~~~

... is simple. It is handled by the input.c module. Hardware autorepeat is
not used, because it's not present in many devices and even where it is
present, it is broken sometimes (at keyboards: Toshiba notebooks). To enable
autorepeat for your device, just set EV_REP in dev->evbit. All will be
handled by the input system.

1.9 Other event types, handling output events
~~~~~~~~~~~~~~~~~~~~~~~~~~~~~~~~~~~~~~~~~~~~~

The other event types up to now are:

EV_LED - used for the keyboard LEDs.
EV_SND - used for keyboard beeps.

They are very similar to for example key events, but they go in the other
direction - from the system to the input device driver. If your input device
driver can handle these events, it has to set the respective bits in evbit,
*and* also the callback routine:

  button_dev->event = button_event;

int button_event(struct input_dev *dev, unsigned int type, unsigned int code, int value);
{
  if (type == EV_SND && code == SND_BELL) {
    outb(value, BUTTON_BELL);
    return 0;
  }
  return -1;
}

This callback routine can be called from an interrupt or a BH (although that
isn't a rule), and thus must not sleep, and must not take too long to finish.

input-programming.txt
该例子提供的案例代码描述了一个button设备,产生的事件通过BUTTON_PORT引脚获取,当有按下/释放发生时,BUTTON_IRQ被触发,以下是驱动的源代码:
#include <linux/input.h>
#include <linux/module.h>
#include <linux/init.h>

#include <asm/irq.h>
#include <asm/io.h>

static struct input_dev *button_dev; /*输入设备结构体*/
/*中断处理函数*/
static irqreturn_t button_interrupt(int irq, void *dummy)
{
  /*向输入子系统报告产生按键事件*/
  input_report_key(button_dev, BTN_0, inb(BUTTON_PORT) & 1);
  /*通知接收者,一个报告发送完毕*/
  input_sync(button_dev);
  return IRQ_HANDLED;
}
/*加载函数*/
static int __init button_init(void)
{
  int error;
  /*申请中断处理函数*/ //返回0表示成功,返回-INVAL表示无效
  if (request_irq(BUTTON_IRQ, button_interrupt, 0, "button", NULL)) {
        /*申请失败,则打印出错信息*/
        printk(KERN_ERR "button.c: Can't allocate irq %d\n", button_irq);
        return -EBUSY;
    }
  /*分配一个设备结构体*/
  //将在 sys/class/input/input-n 下面创建设备属性文件
  button_dev = input_allocate_device();
  if (!button_dev) {   /*判断分配是否成功*/
    printk(KERN_ERR "button.c: Not enough memory\n");
    error = -ENOMEM;
    goto err_free_irq;
  }

  button_dev->evbit[0] = BIT_MASK(EV_KEY); /*设置按键信息*/
  button_dev->keybit[BIT_WORD(BTN_0)] = BIT_MASK(BTN_0);

  error = input_register_device(button_dev); /*注册一个输入设备*/
  if (error) {
    printk(KERN_ERR "button.c: Failed to register device\n");
    goto err_free_dev;
  }

  return 0;
 /*以下是错误处理*/
 err_free_dev:
  input_free_device(button_dev);
 err_free_irq:
  free_irq(BUTTON_IRQ, button_interrupt);
  return error;
}
 /*卸载函数*/
static void __exit button_exit(void)
{
  input_unregister_device(button_dev); /*注销按键设备*/
  free_irq(BUTTON_IRQ, button_interrupt);/*释放按键占用的中断线*/
}

module_init(button_init);
module_exit(button_exit);
从这个简单的例子中可以看到。
- 在初始化函数 button_init() 中注册了一个中断处理函数,然后调用 input_allocate_device() 函数分配了一个 input_dev 结构体,并调用 input_register_device() 对其进行注册。
- 在中断处理函数 button_interrupt() 中,实例将接收到的按键信息上报给 input 子系统,从而通过 input子系统,向用户态程序提供按键输入信息。
以上就是本文的全部内容,希望对大家的学习有所帮助,也希望大家多多支持我们。
相关推荐
-
Linux时间子系统之时间的表示示例详解
前言 在Linux内核中,为了兼容原有的代码,或者符合某种规范,并且还要满足当前精度日益提高的要求,实现了多种与时间相关但用于不同目的的数据结构: 1)jiffies和jiffies_64 内核用jiffies_64全局变量记录系统自启动以来经过了多少次Tick.它的声明如下(代码位于kernel/time/timer.c中): __visible u64 jiffies_64 __cacheline_aligned_in_smp = INITIAL_JIFFIES; EXPORT_SYMBOL
-
简单掌握Linux系统中fork()函数创建子进程的用法
fork()函数用于从已存在的进程中创建一个新进程.新进程称为子进程,而园进程称为父进程.使用fork()函数得到的子进程是父进程的一个复制品,它从父进程处继承了整个进程的地址空间,包括进程的上下文.代码段.进程堆栈.内存信息.打开的文件描述符.符号控制设定.进程优先级.进程组号.当前工作目录.根目录.资源限制和控制终端等,而子进程所独有的只有它的进程号.资源使用和计时器等. 因为子进程几乎是父进程的完全复制,所以父子两进程会运行同一个程序.这就需要用一种方式来区分它们,并使它们照此运行,否则,
-

Win10安装Linux子系统图文教程
Windows10提供了ubantu Linux子系统,终于可以把卡卡的虚拟机扔在一边了,下面介绍一下win10安装linux子系统的过程. 1.打开Windows功能,在这里把勾打上 2.打开设置–>更新和安全–>针对开发人员,选择开发人员模式–>确定 3.打开PowerShell 4.安装Linux,在PowerShell里输入lxrun /install 5.输入y之后就开始下载,这是一个很漫长的等待,大概180多M 6.下载完成之后会出现这个界面,然后我们按y继续 7.这个界
-
手把手教你启用Win10的Linux子系统(图文超详细)
今天为大家介绍如何才能启用Windows10下的Linux子系统,废话不多说,直接看步骤: ####启用开发者模式 打开设置 点击更新和安全 点击开发者选项 启用开发人员模式 ####更改系统功能 使用win+X快捷键调出系统管理菜单后点击应用和功能,然后拉到底下,选择程序和功能 选中应用或关闭Windows功能 勾选适用于Linux的Windows子系统,然后确认并重启就可以了 ####安装Linux系统 打开功能以后系统中其实还没有安装Linux,需要使用cmd完成安装. 首先按Win+R开
-
谈一谈Linux系统重要的子目录问题
/etc/fstab 机自动挂载分区/磁盘,规定哪个分区/设备,挂载到哪里 [root@oldboy ~]# cat /etc/fstab # # /etc/fstab # Created by anaconda on Sun Aug 12 17:26:53 2018 # # Accessible filesystems, by reference, are maintained under '/dev/disk' # See man pages fstab(5), findfs(8), mou
-
Windows10安装linux子系统的两种方式(图文详解)
Windows10支持Linux子系统了,告别繁琐的双系统.虚拟机安装,原生安装方便快捷. windows subsystem for linux简称WSL. 这里介绍2种安装方式,总有一款适合你. 图形化安装 启用开发者模式 按下 Windows 键,打开设置 设置-->更新和安全-->开发者选项-->开发人员模式 开启适用于Linux的Windows子系统按下 Windows jian键,输入控制面板 打开控制面板 打开 应用或关闭Windows功能 ,勾选 适用于Linux的Win
-
Linux输入子系统框架原理解析
input输入子系统框架 linux输入子系统(linux input subsystem)从上到下由三层实现,分别为:输入子系统事件处理层(EventHandler).输入子系统核心层(InputCore)和输入子系统设备驱动层. 一个输入事件,如鼠标移动,键盘按键按下,joystick的移动等等通过 input driver -> Input core -> Event handler -> userspace 到达用户空间传给应用程序. [注意]keyboard.c不会在/dev/
-
Linux 命令行工具解析和格式化输出 JSON的方法
JSON 是一种轻量级且与语言无关的数据存储格式,易于与大多数编程语言集成,也易于人类理解 -- 当然,如果格式正确的话.JSON 这个词代表 J ava S cript O bject N otation,虽然它以 JavaScript 开头,而且主要用于在服务器和浏览器之间交换数据,但现在正在用于许多领域,包括嵌入式系统.在这里,我们将使用 Linux 上的命令行工具解析并格式化打印 JSON.它对于在 shell 脚本中处理大型 JSON 数据或在 shell 脚本中处理 JSON 数据非
-
Linux下tcpdump命令解析及使用详解
简介 用简单的话来定义tcpdump,就是:dump the traffic on a network,根据使用者的定义对网络上的数据包进行截获的包分析工具.tcpdump可以将网络中传送的数据包的"头"完全截获下来提供分析.它支持针对网络层.协议.主机.网络或端口的过滤,并提供and.or.not等逻辑语句来帮助你去掉无用的信息. 实用命令实例 默认启动 tcpdump 普通情况下,直接启动tcpdump将监视第一个网络接口上所有流过的数据包. 监视指定网络接口的数据包 tcpdum
-
Python中getpass模块无回显输入源码解析
本文主要讨论了python中getpass模块的相关内容,具体如下. getpass模块 昨天跟学弟吹牛b安利Python标准库官方文档的时候偶然发现了这个模块.仔细一看内容挺少的,只有两个主要api,就花了点时间阅读了一下源码,感觉挺实用的,在这安利给大家. getpass.getpass(prompt='Password: ', stream=None) 调用该函数可以在命令行窗口里面无回显输入密码.参数prompt代表提示字符串,默认是'Password: '.在Unix系统中,strea
-
linux IPC之socket解析及实例代码
Linux下的Socket通信是一种基于文件的IPC通信,也可以是基于其他设备的IPC通信.它可以在本机内不同进程间实现通信,也可以在实现不同主机之间的通信. socket的创建步骤 服务端 1.通过socket()函数创建socket 2.通过bind函数绑定socket于设备地址 3.通过listen监听指定的socket 4.通过accept等待客户端的连接 客户端 1.通过socket()函数创建socket 2.通过connect连接到服务端 待经过上面的步骤后,服务端和客户端已经建立
-
使用压缩的方式将Windows下的zip压缩包上传到Linux系统的方法解析
我们可以使用在Windows下压缩文件夹,然后到Linux系统下解压缩的方式,完成整个上传工作. 第一步:在Windows系统下,将整个文件夹压缩成zip后缀的压缩包 方法一: 在文件夹xtemp上,右键,选中"发送到"--"压缩(zipped)文件夹" 即可完成zip格式文件夹的压缩 方法二: 在空白处,右键,选择"新建"--"WinRAR ZIP压缩文件" 然后将要压缩的内容,拖拽到压缩包里,即可 第二步:将压缩包xtem
-
Java中的3种输入方式实现解析
这篇文章主要介绍了Java中的3种输入方式实现解析,文中通过示例代码介绍的非常详细,对大家的学习或者工作具有一定的参考学习价值,需要的朋友可以参考下 1.从键盘读取char类型数据 char ch = (char)System.in.read(); System.in 提供的 read() 方法每次只能读取一个字节的数据,所以用的频率比较低. 2.BufferedReader 实现从键盘读取String类型数据 使用BufferedReader 对象的 readLine() 方法必须处理 jav
-
linux输入yum后提示: -bash: /usr/bin/yum: No such file or directory的解决方法
linux输入yum后提示: -bash: /usr/bin/yum: No such file or directory的解决方案 今天在安装程序时,发现有一个插件未安装,我就随手敲了一个命令,看都没看 yum remove yum 然后就杯具了... [root@localhost ~]# yum -bash: /usr/bin/yum: No such file or directory 这个粗心的手误倒不至于让整个系统瘫痪,yum 却无法使用了.于是,我试着折腾了一番 rpm -ivh
-
python Scrapy框架原理解析
Python 爬虫包含两个重要的部分:正则表达式和Scrapy框架的运用, 正则表达式对于所有语言都是通用的,网络上可以找到各种资源. 如下是手绘Scrapy框架原理图,帮助理解 如下是一段运用Scrapy创建的spider:使用了内置的crawl模板,以利用Scrapy库的CrawlSpider.相对于简单的爬取爬虫来说,Scrapy的CrawlSpider拥有一些网络爬取时可用的特殊属性和方法: $ scrapy genspider country_or_district example.p