vue3+TypeScript+vue-router的使用方法
目录
- 简单使用
- 创建项目
- vue-cli创建
- vite创建
- 安装vue-router
- 创建/修改组件
- 修改入口ts
- 启动vue
- 在浏览器中访问
- 文件结构图片
- 综合使用
- 动态参数
- 使用watch监听动态参数
- 使用组合API监听动态参数
- 重定向
- 命名与别名
- 命名路由
- 命名视图
- 别名
- 嵌套路由
- 编程式路由
简单使用
创建项目
vue-cli创建
$npm install -g @vue/cli
$vue --version
@vue/cli 4.5.15
$vue create my-project
然后的步骤:
- Please pick a preset
选择 Manually select features - Check the features needed for your project
选择上TypeScript,特别注意点空格是选择,点回车是下一步 - Choose a version of Vue.js that you want to start the project with
选择 3.x (Preview) - Use class-style component syntax
直接回车 - Use Babel alongside TypeScript
直接回车 - Pick a linter / formatter config
直接回车 - Use history mode for router?
直接回车 - Pick a linter / formatter config
直接回车 - Pick additional lint features
直接回车 - Where do you prefer placing config for Babel, ESLint, etc.?
直接回车 - Save this as a preset for future projects?
直接回车
文件结构:
my-project
+--- babel.config.js
+--- package-lock.json
+--- package.json
+--- public
|   +--- favicon.ico
|   +--- index.html
+--- README.md
+--- src
|   +--- App.vue
|   +--- assets
|   |   +--- logo.png
|   +--- components
|   |   +--- HelloWorld.vue
|   +--- main.ts
|   +--- shims-vue.d.ts
+--- tsconfig.json
+--- node_modules
|   +--- ...
入口文件为
src/main.ts
vite创建
执行以下命令创建项目
$npm init vite-app <project-name>
$cd <project-name>
$npm install
$npm run dev
文件结构:
project-name
+--- index.html
+--- package-lock.json
+--- package.json
+--- public
|   +--- favicon.ico
+--- src
|   +--- App.vue
|   +--- assets
|   |   +--- logo.png
|   +--- components
|   |   +--- HelloWorld.vue
|   +--- index.css
|   +--- main.js
+--- node_modules
|   +--- ...
入口文件为
src/main.ts
注意: 由于使用vite方法创建的项目没有vue的声明文件, 所以需要我们自定义, 否则会报错.src/shims-vue.d.ts
/* eslint-disable */
declare module '*.vue' {
  import type { DefineComponent } from 'vue'
  const component: DefineComponent<{}, {}, any>
  export default component
}
安装vue-router
$npm install vue-router@4
至此, package.json如下:
{
  "name": "my-project",
  "version": "0.1.0",
  "private": true,
  "scripts": {
    "serve": "vue-cli-service serve",
    "build": "vue-cli-service build",
    "lint": "vue-cli-service lint"
  },
  "dependencies": {
    "core-js": "^3.6.5",
    "vue": "^3.0.0",
    "vue-router": "^4.0.12"
  },
  "devDependencies": {
    "@typescript-eslint/eslint-plugin": "^4.18.0",
    "@typescript-eslint/parser": "^4.18.0",
    "@vue/cli-plugin-babel": "~4.5.0",
    "@vue/cli-plugin-eslint": "~4.5.0",
    "@vue/cli-plugin-typescript": "~4.5.0",
    "@vue/cli-service": "~4.5.0",
    "@vue/compiler-sfc": "^3.0.0",
    "@vue/eslint-config-typescript": "^7.0.0",
    "eslint": "^6.7.2",
    "eslint-plugin-vue": "^7.0.0",
    "typescript": "~4.1.5"
  }
}
创建/修改组件
创建src/router/index.ts
import { createRouter, createWebHashHistory } from "vue-router"

import Home from '../components/Home.vue'
import About from '../components/About.vue'
import User from '../components/User.vue'

const routes = [
	// router参数详细看下文
	{
		path: "/home",
		name: "home",
		component: Home
	},
	{
		path: "/about",
		name: "about",
		component: About
	},
	{
		path: "/user/:uid",  // 动态参数
		name: "user",
		component: User
	}
]
export const router = createRouter({
	history: createWebHashHistory(),
	routes: routes
})
创建组件: Home.vue About.vue User.vue
src/components/Home.vue
<template>
  <div>home组件</div>
</template>

<script lang="ts">
import { defineComponent } from "vue";

export default defineComponent({
  name: "Home",
  setup() {
	return {
	  // 返回的数据
	};
  },
});
</script>
src/components/About.vue
<template>
  <div>About组件</div>
</template>

<script lang="ts">
import { defineComponent } from "vue";

export default defineComponent({
  name: "About",
  setup() {
	return {
	  // 返回的数据
	};
  },
});
</script>
src/components/User.vue
<template>
  <div>User组件</div>
</template>

<script lang="ts">
import { defineComponent } from "vue";

export default defineComponent({
  name: "User",
  setup() {
	return {
	  // 返回的数据
	};
  },
});
</script>
修改App.vue
<template>
  <div>{{ appMessage }}</div>
  <!-- router-link会被渲染成a标签 -->
  <router-link to="/home">home</router-link>
  <router-link to="/about">about</router-link>
  <router-link to="/user/lczmx">user</router-link>

  <!-- 路由出口 -->
  <!-- 路由匹配到的组件将渲染在这里 -->
  <router-view></router-view>
</template>

<script lang="ts">
import { defineComponent } from "vue";

export default defineComponent({
  name: "App",
  setup() {
	const appMessage = "App组件";
	return {
	  // 返回的数据
	  appMessage,
	};
  },
});
</script>
<style>
/* 添加样式 */
#app {
  text-align: center;
  margin-top: 50px;
}
a {
  margin: 30px;
  display: inline-block;
}
</style>
修改入口ts
修改src/main.ts:
import { createApp } from 'vue'
import App from './App.vue'
import './index.css'

import { router } from './router'

// 创建应用 返回对应的实例对象
const app = createApp(App)

// 安装 vue-router 插件
app.use(router)
// 调用mount方法
app.mount('#app')
启动vue
$npm run serve

> my-project@0.1.0 serve
> vue-cli-service serve

 INFO  Starting development server...
98% after emitting CopyPlugin

 DONE  Compiled successfully in 6387ms                                                                                               下午4:14:30

  App running at:
  - Local:   http://localhost:8080/
  - Network: http://192.168.43.12:8080/

  Note that the development build is not optimized.
  To create a production build, run npm run build.

No issues found.
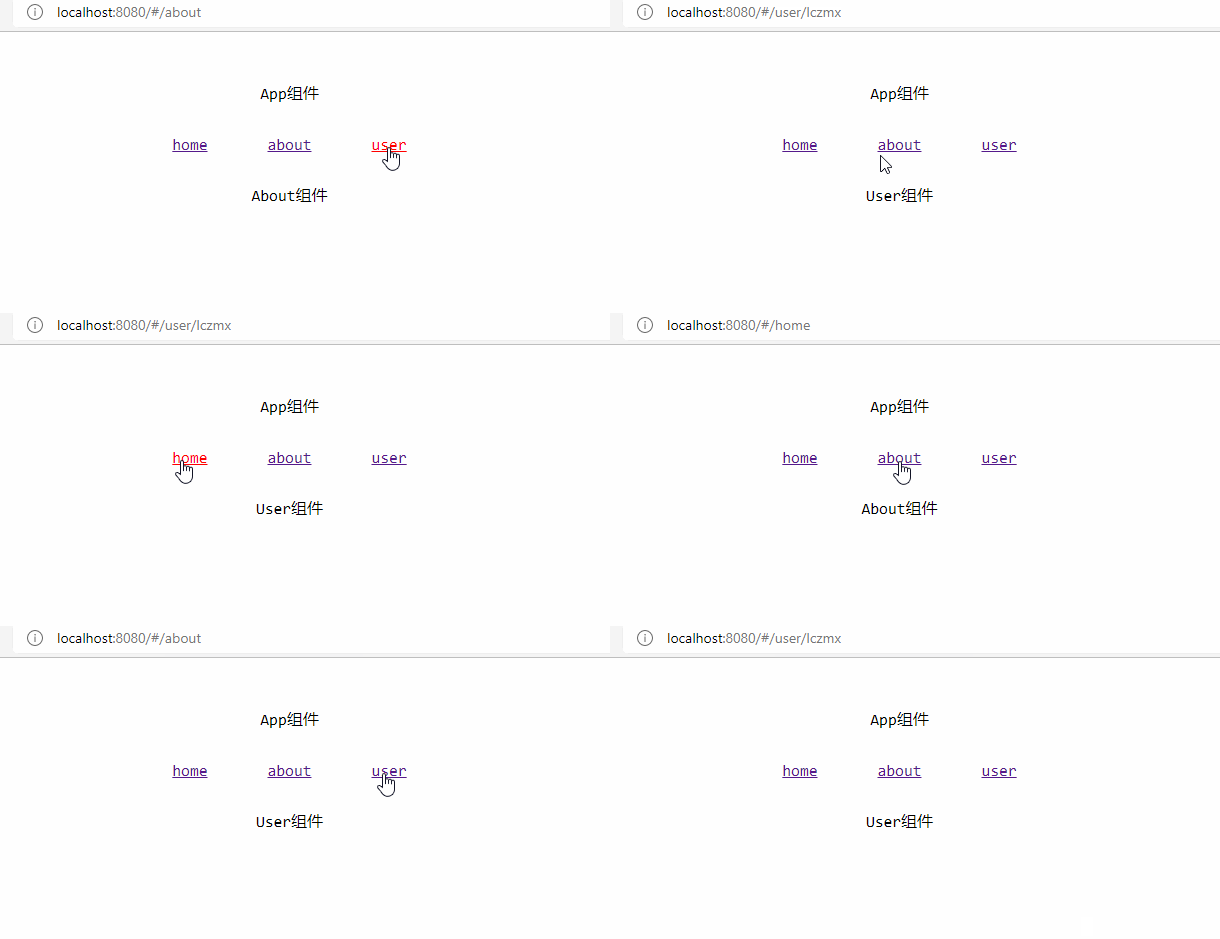
在浏览器中访问
根据提示, 访问http://localhost:8080/, 如下图

文件结构图片

综合使用
动态参数
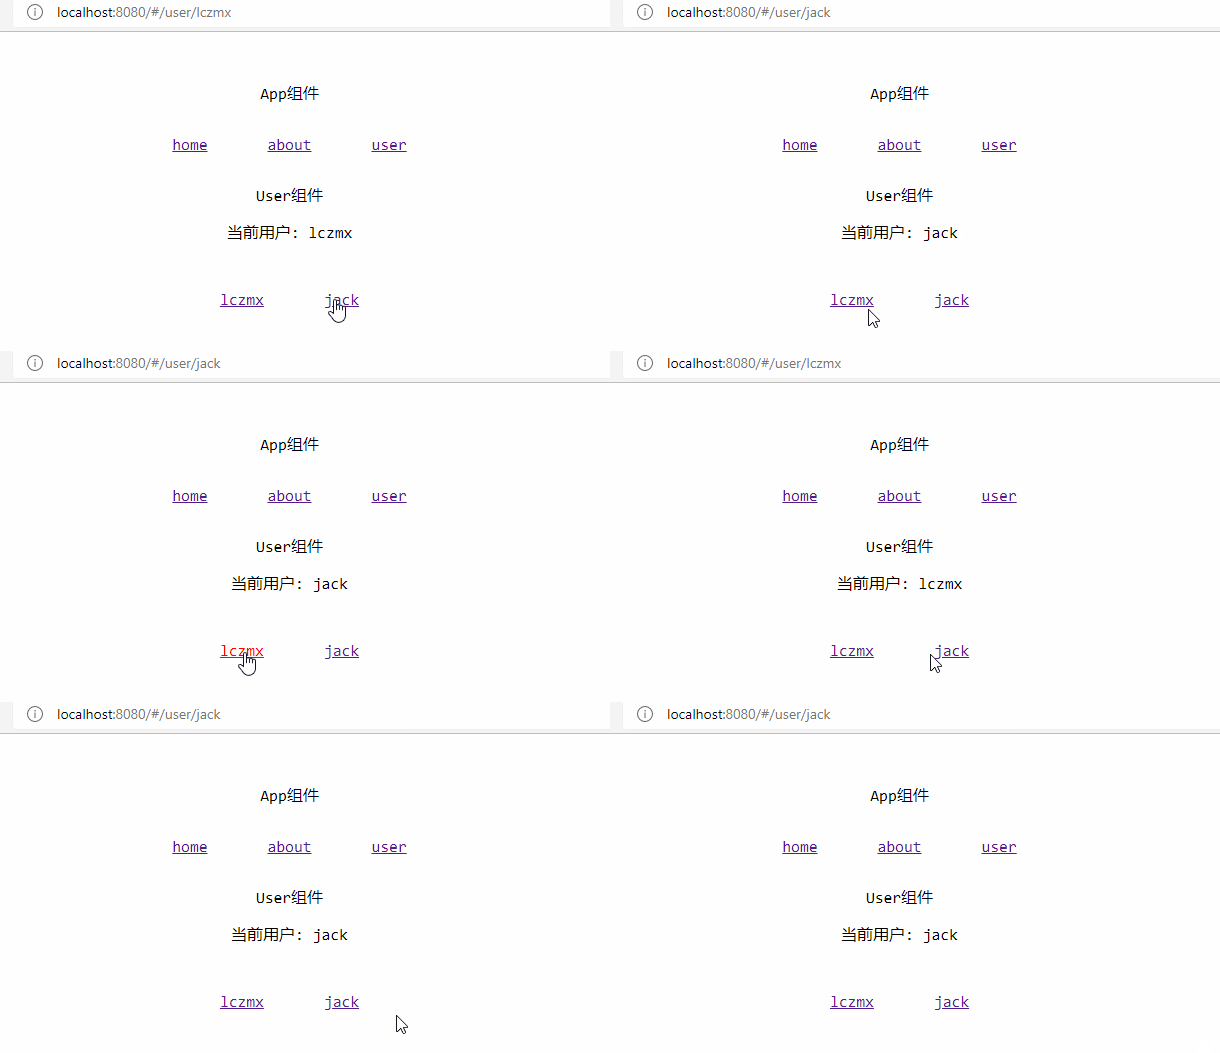
假如我们需要的路由是: /user/lczmx和/user/jack, 但是我们明显不可能为这两个路由定义两个不同的组件, 最好的方法就是使用动态参数:
const routes = [
  // 动态段以冒号开始
  { path: '/users/:id', component: User },
  // 使用正则表达式  `()` 里面的东西会传给前面的pathMatch
  // 值在route.params.pathMatch下
  { path: '/:pathMatch(.*)*', name: 'NotFound', component: NotFound },
]
匹配时, 会将参数映射到router实例的currentRoute.value.params上
注意vue2中: 由于在
setup无法使用this.$route和this.$router
至于如何获取, 看我的另一篇博客: vue3获取当前路由 和 官网: Vue Router 和 组合式 API
匹配列表
| 匹配模式 | 匹配路径 | 当前路由的参数 |
|---|---|---|
/users/:username |
/users/eduardo |
{ username: 'eduardo' } |
/users/:username/posts/:postId |
/users/eduardo/posts/123 |
{ username: 'eduardo', postId: '123' } |
在使用带有参数的路由时需要注意: 由于相同的组件实例将被重复使用,所以组件的生命周期钩子不会被调用
但是我们可以对路由进行监听
使用watch监听动态参数
修改src/components/User.vue:
<template>
  <div>User组件</div>
  <p>当前用户: {{ uid }}</p>

  <router-link to="/user/lczmx">lczmx</router-link>
  <router-link to="/user/jack">jack</router-link>
</template>

<script lang="ts">
import { defineComponent, watch, ref } from "vue";
import { useRouter } from "vue-router";

export default defineComponent({
  name: "User",
  setup() {
    const router = useRouter();
    const uid = ref(router.currentRoute.value.params.uid);
    watch(
      // 监听非响应式数据
      () => router.currentRoute.value,
      (val) => {
        // 修改uid
        uid.value = val.params.uid;
      }
    );
    return {
      // 返回的数据
      uid,
    };
  },
});
</script>

使用组合API监听动态参数
https://next.router.vuejs.org/zh/guide/advanced/composition-api.html
重定向
下面使用router的全部参数:
const routes = [
    {
        path: "/",
        // 写法1 写死url
        // redirect: "/home", // 访问 "/" 时 跳转到 "/home"

        // 写法2 跳转到对应的命名路由
        redirect: { name: "home" },

        // 写法3 定义一个方法
		// 该方法亦可以 返回一个相对路径
        /*
        redirect: to => {
            // 方法接收目标路由作为参数 "to"

            // return 重定向的字符串路径/路径对象

			// query指定参数
            return { path: '/home', query: { q: to.params.searchText } }
        },
        */
    },
    {
        path: "/home",
        name: "home",
        component: Home
    }
]
注意, 重定向不会触发 导航守卫
另附官网的例子: Named Views - Vue Router 4 examples
命名与别名
命名路由
给路由一个名称, 可以在其他路由中使用, 如:
redirect和router-link
const routes = [
  {
    path: '/user/:username',
    name: 'user',
    component: User
  }
]
在redirect的使用如上文, 而router-link如下:
<template>
  <div>User组件</div>
  <p>当前用户: {{ uid }}</p>

  <router-link :to="{ name: 'user', params: { uid: 'lczmx' } }"
    >lczmx</router-link
  >
  <router-link :to="{ name: 'user', params: { uid: 'jack' } }"
    >jack</router-link
  >
</template>
在router.push(router是router对象)中使用:
router.push({ name: 'user', params: { uid: 'lczmx' } })
命名视图
即, 我们可以
router-view定义一个名字, 已达到实现可复用的效果
我们可以使用这个功能实现 一个侧边栏等
举个例子
定义路由:
import { createRouter, createWebHashHistory } from "vue-router"

import Home from '../components/Home.vue'
import About from '../components/About.vue'
import User from '../components/User.vue'

const routes = [
	{
		path: "/",
		components: {
			default: Home,  // 默认用Home组件
			a: About,  // a用About组件
			b: User,  // b用User组件
		},

	},
	{
		path: "/home",
		components: {
			default: About,   // 默认用About组件
			a: Home,  // a用Home组件
			b: User,  // b用User组件
		},

	},
]

export const router = createRouter({
	history: createWebHashHistory(),
	routes: routes
})
修改App.vue
<template>
  <div>{{ appMessage }}</div>

  <!-- router-link会被渲染成a标签 -->
  <router-link to="/">/</router-link>
  <router-link to="/home">/home</router-link>

  <!-- 路由出口 -->
  <!-- 路由匹配到的组件将渲染在这里 -->
  <!-- default -->
  <router-view></router-view>
  <router-view name="about"></router-view>
  <router-view name="user"></router-view>
</template>

<script lang="ts">
import { defineComponent } from "vue";

export default defineComponent({
  name: "App",
  setup() {
	const appMessage = "App组件";
	return {
	  // 返回的数据
	  appMessage,
	};
  },
});
</script>
<style>
/* 添加样式 */
#app {
  text-align: center;
  margin-top: 50px;
}
a {
  margin: 30px;
  display: inline-block;
}
</style>
其他组件About.vue:
<template>
  <div>about组件</div>
</template>
Home.vue:
<template>
  <div>home组件</div>
</template>
User.vue
<template>
  <div>user组件</div>
</template>
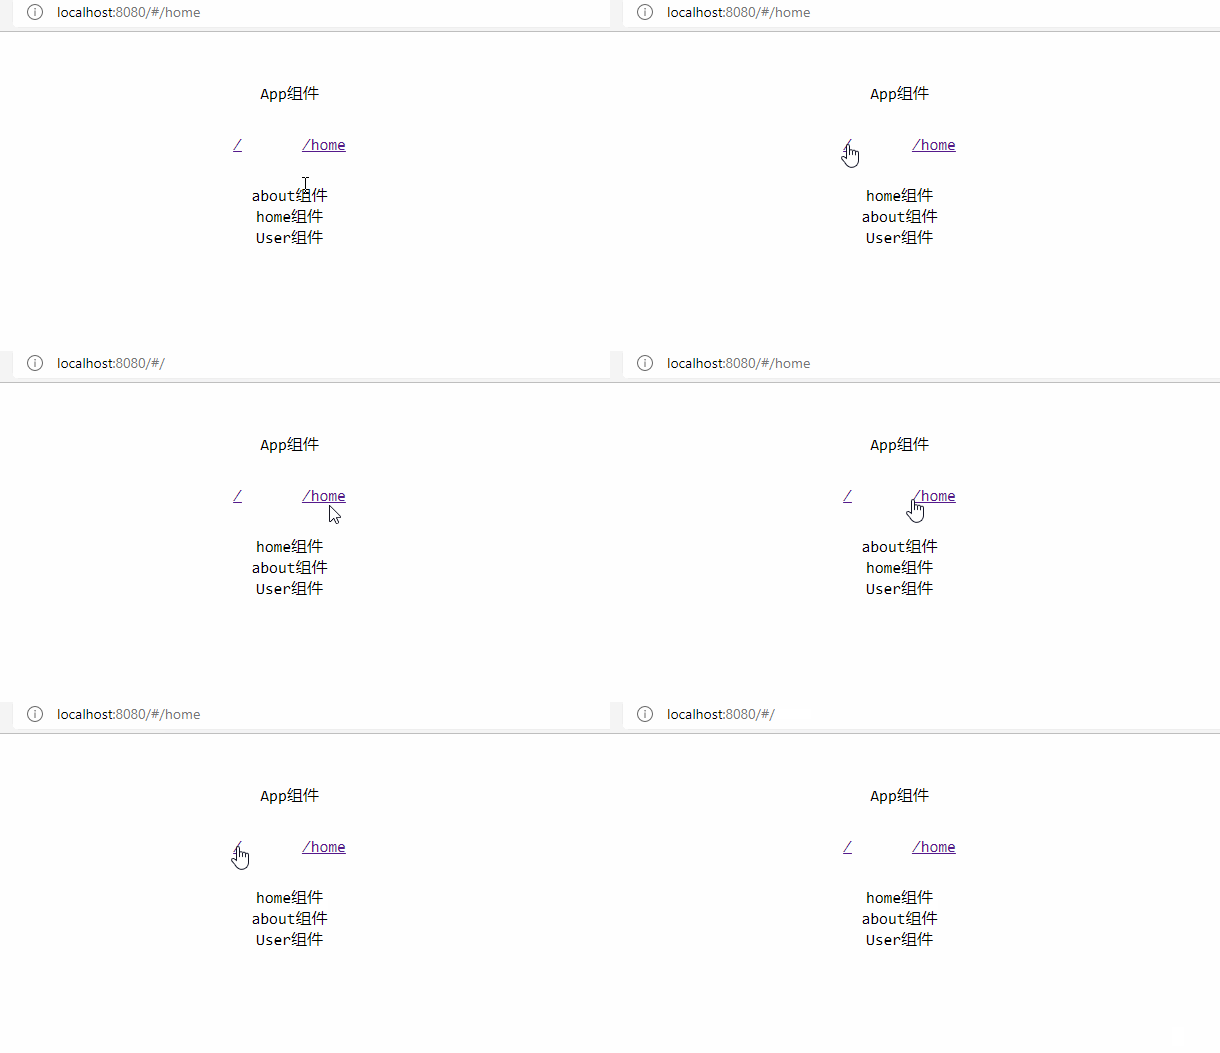
启动服务并访问vue
如图:

假如不指定视图名, 那么为
default
别名
可以实现 不同url 访问同一路由的效果
const routes = [
    // 可以访问 "/home" 也可以访问 "/"
    // 且访问的路径不会改变
    {
        path: "/home",
        name: "home",
        component: Home,
        alias: "/"
    }
嵌套路由
之前我们在App.vue中定义router-view, 让其他组件在哪里渲染
但假如我们需要在其他组件中渲染的话, 就需要嵌套路由了
使用
children嵌套路由, 它的值是路由数据, 就好像外部的router那样定义
例子:
router.index.ts
import { createRouter, createWebHashHistory } from "vue-router"

import Home from '../components/Home.vue'
import About from '../components/About.vue'
import User from '../components/User.vue'
import UserHome from '../components/UserHome.vue'
import UserSettings from '../components/UserSettings.vue'
import UserProfile from '../components/UserProfile.vue'

const routes = [
	// 可以访问 "/home" 也可以访问 "/"
	// 且访问的路径不会改变
	{
		path: "/home",
		name: "home",
		component: Home,
		alias: "/"
	},
	{
		path: "/about",
		name: "about",
		component: About
	},
	{
		path: "/user/:uid",  // 动态参数
		name: "user",
		component: User,  // 内部有router-view渲染要嵌套的路由
		children: [
			// 匹配形如 /user/lczmx 的url
			{ path: "", component: UserHome },

			// 匹配形如 /user/lczmx/settings 的url
			{ path: "settings", component: UserSettings, name: "user-settings" },

			// 匹配形如 /user/lczmx/profile 的url
			{ path: "profile", component: UserProfile, name: "user-profile" }
		]
	}
]

export const router = createRouter({
	history: createWebHashHistory(),
	routes: routes
})
注意: 假如
children中没有path: ""的话, 那么访问/user/lczmx, 只能得到一个页面空白
User.vue
<template>
  <div>
	<router-link :to="{ name: 'user-settings' }">settings</router-link>
	<router-link :to="{ name: 'user-profile' }">profile</router-link>
  </div>

  <router-view></router-view>
</template>
UserHome.vue
<template>
  <div>用户主页</div>
</template>
UserProfile.vue
<template>
  <div>用户详细信息页面</div>
</template>
UserSettings.vue
<template>
  <div>用户设置页面</div>
</template>
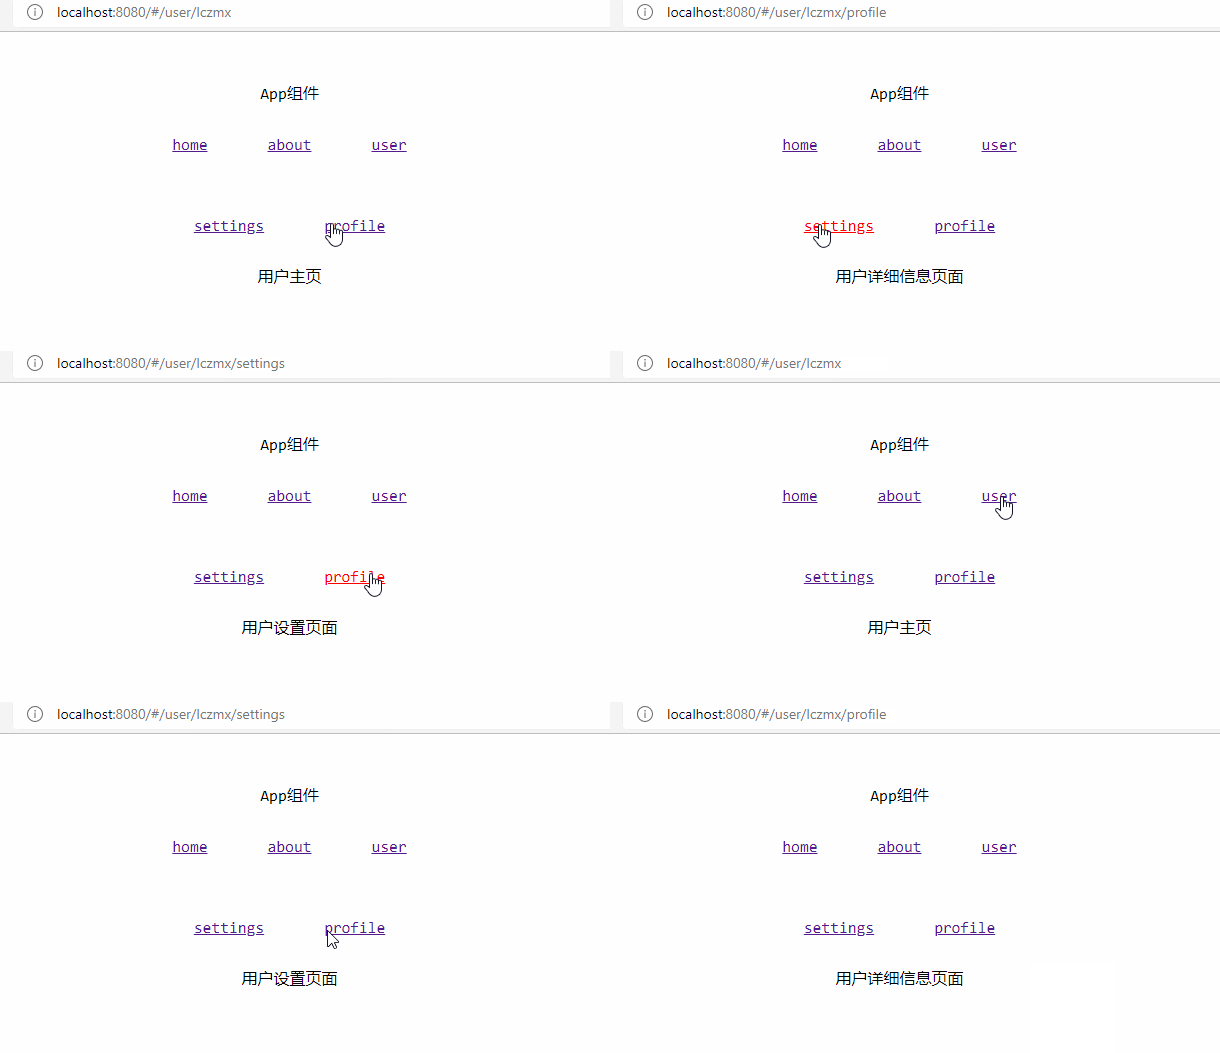
启动并访问
在浏览器中测试:

编程式路由
即不通过a标签, 而是通过js/ts改变路由, 原理是向history栈添加一个新的记录
在vue3中, 有以下写法
<template>
  <div>about组件</div>
  <button @click="changeRouter">修改路由</button>
</template>

<script lang="ts">
import { defineComponent } from "vue";

import { useRouter } from "vue-router";

export default defineComponent({
  name: "About",
  setup() {
    // 获得router对象
    const router = useRouter();

    const changeRouter = () => {
      /* 修改路由的例子 */

      // 1 字符串路径
      router.push("/users/lczmx");

      // 2 带有路径的对象
      router.push({ path: "/users/lczmx" });

      // 3 命名的路由,并加上参数,让路由建立 url
      router.push({ name: "user", params: { username: "lczmx" } });

      // 4 带查询参数,结果是 /register?plan=private
      router.push({ path: "/register", query: { plan: "private" } });

      // 5 带 hash,结果是 /about#team
      router.push({ path: "/about", hash: "#team" });

      // 6 我们可以手动建立 url,但我们必须自己处理编码
      const username = "lczmx";
      router.push(`/user/${username}`); // -> /user/lczmx
      // 同样
      router.push({ path: `/user/${username}` }); // -> /user/lczmx
      // 如果可能的话,使用 `name` 和 `params` 从自动 URL 编码中获益
      router.push({ name: "user", params: { username } }); // -> /user/lczmx

      // 7 `params` 不能与 `path` 一起使用, 否则 `params` 将会被忽略
      router.push({ path: "/user", params: { username } }); // -> /user

      // 8 replace为true 不向history 中添加
      router.push({ path: "/home", replace: true });
      // 等同于
      router.replace({ path: "/home" });

      // 9 横跨历史
      // 向前移动一条记录,与 router.forward() 相同
      router.go(1);
      // 返回一条记录,与router.back() 相同
      router.go(-1);
      // 前进 3 条记录
      router.go(3);
      // 如果没有那么多记录,静默失败
      router.go(-100);
      router.go(100);
    };
    return {
      // 返回的数据
      changeRouter,
    };
  },
});
</script>

<style>
button {
  margin: 30px;
}
</style>
更多见vue-router4官网: Vue Router
以上就是本文的全部内容,希望对大家的学习有所帮助,也希望大家多多支持我们。

