详解Vue3.0 前的 TypeScript 最佳入门实践
前言
我个人对更严格类型限制没有积极的看法,毕竟各类转类型的骚写法写习惯了。
然鹅最近的一个项目中,是 TypeScript + Vue ,毛计喇,学之...…真香!
注意此篇标题的“前”,本文旨在讲Ts混入框架的使用,不讲Class API
1. 使用官方脚手架构建
npm install -g @vue/cli
# OR
yarn global add @vue/cli
新的 Vue CLI 工具允许开发者 使用 TypeScript 集成环境 创建新项目。
只需运行 vue create my-app 。
然后,命令行会要求选择预设。使用箭头键选择 Manually select features 。
接下来,只需确保选择了 TypeScript 和 Babel 选项,如下图:
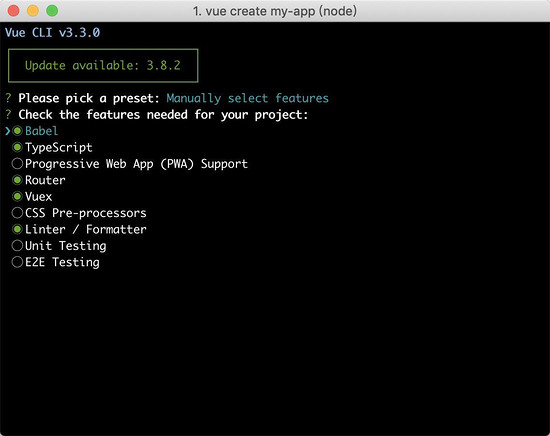
完成此操作后,它会询问你是否要使用 class-style component syntax 。
然后配置其余设置,使其看起来如下图所示。

Vue CLI工具现在将安装所有依赖项并设置项目。

接下来就跑项目喇。
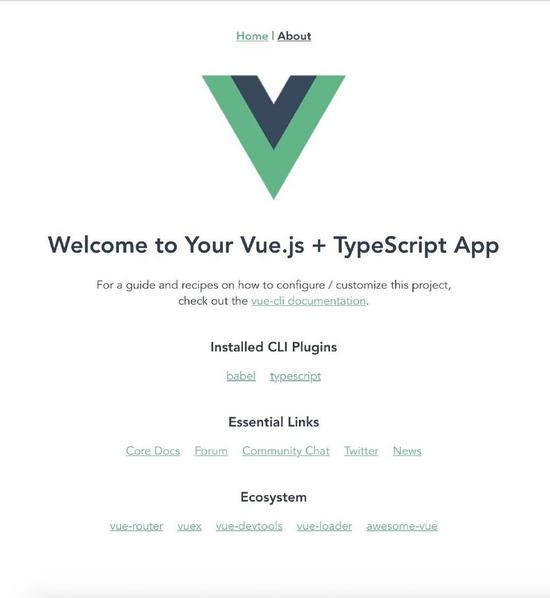
总之,先跑起来再说。
2. 项目目录解析
通过 tree 指令查看目录结构后可发现其结构和正常构建的大有不同。
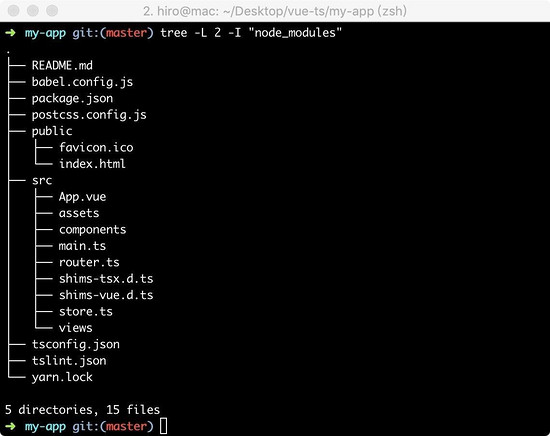
这里主要关注 shims-tsx.d.ts 和 shims-vue.d.ts 两个文件
两句话概括:
shims-tsx.d.ts,允许你以.tsx结尾的文件,在Vue项目中编写jsx代码shims-vue.d.ts主要用于TypeScript识别.vue文件,Ts默认并不支持导入vue文件,这个文件告诉ts导入.vue文件都按VueConstructor<Vue>处理。
此时我们打开亲切的 src/components/HelloWorld.vue ,将会发现写法已大有不同
<template>
 <div class="hello">
 <h1>{{ msg }}</h1>
 <!-- 省略 -->
 </div>
</template>

<script lang="ts">
import { Component, Prop, Vue } from 'vue-property-decorator';

@Component
export default class HelloWorld extends Vue {
 @Prop() private msg!: string;
}
</script>

<!-- Add "scoped" attribute to limit CSS to this component only -->
<style scoped></style>
至此,准备开启新的篇章 TypeScript 极速入门 和 vue-property-decorator
3. TypeScript 极速入门
3.1 基本类型和扩展类型

Typescript 与 Javascript 共享相同的基本类型,但有一些额外的类型。
- 元组
Tuple - 枚举
enum Any与Void
1. 基本类型合集
// 数字,二、八、十六进制都支持
let decLiteral: number = 6;
let hexLiteral: number = 0xf00d;

// 字符串,单双引都行
let name: string = "bob";
let sentence: string = `Hello, my name is ${ name }.

// 数组,第二种方式是使用数组泛型,Array<元素类型>:
let list: number[] = [1, 2, 3];
let list: Array<number> = [1, 2, 3];

let u: undefined = undefined;
let n: null = null;
2. 特殊类型
1. 元组 Tuple

想象 元组 作为有组织的数组,你需要以正确的顺序预定义数据类型。
const messyArray = [' something', 2, true, undefined, null];
const tuple: [number, string, string] = [24, "Indrek" , "Lasn"]
如果不遵循 为元组 预设排序的索引规则,那么 Typescript 会警告。
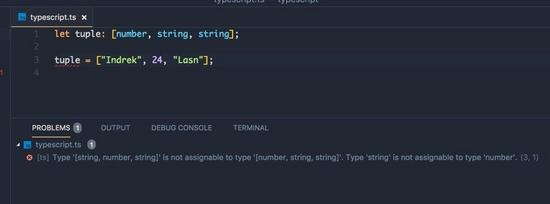
( tuple 第一项应为 number 类型)
2. 枚举 enum *

enum 类型是对JavaScript标准数据类型的一个补充。 像C#等其它语言一样,使用枚举类型可以为一组数值赋予友好的名字。
// 默认情况从0开始为元素编号,也可手动为1开始
enum Color {Red = 1, Green = 2, Blue = 4}
let c: Color = Color.Green;

let colorName: string = Color[2];
console.log(colorName); // 输出'Green'因为上面代码里它的值是2
另一个很好的例子是使用枚举来存储应用程序状态。
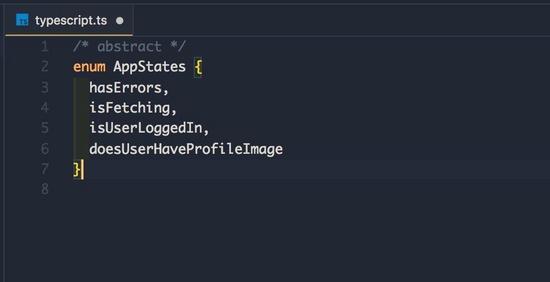
3. Void

在 Typescript 中, 你必须在函数中定义返回类型 。像这样:
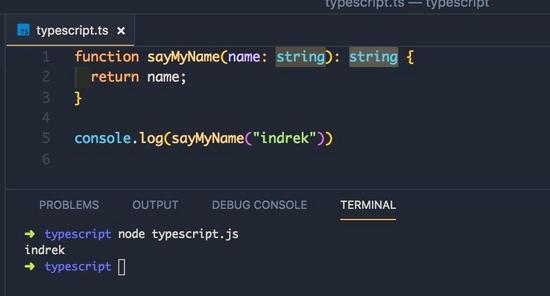
若没有返回值,则会报错:

我们可以将其返回值定义为 void :

此时将无法 return
4. Any

Emmm...就是什么类型都行,当你无法确认在处理什么类型时可以用这个。
但要慎重使用,用多了就失去使用Ts的意义。
let person: any = "前端劝退师"
person = 25
person = true
主要应用场景有:
- 接入第三方库
- Ts菜逼前期都用
5. Never

用很粗浅的话来描述就是:" Never 是你永远得不到的爸爸。"
具体的行为是:
throw new Error(message)
return error("Something failed")
while (true) {} // 存在无法达到的终点

3. 类型断言

简略的定义是:可以用来手动指定一个值的类型。
有两种写法,尖括号和 as :
let someValue: any = "this is a string";

let strLength: number = (<string>someValue).length;
let strLength: number = (someValue as string).length;
使用例子有:
当 TypeScript 不确定一个联合类型的变量到底是哪个类型的时候,我们只能访问此联合类型的所有类型里共有的属性或方法:
function getLength(something: string | number): number {
 return something.length;
}

// index.ts(2,22): error TS2339: Property 'length' does not exist on type 'string | number'.
// Property 'length' does not exist on type 'number'.
如果你访问长度将会报错,而有时候,我们确实需要在还不确定类型的时候就访问其中一个类型的属性或方法,此时需要断言才不会报错:
function getLength(something: string | number): number {
 if ((<string>something).length) {
 return (<string>something).length;
 } else {
 return something.toString().length;
 }
}
3.2 泛型: Generics
软件工程的一个主要部分就是构建组件,构建的组件不仅需要具有明确的定义和统一的接口,同时也需要组件可复用。支持现有的数据类型和将来添加的数据类型的组件为大型软件系统的开发过程提供很好的灵活性。
在 C# 和 Java 中,可以使用"泛型"来创建可复用的组件,并且组件可支持多种数据类型。这样便可以让用户根据自己的数据类型来使用组件。
1. 泛型方法
在TypeScript里, 声明泛型方法 有以下两种方式:
function gen_func1<T>(arg: T): T {
 return arg;
}
// 或者
let gen_func2: <T>(arg: T) => T = function (arg) {
 return arg;
}
调用方式也有两种:
gen_func1<string>('Hello world');
gen_func2('Hello world');
// 第二种调用方式可省略类型参数,因为编译器会根据传入参数来自动识别对应的类型。
2. 泛型与 Any
Ts 的特殊类型 Any 在具体使用时,可以代替任意类型,咋一看两者好像没啥区别,其实不然:
// 方法一:带有any参数的方法
function any_func(arg: any): any {
 console.log(arg.length);
		return arg;
}

// 方法二:Array泛型方法
function array_func<T>(arg: Array<T>): Array<T> {
	 console.log(arg.length);
		return arg;
}
方法一,打印了 arg 参数的 length 属性。因为 any 可以代替任意类型,所以该方法在传入参数不是数组或者带有 length 属性对象时,会抛出异常。
方法二,定义了参数类型是 Array 的泛型类型,肯定会有 length 属性,所以不会抛出异常。
3. 泛型类型
泛型接口:
interface Generics_interface<T> {
 (arg: T): T;
}

function func_demo<T>(arg: T): T {
 return arg;
}

let func1: Generics_interface<number> = func_demo;
func1(123); // 正确类型的实际参数
func1('123'); // 错误类型的实际参数
3.3 自定义类型: Interface vs Type alias
Interface ,国内翻译成接口。
Type alias ,类型别名。

以下内容来自:
Typescript 中的 interface 和 type 到底有什么区别
1. 相同点 都可以用来描述一个对象或函数:
interface User {
 name: string
 age: number
}

type User = {
 name: string
 age: number
};

interface SetUser {
 (name: string, age: number): void;
}
type SetUser = (name: string, age: number): void;
都允许拓展(extends):
interface 和 type 都可以拓展,并且两者并不是相互独立的,也就是说 interface 可以 extends type , type 也可以 extends interface 。 虽然效果差不多,但是两者语法不同 。
interface extends interface
interface Name {
 name: string;
}
interface User extends Name {
 age: number;
}
type extends type
type Name = {
 name: string;
}
type User = Name
interface extends type
type Name = {
 name: string;
}
interface User extends Name {
 age: number;
}
type extends interface
interface Name {
 name: string;
}
type User = Name
2. 不同点
type 可以而 interface 不行
type 可以声明基本类型别名,联合类型,元组等类型
// 基本类型别名
type Name = string

// 联合类型
interface Dog {
 wong();
}
interface Cat {
 miao();
}

type Pet = Dog | Cat

// 具体定义数组每个位置的类型
type PetList = [Dog, Pet]
type 语句中还可以使用 typeof 获取实例的 类型进行赋值
// 当你想获取一个变量的类型时,使用 typeof
let div = document.createElement('div');
type B = typeof div
其他骚操作
type StringOrNumber = string | number;
type Text = string | { text: string };
type NameLookup = Dictionary<string, Person>;
type Callback<T> = (data: T) => void;
type Pair<T> = [T, T];
type Coordinates = Pair<number>;
type Tree<T> = T | { left: Tree<T>, right: Tree<T> };
interface 可以而 type 不行
interface 能够声明合并
interface User {
 name: string
 age: number
}

interface User {
 sex: string
}

/*
User 接口为 {
 name: string
 age: number
 sex: string
}
*/
interface 有可选属性和只读属性
可选属性
接口里的属性不全都是必需的。 有些是只在某些条件下存在,或者根本不存在。 例如给函数传入的参数对象中只有部分属性赋值了。带有可选属性的接口与普通的接口定义差不多,只是在可选属性名字定义的后面加一个 ? 符号。如下所示
interface Person {
 name: string;
 age?: number;
 gender?: number;
}
只读属性
顾名思义就是这个属性是不可写的,对象属性只能在对象刚刚创建的时候修改其值。 你可以在属性名前用 readonly 来指定只读属性,如下所示:
interface User {
 readonly loginName: string;
 password: string;
}
上面的例子说明,当完成User对象的初始化后loginName就不可以修改了。
3.4 实现与继承: implements vs extends
extends 很明显就是ES6里面的类继承,那么 implement 又是做什么的呢?它和 extends 有什么不同?
implement ,实现。与C#或Java里接口的基本作用一样, TypeScript 也能够用它来明确的强制一个类去符合某种契约
implement基本用法:
interface IDeveloper {
 name: string;
 age?: number;
}
// OK
class dev implements IDeveloper {
 name = 'Alex';
 age = 20;
}
// OK
class dev2 implements IDeveloper {
 name = 'Alex';
}
// Error
class dev3 implements IDeveloper {
 name = 'Alex';
 age = '9';
}
而 extends 是继承父类,两者其实可以混着用:
class A extends B implements C,D,E
搭配 interface 和 type 的用法有:

3.5 声明文件与命名空间: declare 和 namespace
前面我们讲到Vue项目中的 shims-tsx.d.ts 和 shims-vue.d.ts ,其初始内容是这样的:
// shims-tsx.d.ts
import Vue, { VNode } from 'vue';

declare global {
 namespace JSX {
 // tslint:disable no-empty-interface
 interface Element extends VNode {}
 // tslint:disable no-empty-interface
 interface ElementClass extends Vue {}
 interface IntrinsicElements {
 [elem: string]: any;
 }
 }
}

// shims-vue.d.ts
declare module '*.vue' {
 import Vue from 'vue';
 export default Vue;
}
declare :当使用第三方库时,我们需要引用它的声明文件,才能获得对应的代码补全、接口提示等功能。
这里列举出几个常用的:
- declare var 声明全局变量
- declare function 声明全局方法
- declare class 声明全局类
- declare enum 声明全局枚举类型
- declare global 扩展全局变量
- declare module 扩展模块
namespace :“内部模块”现在称做“命名空间”
module X { 相当于现在推荐的写法 namespace X { )
跟其他 JS 库协同
类似模块,同样也可以通过为其他 JS 库使用了命名空间的库创建 .d.ts 文件的声明文件,如为 D3 JS 库,可以创建这样的声明文件:
declare namespace D3{
 export interface Selectors { ... }
}
declare var d3: D3.Base;
所以上述两个文件:
shims-tsx.d.ts, 在全局变量global中批量命名了数个内部模块。shims-vue.d.ts,意思是告诉TypeScript*.vue后缀的文件可以交给vue模块来处理。
3.6 访问修饰符: private 、 public 、 protected
其实很好理解:
- 默认为
public - 当成员被标记为
private时,它就不能在声明它的类的外部访问,比如:
class Animal {
 private name: string;
 constructor(theName: string) {
 this.name = theName;
 }
}

let a = new Animal('Cat').name; //错误,‘name'是私有的
protected 和 private 类似,但是, protected 成员在派生类中可以访问
class Animal {
 protected name: string;
 constructor(theName: string) {
 this.name = theName;
 }
}

class Rhino extends Animal {
 constructor() {
 super('Rhino');
 }
 getName() {
 console.log(this.name) //此处的name就是Animal类中的name
 }
}
3.7 可选参数 ( ?: )和非空断言操作符(!.)
可选参数
function buildName(firstName: string, lastName?: string) {
 return firstName + ' ' + lastName
}

// 错误演示
buildName("firstName", "lastName", "lastName")
// 正确演示
buildName("firstName")
// 正确演示
buildName("firstName", "lastName")
非空断言操作符:
能确定变量值一定不为空时使用。
与可选参数 不同的是,非空断言操作符不会防止出现 null 或 undefined。
let s = e!.name; // 断言e是非空并访问name属性
4. Vue 组件的 Ts 写法
从 vue2.5 之后,vue 对 ts 有更好的支持。根据官方文档,vue 结合 typescript ,有两种书写方式:
**Vue.extend **
 import Vue from 'vue'

 const Component = Vue.extend({
 	// type inference enabled
 })
vue-class-component
import { Component, Vue, Prop } from 'vue-property-decorator'

@Component
export default class Test extends Vue {
 @Prop({ type: Object })
 private test: { value: string }
}
理想情况下, Vue.extend 的书写方式,是学习成本最低的。在现有写法的基础上,几乎 0 成本的迁移。
但是 Vue.extend 模式,需要与 mixins 结合使用。在 mixin 中定义的方法,不会被 typescript 识别到
,这就意味着会出现 丢失代码提示、类型检查、编译报错等问题。
菜鸟才做选择,大佬都挑最好的。直接讲第二种吧:
4.1 vue-class-component
我们回到 src/components/HelloWorld.vue
<template>
 <div class="hello">
 <h1>{{ msg }}</h1>
 <!-- 省略 -->
 </div>
</template>

<script lang="ts">
import { Component, Prop, Vue } from 'vue-property-decorator';

@Component
export default class HelloWorld extends Vue {
 @Prop() private msg!: string;
}
</script>

<!-- Add "scoped" attribute to limit CSS to this component only -->
<style scoped></style>
有写过 python 的同学应该会发现似曾相识:
vue-property-decorator 这个官方支持的库里,提供了函数 **装饰器(修饰符)**语法
1. 函数修饰符 @
“@”,与其说是修饰函数倒不如说是引用、调用它修饰的函数。
或者用句大白话描述: @ : "下面的被我包围了。"
举个栗子,下面的一段代码,里面两个函数,没有被调用,也会有输出结果:
test(f){
 console.log("before ...");
 f()
		console.log("after ...");
 }

@test
func(){
	console.log("func was called");
}
直接运行,输出结果:
before ...
func was called
after ...
上面代码可以看出来:
- 只定义了两个函数:
test和func,没有调用它们。 - 如果没有“@test”,运行应该是没有任何输出的。
但是,解释器读到函数修饰符“@”的时候,后面步骤会是这样:
- 去调用
test函数,test函数的入口参数就是那个叫“func”的函数; test函数被执行,入口参数的(也就是func函数)会被调用(执行);
换言之,修饰符带的那个函数的入口参数,就是下面的那个整个的函数。有点儿类似 JavaScrip t里面的 function a (function () { ... });

2. vue-property-decorator 和 vuex-class 提供的装饰器
vue-property-decorator 的装饰器:
- @Prop
- @PropSync
- @Provide
- @Model
- @Watch
- @Inject
- @Provide
- @Emit
- @Component (provided byvue-class-component)
- Mixins (the helper function named mixins provided by vue-class-component)
vuex-class 的装饰器:
- @State
- @Getter
- @Action
- @Mutation
我们拿原始Vue组件模版来看:
import {componentA,componentB} from '@/components';

export default {
	components: { componentA, componentB},
	props: {
 propA: { type: Number },
 propB: { default: 'default value' },
 propC: { type: [String, Boolean] },
 }
 // 组件数据
 data () {
 return {
 message: 'Hello'
 }
 },
 // 计算属性
 computed: {
 reversedMessage () {
 return this.message.split('').reverse().join('')
 }
 // Vuex数据
 step() {
 	return this.$store.state.count
 }
 },
 methods: {
 changeMessage () {
 this.message = "Good bye"
 },
 getName() {
 	let name = this.$store.getters['person/name']
 	return name
 }
 },
 // 生命周期
 created () { },
 mounted () { },
 updated () { },
 destroyed () { }
}
以上模版替换成修饰符写法则是:
import { Component, Vue, Prop } from 'vue-property-decorator';
import { State, Getter } from 'vuex-class';
import { count, name } from '@/person'
import { componentA, componentB } from '@/components';

@Component({
 components:{ componentA, componentB},
})
export default class HelloWorld extends Vue{
	@Prop(Number) readonly propA!: number | undefined
 @Prop({ default: 'default value' }) readonly propB!: string
 @Prop([String, Boolean]) readonly propC!: string | boolean | undefined

 // 原data
 message = 'Hello'

 // 计算属性
	private get reversedMessage (): string[] {
 	return this.message.split('').reverse().join('')
 }
 // Vuex 数据
 @State((state: IRootState) => state . booking. currentStep) step!: number
	@Getter( 'person/name') name!: name

 // method
 public changeMessage (): void {
 this.message = 'Good bye'
 },
 public getName(): string {
 let storeName = name
 return storeName
 }
	// 生命周期
 private created ():void { },
 private mounted ():void { },
 private updated ():void { },
 private destroyed ():void { }
}
正如你所看到的,我们在生命周期 列表那都添加 private XXXX 方法,因为这不应该公开给其他组件。
而不对 method 做私有约束的原因是,可能会用到 @Emit 来向父组件传递信息。
4.2 添加全局工具
引入全局模块,需要改 main.ts :
import Vue from 'vue';
import App from './App.vue';
import router from './router';
import store from './store';

Vue.config.productionTip = false;

new Vue({
 router,
 store,
 render: (h) => h(App),
}).$mount('#app');
npm i VueI18n
import Vue from 'vue';
import App from './App.vue';
import router from './router';
import store from './store';
// 新模块
import i18n from './i18n';

Vue.config.productionTip = false;

new Vue({
 router,
 store,
 i18n, // 新模块
 render: (h) => h(App),
}).$mount('#app');
但仅仅这样,还不够。你需要动 src/vue-shim.d.ts :
// 声明全局方法
declare module 'vue/types/vue' {
 interface Vue {
 readonly $i18n: VueI18Next;
 $t: TranslationFunction;
 }
}
之后使用 this.$i18n() 的话就不会报错了。
4.3 Axios 使用与封装
Axios的封装千人千面
如果只是想简单在Ts里体验使用Axios,可以安装vue-axios
简单使用Axios
$ npm i axios vue-axios
main.ts添加:
import Vue from 'vue'
import axios from 'axios'
import VueAxios from 'vue-axios'

Vue.use(VueAxios, axios)
然后在组件内使用:
Vue.axios.get(api).then((response) => {
 console.log(response.data)
})

this.axios.get(api).then((response) => {
 console.log(response.data)
})

this.$http.get(api).then((response) => {
 console.log(response.data)
})
1. 新建文件 request.ts
文件目录:
-api
 - main.ts // 实际调用
-utils
 - request.ts // 接口封装
2. request.ts 文件解析
import * as axios from 'axios';
import store from '@/store';
// 这里可根据具体使用的UI组件库进行替换
import { Toast } from 'vant';
import { AxiosResponse, AxiosRequestConfig } from 'axios';

 /* baseURL 按实际项目来定义 */
const baseURL = process.env.VUE_APP_URL;

 /* 创建axios实例 */
const service = axios.default.create({
 baseURL,
 timeout: 0, // 请求超时时间
 maxContentLength: 4000,
});

service.interceptors.request.use((config: AxiosRequestConfig) => {
 return config;
}, (error: any) => {
 Promise.reject(error);
});

service.interceptors.response.use(
 (response: AxiosResponse) => {
 if (response.status !== 200) {
  Toast.fail('请求错误!');
 } else {
  return response.data;
 }
 },
 (error: any) => {
 return Promise.reject(error);
 });

export default service;
为了方便,我们还需要定义一套固定的 axios 返回的格式,新建 ajax.ts :
export interface AjaxResponse {
 code: number;
 data: any;
 message: string;
}
3. main.ts 接口调用:
// api/main.ts
import request from '../utils/request';

// get
export function getSomeThings(params:any) {
 return request({
 url: '/api/getSomethings',
 });
}

// post
export function postSomeThings(params:any) {
 return request({
 url: '/api/postSomethings',
 methods: 'post',
 data: params
 });
}
5. 编写一个组件
为了减少时间,我们来替换掉 src/components/HelloWorld.vue ,做一个博客帖子组件:
<template>
	<div class="blogpost">
		<h2>{{ post.title }}</h2>
		<p>{{ post.body }}</p>
		<p class="meta">Written by {{ post.author }} on {{ date }}</p>
	</div>
</template>

<script lang="ts">
import { Component, Prop, Vue } from 'vue-property-decorator';

// 在这里对数据进行类型约束
export interface Post {
	title: string;
	body: string;
	author: string;
	datePosted: Date;
}

@Component
export default class HelloWorld extends Vue {
	@Prop() private post!: Post;

	get date() {
		return `${this.post.datePosted.getDate()}/${this.post.datePosted.getMonth()}/${this.post.datePosted.getFullYear()}`;
	}
}
</script>

<style scoped>
h2 {
 text-decoration: underline;
}
p.meta {
 font-style: italic;
}
</style>
然后在 Home.vue 中使用:
<template>
 <div class="home">
 <img alt="Vue logo" src="../assets/logo.png">
 	<HelloWorld v-for="blogPost in blogPosts" :post="blogPost" :key="blogPost.title" />
 </div>
</template>

<script lang="ts">
import { Component, Vue } from 'vue-property-decorator';
import HelloWorld, { Post } from '@/components/HelloWorld.vue'; // @ is an alias to /src

@Component({
 components: {
 HelloWorld,
 },
})
export default class Home extends Vue {
 private blogPosts: Post[] = [
 {
  title: 'My first blogpost ever!',
  body: 'Lorem ipsum dolor sit amet.',
  author: 'Elke',
  datePosted: new Date(2019, 1, 18),
 },
 {
  title: 'Look I am blogging!',
  body: 'Hurray for me, this is my second post!',
  author: 'Elke',
  datePosted: new Date(2019, 1, 19),
 },
 {
  title: 'Another one?!',
  body: 'Another one!',
  author: 'Elke',
  datePosted: new Date(2019, 1, 20),
 },
 ];
}
</script>
这时候运行项目:

这就是简单的父子组件
以上就是本文的全部内容,希望对大家的学习有所帮助,也希望大家多多支持我们。

