C#实现分页组件的方法
分页无论是前端和后端,基本都有广泛应用!下面通过一个小小案例完成这个分页效果:
参数含义:
string urlFormat: 要传给服务器端的URL地址格式,方便在点超链接时进行相应的跳转
long totalSize: 总的数据条数。
long pageSize: 每页多少条数据
long currentPage: 当前的页数
后面通过具体的一个案例来用这个分页方法:
一.分页方法:
/// <summary>
  /// 生成页码的html
  /// </summary>
  /// <param name="urlFormat">超链接的格式。list.ashx?pagenum={pageNum}。地址中用{pagenum}做为当前页码的占位符</param></param>
  /// <param name="totalSize">总数据条数</param>
  /// <param name="pageSize">每页多少条数据</param>
  /// <param name="currentPage">当前页</param>
  /// <returns></returns>
  public static RawString Pager(string urlFormat, long totalSize,
   long pageSize, long currentPage)
  {
   StringBuilder sb = new StringBuilder();
   //总页数
   long totalPageCount = (long)Math.Ceiling((totalSize * 1.0f) / (pageSize * 1.0f));
   //当前页的前几页
   long firstPage = Math.Max(currentPage - 5, 1);
   //当前页的后几页
   long lastPage = Math.Min(currentPage + 6, totalPageCount);
   //绘制分页,首页
   sb.AppendLine("<div><a href='" + urlFormat.Replace("{pageNum}", "1") + "'>首页</a>");
   //绘制分页中间数据部分
   for (long i = firstPage; i < lastPage; i++)
   {
    string url = urlFormat.Replace("{pageNum}", i.ToString());
    if (i == currentPage) //点击后就不显示超链接
    {
     sb.AppendLine("<a>" + i + "</a>");
    }
    else
    {
     sb.AppendLine("<a href='" + url + "'>" + i + "</a>");
    }
   }
   //显示最后一页
   sb.AppendLine("<a href='" + urlFormat.Replace("{pageNum}", totalPageCount.ToString()) + "'>末页</a></div>");
   return new RawString(sb.ToString());
  }
二.案例调用:
服务器端(test.ashx):这里为了方便看到效果,展示数据直接用的固定数据
public void ProcessRequest(HttpContext context)
  {
   context.Response.ContentType = "text/html";
   long pn = Convert.ToInt64(context.Request["pn"]);
   if (pn == 0) //Convert.ToInt64(null)返回的是0
   {
    pn = 1;
   }
   long[] num = new long[50]; //这里的数据用的是固定数据
   for (int i = 0; i < 50; i++)
   {
    num[i] = ((pn-1) * 50) + i;
   }
   OutputRazor(context, "~/test.cshtml", new { nums=num,page=pn}); //这里用的Razor模板引擎
  }
这里的Razor方法见:Razor模板引擎简单介绍
UI端展示(test.cshtml):
<body>
  <ul>
    @{
  foreach (int i in Model.nums)
  {
   <li>@i</li>
  }
  }
   </ul>
  @Pager("test.ashx?pn={pageNum}", 1020, 50, Model.page);
</body>
效果图:

三.jQuery分页插件:
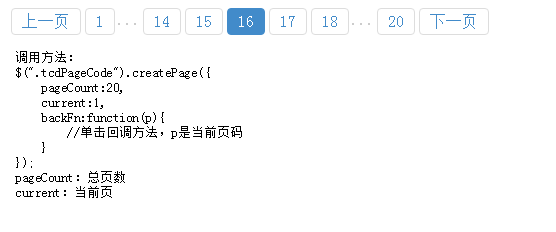
前面写的这些主要是进行功能的实现,样式效果差了点。下面贴上通过jQuery实现的分页效果
jQuery的效果图,及调用方法:

完整代码:
<!DOCTYPE html>
<html lang="zh-cn" xmlns="http://www.w3.org/1999/xhtml">
<head>
<meta charset="utf-8" />
<title>一个非常简单的jQuery分页插件</title>
<style>
*{ margin:0; padding:0; list-style:none;}
a{ text-decoration:none;}
a:hover{ text-decoration:none;}
.tcdPageCode{padding: 15px 20px;text-align: left;color: #ccc;}
.tcdPageCode a{display: inline-block;color: #428bca;display: inline-block;height: 25px; line-height: 25px; padding: 0 10px;border: 1px solid #ddd; margin: 0 2px;border-radius: 4px;vertical-align: middle;}
.tcdPageCode a:hover{text-decoration: none;border: 1px solid #428bca;}
.tcdPageCode span.current{display: inline-block;height: 25px;line-height: 25px;padding: 0 10px;margin: 0 2px;color: #fff;background-color: #428bca; border: 1px solid #428bca;border-radius: 4px;vertical-align: middle;}
.tcdPageCode span.disabled{ display: inline-block;height: 25px;line-height: 25px;padding: 0 10px;margin: 0 2px; color: #bfbfbf;background: #f2f2f2;border: 1px solid #bfbfbf;border-radius: 4px;vertical-align: middle;}
</style>
</head>
<body>
<!-- 代码部分begin -->
 <div class="tcdPageCode">
 </div>
 <pre>
 调用方法:
 $(".tcdPageCode").createPage({
  pageCount:20,
  current:1,
  backFn:function(p){
   //单击回调方法,p是当前页码
  }
 });
 pageCount:总页数
 current:当前页
 </pre>
</body>
<script src="/ajaxjs/jquery.min.js"></script>
<script src="/ajaxjs/jquery.page.js"></script>
<script>
 $(".tcdPageCode").createPage({
  pageCount:20,
  current:5,
  backFn:function(p){
   console.log(p);
  }
 });
</script>
<!-- 代码部分end -->
</html>
以上就是本文的全部内容,希望对大家的学习有所帮助,也希望大家多多支持我们。
赞 (0)

