C#操作IIS程序池及站点的创建配置实现代码
首先要对Microsoft.Web.Administration进行引用,它主要是用来操作IIS7;
using System.DirectoryServices;
using Microsoft.Web.Administration;
1:首先是对本版IIS的版本进行配置:
DirectoryEntry getEntity = new DirectoryEntry("IIS://localhost/W3SVC/INFO");
string Version = getEntity.Properties["MajorIISVersionNumber"].Value.ToString();
MessageBox.Show("IIS版本为:" + Version);
2:是判断程序池是存在;
/// <summary>
/// 判断程序池是否存在
/// </summary>
/// <param name="AppPoolName">程序池名称</param>
/// <returns>true存在 false不存在</returns>
private bool IsAppPoolName(string AppPoolName)
{
bool result = false;
DirectoryEntry appPools = new DirectoryEntry("IIS://localhost/W3SVC/AppPools");
foreach (DirectoryEntry getdir in appPools.Children)
{
if (getdir.Name.Equals(AppPoolName))
{
result = true;
}
}
return result;
}
3:删除应用程序池
/// <summary>
/// 删除指定程序池
/// </summary>
/// <param name="AppPoolName">程序池名称</param>
/// <returns>true删除成功 false删除失败</returns>
private bool DeleteAppPool(string AppPoolName)
{
bool result = false;
DirectoryEntry appPools = new DirectoryEntry("IIS://localhost/W3SVC/AppPools");
foreach (DirectoryEntry getdir in appPools.Children)
{
if (getdir.Name.Equals(AppPoolName))
{
try
{
getdir.DeleteTree();
result = true;
}
catch
{
result = false;
}
}
}
return result;
}
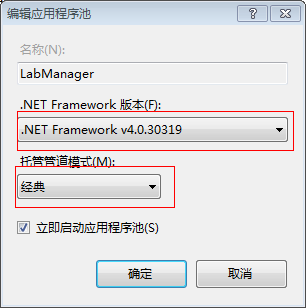
4:创建应用程序池 (对程序池的设置主要是针对IIS7;IIS7应用程序池托管模式主要包括集成跟经典模式,并进行NET版本的设置)
string AppPoolName = "LamAppPool";
if (!IsAppPoolName(AppPoolName))
{
DirectoryEntry newpool;
DirectoryEntry appPools = new DirectoryEntry("IIS://localhost/W3SVC/AppPools");
newpool = appPools.Children.Add(AppPoolName, "IIsApplicationPool");
newpool.CommitChanges();
MessageBox.Show(AppPoolName + "程序池增加成功");
}
#endregion
#region 修改应用程序的配置(包含托管模式及其NET运行版本)
ServerManager sm = new ServerManager();
sm.ApplicationPools[AppPoolName].ManagedRuntimeVersion = "v4.0";
sm.ApplicationPools[AppPoolName].ManagedPipelineMode = ManagedPipelineMode.Classic; //托管模式Integrated为集成 Classic为经典
sm.CommitChanges();
MessageBox.Show(AppPoolName + "程序池托管管道模式:" + sm.ApplicationPools[AppPoolName].ManagedPipelineMode.ToString() + "运行的NET版本为:" + sm.ApplicationPools[AppPoolName].ManagedRuntimeVersion);
运用C#代码来对IIS7程序池托管管道模式及版本进行修改;
5:针对IIS6的NET版进行设置;因为此处我是用到NET4.0所以V4.0.30319 若是NET2.0则在这进行修改 v2.0.50727
//启动aspnet_regiis.exe程序
string fileName = Environment.GetEnvironmentVariable("windir") + @"\Microsoft.NET\Framework\v4.0.30319\aspnet_regiis.exe";
ProcessStartInfo startInfo = new ProcessStartInfo(fileName);
//处理目录路径
string path = vdEntry.Path.ToUpper();
int index = path.IndexOf("W3SVC");
path = path.Remove(0, index);
//启动ASPnet_iis.exe程序,刷新脚本映射
startInfo.Arguments = "-s " + path;
startInfo.WindowStyle = ProcessWindowStyle.Hidden;
startInfo.UseShellExecute = false;
startInfo.CreateNoWindow = true;
startInfo.RedirectStandardOutput = true;
startInfo.RedirectStandardError = true;
Process process = new Process();
process.StartInfo = startInfo;
process.Start();
process.WaitForExit();
string errors = process.StandardError.ReadToEnd();
6:平常我们可能还得对IIS中的MIME类型进行增加;下面主要是我们用到两个类型分别是:xaml,xap
IISOle.MimeMapClass NewMime = new IISOle.MimeMapClass();
NewMime.Extension = ".xaml"; NewMime.MimeType = "application/xaml+xml";
IISOle.MimeMapClass TwoMime = new IISOle.MimeMapClass();
TwoMime.Extension = ".xap"; TwoMime.MimeType = "application/x-silverlight-app";
rootEntry.Properties["MimeMap"].Add(NewMime);
rootEntry.Properties["MimeMap"].Add(TwoMime);
rootEntry.CommitChanges();
7:下面是做安装时一段对IIS进行操作的代码;兼容IIS6及IIS7;新建虚拟目录并对相应的属性进行设置;对IIS7还进行新建程序池的程序;并设置程序池的配置;
/// <summary>
/// 创建网站
/// </summary>
/// <param name="siteInfo"></param>
public void CreateNewWebSite(NewWebSiteInfo siteInfo)
{
if (!EnsureNewSiteEnavaible(siteInfo.BindString))
{
throw new Exception("该网站已存在" + Environment.NewLine + siteInfo.BindString);
}
DirectoryEntry rootEntry = GetDirectoryEntry(entPath);
newSiteNum = GetNewWebSiteID();
DirectoryEntry newSiteEntry = rootEntry.Children.Add(newSiteNum, "IIsWebServer");
newSiteEntry.CommitChanges();
newSiteEntry.Properties["ServerBindings"].Value = siteInfo.BindString;
newSiteEntry.Properties["ServerComment"].Value = siteInfo.CommentOfWebSite;
newSiteEntry.CommitChanges();
DirectoryEntry vdEntry = newSiteEntry.Children.Add("root", "IIsWebVirtualDir");
vdEntry.CommitChanges();
string ChangWebPath = siteInfo.WebPath.Trim().Remove(siteInfo.WebPath.Trim().LastIndexOf('\\'),1);
vdEntry.Properties["Path"].Value = ChangWebPath;
vdEntry.Invoke("AppCreate", true);//创建应用程序
vdEntry.Properties["AccessRead"][0] = true; //设置读取权限
vdEntry.Properties["AccessWrite"][0] = true;
vdEntry.Properties["AccessScript"][0] = true;//执行权限
vdEntry.Properties["AccessExecute"][0] = false;
vdEntry.Properties["DefaultDoc"][0] = "Login.aspx";//设置默认文档
vdEntry.Properties["AppFriendlyName"][0] = "LabManager"; //应用程序名称
vdEntry.Properties["AuthFlags"][0] = 1;//0表示不允许匿名访问,1表示就可以3为基本身份验证,7为windows继承身份验证
vdEntry.CommitChanges();
//操作增加MIME
//IISOle.MimeMapClass NewMime = new IISOle.MimeMapClass();
//NewMime.Extension = ".xaml"; NewMime.MimeType = "application/xaml+xml";
//IISOle.MimeMapClass TwoMime = new IISOle.MimeMapClass();
//TwoMime.Extension = ".xap"; TwoMime.MimeType = "application/x-silverlight-app";
//rootEntry.Properties["MimeMap"].Add(NewMime);
//rootEntry.Properties["MimeMap"].Add(TwoMime);
//rootEntry.CommitChanges();
#region 针对IIS7
DirectoryEntry getEntity = new DirectoryEntry("IIS://localhost/W3SVC/INFO");
int Version =int.Parse(getEntity.Properties["MajorIISVersionNumber"].Value.ToString());
if (Version > 6)
{
#region 创建应用程序池
string AppPoolName = "LabManager";
if (!IsAppPoolName(AppPoolName))
{
DirectoryEntry newpool;
DirectoryEntry appPools = new DirectoryEntry("IIS://localhost/W3SVC/AppPools");
newpool = appPools.Children.Add(AppPoolName, "IIsApplicationPool");
newpool.CommitChanges();
}
#endregion
#region 修改应用程序的配置(包含托管模式及其NET运行版本)
ServerManager sm = new ServerManager();
sm.ApplicationPools[AppPoolName].ManagedRuntimeVersion = "v4.0";
sm.ApplicationPools[AppPoolName].ManagedPipelineMode = ManagedPipelineMode.Classic; //托管模式Integrated为集成 Classic为经典
sm.CommitChanges();
#endregion
vdEntry.Properties["AppPoolId"].Value = AppPoolName;
vdEntry.CommitChanges();
}
#endregion
//启动aspnet_regiis.exe程序
string fileName = Environment.GetEnvironmentVariable("windir") + @"\Microsoft.NET\Framework\v4.0.30319\aspnet_regiis.exe";
ProcessStartInfo startInfo = new ProcessStartInfo(fileName);
//处理目录路径
string path = vdEntry.Path.ToUpper();
int index = path.IndexOf("W3SVC");
path = path.Remove(0, index);
//启动ASPnet_iis.exe程序,刷新脚本映射
startInfo.Arguments = "-s " + path;
startInfo.WindowStyle = ProcessWindowStyle.Hidden;
startInfo.UseShellExecute = false;
startInfo.CreateNoWindow = true;
startInfo.RedirectStandardOutput = true;
startInfo.RedirectStandardError = true;
Process process = new Process();
process.StartInfo = startInfo;
process.Start();
process.WaitForExit();
string errors = process.StandardError.ReadToEnd();
if (errors != string.Empty)
{
throw new Exception(errors);
}
}
string entPath = String.Format("IIS://{0}/w3svc", "localhost");
public DirectoryEntry GetDirectoryEntry(string entPath)
{
DirectoryEntry ent = new DirectoryEntry(entPath);
return ent;
}
public class NewWebSiteInfo
{
private string hostIP; // 主机IP
private string portNum; // 网站端口号
private string descOfWebSite; // 网站表示。一般为网站的网站名。例如"www.dns.com.cn"
private string commentOfWebSite;// 网站注释。一般也为网站的网站名。
private string webPath; // 网站的主目录。例如"e:\ mp"
public NewWebSiteInfo(string hostIP, string portNum, string descOfWebSite, string commentOfWebSite, string webPath)
{
this.hostIP = hostIP;
this.portNum = portNum;
this.descOfWebSite = descOfWebSite;
this.commentOfWebSite = commentOfWebSite;
this.webPath = webPath;
}
public string BindString
{
get
{
return String.Format("{0}:{1}:{2}", hostIP, portNum, descOfWebSite); //网站标识(IP,端口,主机头值)
}
}
public string PortNum
{
get
{
return portNum;
}
}
public string CommentOfWebSite
{
get
{
return commentOfWebSite;
}
}
public string WebPath
{
get
{
return webPath;
}
}
}
8:下面的代码是对文件夹权限进行设置,下面代码是创建Everyone 并给予全部权限
/// <summary>
/// 设置文件夹权限 处理给EVERONE赋予所有权限
/// </summary>
/// <param name="FileAdd">文件夹路径</param>
public void SetFileRole()
{
string FileAdd = this.Context.Parameters["installdir"].ToString();
FileAdd = FileAdd.Remove(FileAdd.LastIndexOf('\\'), 1);
DirectorySecurity fSec = new DirectorySecurity();
fSec.AddAccessRule(new FileSystemAccessRule("Everyone",FileSystemRights.FullControl,InheritanceFlags.ContainerInherit|InheritanceFlags.ObjectInherit,PropagationFlags.None,AccessControlType.Allow));
System.IO.Directory.SetAccessControl(FileAdd, fSec);
}
相关推荐
-
用C#操纵IIS(代码)
using System; using System.DirectoryServices; using System.Collections; using System.Text.RegularExpressions; using System.Text; /** * @author 吴海燕 * @email wuhy80-usual@yahoo.com * 2004-6-25 第一版 */ namespace Wuhy.ToolBox { ///
-
C#创建IIS虚拟目录的方法
本文实例讲述了C#创建IIS虚拟目录的方法.分享给大家供大家参考.具体分析如下: DirectoryEntry是.Net给我们的一大礼物,他的名字我们就知道他的功能--目录入口.使用过ADSI的人都知道操作IIS,WinNT这些时,我们还需要提供他们的Path,操作IIS时,这个Path的格式为: 复制代码 代码如下: IIS://ComputerName/Service/Website/Directory ComputerName:即操作的服务器的名字,可以是名字也可以是IP,经常用的就是lo
-
C#实现获取IIS站点及虚拟目录信息的方法
本文实例讲述了C#实现获取IIS站点及虚拟目录信息的方法.分享给大家供大家参考.具体如下: using System; using System.DirectoryServices; using System.Collections.Generic; using System.Text; namespace ConsoleApplication1 { class Program { static void Main(string[] args) { DirectoryEntry rootEntr
-
C#修改IIS站点framework版本号的方法
本文实例讲述了C#修改IIS站点framework版本号的方法.分享给大家供大家参考.具体如下: 使用ASP.NET IIS 注册工具 (Aspnet_regiis.exe)可以方便地更新 ASP.NET 应用程序的脚本映射,使其指向与该工具关联的 ASP.NET ISAPI 版本. 关于ASP.NET IIS 注册工具的更详细的内容,请参考MSDN. 在控制台上我们使用下面的命令可以修改一个虚拟目录的Asp.Net版本: 复制代码 代码如下: Aspnet_iis.exe –s path 我们
-
c# 解决IIS写Excel的权限问题
具体配置方法如下: 1:在服务器上安装office的Excel软件. 2:在"开始"->"运行"中输入dcomcnfg.exe启动"组件服务" 3:依次双击"组件服务"->"计算机"->"我的电脑"->"DCOM配置" 4:在"DCOM配置"中找到"Microsoft Excel 应用程序",在它上面点击
-
c#操作iis根目录的方法
本文实例讲述了c#操作iis根目录的方法.分享给大家供大家参考.具体实现方法如下: using System; using System.DirectoryServices; using System.Collections; namespace IISManagement { /// <summary> /// IISManager 的摘要说明. /// </summary> public class IISManager { //定义需要使用的 private string _
-
C#实现创建,删除,查找,配置虚拟目录实例详解
本文实例讲述了C#实现创建,删除,查找,配置虚拟目录的方法.分享给大家供大家参考.具体如下: #region<<虚拟目录>> /// <summary> /// 创建虚拟目录 /// </summary> /// <param >虚拟目录别名</param> /// <param >内容所在路径</param> public static bool CreateVirtualDirectory(string w
-
C#操作IIS方法集合
C# 操作IIS方法集合 如果在win8,win7情况下报错:未知错误(0x80005000) ----见http://www.jb51.net/article/72881.htm using System; using System.Collections; using System.Collections.Generic; using System.DirectoryServices; using System.Linq; using System.Net; using System.Tex
-

C#操作IIS程序池及站点的创建配置实现代码
首先要对Microsoft.Web.Administration进行引用,它主要是用来操作IIS7: using System.DirectoryServices;using Microsoft.Web.Administration; 1:首先是对本版IIS的版本进行配置: 复制代码 代码如下: DirectoryEntry getEntity = new DirectoryEntry("IIS://localhost/W3SVC/INFO"); string V
-
.Net中如何操作IIS的虚拟目录原理分析及实现方案
.Net中实际上已经为我们在这方面做得很好了.FCL中提供了不少的类来帮助我们完成这项工作,让我们的开发工作变非常简单和快乐.编程控制IIS实际上很简单,和ASP一样,.Net中需要使用ADSI来操作IIS,但是此时我们不再需要GetObject这个东东了,因为Net为我们提供了更加强大功能的新东东. System.DirectoryServices命名空间中包括了些强大的东东--DirectoryEntry, DirectoryEntries,它们为我们提供了访问活动目录的强大功能,在这些类允
-
c# 在windows中操作IIS设置FTP服务器的示例
什么是FTP FTP(File Transfer Protocol)是TCP/IP网络上两台计算机传送文件的协议,使得主机间可以共享文件.可以将 Internet 信息服务 (IIS) 配置为作为 FTP 服务器来运行. 这样,其他计算机便可以连接到服务器并将文件复制到服务器或者从服务器复制文件. 例如,如果您在自己的计算机上承载网站,并且希望允许远程用户连接到您的计算机并将他们的文件复制到服务器,则可以将 IIS 配置为充当 FTP 服务器. 主要实现方式 下面主要讲解一下,在Window的I
-
让IIS建立的站点默认是.net 2.0的,而不是.net 1.1的代码
'/*========================================================================= ' * Intro 让IIS建立的站点默认是.net 2.0的,而不是.net 1.1的,没有使用WMI,所以在操作前先得停止IIS相关服务 ' * FileName ChangeMetaBaseScriptMaps.vbs ' * Author yongfa365 ' * Version
-
使用jquery datatable和bootsrap创建表格实例代码
使用jquery-datatable插件 bootstrap前端框架 json 一.创建demo.html 代码块 代码块语法遵循标准markdown代码,例如: <%@ page language="java" import="java.util.*" pageEncoding="UTF-8"%> <%@ taglib uri="http://java.sun.com/jsp/jstl/core" pref
-
Python中操作各种多媒体,视频、音频到图片的代码详解
我们经常会遇到一些对于多媒体文件修改的操作,像是对视频文件的操作:视频剪辑.字幕编辑.分离音频.视频音频混流等.又比如对音频文件的操作:音频剪辑,音频格式转换.再比如我们最常用的图片文件,格式转换.各个属性的编辑等.因为多媒体文件的操作众多,本文选取一些极具代表性的操作,以代码的形式实现各个操作. 一.图片操作 操作图片的模块有许多,其中比较常用的两个就是 Pillow 和 opencv ,两个模块各有优势.其中 opencv 是计算机视觉处理的开源模块,应用的范围更加广泛,从图像处理到视频处理
-
在Idea2020.1中使用gitee2020.1.0创建第一个代码库的实现
以前一直做C#项目,最近一个项目得用JAVA,记录下自己遇到的坑,给大家趟趟路. 这里只介绍重点的地方,其他地方大家网上找文档,太多了,不想一一抄过来. 一.学习目标:编写代码+连接数据库+使用码云Gitee (1)安装IDEA2020.1,编制HELLO程序 这个网上资料多,基本没啥问题,对应操作即可. (2)连接SQLSERVER数据库 在使用的mybatis,这里遇到2个坑:一个是需要在创建项目的时候,引入mybatis和sqlserver的包,不然没法用,使得我重新建了一个项目:另一个就
-
Python服务器创建虚拟环境跑代码
目录 一.前言 二.创建虚拟环境用来跑代码 一.前言 最近忙着在服务器上跑代码 学习积累了一些经验技巧 这里用来记录分享给大家 二.创建虚拟环境用来跑代码 下面我会以一个实例为模板,学习完之后,再删掉 不会占用大家的服务器 1.连接上服务器 比如我的连接方式为:ssh -p 你的编号 username-host 2.创建虚拟环境 这里我以一篇代码为例 创建虚拟环境 conda create -n KDDocRE python==3.7.4 3.进入虚拟环境 conda activate KDDo