C# Winform调用百度接口实现人脸识别教程(附源码)
百度是个好东西,这篇调用了百度的接口(当然大牛也可以自己写),人脸检测技术,所以使用的前提是有网的情况下。当然大家也可以去参考百度的文档。

话不多说,我们开始:
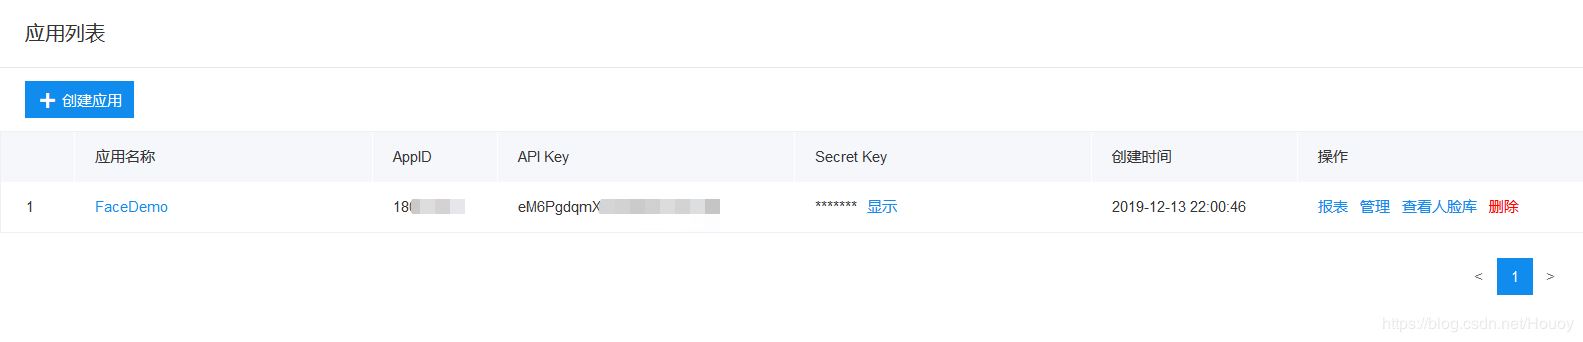
第一步,在百度创建你的人脸识别应用
打开百度AI开放平台链接: 点击跳转百度人脸检测链接,创建新应用

创建成功成功之后。进行第二步
第二步,使用API Key和Secret Key,获取 AssetToken
平台会分配给你相关凭证,拿到API Key和Secret Key,获取 AssetToken
接下来我们创建一个AccessToken类,来获取我们的AccessToken
using System;
using System.Collections.Generic;
using System.Linq;
using System.Net.Http;
using System.Text;
using System.Threading.Tasks;

namespace AegeanHotel_management_system
{
  class AccessToken
  {
    // 调用getAccessToken()获取的 access_token建议根据expires_in 时间 设置缓存
    // 返回token示例
    public static string TOKEN = "24.ddb44b9a5e904f9201ffc1999daa7670.2592000.1578837249.282335-18002137";

    // 百度云中开通对应服务应用的 API Key 建议开通应用的时候多选服务
    private static string clientId = "这里是你的API Key";
    // 百度云中开通对应服务应用的 Secret Key
    private static string clientSecret = "这里是你的Secret Key";

    public static string getAccessToken()
    {
      string authHost = "https://aip.baidubce.com/oauth/2.0/token";
      HttpClient client = new HttpClient();
      List<KeyValuePair<String, String>> paraList = new List<KeyValuePair<string, string>>();
      paraList.Add(new KeyValuePair<string, string>("grant_type", "client_credentials"));
      paraList.Add(new KeyValuePair<string, string>("client_id", clientId));
      paraList.Add(new KeyValuePair<string, string>("client_secret", clientSecret));

      HttpResponseMessage response = client.PostAsync(authHost, new FormUrlEncodedContent(paraList)).Result;
      string result = response.Content.ReadAsStringAsync().Result;
      return result;
    }
  }
}
第三步,封装图片信息类Face,保存图像信息
封装图片信息类Face,保存拍到的图片信息,保存到百度云端中,用于以后扫描秒人脸做对比。
using Newtonsoft.Json;
using System;
using System.Collections.Generic;
using System.Linq;
using System.Text;
using System.Threading.Tasks;

namespace AegeanHotel_management_system
{
  [Serializable]
  class Face
  {
    [JsonProperty(PropertyName = "image")]
    public string Image { get; set; }
    [JsonProperty(PropertyName = "image_type")]
    public string ImageType { get; set; }
    [JsonProperty(PropertyName = "group_id_list")]
    public string GroupIdList { get; set; }
    [JsonProperty(PropertyName = "quality_control")]
    public string QualityControl { get; set; } = "NONE";
    [JsonProperty(PropertyName = "liveness_control")]
    public string LivenessControl { get; set; } = "NONE";
    [JsonProperty(PropertyName = "user_id")]
    public string UserId { get; set; }
    [JsonProperty(PropertyName = "max_user_num")]
    public int MaxUserNum { get; set; } = 1;
  }
}
第四步,定义人脸注册和搜索类FaceOperate
定义人脸注册和搜索类FaceOperate,里面定义两个方法分别为,注册人脸方法和搜索人脸方法。
using Newtonsoft.Json;
using System;
using System.Collections.Generic;
using System.IO;
using System.Linq;
using System.Net;
using System.Text;
using System.Threading.Tasks;

namespace AegeanHotel_management_system
{
  class FaceOperate : IDisposable
  {
    public string token { get; set; }
    /// <summary>
    /// 注册人脸
    /// </summary>
    /// <param name="face"></param>
    /// <returns></returns>
    public FaceMsg Add(FaceInfo face)
    {
      string host = "https://aip.baidubce.com/rest/2.0/face/v3/faceset/user/add?access_token=" + token;
      Encoding encoding = Encoding.Default;
      HttpWebRequest request = (HttpWebRequest)WebRequest.Create(host);
      request.Method = "post";
      request.KeepAlive = true;
      String str = JsonConvert.SerializeObject(face);
      byte[] buffer = encoding.GetBytes(str);
      request.ContentLength = buffer.Length;
      request.GetRequestStream().Write(buffer, 0, buffer.Length);
      HttpWebResponse response = (HttpWebResponse)request.GetResponse();
      StreamReader reader = new StreamReader(response.GetResponseStream(), Encoding.Default);
      string result = reader.ReadToEnd();
      FaceMsg msg = JsonConvert.DeserializeObject<FaceMsg>(result);
      return msg;
    }
    /// <summary>
    /// 搜索人脸
    /// </summary>
    /// <param name="face"></param>
    /// <returns></returns>
    public MatchMsg FaceSearch(Face face)
    {
      string host = "https://aip.baidubce.com/rest/2.0/face/v3/search?access_token=" + token;
      Encoding encoding = Encoding.Default;
      HttpWebRequest request = (HttpWebRequest)WebRequest.Create(host);
      request.Method = "post";
      request.KeepAlive = true;
      String str = JsonConvert.SerializeObject(face); ;
      byte[] buffer = encoding.GetBytes(str);
      request.ContentLength = buffer.Length;
      request.GetRequestStream().Write(buffer, 0, buffer.Length);
      HttpWebResponse response = (HttpWebResponse)request.GetResponse();
      StreamReader reader = new StreamReader(response.GetResponseStream(), Encoding.Default);
      string result = reader.ReadToEnd();
      MatchMsg msg = JsonConvert.DeserializeObject<MatchMsg>(result);
      return msg;
    }
    public void Dispose()
    {

    }
  }
}
在把类定义完成之后,我们就可以绘制我们的摄像头了videoSourcePlayer
第五步,绘制videoSourcePlayer控件,对人脸进行拍摄
现在我们是没有这个控件的,所以我们要先导包,点击我们的工具选项卡,选择NuGet包管理器,管理解决方案的NuGet程序包,安装一下的包:
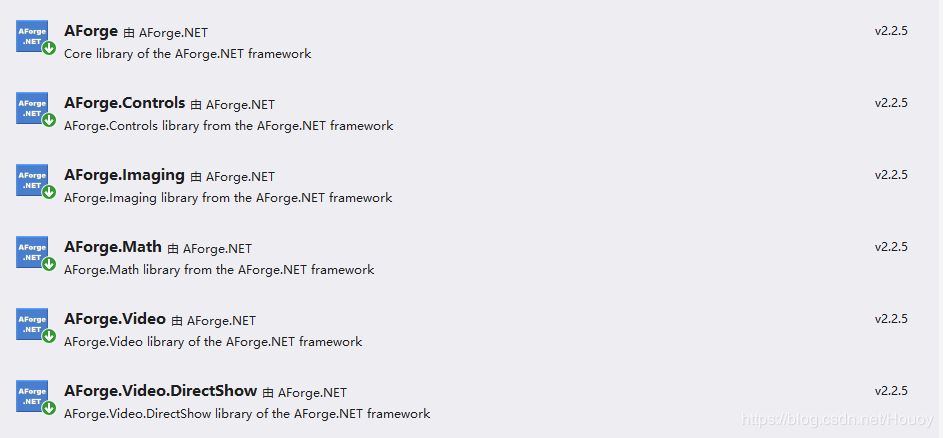
然后我们就能看到videoSourcePlayer控件,把它绘制在窗体上就好了。

第五步,调用摄像头拍摄注册人脸
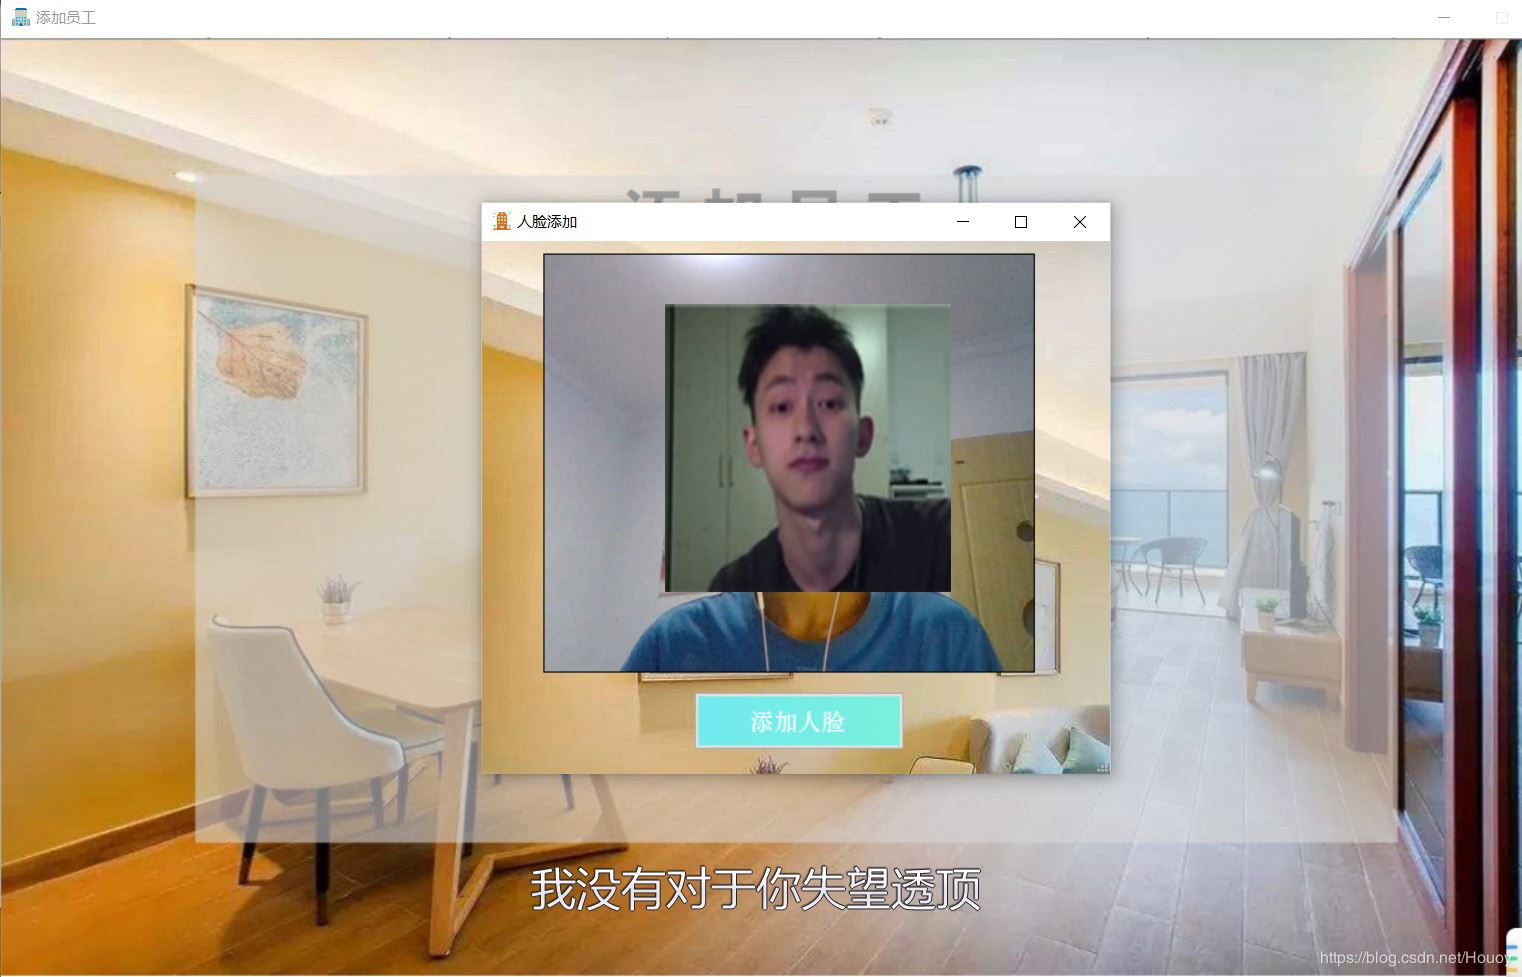
然后我们就可以写控制摄像头的语句以及拍摄之后注册处理的方法了:
using AForge.Video.DirectShow;
using Newtonsoft.Json;
using System;
using System.Collections.Generic;
using System.ComponentModel;
using System.Data;
using System.Drawing;
using System.Linq;
using System.Text;
using System.Threading.Tasks;
using System.Windows.Forms;

namespace AegeanHotel_management_system
{
  public partial class FrmFacePeople : Form
  {
    string tocken = "";
    public FrmFacePeople()
    {
      InitializeComponent();
      Tocken tk = JsonConvert.DeserializeObject<Tocken>(AccessToken.getAccessToken());
      this.tocken = tk.AccessToken;
    }

    private FilterInfoCollection videoDevices;
    private VideoCaptureDevice videoDevice;
    private void FrmFacePeople_Load(object sender, EventArgs e)
    {
      //获取摄像头
      videoDevices = new FilterInfoCollection(FilterCategory.VideoInputDevice);
      //实例化摄像头
      videoDevice = new VideoCaptureDevice(videoDevices[0].MonikerString);
      //将摄像头视频播放在控件中
      videoSourcePlayer1.VideoSource = videoDevice;
      //开启摄像头
      videoSourcePlayer1.Start();
    }

    private void FrmFacePeople_FormClosing(object sender, FormClosingEventArgs e)
    {
      videoSourcePlayer1.Stop();
    }

    private void button1_Click(object sender, EventArgs e)
    {
      //拍照
      Bitmap img = videoSourcePlayer1.GetCurrentVideoFrame();
      //图片转Base64
      string imagStr = ImagHelper.ImgToBase64String(img);
      //实例化FaceInfo对象
      FaceInfo faceInfo = new FaceInfo();
      faceInfo.Image = imagStr;
      faceInfo.ImageType = "BASE64";
      faceInfo.GroupId = "admin";
      faceInfo.UserId = Guid.NewGuid().ToString().Replace('-', '_');//生成一个随机的UserId 可以固定为用户的主键
      faceInfo.UserInfo = "";
      using (FaceOperate faceOperate = new FaceOperate())
      {
        faceOperate.token = tocken;
        //调用注册方法注册人脸
        var msg = faceOperate.Add(faceInfo);
        if (msg.ErroCode == 0)
        {
          MessageBox.Show("添加成功");
          //关闭摄像头
          videoSourcePlayer1.Stop();
        }
      }
    }
  }
}
我们在添加人脸之后可以到百度只能云的人脸库中查看一下添加是否成功。

如果添加成功,那么恭喜,我们就可以进行人脸识别了。
第六步,拍摄之后对比查询人脸识别
然后我们就可以写控制摄像头的语句以及拍摄之后搜索处理的方法了:
using AForge.Video.DirectShow;
using Newtonsoft.Json;
using System;
using System.Collections.Generic;
using System.ComponentModel;
using System.Data;
using System.Drawing;
using System.Linq;
using System.Text;
using System.Threading.Tasks;
using System.Windows.Forms;

namespace AegeanHotel_management_system
{
  public partial class FrmFaceDemo : Form
  {
    string tocken = "";
    FrmLogin login;
    public FrmFaceDemo(FrmLogin login)
    {

      this.login = login;
      InitializeComponent();
      //获取Token并反序列化
      Tocken tk = JsonConvert.DeserializeObject<Tocken>(AccessToken.getAccessToken());
      this.tocken = tk.AccessToken;
    }

    private FilterInfoCollection videoDevices;
    private VideoCaptureDevice videoDevice;

    private void FrmFaceDemo_Load(object sender, EventArgs e)
    {
      videoDevices = new FilterInfoCollection(FilterCategory.VideoInputDevice);
      videoDevice = new VideoCaptureDevice(videoDevices[0].MonikerString);
      videoSourcePlayer1.VideoSource = videoDevice;
      //开启摄像头
      videoSourcePlayer1.Start();
    }
    private void NewMethod()
    {
      //获取图片 拍照
      Bitmap img = videoSourcePlayer1.GetCurrentVideoFrame();
      //关闭相机
      videoSourcePlayer1.Stop();
      //图片转Base64
      string imagStr = ImagHelper.ImgToBase64String(img);
      Face faceInfo = new Face();
      faceInfo.Image = imagStr;
      faceInfo.ImageType = "BASE64";
      faceInfo.GroupIdList = "admin";
      this.Hide();
      using (FaceOperate faceOperate = new FaceOperate())
      {
        try
        {
          faceOperate.token = tocken;
          //调用查找方法
          var msg = faceOperate.FaceSearch(faceInfo);

          foreach (var item in msg.Result.UserList)
          {
            //置信度大于90 认为是本人
            if (item.Score > 90)
            {
              DialogResult dialog = MessageBox.Show("登陆成功", "系统提示", MessageBoxButtons.OK, MessageBoxIcon.Information);
              //this.label1.Text = item.UserId;
              if (dialog == DialogResult.OK)
              {
                FrmShouYe shouye = new FrmShouYe();
                shouye.Show();
                login.Hide();
                this.Close();

              }
              return;
            }
            else
            {
              DialogResult dialog = MessageBox.Show("人员不存在", "系统提示", MessageBoxButtons.OK, MessageBoxIcon.Information);
              if (dialog == DialogResult.OK)
              {
                this.Close();
              }
            }
          }
        }
        catch (Exception e)
        {
          DialogResult dialog = MessageBox.Show("人员不存在,错误提示"+e, "系统提示", MessageBoxButtons.OK, MessageBoxIcon.Information);
          if (dialog == DialogResult.OK)
          {
            this.Close();
          }
        }

      }
    }

    private void videoSourcePlayer1_Click(object sender, EventArgs e)
    {
      NewMethod();
    }
  }
}
写到这我们就结束了,人脸识别的注册和搜索功能就已经都实现完毕了,接下来我们还可以在百度智能云的监控报报表中查看调用次数
查看监控报表

到此这篇关于C# Winform调用百度接口实现人脸识别教程(附源码)的文章就介绍到这了,更多相关C# 百度接口人脸识别内容请搜索我们以前的文章或继续浏览下面的相关文章希望大家以后多多支持我们!
相关推荐
-
C#实现基于ffmpeg加虹软的人脸识别的示例
关于人脸识别 目前的人脸识别已经相对成熟,有各种收费免费的商业方案和开源方案,其中OpenCV很早就支持了人脸识别,在我选择人脸识别开发库时,也横向对比了三种库,包括在线识别的百度.开源的OpenCV和商业库虹软(中小型规模免费). 百度的人脸识别,才上线不久,文档不太完善,之前联系百度,官方也给了我基于Android的Example,但是不太符合我的需求,一是照片需要上传至百度服务器(这个是最大的问题),其次,人脸的定位需要自行去实现(捕获到人脸后上传进行识别). OpenCV很早以前就用过,
-
C# 10分钟完成百度人脸识别(入门篇)
嗨咯,小编在此祝大家新年快乐财多多! 今天我们来盘一盘人脸注册.人脸识别等相关操作,这是一个简单入门教程. 话不多说,我们进入主题: 完成人脸识别所需的步骤: 注册百度账号api,创建自己的应用: 创建vs控制台应用程序,引入动态链接库: 编写代码调试,效果图查看: 总结. 1.注册百度账号api,创建自己的应用 注册地址: https://login.bce.baidu.com/ 注册登录之后,在"产品服务" 菜单下找到人脸识别 ,如下图: 点击去创建自己的应用名称,其实最主要的就是
-
C# Winform调用百度接口实现人脸识别教程(附源码)
百度是个好东西,这篇调用了百度的接口(当然大牛也可以自己写),人脸检测技术,所以使用的前提是有网的情况下.当然大家也可以去参考百度的文档. 话不多说,我们开始: 第一步,在百度创建你的人脸识别应用 打开百度AI开放平台链接: 点击跳转百度人脸检测链接,创建新应用 创建成功成功之后.进行第二步 第二步,使用API Key和Secret Key,获取 AssetToken 平台会分配给你相关凭证,拿到API Key和Secret Key,获取 AssetToken 接下来我们创建一个AccessTo
-

使用Python实现简单的人脸识别功能(附源码)
目录 前言 一.首先 二.接下来 1.对照人脸获取 2. 通过算法建立对照模型 3.识别 前言 今天,我们用Python实现简单的人脸识别技术! Python里,简单的人脸识别有很多种方法可以实现,依赖于python胶水语言的特性,我们通过调用包可以快速准确的达成这一目的.这里介绍的是准确性比较高的一种. 一.首先 梳理一下实现人脸识别需要进行的步骤: 流程大致如此,在此之前,要先让人脸被准确的找出来,也就是能准确区分人脸的分类器,在这里我们可以用已经训练好的分类器,网上种类较全,分类准确度也比
-
python调用百度API实现人脸识别
1.代码 from aip import AipFace import cv2 import time import base64 from PIL import Image from io import BytesIO import pyttsx3 # """ 你的 APPID AK SK """ APP_ID = '1965####' API_KEY = 'YXL65ekIloykyjrT4kzc####' SECRET_KEY = 'lFi
-
WinForm调用百度地图接口用法示例
本文实例讲述了WinForm调用百度地图接口用法.分享给大家供大家参考,具体如下: 1.首先用一个html文件调用百度地图接口(主要注册一个序列号): <!DOCTYPE html PUBLIC "-//W3C//DTD XHTML 1.0 Transitional//EN" "http://www.w3.org/TR/xhtml1/DTD/xhtml1-transitional.dtd"> <html xmlns="http://www
-
SpringBoot集成百度AI实现人脸识别的项目实践
目录 1. 百度AI开放平台 2. 文档集成 3. 代码实现 3.1 创建SpringBoot工程 3.2 添加百度AI依赖 3.3 创建AipFace 3.4 注册人脸接口 3.5 人脸登录接口 3.6 页面 3.7 测试结果 1. 百度AI开放平台 选择百度AI当然就要去创建对于的账号,同时创建应用信息. 进入百度AI官网,然后在开放能力Tab里面选择人脸与人体,按图中所示操作吧. 该登录就登录吧,百度账号. 对于新用户来说,可以选择免费尝鲜,要不然得充值,练手的话,这个就够了,反正各种免费
-
Python调用百度AI实现身份证识别
目录 一.安装baidu-aip模块 二.获取百度AI接口密钥 三.调用百度接口识别身份证 一.安装baidu-aip模块 按win+R打开cmd,在里面输入 pip3 install baidu-aip 若出现如下界面,即成功安装了baidu-aip模块: 如果想快速了解识别营业执照代码原理,可以跳过第二部分,先看第三部分的内容. 二.获取百度AI接口密钥 在应用python识别身份证的过程中,有三行代码使用了百度AI接口密钥,故先阐述如何获得该密钥.首先,进入如下百度AI官方网站:https
-
JavaCV调用百度AI实现人脸检测方法详解
目录 本篇概览 注册百度账号 登录百度智能云 实名认证 创建应用 拿到API Key和Secret Key 编码 使用限制 本篇概览 在检测人脸数量.位置.性别.口罩等场景时,可以考虑使用百度开放平台提供的web接口,一个web请求就能完成检测得到结果,本篇记录了从申请到真实调用的完整过程,由以下步骤组成: 注册百度账号 按照您的实际情况,注册个人或者企业账号,这个不多说了 登录百度智能云 使用刚才注册号的账号登录,地址是:https://login.bce.baidu.com/ 实名认证 打开
-
10分钟学会使用python实现人脸识别(附源码)
前言 今天,我们用Python实现简单的人脸识别技术! Python里,简单的人脸识别有很多种方法可以实现,依赖于python胶水语言的特性,我们通过调用包可以快速准确的达成这一目的.这里介绍的是准确性比较高的一种. 一.首先 梳理一下实现人脸识别需要进行的步骤: 流程大致如此,在此之前,要先让人脸被准确的找出来,也就是能准确区分人脸的分类器,在这里我们可以用已经训练好的分类器,网上种类较全,分类准确度也比较高,我们也可以节约在这方面花的时间. 既然用的是python,那自然少不了包的使用了,在
-
基于opencv和pillow实现人脸识别系统(附demo)
目录 一.人脸检测和数据收集 二.训练识别器 三.人脸识别和显示 本文不涉及分类器.训练识别器等算法原理,仅包含对其应用(未来我也会写自己对机器学习算法原理的一些观点和了解) 首先我们需要知道的是利用现有框架做一个人脸识别系统并不难,然后就开始我们的系统开发吧. 我们的系统主要分为三个部分,然后我还会提出对补获图片不能添加中文的解决方案.我们需要完成的任务:1.人脸检测和数据收集2.训练识别器3.人脸识别和显示 在读此篇文章之前我相信你已经做了python环境部署和opencv模块的下载安装工作
-
Python接口自动化之request请求封装源码分析
目录 1. 源码分析 2. requests请求封装 3. 总结 前言: 我们在做自动化测试的时候,大家都是希望自己写的代码越简洁越好,代码重复量越少越好.那么,我们可以考虑将request的请求类型(如:Get.Post.Delect请求)都封装起来.这样,我们在编写用例的时候就可以直接进行请求了. 1. 源码分析 我们先来看一下Get.Post.Delect等请求的源码,看一下它们都有什么特点. (1)Get请求源码 def get(self, url, **kwargs): r""