spring boot实现自动输出word文档功能的实例代码
spring boot实现自动输出word文档功能
本文用到Apache POI组件
组件依赖在pom.xml文件中添加
<dependency>
            <groupId>org.apache.poi</groupId>
            <artifactId>poi</artifactId>
            <version>4.1.0</version>
        </dependency>
        <dependency>
            <groupId>org.apache.poi</groupId>
            <artifactId>poi-ooxml</artifactId>
            <version>4.1.0</version>
        </dependency>
首先创建相关的实体类、编写需要用到的sql查询。
import lombok.Data;

// 选择题实体
@Data
public class MultiQuestion {
    private Integer questionId;

    private String subject;

    private String section;

    private String answerA;

    private String answerB;

    private String answerC;

    private String answerD;

    private String question;

    private String level;

    private String rightAnswer;

    private String analysis; //题目解析

    private Integer score;
 }
import lombok.Data;

//填空题实体类
@Data
public class FillQuestion {
    private Integer questionId;

    private String subject;

    private String question;

    private String answer;

    private Integer score;

    private String level;

    private String section;

    private String analysis; //题目解析
 }
import lombok.Data;

//判断题实体类
@Data
public class JudgeQuestion {
    private Integer questionId;

    private String subject;

    private String question;

    private String answer;

    private String level;

    private String section;

    private Integer score;

    private String analysis; //题目解析
}
创建好要用到的实体类之后,利用mybatis写sql查询,可以分为两种:1、配置mapper.xml文件路径,在xml文件中编写sql语句。2、直接使用注解。本文使用方法为第二种。
@Mapper
public interface MultiQuestionMapper {
    /**
     * select * from multiquestions where questionId in (
     * 	select questionId from papermanage where questionType = 1 and paperId = 1001
     * )
     */
    @Select("select * from multi_question where questionId in (select questionId from paper_manage where questionType = 1 and paperId = #{paperId})")
    List<MultiQuestion> findByIdAndType(Integer PaperId);

    @Select("select * from multi_question")
    IPage<MultiQuestion> findAll(Page page);

    /**
     * 查询最后一条记录的questionId
     * @return MultiQuestion
     */
    @Select("select questionId from multi_question order by questionId desc limit 1")
    MultiQuestion findOnlyQuestionId();

    @Options(useGeneratedKeys = true,keyProperty = "questionId")
    @Insert("insert into multi_question(subject,question,answerA,answerB,answerC,answerD,rightAnswer,analysis,section,level) " +
            "values(#{subject},#{question},#{answerA},#{answerB},#{answerC},#{answerD},#{rightAnswer},#{analysis},#{section},#{level})")
    int add(MultiQuestion multiQuestion);

    @Select("select questionId from multi_question  where subject =#{subject} order by rand() desc limit #{pageNo}")
    List<Integer> findBySubject(String subject,Integer pageNo);

}
//填空题
@Mapper
public interface FillQuestionMapper {

    @Select("select * from fill_question where questionId in (select questionId from paper_manage where questionType = 2 and paperId = #{paperId})")
    List<FillQuestion> findByIdAndType(Integer paperId);

    @Select("select * from fill_question")
    IPage<FillQuestion> findAll(Page page);

    /**
     * 查询最后一条questionId
     * @return FillQuestion
     */
    @Select("select questionId from fill_question order by questionId desc limit 1")
    FillQuestion findOnlyQuestionId();

    @Options(useGeneratedKeys = true,keyProperty ="questionId" )
    @Insert("insert into fill_question(subject,question,answer,analysis,level,section) values " +
            "(#{subject,},#{question},#{answer},#{analysis},#{level},#{section})")
    int add(FillQuestion fillQuestion);

    @Select("select questionId from fill_question where subject = #{subject} order by rand() desc limit #{pageNo}")
    List<Integer> findBySubject(String subject,Integer pageNo);
}
//判断题

@Mapper
public interface JudgeQuestionMapper {

    @Select("select * from judge_question where questionId in (select questionId from paper_manage where questionType = 3 and paperId = #{paperId})")
    List<JudgeQuestion> findByIdAndType(Integer paperId);

    @Select("select * from judge_question")
    IPage<JudgeQuestion> findAll(Page page);

    /**
     * 查询最后一条记录的questionId
     * @return JudgeQuestion
     */
    @Select("select questionId from judge_question order by questionId desc limit 1")
    JudgeQuestion findOnlyQuestionId();

    @Insert("insert into judge_question(subject,question,answer,analysis,level,section) values " +
            "(#{subject},#{question},#{answer},#{analysis},#{level},#{section})")
    int add(JudgeQuestion judgeQuestion);

    @Select("select questionId from judge_question  where subject=#{subject}  order by rand() desc limit #{pageNo}")
    List<Integer> findBySubject(String subject,Integer pageNo);
}
写好mapper底层查询后,需要创建service及其实现类来调用mapper底层。例如:
public interface JudgeQuestionService {

    List<JudgeQuestion> findByIdAndType(Integer paperId);

    IPage<JudgeQuestion> findAll(Page<JudgeQuestion> page);

    JudgeQuestion findOnlyQuestionId();

    int add(JudgeQuestion judgeQuestion);

    List<Integer> findBySubject(String subject,Integer pageNo);
}
@Service
public class JudgeQuestionServiceImpl implements JudgeQuestionService {

    @Autowired
    private JudgeQuestionMapper judgeQuestionMapper;

    @Override
    public List<JudgeQuestion> findByIdAndType(Integer paperId) {
        return judgeQuestionMapper.findByIdAndType(paperId);
    }

    @Override
    public IPage<JudgeQuestion> findAll(Page<JudgeQuestion> page) {
        return judgeQuestionMapper.findAll(page);
    }

    @Override
    public JudgeQuestion findOnlyQuestionId() {
        return judgeQuestionMapper.findOnlyQuestionId();
    }

    @Override
    public int add(JudgeQuestion judgeQuestion) {
        return judgeQuestionMapper.add(judgeQuestion);
    }

    @Override
    public List<Integer> findBySubject(String subject, Integer pageNo) {
        return judgeQuestionMapper.findBySubject(subject,pageNo);
    }
}
最后将输出文件方法写在controller层:
@RequestMapping("/exam/exportWord")
    public void exportWord(int examCode, HttpServletResponse response) throws FileNotFoundException{
    //由于题目应于考试信息对应 所以需要先查出考试信息后根据pageId来查找对应的组卷信息
        ExamManage res = examManageService.findById(examCode);
        int paperId = res.getPaperId();
        List<MultiQuestion> multiQuestionRes = multiQuestionService.findByIdAndType(paperId);   //选择题题库 1
        List<FillQuestion> fillQuestionsRes = fillQuestionService.findByIdAndType(paperId);     //填空题题库 2
        List<JudgeQuestion> judgeQuestionRes = judgeQuestionService.findByIdAndType(paperId);
        //响应到客户端
        XWPFDocument document= new XWPFDocument();
        //分页
        XWPFParagraph firstParagraph = document.createParagraph();
        //格式化段落
        firstParagraph.getStyleID();
        XWPFRun run = firstParagraph.createRun();
        int i = 1;
        run.setText("一、选择题" + "\r\n"); //换行
        for (MultiQuestion multiQuestion : multiQuestionRes) {
            String str = multiQuestion.getQuestion();
            String str1 = multiQuestion.getAnswerA();
            String str2 = multiQuestion.getAnswerB();
            String str3 = multiQuestion.getAnswerC();
            String str4 = multiQuestion.getAnswerD();
            run.setText(i + ". " + str + "\r\n");
            run.setText("A. " + str1 + "\r\n");
            run.setText("B. " + str2 + "\r\n");
            run.setText("C. " + str3 + "\r\n");
            run.setText("D. " + str4 + "\r\n");
            i++;
        }
        run.setText("二、填空题" + "\r\n");
        for (FillQuestion fillQuestion : fillQuestionsRes) {
            String str = fillQuestion.getQuestion();
            run.setText(i + ". " + str + "\r\n");
            i++;
        }
        run.setText("三、判断题" + "\r\n");
        for (JudgeQuestion judgeQuestion : judgeQuestionRes) {
            String str = judgeQuestion.getQuestion();
            run.setText(i + ". " + str + "\r\n");
            i++;
        }
        document.createTOC();

        try {
            //设置相应头
            this.setResponseHeader(response, res.getSource() + "试卷.doc");
            //输出流
            OutputStream os = response.getOutputStream();
            document.write(os);
            os.flush();
            os.close();
        } catch (Exception e) {
            e.printStackTrace();
        }
    }

    /**
     * 发送响应流方法
     */
    private void setResponseHeader(HttpServletResponse response, String fileName) {
        try {
            try {
                fileName = URLEncoder.encode(fileName, "UTF-8");
            } catch (UnsupportedEncodingException e) {
                e.printStackTrace();
            }
            response.setContentType("application/octet-stream;charset=UTF-8");
            response.setHeader("Content-Disposition", "attachment;filename="+ fileName);
            //遵守缓存规定
            response.addHeader("Pargam", "no-cache");
            response.addHeader("Cache-Control", "no-cache");
        } catch (Exception ex) {
            ex.printStackTrace();
        }
    }
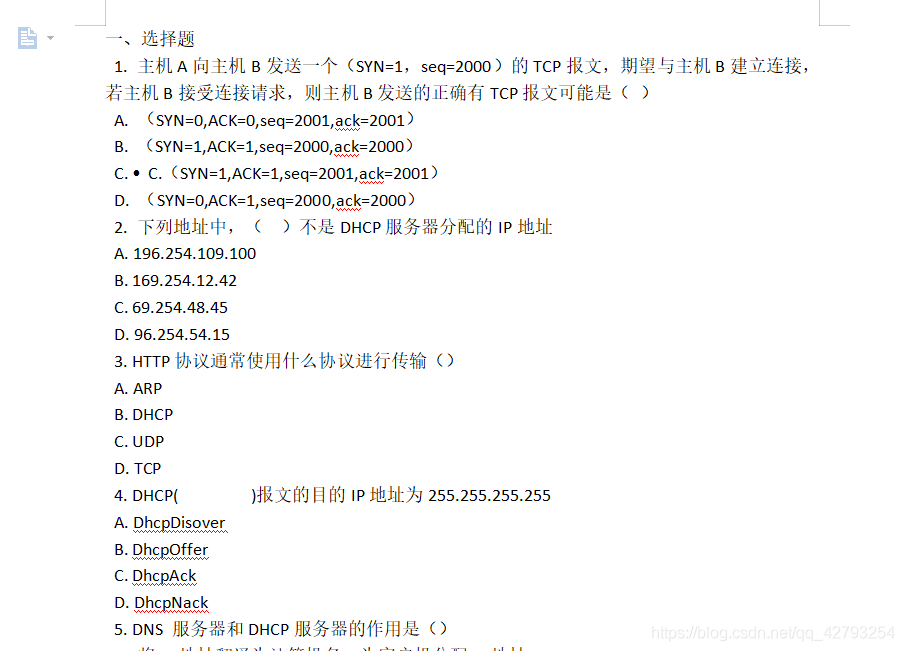
效果:

到此这篇关于spring boot实现自动输出word文档功能的文章就介绍到这了,更多相关spring boot自动输出word文档内容请搜索我们以前的文章或继续浏览下面的相关文章希望大家以后多多支持我们!
赞 (0)

