vue3使用element-plus搭建后台管理系统之菜单管理功能
菜单管理是一套系统中最常见最核心的系统管理模块之一,我把菜单管理分成了2个部分,左边可以管理维护菜单,在菜单的最右侧可以维护每个菜单按钮权限配置

使用element-plus el-tree组件快速开发树形菜单结构,el-tree组件中filter-node-method事件便可以实现树形菜单筛选过滤功能

<template>
  <div class="common-tree">
    <el-tree
      :ref="treeRef"
      :data="treeData"
      :check-strictly="checkStrictly"
      show-checkbox
      :accordion="false"
      node-key="id"
      default-expand-all
      :highlight-current="true"
      :expand-on-click-node="false"
      @node-click="nodeClick"
      :filter-node-method="filterNode"
      empty-text="暂无数据"
    >
     <template #default="{ node, data }">
        <span class="custom-tree-node">
          <span style="margin-right: 15px;">{{ data.name }}</span>
           <slot
            :data="data"
            :node="node"
          />
        </span>
      </template>
    </el-tree>
  </div>
</template>
<script>
import { ref, reactive } from 'vue'
import { returnStatement } from '@babel/types';

export default {
  name: 'CommonTree',
  props: {
    treeRef: {
      type: String,
      default: "treeRef"
    },
    treeData: {
      type: Array,
      required: true,
      default () {
        return []
      }
    },
    checkStrictly: {
      type: Boolean,
      default () {
        return true
      }
    }
  },
  setup(props, { emit }) {
    const nodeClick = (data, node, tree) => {
      emit('nodeClick', data, node, tree)
    }
    const filterNode = (value, data) => {
      if (!value) return true
      return data.label.includes(value)
    }

    return { nodeClick, filterNode }
  }
}
</script>
使用element-plus el-dialog、el-icon、el-form组件实现菜单新增编辑
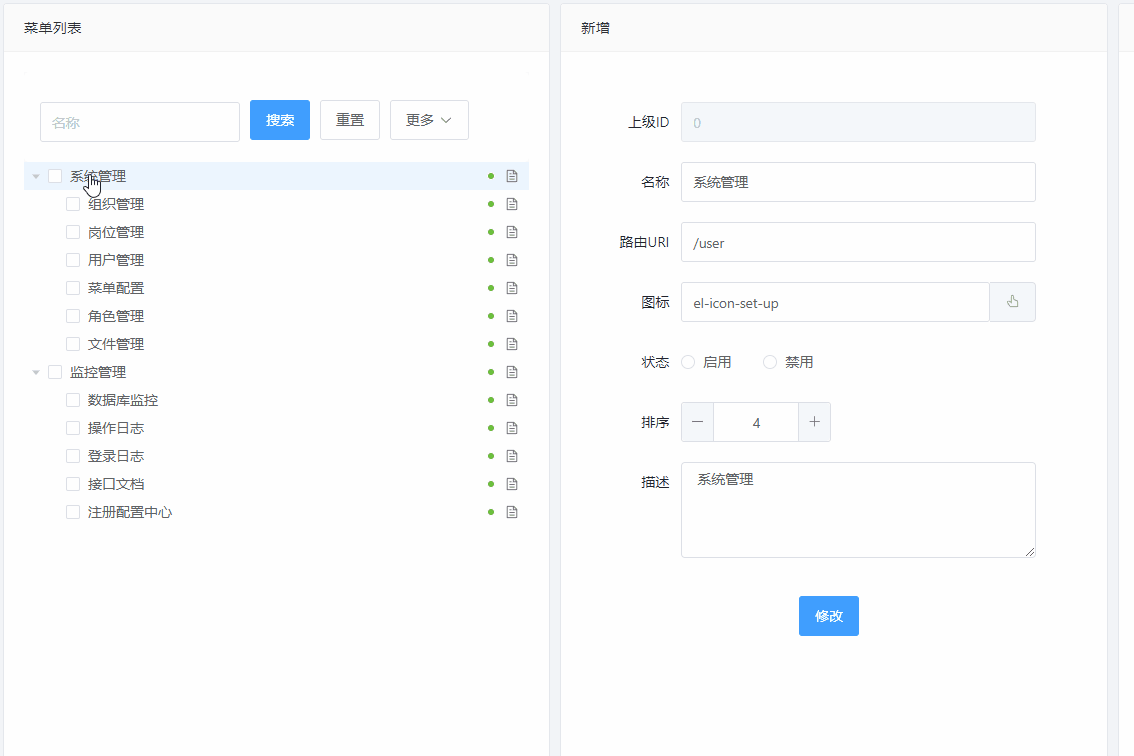
el-dialog组件实现弹窗,选择图标功能,父组件通过v-model绑定变量,子组件通过emit('update语法糖实现父子组件属性快速传递
子组件代码:
<template>
  <el-dialog width="800px" v-model="visible" title="图标" :before-close="handleClose" >
    <ul class="iconUl">
      <li v-for="icon in iconList" :key="icon">
        <span :class="{'active':choosedIcon === icon}"
          @click="chooseIcon(icon)"
          @dblclick="confirm(icon)"
        >
            <el-icon style="width:48px;height: 48px;"><component class="icon" :is="icon" /></el-icon>
        </span>
        <p>{{ icon }}</p>
      </li>
    </ul>
    <template #footer>
      <span class="dialog-footer">
        <el-button type="primary" @click="confirm(choosedIcon)">确认</el-button>
        <el-button @click="this.$emit('update:visible', false)">取消</el-button>
      </span>
    </template>
  </el-dialog>
</template>
<script>
import { ref, reactive } from 'vue'
import * as IconsModule from '@element-plus/icons-vue'

export default {
  name: 'Icons',
  props: {
    visible: {
      type: Boolean,
      default: false
    }
  },
  setup(props, { emit }) {
    const iconList = ref([])
    const choosedIcon = ref(null)

    for (var key in IconsModule) {
      iconList.value.push(IconsModule[key].name)
    }
    const chooseIcon = (icon) => {
      choosedIcon.value = icon
    }
    const confirm = (icon) => {
      emit('update:icon', icon)
      emit('update:visible', false)
    }
    const handleClose = (done) => {
      emit('update:visible', false)
    }
    return { iconList, choosedIcon, chooseIcon, confirm, handleClose }
  }
}
父组件代码:
<icons v-model:visible="dialogIconVisible" v-model:icon="menu.icon" />
使用element-plus el-table组件实现菜单按钮权限配置

菜单按钮权限配置表格部分代码:
 <el-table
  ref="resourceTableKey"
  :data="resource.tableData.records"
  stripe
  empty-text="暂无数据"
  :header-cell-style="{background:'#FCFBFF',border:'0'}"
  style="width: 100%"
  @selection-change="resourceSelectChange"
>
  <el-table-column type="selection" width="40" />
  <el-table-column label="编码" width="80" show-overflow-tooltip>
    <template #default="scope">{{ scope.row.code }}</template>
  </el-table-column>
  <el-table-column label="名称" width="80" show-overflow-tooltip>
    <template #default="scope">{{ scope.row.name }}</template>
  </el-table-column>
  <el-table-column label="请求方式" width="80" show-overflow-tooltip>
    <template #default="scope">{{ scope.row.method }}</template>
  </el-table-column>
  <el-table-column label="请求地址" width="80" show-overflow-tooltip>
    <template #default="scope">{{ scope.row.url }}</template>
  </el-table-column>
  <el-table-column label="操作" width="140">
    <template #default="scope">
      <el-button type="primary" size="small" @click="resourceEdit(scope.$index, scope.row)"
        >修改</el-button
      >
      <el-button
        type="danger"
        size="small"
        @click="resourceSingleDelete(scope.$index, scope.row)"
        >删除</el-button
      >
    </template>
  </el-table-column>
</el-table>

// ----------------------编辑菜单按钮权限配置----------------------------
<script>
const resourceTableKey = ref(null)

const resource = reactive({
  queryParams: {
    code: null,
    name: null,
    menuId: null
  },
  tableData: {
    total: 2,
    records: []
  },
  pagination: {
    size: 10,
    current: 1
  },
  formData: {},
  selection: []
})

const resourceSearch = () => {
  getResourceList().then(data => {
    resource.tableData.records = data.data
  })
}

const resourceAdd = () => {
  dialogEditVisible.value = true
  resource.formData = {}
}

const resourceEdit = (index, row) => {
  dialogEditVisible.value = true
  resource.formData = row
}

const resourceSingleDelete = (index, row) => {
  ElMessageBox.confirm('确认删除?',
  '确认删除',
  {
    confirmButtonText: '确认',
    cancelButtonText: '取消',
    confirmButtonClass: 'confirmButton',
    type: 'warning',
  })
  .then(() => {
    resource.tableData.records.splice(index, 1)
  })
  .catch(() => { })
}

const resourceSelectChange = (selection) => {
  resource.selection = selection
}

const resourceBatchDelete = () => {
  if (!resource.selection.length) {
    ElMessageBox.alert('请选择要删除项!', '提示', { confirmButtonText: '确认', type: 'warning' })
    return
  }
  ElMessageBox.confirm('确认删除?',
  '确认删除',
  {
    confirmButtonText: '确认',
    cancelButtonText: '取消',
    type: 'warning',
  })
  .then(() => {
    resource.tableData.records = resource.tableData.records.filter(function(items){
      return (resource.selection.filter(function(selectionItems){
        return selectionItems.id == items.id
      })).length == 0
    })
  })
  .catch(() => { })
}

const resourceReturn = { resourceTableKey, resource, resourceEdit, resourceAdd, resourceSingleDelete, resourceSelectChange, resourceBatchDelete }
</script>
// ----------------------编辑菜单按钮权限配置----------------------------
菜单按钮权限配置表单部分代码:
<template>
  <el-dialog width="800px" v-model="visible" title="修改" :before-close="handleClose" >
    <el-form ref="form" :model="fromData" label-position="right" label-width="100px">
      <el-form-item label="编码" prop="code">
        <el-input v-model="fromData.code" />
        <p class="note">建议使用:作为分隔符,并以view、add、update、delete、export、import、download、upload等关键词结尾</p>
        <p class="note">如:menu:add、 resource:view、 file:upload</p>
      </el-form-item>
      <el-form-item label="名称" prop="name">
        <el-input v-model="fromData.name" />
      </el-form-item>
      <el-form-item label="请求方式" prop="describe" >
        <el-input v-model="fromData.method" />
      </el-form-item>
      <el-form-item label="请求地址" prop="describe" >
        <el-input v-model="fromData.url" />
      </el-form-item>
      <el-form-item label="描述" prop="describe" >
        <el-input v-model="fromData.describe" />
      </el-form-item>
    </el-form>
    <template #footer>
      <span class="dialog-footer">
        <el-button type="primary" @click="confirm()">确认</el-button>
        <el-button @click="this.$emit('update:visible', false)" >取消</el-button>
      </span>
    </template>
  </el-dialog>
</template>
<script>
import { ref, reactive, watch } from 'vue'
import { returnStatement } from '@babel/types';

export default {
  name: 'edit',
  props: {
    visible: {
      type: Boolean,
      default: false
    },
    resource: {
      type: Object,
      default: () => ({})
    }
  },
  setup(props, { emit }) {
    const fromData = reactive({})

    watch(() => props.resource, (newResource) => {
        for (const key in fromData) {
          fromData[key] = ''
        }
        for (const key in newResource) {
          fromData[key] = newResource[key]
        }
    }, { immediate: true })

    const confirm = () => {
      for (const key in fromData) {
        props.resource[key] = fromData[key]
      }
      emit('update:visible', false)
    }
    const handleClose = (done) => {
      emit('update:visible', false)
    }

    return { confirm, handleClose, fromData }
  }
}
</script>
到此这篇关于vue3使用element-plus搭建后台管理系统---菜单管理的文章就介绍到这了,更多相关vue3 element-plus后台管理系统内容请搜索我们以前的文章或继续浏览下面的相关文章希望大家以后多多支持我们!
相关推荐
-

利用Vue3和element-plus实现图片上传组件
目录 前言 具体代码 图片上传 上传组件 前言 element-plus 提供了 uploader 组件,但是不好定制化,所以自己又造了个轮子,实现了一个图片上传的组件,它的预期行为是: 1.还没上传图片时,显示上传卡片 2.上传图片时显示进度条,隐藏上传卡片 3.上传成功时显示图片缩略图,上传失败则显示失败提示 4.支持上传图片的预览和删除 具体如下图所示: 具体代码 图片上传 这里使用的图床是牛图网,无需注册,貌似也没有图片大小的限制,但是请不要上传违规图像. <code>import a
-
Vue3中element-plus全局使用Icon图标的过程详解
目录 1.安装图标库 2.注册 3.在组件中直接使用 4.在el-menu组件中动态使用 总结 Vue项目中使用Element-plus的Icon图标,包括按钮和动态菜单 1.安装图标库 npm install @element-plus/icons 2.注册 main.ts文件中引入并注册 import { createApp } from 'vue' import App from './App.vue' import ElementPlus from 'element-plus' impo
-
vue3中element-plus icon图标的正确使用姿势
目录 前言: 改变: 错误使用: 正确使用: setup script扩展 更新 总结 前言: 为了适应vue3的更新,element组件也将其内容升级为了plus用以配套的使用,很多组件新增了更加多元的功能,但我用的时候就觉得那个icon图标,怎么变得特别难用呢?原来是没有掌握正确的使用方法 改变: // 原来 <i class="el-icon-edit"></i> // plus <el-icon :size="size" :co
-
详解Vue3怎么使用element-plus
目录 1.安装 2.在main.js引入 3.使用 vue3出来一段时间了,element也更新了版本去兼容vue3,在这里简单的介绍一下如何使用element-plus吧 1.安装 npm install element-plus --save 2.在main.js引入 import { createApp, Vue } from 'vue'; import ElementPlus from 'element-plus'; import 'element-plus/dist/index.css
-
vue3使用element-plus搭建后台管理系统之菜单管理功能
菜单管理是一套系统中最常见最核心的系统管理模块之一,我把菜单管理分成了2个部分,左边可以管理维护菜单,在菜单的最右侧可以维护每个菜单按钮权限配置 使用element-plus el-tree组件快速开发树形菜单结构,el-tree组件中filter-node-method事件便可以实现树形菜单筛选过滤功能 <template> <div class="common-tree"> <el-tree :ref="treeRef" :data
-
vue-element-admin搭建后台管理系统的实现步骤
近期在搞一个会议健康申报系统时,要搞一个后台,用到了vue-element-admin模板,使用的是PanJianChen(源码地址:https://github.com/PanJiaChen/vue-admin-template) 第一步:当前是下载源码了,下载地址:https://github.com/PanJiaChen/vue-admin-template 第二步:修改登录页面,登录接口(/store/modules/admin.js/login()),根据实际情况修改用户信息接口(/s
-
分布式医疗挂号系统之搭建后台管理系统页面
目录 前言 一.搭建前端环境 (1)引入项目到项目工作区 (2)根据package.json下载依赖 (3)启动创建好的前端项目 二.前端环境目录结构 (1)总体目录概览 (2)关键文件 package.js build/webpack.dev.conf.js index.html src/main.js config/dev.env.js src/utils/request.js src/api/login.js 三.登录改造 (1)登入方法改造 获取用户信息方法改造 登出方法改造 前端登出方
-
Vue后台管理系统之实现分页功能示例
本文主要介绍了Vue后台管理系统之实现分页功能,分享给大家,具体如下: 效果图: 功能描述: 显示数据的总数目 可选择每天的显示条数 点击页码跳转到指定页数 输入页码可跳转到指定页 1.功能实现 1.1 结构 <!-- 分页 --> <el-pagination @size-change="handleSizeChange" @current-change="handleCurrentChange" :current-page="quer
-
Vue + Element UI 实现权限管理系统之菜单功能实现代码
目录 菜单功能实现 菜单接口封装 菜单管理界面 测试效果 源码下载 菜单功能实现 菜单接口封装 菜单管理是一个对菜单树结构的增删改查操作. 提供一个菜单查询接口,查询整颗菜单树形结构. http/modules/menu.js 添加findMenuTree 接口. import axios from '../axios' /* * 菜单管理模块 */ // 保存 export const save = (data) => { return axios({ url: '/menu/save', m
-
Bootstrap Table快速完美搭建后台管理系统
Bootstrap Table是基于 Bootstrap 的 jQuery 表格插件,通过简单的设置,就可以拥有强大的单选.多选.排序.分页,以及编辑.导出.过滤(扩展)等等的功能:http://bootstrap-table.wenzhixin.net.cn/zh-cn/documentation/ 现在做的一个app管理以及后台配置系统,需要针对不同的城市作相应的定制化的配置,对一些后台数据也做一些展示和操作,所以每一个模块基本都会有表格的展现形式,这样做的好处就是直观方便操作.对于用什么t
-
详解使用VUE搭建后台管理系统(vue-cli更新至3.0)
最近还没来得及更新文章,就发现vue-cli已经更新到3.0版本了. //想了想还是用升级吧,反正最终都逃不掉,不如在这个项目上实验一下3.0的威力(并不会). 升级vue-cli npm install -g vue@cli vue -V 使用图形化界面创建项目 这里需要到自定义目录下,方便以后的项目管理:执行命令后,会打开一个localhost:8080的窗口,是vue项目的图形化管理界面 cd targetFolder vue ui 创建新项目 这里不一一介绍了,随便截了两张图看看 这里配
-
使用vue3搭建后台系统的详细步骤
目录 一.配置vite 二.router路由 1.安装router路由 2.配置router路由 3.注册router路由 4.使用router路由 三.安装element plus等其他依赖 1.注册element plus并配置图标 四.pinia使用 1.安装pinia 2.注册pinia 3.配置pinia 4.测试pinia 五.layout布局 六.菜单栏logo 七.路由和页面联动 1.路由和页面联动的注意细节 首先使用npm 或者yarn创建一个vue项目 // 使用npm创建一
-
详解使用React全家桶搭建一个后台管理系统
引子 学生时代为了掌握某个知识点会不断地做习题,做总结,步入岗位之后何尝不是一样呢?做业务就如同做习题,如果'课后'适当地进行总结,必然更快地提升自己的水平. 由于公司采用的react+node的技术栈,于是就完成了一个reactSPA小项目,计划日后把平时工作中遇到的业务以及学习中遇到有趣的东西给抽象成demo展示出来.目前该项目只是把雏形搭好,效果如下.在此文的基础上,写了篇新文章使用React全家桶搭建一个后台管理系统,欢迎围观.(附注:因为项目不时更新,文章不一定会即时更新,所以以实际的
-
Vue3后台管理系统之创建和配置项目
目录 1.概述 2.创建项目 2.1.创建Vue3 2.2.手动配置插件 2.3.选择hash路由 2.4.选择代码校验规范 3.项目结构配置 3.1.创建配置文件 3.2.启动项目 3.3.配置ESLint格式化 3.4.初始化项目 3.5.启动项目 总结 1.概述 这篇文章开始进入一个新的专栏,这个专栏将介绍如何创建一个Web端后台管理系统 2.创建项目 2.1.创建Vue3 # 创建vue3 vue create vue-manage-system 2.2.手动配置插件 选择手动配置模式