go smtp实现邮件发送示例详解
目录
- smtp指令
- go demo
- sdk中SendMail方法
- DialAndSend实现
smtp指令
书接上文邮件实现详解,这里我们及我们简单复习一下smtp的指令如下:
telnet smtp.163.com 25
[outpout]
ehlo dz45693
[outpout]
auth login
[outpout]
输入用户名base64
[outpout]
输入密码base64
mail from:<dz45693@163.com>
[outpout]
rcpt to:<dz45693@sina.com>
[outpout]
data
[outpout]
from:<dz45693@163.com>
to:<dz45693@sina.com>
subject:hello world
This is the first email sent by hand using the SMTP protocol
quit

go demo
好,那我们下现在用go实现代码让如下:这里只是一个demo,主要熟悉smtp命令
package main
import (
	"bufio"
	"encoding/base64"
	"fmt"
	"net"
	"strconv"
	"strings"
)
func main() {
	testSmtp()
}
var gConn net.Conn
var gRead *bufio.Reader
var gWrite *bufio.Writer
//可以放到这样的类里
type TcpClient struct {
	Conn  net.Conn
	Read  *bufio.Reader
	Write *bufio.Writer
} //
func Connect(host string, port int) (net.Conn, *bufio.Reader, *bufio.Writer) {
	addr := host + ":" + strconv.Itoa(port)
	conn, err := net.Dial("tcp", addr)
	if err != nil {
		return nil, nil, nil
	}
	reader := bufio.NewReader(conn)
	writer := bufio.NewWriter(conn)
	return conn, reader, writer
} //
//收取一行,可再优化
func RecvLine() string {
	line, err := gRead.ReadString('\n') //如何设定超时?
	if err != nil {
		fmt.Print(err)
		return ""
	}
	line = strings.Split(line, "\r")[0] //还要再去掉 "\r",其实不去掉也可以
	return line
}
func SendLine(line string) {
	gWrite.WriteString(line + "\r\n")
	gWrite.Flush()
}
//解码一行命令,这里比较简单就是按空格进行分隔就行了
func DecodeCmd(line string, sp string) []string {
	tmp := strings.Split(line, sp)
	var cmds = []string{"", "", "", "", ""} //先定义多几个,以面后面使用时产生异常
	for i := 0; i < len(tmp); i++ {
		if i >= len(cmds) {
			break
		}
		cmds[i] = tmp[i]
	}
	return cmds
}
//读取多行结果
func RecvMCmd() string {
	i := 0
	rs := ""
	mLine := ""
	for i = 0; i < 50; i++ {
		rs = RecvLine() //只收取一行
		mLine = mLine + rs + "\r\n"
		if len(rs) < 4 {
			break
		} //长度要足够
		c4 := rs[4-1] //第4个字符
		if ' ' == c4 {
			break
		} //第4个字符是空格就表示读取完了//也可以判断 "250[空格]"
	}
	return mLine
}
//简单的测试一下 smtp
func testSmtp() {
	//连接
	gConn, gRead, gWrite = Connect("smtp.163.com", 25)
	defer gConn.Close()
	//收取一行
	line := RecvLine()
	fmt.Println("recv:" + line)
	//解码一下,这样后面的 EHLO 才能有正确的第二个参数
	cmds := DecodeCmd(line, " ")
	domain := cmds[1] //要从对方的应答中取出域名//空格分开的各个命令参数中的第二个
	//发送一个命令
	SendLine("EHLO" + " " + domain) //domain 要求其实来自 HELO 命令//HELO <SP> <domain> <CRLF>
	//收取多行
	line = RecvMCmd()
	fmt.Println("recv:" + line)
	//--------------------------------------------------
	//用 base64 登录
	SendLine("AUTH LOGIN")
	//收取一行
	line = RecvLine()
	fmt.Println("recv:" + line)
	s := "dz45693" //要换成你的用户名,注意 163 邮箱的话不要带后面的 @域名 部分
	s = base64.StdEncoding.EncodeToString([]byte(s))
	SendLine(s)
	//收取一行
	line = RecvLine()
	fmt.Println("recv:" + line)
	s = "xxxxx" //要换成您的密码
	s = base64.StdEncoding.EncodeToString([]byte(s))
	SendLine(s)
	//收取一行
	line = RecvLine()
	fmt.Println("recv:" + line)
	//--------------------------------------------------
	//邮件内容
	from := "dz45693@163.com"
	to := "dz45693@sina.com"
	SendLine("MAIL FROM: <" + from + ">") //注意"<" 符号和前面的空格。空格在协议中有和没有都可能,最好还是有
	//收取一行
	line = RecvLine()
	fmt.Println("recv:" + line)
	SendLine("RCPT TO: <" + to + ">")
	//收取一行
	line = RecvLine()
	fmt.Println("recv:" + line)
	SendLine("DATA")
	//收取一行
	line = RecvLine()
	fmt.Println("recv:" + line)
//发送邮件头
	SendLine("from:<dz45693@163.com>")
	SendLine("to:<dz45693@sina.com>")
	SendLine("subject:hello world")
	SendLine("") //发送空行 后面就是邮件体
	SendLine("This is the first email sent by hand using the SMTP protocol")
	SendLine(".") //邮件结束符
	//收取一行
	line = RecvLine()
	fmt.Println("recv:" + line)
	SendLine("quit") //链接推出
	line = RecvLine()
	fmt.Println("recv:" + line)
} //
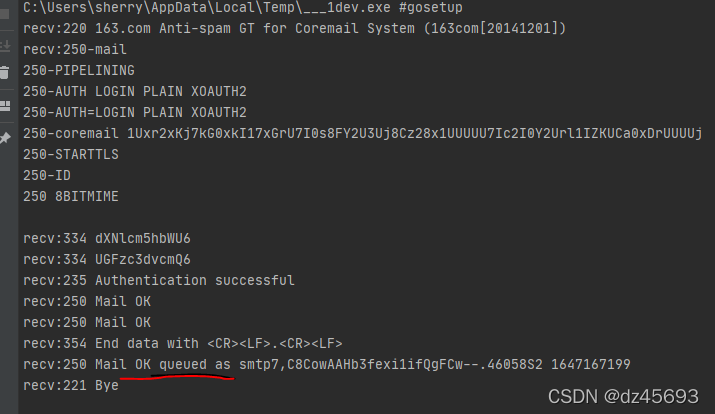
运行结果如下:

sdk中SendMail方法
在go的sdk中提供了SendMail方法【发送邮件后这个方法会关闭链接】,实现如下:

实现如下:
 func SendMailBySmtp(){
	auth := smtp.PlainAuth("", "dz45693@163.com", "xxx", "smtp.163.com")
	to := []string{"dz45693@sina.com"}
	image,_:=ioutil.ReadFile("d:\\Downloads\\1.png")
	imageBase64:=base64.StdEncoding.EncodeToString(image)
	msg := []byte("from:dz45693@163.com\r\n"+
		"to: dz45693@sina.com\r\n" +
		"Subject: hello,subject!\r\n"+
		"Content-Type:multipart/mixed;boundary=a\r\n"+
		"Mime-Version:1.0\r\n"+
		"\r\n" +
		"--a\r\n"+
		"Content-type:text/plain;charset=utf-8\r\n"+
		"Content-Transfer-Encoding:quoted-printable\r\n"+
		"\r\n"+
		"此处为正文内容!\r\n"+
		"--a\r\n"+
		"Content-type:image/jpg;name=1.jpg\r\n"+
		"Content-Transfer-Encoding:base64\r\n"+
		"\r\n"+
		imageBase64+"\r\n"+
		"--a--\r\n")
	err := smtp.SendMail("smtp.163.com:25", auth, "dz45693@163.com", to, msg)
	if err != nil {
		fmt.Println(err)
	}
}
运行效果:

使用第三方库gomail实现邮件的发送更多了解,
请前往:https://pkg.go.dev/gopkg.in/gomail.v2?utm_source=godoc
示例如下:
func SendMailByGomailOne(){
	m := gomail.NewMessage()
	m.SetAddressHeader("From", "dz45693@163.com", "dz45693")
	m.SetHeader("To", "dz45693@sina.com")
	m.SetHeader("Subject", "hello SendMailByGomailOne!")
	m.Embed("d:\\Downloads\\1.png")
	m.SetBody("text/html", "此处为正文121333!")
	d := gomail.NewDialer("smtp.163.com", 25, "dz45693@163.com", "xxxx")
	if err := d.DialAndSend(m); err != nil {
		panic(err)
	}
}
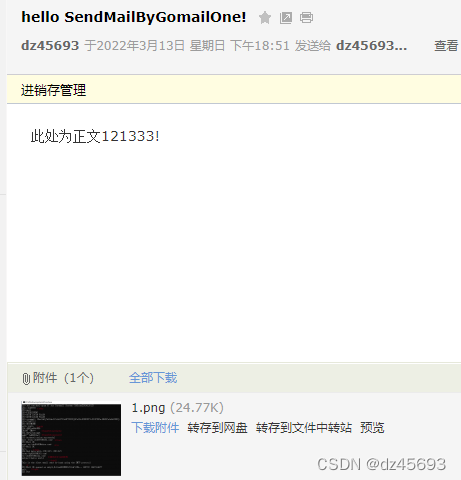
运行结果:

DialAndSend实现
来我们看看DialAndSend的实现如下:
package gomail
import (
	"crypto/tls"
	"fmt"
	"io"
	"net"
	"net/smtp"
	"strings"
	"time"
)
// A Dialer is a dialer to an SMTP server.
type Dialer struct {
	// Host represents the host of the SMTP server.
	Host string
	// Port represents the port of the SMTP server.
	Port int
	// Username is the username to use to authenticate to the SMTP server.
	Username string
	// Password is the password to use to authenticate to the SMTP server.
	Password string
	// Auth represents the authentication mechanism used to authenticate to the
	// SMTP server.
	Auth smtp.Auth
	// SSL defines whether an SSL connection is used. It should be false in
	// most cases since the authentication mechanism should use the STARTTLS
	// extension instead.
	SSL bool
	// TSLConfig represents the TLS configuration used for the TLS (when the
	// STARTTLS extension is used) or SSL connection.
	TLSConfig *tls.Config
	// LocalName is the hostname sent to the SMTP server with the HELO command.
	// By default, "localhost" is sent.
	LocalName string
}
// NewDialer returns a new SMTP Dialer. The given parameters are used to connect
// to the SMTP server.
func NewDialer(host string, port int, username, password string) *Dialer {
	return &Dialer{
		Host:     host,
		Port:     port,
		Username: username,
		Password: password,
		SSL:      port == 465,
	}
}
// NewPlainDialer returns a new SMTP Dialer. The given parameters are used to
// connect to the SMTP server.
//
// Deprecated: Use NewDialer instead.
func NewPlainDialer(host string, port int, username, password string) *Dialer {
	return NewDialer(host, port, username, password)
}
// Dial dials and authenticates to an SMTP server. The returned SendCloser
// should be closed when done using it.
func (d *Dialer) Dial() (SendCloser, error) {
	conn, err := netDialTimeout("tcp", addr(d.Host, d.Port), 10*time.Second)
	if err != nil {
		return nil, err
	}
	if d.SSL {
		conn = tlsClient(conn, d.tlsConfig())
	}
	c, err := smtpNewClient(conn, d.Host)
	if err != nil {
		return nil, err
	}
	if d.LocalName != "" {
		if err := c.Hello(d.LocalName); err != nil {
			return nil, err
		}
	}
	if !d.SSL {
		if ok, _ := c.Extension("STARTTLS"); ok {
			if err := c.StartTLS(d.tlsConfig()); err != nil {
				c.Close()
				return nil, err
			}
		}
	}
	if d.Auth == nil && d.Username != "" {
		if ok, auths := c.Extension("AUTH"); ok {
			if strings.Contains(auths, "CRAM-MD5") {
				d.Auth = smtp.CRAMMD5Auth(d.Username, d.Password)
			} else if strings.Contains(auths, "LOGIN") &&
				!strings.Contains(auths, "PLAIN") {
				d.Auth = &loginAuth{
					username: d.Username,
					password: d.Password,
					host:     d.Host,
				}
			} else {
				d.Auth = smtp.PlainAuth("", d.Username, d.Password, d.Host)
			}
		}
	}
	if d.Auth != nil {
		if err = c.Auth(d.Auth); err != nil {
			c.Close()
			return nil, err
		}
	}
	return &smtpSender{c, d}, nil
}
func (d *Dialer) tlsConfig() *tls.Config {
	if d.TLSConfig == nil {
		return &tls.Config{ServerName: d.Host}
	}
	return d.TLSConfig
}
func addr(host string, port int) string {
	return fmt.Sprintf("%s:%d", host, port)
}
// DialAndSend opens a connection to the SMTP server, sends the given emails and
// closes the connection.
func (d *Dialer) DialAndSend(m ...*Message) error {
	s, err := d.Dial()
	if err != nil {
		return err
	}
	defer s.Close()
	return Send(s, m...)
}
type smtpSender struct {
	smtpClient
	d *Dialer
}
func (c *smtpSender) Send(from string, to []string, msg io.WriterTo) error {
	if err := c.Mail(from); err != nil {
		if err == io.EOF {
			// This is probably due to a timeout, so reconnect and try again.
			sc, derr := c.d.Dial()
			if derr == nil {
				if s, ok := sc.(*smtpSender); ok {
					*c = *s
					return c.Send(from, to, msg)
				}
			}
		}
		return err
	}
	for _, addr := range to {
		if err := c.Rcpt(addr); err != nil {
			return err
		}
	}
	w, err := c.Data()
	if err != nil {
		return err
	}
	if _, err = msg.WriteTo(w); err != nil {
		w.Close()
		return err
	}
	return w.Close()
}
func (c *smtpSender) Close() error {
	return c.Quit()
}
// Stubbed out for tests.
var (
	netDialTimeout = net.DialTimeout
	tlsClient      = tls.Client
	smtpNewClient  = func(conn net.Conn, host string) (smtpClient, error) {
		return smtp.NewClient(conn, host)
	}
)
type smtpClient interface {
	Hello(string) error
	Extension(string) (bool, string)
	StartTLS(*tls.Config) error
	Auth(smtp.Auth) error
	Mail(string) error
	Rcpt(string) error
	Data() (io.WriteCloser, error)
	Quit() error
	Close() error
}
DialAndSend ,首先调用Dial方法创建连接,然后发送邮件,最后关闭链接,如果要频繁发邮件,那么是否保持长连接更好了?这里的Dial 调用了smtp.NewClient 创建smtp.Client对象c,然后调用c.Hello ,c.Auth,send 实际是调用c.Mail,c.Rcpt,c.Data,那么我们可以自己调用Dial方法 然后循环调用send方法,最后在close。
代码如下:
func SendMailByGomailTwo() {
	d := gomail.NewDialer("smtp.163.com", 25, "dz45693@163.com", "xxxx")
	m := gomail.NewMessage()
	m.SetAddressHeader("From", "dz45693@163.com", "dz45693")
	m.SetHeader("To", "dz45693@sina.com")
	m.SetHeader("Subject", "hello SendMailByGomailtwo!")
	m.Embed("d:\\Downloads\\1.png")
	m.SetBody("text/html", "此处为正文121333!SendMailByGomailtwo")
	s, err := d.Dial()
	if err != nil {
		panic(err)
	}
	defer s.Close()
	err = gomail.Send(s, m)
	if err != nil {
		panic(err)
	}
	m.Reset()
	m.SetAddressHeader("From", "dz45693@163.com", "dz45693")
	m.SetHeader("To", "dz45693@sina.com")
	m.SetHeader("Subject", "hello SendMailByGomailthree!")
	m.Embed("d:\\Downloads\\2.png")
	m.SetBody("text/html", "此处为正文1SendMailByGomailthreeSendMailByGomailthree!")
	err = gomail.Send(s, m)
	if err != nil {
		panic(err)
	}
}
运行结果:

以上就是go smtp实现邮件发送示例详解的详细内容,更多关于go smtp邮件发送的资料请关注我们其它相关文章!
赞 (0)

