Android Fragment实现底部通知栏
Android Fragment实现底部通知栏,供大家参考,具体内容如下
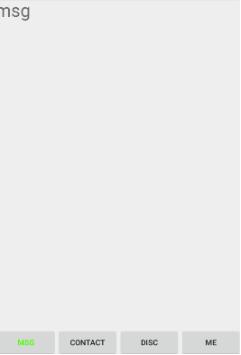
截图如下:

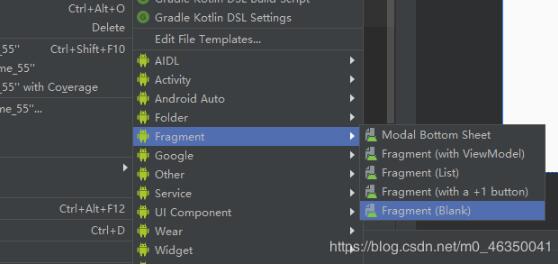
1. 第一步先要创建fragment(动态注册)

然后将两个勾选取消掉(还有一种是自己手动创建)
会自动生成相对应的layout布局,剩下的要根据自己的需求了
2.在Activity的布局里写好四个按钮
这里不是重点…
<?xml version="1.0" encoding="utf-8"?>
<RelativeLayout xmlns:android="http://schemas.android.com/apk/res/android"
  android:layout_width="match_parent"
  android:layout_height="match_parent"
  >
<LinearLayout
  android:id="@+id/ll_content_part"
  android:layout_width="match_parent"
  android:layout_height="match_parent"
  >
</LinearLayout>
<LinearLayout
  android:id="@+id/ll_function"
  android:layout_alignParentBottom="true"
  android:orientation="horizontal"
  android:layout_width="match_parent"
  android:layout_height="wrap_content">

<Button
  android:id="@+id/btn_msg_list"
  android:layout_width="0dp"
  android:layout_height="wrap_content"
  android:layout_weight="1"
  android:textSize="13dp"
  android:onClick="click"
  android:text="msg"/>
  <Button
    android:id="@+id/btn_contact"
    android:layout_width="0dp"
    android:layout_height="wrap_content"
    android:layout_weight="1"
    android:textSize="13dp"
    android:onClick="click"
    android:text="contact"/>
  <Button
    android:id="@+id/btn_disc"
    android:layout_width="0dp"
    android:layout_height="wrap_content"
    android:layout_weight="1"
    android:textSize="13dp"
    android:onClick="click"
    android:text="disc"/>
  <Button
    android:id="@+id/btn_me"
    android:layout_width="0dp"
    android:layout_height="wrap_content"
    android:layout_weight="1"
    android:textSize="13dp"
    android:onClick="click"
    android:text="me"/>
</LinearLayout>
</RelativeLayout>
3.Activity的代码
其中定义了四个整型常量记录了四个按钮的状态,还有一个当前状态,进而判断当前点击按钮的状态,点击切换文字颜色和图标
每次判断四个Fragment的引用是否为空,不为空就不需要每次在new一遍Fragment
replace每次都会重新初始化fragment,它是先remove掉相同id的fragment,再add当前fragment。
add不会回每次都初始化fragment,一般配合hide()和show()方法
public class MainActivity extends AppCompatActivity {

  private Button btn_contact;
  private Button btn_disc;
  private Button btn_me;
  private Button btn_msg_list;
  private FragmentManager fragmentManager;
  private MsgListFragment msgListFragment;
  private ContactFragment contactFragment;
  private DiscoveryFragment discoveryFragment;
  private MeFragment meFragment;

  private final int STATE_MSG =1;
  private final int STATE_CON =2;
  private final int STATE_DIS =3;
  private final int STATE_ME =4;
  private int currentState;

  @Override
  protected void onCreate(Bundle savedInstanceState) {
    super.onCreate(savedInstanceState);
    setContentView(R.layout.activity_main);
    initView();
    initData();
    chageButtonColor(currentState,STATE_MSG);
  }

  private void initData() {
    fragmentManager = getFragmentManager();
    switchFragment(this.STATE_MSG);
  }

  private void initView() {
    btn_contact = (Button) findViewById(R.id.btn_contact);
    btn_disc = (Button) findViewById(R.id.btn_disc);
    btn_me = (Button) findViewById(R.id.btn_me);
    btn_msg_list = (Button) findViewById(R.id.btn_msg_list);
  }

  public void click(View view) {

    switch (view.getId()){
      case R.id.btn_msg_list:

        switchFragment(this.STATE_MSG);
        break;
      case R.id.btn_contact:
        switchFragment(this.STATE_CON);
        break;

      case R.id.btn_disc:
        switchFragment(this.STATE_DIS);
        break;
      case R.id.btn_me:
        switchFragment(this.STATE_ME);
        break;
    }
  }

  private void switchFragment(int toState) {

    if (toState == currentState)
      return;
    chageButtonColor(currentState,toState);
    this.currentState=toState;

    FragmentTransaction transaction = this.fragmentManager.beginTransaction();

    Fragment fragment=msgListFragment;
    switch (toState){
      case STATE_DIS:
        if (discoveryFragment == null)
          discoveryFragment= new DiscoveryFragment();
        fragment= discoveryFragment;
        break;
      case STATE_ME:
        if (meFragment == null)
          meFragment= new MeFragment();
        fragment= meFragment;
        break;
      case STATE_CON:
        if (contactFragment == null)
          contactFragment= new ContactFragment();
        fragment= contactFragment;
        break;
      case STATE_MSG:
        if (msgListFragment == null)
          msgListFragment= new MsgListFragment();
        fragment= msgListFragment;
        break;
    }
    transaction.replace(R.id.ll_content_part,fragment);
    transaction.commit();
  }

  private void chageButtonColor(int currentState,int toState){

    switch (currentState){
      case STATE_DIS:
        this.btn_disc.setTextColor(Color.BLACK);
        break;
        case STATE_ME:
          this.btn_me.setTextColor(Color.BLACK);
        break;
      case STATE_CON:
        this.btn_contact.setTextColor(Color.BLACK);
        break;
      case STATE_MSG:
        this.btn_msg_list.setTextColor(Color.BLACK);
        break;
    }
    switch (toState){
      case STATE_DIS:
        this.btn_disc.setTextColor(Color.GREEN);
        break;
      case STATE_ME:
        this.btn_me.setTextColor(Color.GREEN);
        break;
      case STATE_CON:
        this.btn_contact.setTextColor(Color.GREEN);
        break;
      case STATE_MSG:
        this.btn_msg_list.setTextColor(Color.GREEN);
        break;
    }
  }
}
以上就是本文的全部内容,希望对大家的学习有所帮助,也希望大家多多支持我们。
赞 (0)

