基于PHP的登录和注册的功能的实现
1.新建三个html文件,两个php文件和若干个CSS文件和若干个JS文件
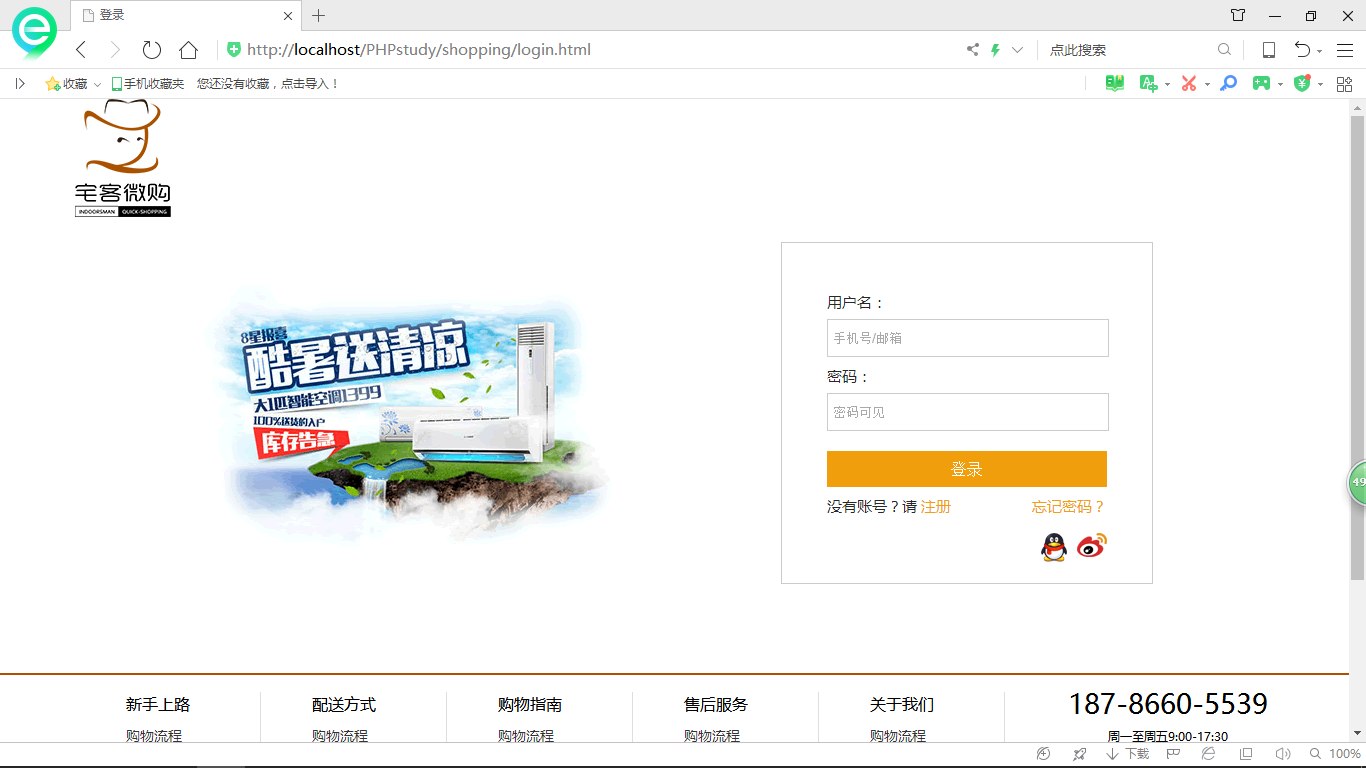
2.登录的html页面显示效果图
3.注册的页面的显示效果图

4.登录页面的form表单代码
<div class="sign-con w1200">
			<img src="img/logn-tu.gif" class="sign-contu f-l"/>
			<form action="login.php" method="post">
				<div class="sign-ipt f-l">
					<p>用户名:</p>
					<input type="text" name="username" placeholder="手机号/邮箱" />
					<p>密码:</p>
					<input type="password" name="password" placeholder="密码可见" />
					<br />
					<button class="slig-btn">登录</button>
					<p>
						没有账号?请
						<a href="regist.html" rel="external nofollow" >注册</a>
						<a href="#" rel="external nofollow" rel="external nofollow" rel="external nofollow" rel="external nofollow" class="wj">忘记密码?</a>
					</p>
					<div class="sign-qx">
						<a href="#" rel="external nofollow" rel="external nofollow" rel="external nofollow" rel="external nofollow" class="f-r">
							<img src="img/sign-xinlan.gif" />
						</a>
						<a href="#" rel="external nofollow" rel="external nofollow" rel="external nofollow" rel="external nofollow" class="qq f-r">
							<img src="img/sign-qq.gif" />
						</a>
						<div style="clear: both;"></div>
					</div>
				</div>
			</form>
			<div style="clear: both;"></div>
		</div>
5.注册页面的form表单代码
<div class="password-con registered">
			<form action="regist.php" method="post">
				<div class="psw">
					<p class="psw-p1">用户名</p>
					<input type="text" name="username" placeholder="HR了" />
					<span class="dui"></span>
				</div>
				<div class="psw">
					<p class="psw-p1">输入密码</p>
					<input type="password" name="password" placeholder="请输入密码" />
					<span class="cuo">密码由6-16的字母、数字、符号组成</span>
				</div>
				<div class="psw">
					<p class="psw-p1">确认密码</p>
					<input type="password" name="repassword" placeholder="请再次输入密码" />
					<span class="cuo">密码不一致,请重新输入</span>
				</div>
				<div class="psw psw2">
					<p class="psw-p1">手机号/邮箱</p>
					<input type="text" name="telphone" placeholder="请输入手机/邮箱验证码" />
					<button>获取短信验证码</button>
				</div>
				<div class="psw psw3">
					<p class="psw-p1">验证码</p>
					<input type="text" placeholder="请输入验证码" />
				</div>
				<div class="yanzhentu">
					<div class="yz-tu f-l">
						<img src="img/psw-yanzhengtu.gif" />
					</div>
					<p class="f-l">
						看不清楚?
						<a href="#" rel="external nofollow" rel="external nofollow" rel="external nofollow" rel="external nofollow" >换张图</a>
					</p>
					<div style="clear: both;"></div>
				</div>
				<div class="agreement">
					<input type="checkbox" name="hobby" />
					<p>
						我有阅读并同意
						<span>《宅客微购网站服务协议》</span>
					</p>
				</div>
				<button type="submit" value="注册" class="psw-btn">立即注册</button>
				<p class="sign-in">
					已有账号?请
					<a href="login.html" rel="external nofollow" >登录</a>
				</p>
			</form>
		</div><!-- 注册框结束 -->
6.login.php代码
<?php
  header("Content-type: text/html; charset=utf-8");
  $username = $_POST['username'];
  $password = $_POST['password'];
  $conn = new mysqli('localhost','root','root','shopping');
  if ($conn->connect_error){
    echo '数据库连接失败!';
    exit(0);
  }else{
    if ($username == ''){
      echo '<script>alert("请输入用户名!");history.go(-1);</script>';
      exit(0);
    }
    if ($password == ''){
      echo '<script>alert("请输入密码!");history.go(-1);</script>';
      exit(0);
    }
    $sql = "select username,password from userinfo where username = '$_POST[username]' and password = '$_POST[password]'";
    $result = $conn->query($sql);
    $number = mysqli_num_rows($result);
    if ($number) {
      echo '<script>window.location="index.html";</script>';
    } else {
      echo '<script>alert("用户名或密码错误!");history.go(-1);</script>';
    }
  }
?>
7.regist.php代码
<?php
  header("Content-type: text/html; charset=utf-8");
    $username = $_POST['username'];
    $password = $_POST['password'];
    $repassword = $_POST['repassword'];
    $telphone = $_POST['telphone'];
    if ($username == ''){
      echo '<script>alert("请输入用户名!");history.go(-1);</script>';
      exit(0);
    }
    if ($password == ''){
      echo '<script>alert("请输入密码");history.go(-1);</script>';
      exit(0);
    }
    if ($password != $repassword){
      echo '<script>alert("密码与确认密码应该一致");history.go(-1);</script>';
      exit(0);
    }
    if($password == $repassword){
      $conn = new mysqli('localhost','root','root','shopping');
      if ($conn->connect_error){
        echo '数据库连接失败!';
        exit(0);
      }else {
        $sql = "select username from userinfo where username = '$_POST[username]'";
        $result = $conn->query($sql);
        $number = mysqli_num_rows($result);
        if ($number) {
          echo '<script>alert("用户名已经存在");history.go(-1);</script>';
        } else {
          $sql_insert = "insert into userinfo (username,password,telphone) values('$_POST[username]','$_POST[password]','$_POST[telphone]')";
          $res_insert = $conn->query($sql_insert);
          if ($res_insert) {
            echo '<script>window.location="index.html";</script>';
          } else {
            echo "<script>alert('系统繁忙,请稍候!');</script>";
          }
        }
      }
    }else{
      echo "<script>alert('提交未成功!'); history.go(-1);</script>";
    }
?>
8.进入首页后的图片

9.数据库的图片

到此这篇关于基于PHP的登录和注册的功能的实现的文章就介绍到这了,更多相关PHP实现登录和注册的功能内容请搜索我们以前的文章或继续浏览下面的相关文章希望大家以后多多支持我们!
相关推荐
-

php+mysql实现简单登录注册修改密码网页
对于php和mysql的连接在许多blog上都有说明,为了将mysql中的查询,修改,插入等操作掌握,本文介绍了一下如何采用mysql做一个登录注册修改密码的网页. 其中,如下 1.登录-即为对数据库中的内容给予查询,并验证html中的信息与数据库是否匹配: 2.注册-即为对数据库中的内容进行插入,注册帐号与密码: 3.修改密码-即为对数据库中的内容进行修改. 这三个操作,我用了8个php和html文本来建立 具体见代码部分 1.登录的主界面index.html: <p> </p>
-
php+redis实现注册、删除、编辑、分页、登录、关注等功能示例
本文实例讲述了php+redis实现注册.删除.编辑.分页.登录.关注等功能.分享给大家供大家参考,具体如下: 主要界面 连接redis redis.php <?php //实例化 $redis = new Redis(); //连接服务器 $a=$redis->connect("localhost",6379); //var_dump($a); //授权 $redis->auth("107lab"); 注册界面 add.php <form
-
基于PHP实现用户注册登录功能
本文介绍的是基于PHP实现用户注册登录功能,本项目分为四部分内容:1前端页面制作,2验证码制作,3实现注册登陆,4功能完善.具体情况可以往下看. 验证码制作 一.实验简介 本次实验将会带领大家使用面向对象的思想封装一个验证码类.并在注册和登陆界面展示使用.通过本次实验的学习,你将会领悟到 PHP 的 OOP 思想,以及 GD 库的使用,验证码生成. 1.1 涉及到的知识点 PHP GD库 OOP编程 1.2 开发工具 sublime,一个方便快速的文本编辑器.点击桌面左下角: 应用程序菜单/开发
-
PHP实现的注册,登录及查询用户资料功能API接口示例
本文实例讲述了PHP实现的注册,登录及查询用户资料功能API接口.分享给大家供大家参考,具体如下: 服务端 <?php require 'conn.php'; header('Content-Type:text/html;charset=utf-8'); $action = $_GET['action']; switch ($action) { //注册会员 case"adduserinfo"; $username = lib_replace_end_tag(trim($_GET
-
基于PHP实现用户登录注册功能的详细教程
教程前先给大家看看小编的实现成果吧! 图1: 图2: 图3: 教程: 实现这个功能我们需要五个php文件: login.php (登录界面,如图2) <!DOCTYPE html> <html><head> <title>登录</title> <meta name="content-type"; charset="UTF-8"> </head><body> <div
-
php注册登录系统简化版
登录注册系统是日常上网最普通的操作,我设了一个分类一步步完善注册登录系统,若哪里有误,请见谅. 所用语言:php 数据库 :mysql 本次实现功能: 1.用户注册 2.用户登录 主要文件: 完整代码 1 sql 在已有的数据库里创建user表,id,username,password三个字段 复制代码 代码如下: create table user(id int(10) not null auto_increment,username varchar(30),password varchar(
-
php自动注册登录验证机制实现代码
背景: 在phpwind站点后台添加一个名为"广告管家"(广告管家为CNZZ的一款广告投放的应用)的应用,整个"广告管家"的应用是通过iframe载入,载入的具体内容根据不同站点显示针对该站点的具体内容,为了提高易用性,有以下的两点要求: 1.首次进入"广告管家"页面自动注册CNZZ账户 2.以后每次进入"广告管家"页面默认为首次注册的CNZZ账户 设计: 1.尝试载入用户帐号和密码信息,此信息保存在数据库或是文本缓存中 2.
-
PHP实现的登录,注册及密码修改功能分析
本文实例讲述了PHP实现登录,注册及密码修改功能的方法.分享给大家供大家参考,具体如下: 这里介绍注册,登录,修改密码的界面布局与功能实现: 1.登录 2.忘记密码 3.免费注册 页面布局: <div id="views" class="views"> <div id="view-login" class="page-view view-login active"> <present name=&
-
php注册和登录界面的实现案例(推荐)
当初我觉得一个网站上注册和登录这两个功能很神奇,后来自己研究一下发现其实道理很简单,接下来看一下怎么实现的吧.... 我在我的电脑上建了几个文件: login.html (登录页面) register.html(注册页面) success.html(登录成功跳转页面) return.html(注册成功页面) login.php register.php 登录界面和注册界面以及success.html并没有 什么都是些html标记如下: <html> <head> <meta
-
PHP实现登录注册之BootStrap表单功能
前言 前面几篇简单介绍了一下前端与PHP的一些知识点,前端中表单提交是一个非常重要的模块,在本篇中我会介绍一些关于表单的知识,如果前面内容你掌握的不好并且没有大量的练习,我感觉你最好先把标签都记下来. 项目简介 登录与注册是我们在web开发中最常见的模块,也是我们日常生活中经常接触的功能.用户通过前端表单页面填写内容,通过POST方式提交到后台,然后经过PHP代码处理提交内容后,针对登录或者注册的逻辑继续操作. 登录与注册图解 BootStrap前端框架[ http://v3.bootcss.c