Android GridLayout使用案例详解
目录
- 一、简介
- 二、常用属性介绍
- 三、平分问题
- 四、小米计算器效果
- 五、动态加载
一、简介
GridLayout是Android4.0引入的网格布局,使用它可以减少布局嵌套。也算是常用,但一直没仔细看过,今天研究一下
二、常用属性介绍
GridLayout 使用属性
| 属性 | 作用 |
|---|---|
| android:columnCount | 最大列数 |
| android:rowCount | 最大行数 |
| android:orientation | GridLayout中子元素的布局方向 |
| android:alignmentMode | alignBounds:对齐子视图边界 alignMargins :对齐子视距内容,默认值 |
| android:columnOrderPreserved | 使列边界显示的顺序和列索引的顺序相同,默认是true |
| android:rowOrderPreserved | 使行边界显示的顺序和行索引的顺序相同,默认是true |
| android:useDefaultMargins | 没有指定视图的布局参数时使用默认的边距,默认值是false |
item属性
| 属性 | 作用 |
|---|---|
| android:layout_column | 指定该单元格在第几列显示 |
| android:layout_row | 指定该单元格在第几行显示 |
| android:layout_columnSpan | 指定该单元格占据的列数 |
| android:layout_rowSpan | 指定该单元格占据的行数 |
| android:layout_gravity | 指定该单元格在容器中的位置 |
| android:layout_columnWeight | (API21加入)列权重 |
| android:layout_rowWeight | (API21加入) 行权重 |
| android:layout_gravity | 作用 |
|---|---|
| center | 不改变元素的大小,仅居中 |
| center_horizontal | 不改变大小,水平居中 |
| center_vertical | 不改变大小,垂直居中 |
| top | 不改变大小,置于顶部 |
| left | 不改变大小,置于左边 |
| bottom | 不改变大小,置于底部 |
| right | 不改变大小,置于右边 |
| start | 不改变大小,根据系统语言,置于开始位置 |
| end | 不改变大小,置于结尾 |
| fill | 拉伸元素控件,填满其应该所占的格子 |
| fill_vertical | 仅垂直方向上拉伸填充 |
| fill_horizontal | 仅水平方向上拉伸填充 |
| clip_vertical | 垂直方向上裁剪元素,仅当元素大小超过格子的空间时 |
| clip_horizontal | 水平方向上裁剪元素,仅当元素大小超过格子的空间时 |
注意
使用layout_columnSpan 、layout_rowSpan时要加上layout_gravity属性,否则没有效果;另外item在边缘时宽高计算会出现错误,需要我们手动设置宽高,否则达不到想要的效果
三、平分问题
GridLayout在API21时引入了android:layout_columnWeight和android:layout_rowWeight来解决平分问题
那么在API21以前的,想要平分的话:引用兼容包
compile 'com.android.support:gridlayout-v7:25.+'
注意:
- 使用该控件,命名空间使用app
- 单独设置app:layout_columnWeight时,这一列的所有item都设置为这个属性,才能达到预期效果,否则这一列中设置了该属性的item,都会被隐藏,显示不出来
- 单独设置app:layout_rowWeight时,没有问题
四、小米计算器效果
<?xml version="1.0" encoding="utf-8"?>
<android.support.v7.widget.GridLayout
    xmlns:android="http://schemas.android.com/apk/res/android"
    xmlns:app="http://schemas.android.com/apk/res-auto"
    xmlns:tools="http://schemas.android.com/tools"
    android:id="@+id/grid_layout"
    android:layout_width="match_parent"
    android:layout_height="match_parent"
    android:background="#ece7e7"
    app:alignmentMode="alignBounds"
    app:columnCount="4"
    app:orientation="horizontal"
    app:rowCount="5"
    app:useDefaultMargins="false"
    tools:context="com.strivestay.gridlayoutdemo.MainActivity">

    <!-- 如果不使用 app:layout_gravity="fill",
        则实际下面这个textview的宽度只是wrap_content,
        实现不了想要的right|bottom效果;
        或者,
        用app:layout_columnWeight="1",
        效果等同,填充满
    -->
    <TextView
        android:gravity="right|bottom"
        android:text="0"
        app:layout_columnSpan="4"
        app:layout_rowWeight="3"
        app:layout_columnWeight="1"/>

    <TextView
        android:layout_margin="1dp"
        android:background="#ffffff"
        android:gravity="center"
        android:text="AC"
        android:textColor="#f68904"
        app:layout_columnWeight="1"
        app:layout_rowWeight="1"/>

    <TextView
        android:layout_margin="1dp"
        android:background="#ffffff"
        android:gravity="center"
        android:text="退格"
        app:layout_columnWeight="1"
        app:layout_rowWeight="1"/>

    <TextView
        android:layout_margin="1dp"
        android:background="#ffffff"
        android:gravity="center"
        android:text="/"
        app:layout_columnWeight="1"
        app:layout_rowWeight="1"/>

    <TextView
        android:layout_margin="1dp"
        android:background="#ffffff"
        android:gravity="center"
        android:text="*"
        app:layout_columnWeight="1"
        app:layout_rowWeight="1"/>

    <TextView
        android:layout_margin="1dp"
        android:background="#ffffff"
        android:gravity="center"
        android:text="7"
        app:layout_columnWeight="1"
        app:layout_rowWeight="1"/>

    <TextView
        android:layout_margin="1dp"
        android:background="#ffffff"
        android:gravity="center"
        android:text="8"
        app:layout_columnWeight="1"
        app:layout_rowWeight="1"/>

    <TextView
        android:layout_margin="1dp"
        android:background="#ffffff"
        android:gravity="center"
        android:text="9"
        app:layout_columnWeight="1"
        app:layout_rowWeight="1"/>

    <TextView
        android:layout_margin="1dp"
        android:background="#ffffff"
        android:gravity="center"
        android:text="—"
        app:layout_columnWeight="1"
        app:layout_rowWeight="1"/>

    <TextView
        android:layout_margin="1dp"
        android:background="#ffffff"
        android:gravity="center"
        android:text="4"
        app:layout_columnWeight="1"
        app:layout_rowWeight="1"/>

    <TextView
        android:layout_margin="1dp"
        android:background="#ffffff"
        android:gravity="center"
        android:text="5"
        app:layout_columnWeight="1"
        app:layout_rowWeight="1"/>

    <TextView
        android:layout_margin="1dp"
        android:background="#ffffff"
        android:gravity="center"
        android:text="6"
        app:layout_columnWeight="1"
        app:layout_rowWeight="1"/>

    <TextView
        android:layout_margin="1dp"
        android:background="#ffffff"
        android:gravity="center"
        android:text="+"
        app:layout_columnWeight="1"
        app:layout_rowWeight="1"/>

    <TextView
        android:layout_margin="1dp"
        android:background="#ffffff"
        android:gravity="center"
        android:text="1"
        app:layout_columnWeight="1"
        app:layout_rowWeight="1"/>

    <TextView
        android:layout_margin="1dp"
        android:background="#ffffff"
        android:gravity="center"
        android:text="2"
        app:layout_columnWeight="1"
        app:layout_rowWeight="1"/>

    <TextView
        android:layout_margin="1dp"
        android:background="#ffffff"
        android:gravity="center"
        android:text="3"
        app:layout_columnWeight="1"
        app:layout_rowWeight="1"/>

    <TextView
        android:layout_margin="1dp"
        android:background="#f68904"
        android:gravity="center"
        android:text="="
        android:textColor="#ffffff"
        app:layout_columnWeight="1"
        app:layout_rowSpan="2"
        app:layout_rowWeight="1"/>

    <TextView
        android:layout_margin="1dp"
        android:background="#ffffff"
        android:gravity="center"
        android:text="%"
        app:layout_columnWeight="1"
        app:layout_rowWeight="1"/>

    <TextView
        android:layout_margin="1dp"
        android:background="#ffffff"
        android:gravity="center"
        android:text="0"
        app:layout_columnWeight="1"
        app:layout_rowWeight="1"/>

    <TextView
        android:layout_margin="1dp"
        android:background="#ffffff"
        android:gravity="center"
        android:text="."
        app:layout_columnWeight="1"
        app:layout_rowWeight="1"/>

</android.support.v7.widget.GridLayout>
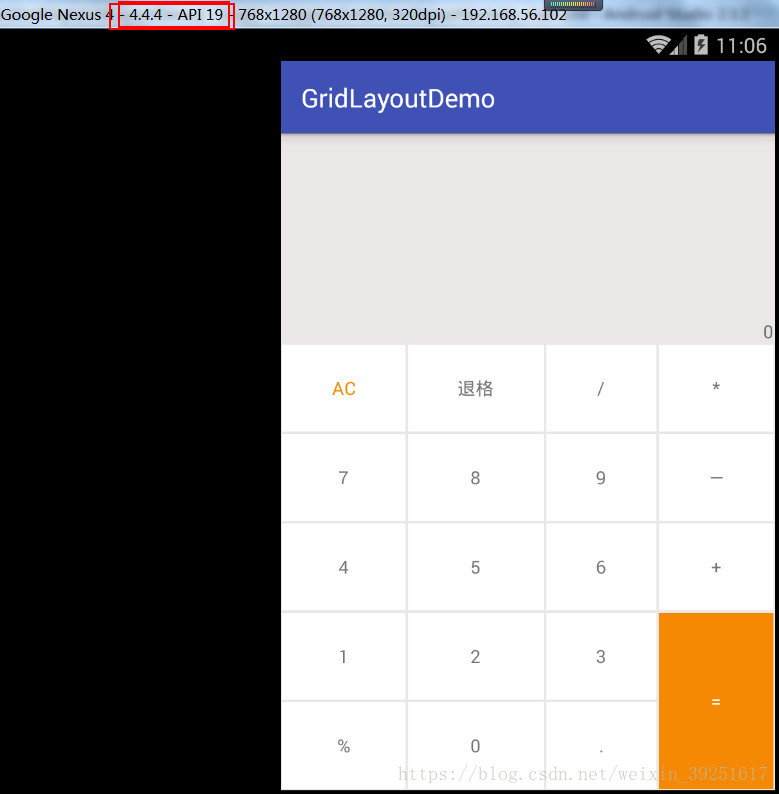
效果: 4.4.4模拟器
五、动态加载
1.xml引用GridLayout
<?xml version="1.0" encoding="utf-8"?>
<android.support.v7.widget.GridLayout
    xmlns:android="http://schemas.android.com/apk/res/android"
    xmlns:app="http://schemas.android.com/apk/res-auto"
    xmlns:tools="http://schemas.android.com/tools"
    android:id="@+id/grid_layout"
    android:layout_width="match_parent"
    android:layout_height="match_parent"
    android:background="#ece7e7"
    app:orientation="horizontal"
    app:useDefaultMargins="false"
    app:alignmentMode="alignBounds"
    tools:context="com.strivestay.gridlayoutdemo.MainActivity">

</android.support.v7.widget.GridLayout>
2.动态添加
package com.strivestay.gridlayoutdemo;

import android.graphics.Color;
import android.os.Bundle;
import android.support.v7.app.AppCompatActivity;
import android.support.v7.widget.GridLayout;
import android.view.Gravity;
import android.widget.TextView;
/**
 * GridLayout示例
 * @author StriveStay
 * @date 2018/3/27
 */
public class MainActivity extends AppCompatActivity {

    private String[] mStrings = {"0","AC","退格","/","*","7","8","9","—","4","5","6","+","1","2","3","=","%","0","."};

    @Override
    protected void onCreate(Bundle savedInstanceState) {
        super.onCreate(savedInstanceState);
        // xml布局
//        setContentView(R.layout.activity_main);

        // 动态添加
        setContentView(R.layout.activity_main2);

        GridLayout gridLayout = (GridLayout) findViewById(R.id.grid_layout);

        // 6行   4列
        gridLayout.setColumnCount(4);
        gridLayout.setRowCount(6);

        for (int i = 0; i < mStrings.length; i++) {
            TextView textView = new TextView(this);
            GridLayout.LayoutParams params = new GridLayout.LayoutParams();
            params.width =0;
            params.height =0;

            if(i == 0){
                // 设置行列下标, 所占行列  ,比重
                // 对应: layout_row  , layout_rowSpan , layout_rowWeight
                // 如下代表: item坐标(0,0), 占 1 行,比重为 3 ; 占 4 列,比重为 1
                params.rowSpec = GridLayout.spec(0,1,3f);
                params.columnSpec = GridLayout.spec(0,4,1f);

                textView.setGravity(Gravity.BOTTOM|Gravity.RIGHT);
            }else{
                // 设置行列下标,和比重
                params.rowSpec = GridLayout.spec((i+3)/4,1f);
                params.columnSpec = GridLayout.spec((i+3)%4,1f);

                // 背景
                textView.setBackgroundColor(Color.WHITE);

                // 字体颜色
                if("AC".equals(mStrings[i])){
                    textView.setTextColor(Color.parseColor("#f68904"));
                }

                if("=".equals(mStrings[i])){
                    textView.setBackgroundColor(Color.parseColor("#f68904"));
                    textView.setTextColor(Color.WHITE);
                    params.rowSpec = GridLayout.spec((i+3)/4,2,1f);
                }

                // 居中显示
                textView.setGravity(Gravity.CENTER);

                // 设置边距
                params.setMargins(2,2,2,2);
            }

            // 设置文字
            textView.setText(mStrings[i]);

            // 添加item
            gridLayout.addView(textView,params);
        }
    }
}
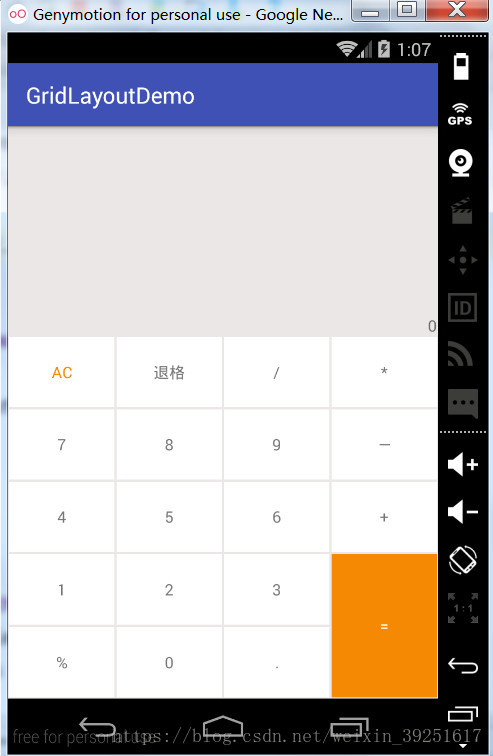
效果和用xml中直接布局一样:
注意:
GridLayout.spec(); 这个方法是一个重点,需要好好看一下,而且由于它有几个重载方法,使用时也要注意。比如说下面两个方法:
 public static Spec spec(int start, int size)
 public static Spec spec(int start, float weight)
我刚开始就忽略了这点,本想用的是第二个带有weight的方法,但是传入参数时,没有加上f,就调用了第一个方法,搞了半天才发现
所以,如果调用的是第二个方法,一定要注意float参数的表示方法,加个f,如:GridLayout.spec(0,1f);
到此这篇关于Android GridLayout使用案例详解的文章就介绍到这了,更多相关Android GridLayout使用内容请搜索我们以前的文章或继续浏览下面的相关文章希望大家以后多多支持我们!
相关推荐
-

Android中使用GridLayout网格布局来制作简单的计算器App
关于GridLayout 在android4.0版本之前,如果想要达到网格布局的效果,首先可以考虑使用最常见的LinearLayout布局,但是这样的排布会产生如下几点问题: 1.不能同时在X,Y轴方向上进行控件的对齐. 2.当多层布局嵌套时会有性能问题. 3.不能稳定地支持一些支持自由编辑布局的工具. 其次考虑使用表格布局TabelLayout,这种方式会把包含的元素以行和列的形式进行排列,每行为一个TableRow对象,也可以是一个View对象,而在TableRow中还可以继续添加其他的控件
-
Android RecyclerView使用GridLayoutManager间距设置的方法
使用RecyclerView设置间距,需要重写RecyclerView.ItemDecoration这个类.有如下的效果图需要实现,间距只有中间的格子和底部的格式之间有. 实现方法很简单,因为这个效果是每一行有3个格子,只要每行的第一个格式左边间距为0即可以.其他都设置左边距和底部距离. 代码如下: public class SpaceItemDecoration extends RecyclerView.ItemDecoration { private int space; public Sp
-
Android自定义ViewGroup之CustomGridLayout(一)
之前写了两篇关于自定义view的文章,本篇讲讲自定义ViewGroup的实现. 我们知道ViewGroup就是View的容器类,我们经常用的LinearLayout,RelativeLayout等都是ViewGroup的子类.并且我们在写布局xml的时候,会告诉容器(凡是以layout为开头的属性,都是为用于告诉容器的),我们的宽度(layout_width).高度(layout_height).对齐方式(layout_gravity)等:于是乎,ViewGroup的职能为:给childView
-
Android开发之计算器GridLayout布局实现方法示例
本文实例讲述了Android开发之计算器GridLayout布局实现方法.分享给大家供大家参考,具体如下: 运行效果: Demo 下载地址:https://github.com/LonglyWolf/Calculator 或者点击此处本站下载. 按钮布局实现: 一个Linearlayout 嵌套三个TextView 最下方的显示当前计算式.上面为先前的计算式. Gridview 网格布局排布按钮 <?xml version="1.0" encoding="utf-8&q
-
Android使用GridLayout绘制自定义日历控件
效果图 思路:就是先设置Gridlayout的行列数,然后往里面放置一定数目的自定义日历按钮控件,最后实现日历逻辑就可以了. 步骤: 第一步:自定义日历控件(初步) 第二步:实现自定义单个日期按钮控件 第三步:将第二步得到的控件动态添加到第一步的布局中,并实现日期逻辑 第四步:编写单个日期点击监听器接口 第一步:自定义日历控件(初步) <?xml version="1.0" encoding="utf-8"?> <LinearLayout xmln
-
Android布局之GridLayout网格布局
网格布局标签是GridLayout.这个布局是android4.0新增的布局.这个布局只有4.0之后的版本才能使用. 不过新增了一些东东 ①跟LinearLayout(线性布局)一样,他可以设置容器中组件的对齐方式 ②容器中的组件可以跨多行也可以跨多列(相比TableLayout直接放组件,占一行相比较) 因为是android 4.0新增的,API Level 14,在这个版本以前的sdk 都需要导入项目,等下会详细介绍 常用属性: 排列对齐: ①设置组件的排列方式: android:ori
-
Android GridLayout使用案例详解
目录 一.简介 二.常用属性介绍 三.平分问题 四.小米计算器效果 五.动态加载 一.简介 GridLayout是Android4.0引入的网格布局,使用它可以减少布局嵌套.也算是常用,但一直没仔细看过,今天研究一下 二.常用属性介绍 GridLayout 使用属性 属性 作用 android:columnCount 最大列数 android:rowCount 最大行数 android:orientation GridLayout中子元素的布局方向 android:alignmentMode a
-
Android LayoutParams使用案例详解
LayoutParams是什么? LayoutParams主要保存了一个View的布局参数,因此可以使用LayoutParams来改变布局参数从而达到View位置的效果,一般在自定义View的时候使用. LayoutParams怎么用? 如果父控件是LinearLayout,需要使用LinearLayout.LayoutParams 代码如下: LinearLayout.LayoutParams layoutParams=(LinearLayout.LayoutParams)getLayoutP
-
Android ActivityManager使用案例详解
前言 Activity可以获取运行中的应用信息,可以获取到servcie,process,app,memory,Task信息等. 获取信息 ActivityManager.MemoryInfo MemoryInfo中重要的字段:availMem(系统可用内存),totalMem(总内存),threshold(低内存阈值,即低内存的临界线),lowMemory(是否为低内存状态) Debug.MemoryInfo Debug.MemoryInfo主要用于获取进程下的内存信息. ActivityMa
-
Android之AttributeSet案例详解
public interface AttributeSet { /** * Returns the number of attributes available in the set. * * @return A positive integer, or 0 if the set is empty. */ public int getAttributeCount(); /** * Returns the name of the specified attribute. * * @param in
-
Android Handler使用案例详解
什么是Handler? Handler可以发送和处理消息对象或Runnable对象,这些消息对象和Runnable对象与一个线程相关联.每个Handler的实例都关联了一个线程和线程的消息队列.当创建了一个Handler对象时,一个线程或消息队列同时也被创建,该Handler对象将发送和处理这些消息或Runnable对象. handler类有两种主要用途: 执行Runnable对象,还可以设置延迟. 两个线程之间发送消息,主要用来给主线程发送消息更新UI. 为什么要用Handler 解决多线程并
-
Android VelocityTracker使用案例详解
VelocityTracker顾名思义即速度跟踪,在android中主要应用于touch even.VelocityTracker通过跟踪一连串事件实时计算出当前的速度,这样的用法在android系统空间中随处可见,比如Gestures中的Fling, Scrolling等. VelocityTracker主要用跟踪触摸屏事件(flinging事件和其他gestures手势事件)的速率.用addMovement(MotionEvent)函数将Motion event加入到Veloci
-
Android开发之对话框案例详解(五种对话框)
下面通过实例代码给大家分享5种android对话框,具体内容详情如下所示: 1 弹出普通对话框 --- 系统更新 2 自定义对话框-- 用户登录 3 时间选择对话框 -- 时间对话框 4 进度条对话框 -- 信息加载.. 5 popuWindow对话框 1 弹出普通对话框 --- 系统更新 //弹出普通对话框 public void showNormalDialog(View v) { AlertDialog.Builder builder = new Builder(this); //设置D
-
Android notifyDataSetChanged() 动态更新ListView案例详解
有时候我们需要修改已经生成的列表,添加或者修改数据,notifyDataSetChanged()可以在修改适配器绑定的数组后,不用重新刷新Activity,通知Activity更新ListView.今天的例子就是通过Handler AsyncTask两种方式来动态更新ListView. <?xml version="1.0" encoding="utf-8"?> <LinearLayout xmlns:android="http://sc
-
Android ExpandableListView使用方法案例详解
目录 一.前言 二.实现的功能 三.具体代码 1.主xml代码 2.父布局xml代码 3.子布局xml代码 4.主activity代码 5.adapter代码 一.前言 "好记性不如烂笔头",再次验证了这句话是真的很有道理啊,一个月前看了一下ExpandableListView的使用,今天再看居然忘了这个是干啥的了,今天就详细讲解一下ExpandableListView的使用方法,感觉对于二级条目显示功能都可以实现. 二.实现的功能 1.可实现二级列表条目显示功能,具体包括可自定义
-
Android HandlerThread案例详解
HandlerThread 顾名思义就是一种可以使用 Handler 的 Thread.日常开发中我们经常会通过创建一个 Thread 去执行任务,有多个任务就多创建几个线程实现,这时候可能出现线程同步的问题.不过有时候我们并不需要很强的并发性,只需保证按照顺序地执行各个任务即可,有什么好办法实现呢?第一反应想到的可能是通过 Executors.newSingleThreadExecutor() 方法来创建一个 SingleThreadExecutor,来统一所有的任务到一个线程中,然后按顺序执