Pinia进阶setup函数式写法封装到企业项目
目录
- 开场
- 认识Pinia
- Pinia与Vuex代码分割机制
- Pinia的常规用法
- 1. 安装
- 2. 挂载全局实例
- 3. 创建第一个store
- 4. 业务组件对store的调用
- 5. 良好的编程习惯
- 企业项目封装攻略
- 1. 全局注册机
- 重复打包问题
- 创建总入口
- 总线注册
- 打包解耦
- 2. Store组管理
- 场景分析
- 组级Store创建
- 单元Store
- 业务组件调用
- 效果
- 落幕
开场
Hello大家好,相信在座各位假如使用Vue生态开发项目情况下,对Pinia状态管理库应该有所听闻或正在使用,假如还没接触到Pinia,这篇文章可以帮你快速入门,并如何在企业项目中更优雅封装使用。
本文先给大家阐述如何去理解、使用Pinia,最后讲怎样把Pinia集成到工程中,适合大多数读者,至于研读Pinia的源码等进阶科普,会另外开一篇文章细述。另外,本文的所有demo,都专门开了个GitHub项目来保存,有需要的同学可以拿下来实操一下。
认识Pinia
Pinia读音:/piːnjʌ/,是Vue官方团队推荐代替Vuex的一款轻量级状态管理库。 它最初的设计理念是让Vue Store拥有一款Composition API方式的状态管理库,并同时能支持 Vue2.x版本的Option API 和 Vue3版本的setup Composition API开发模式,并完整兼容Typescript写法(这也是优于Vuex的重要因素之一),适用于所有的vue项目。
比起Vuex,Pinia具备以下优点:
- 完整的 TypeScript 支持:与在 Vuex 中添加 TypeScript 相比,添加 TypeScript 更容易
- 极其轻巧(体积约 1KB)
- store 的 action 被调度为常规的函数调用,而不是使用 dispatch 方法或 MapAction 辅助函数,这在 Vuex 中很常见
- 支持多个Store
- 支持 Vue devtools、SSR 和 webpack 代码拆分
Pinia与Vuex代码分割机制
上述的Pinia轻量有一部分体现在它的代码分割机制中。
举个例子:某项目有3个store「user、job、pay」,另外有2个路由页面「首页、个人中心页」,首页用到job store,个人中心页用到了user store,分别用Pinia和Vuex对其状态管理。
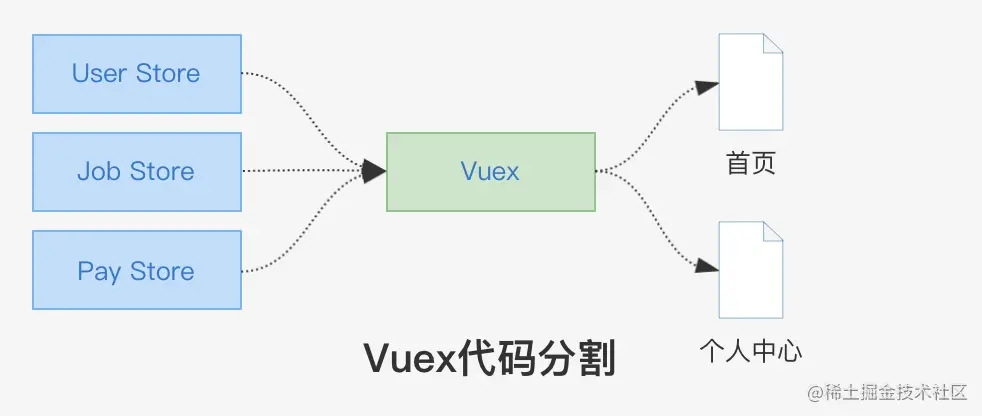
先看Vuex的代码分割: 打包时,vuex会把3个store合并打包,当首页用到Vuex时,这个包会引入到首页一起打包,最后输出1个js chunk。这样的问题是,其实首页只需要其中1个store,但其他2个无关的store也被打包进来,造成资源浪费。

Pinia的代码分割: 打包时,Pinia会检查引用依赖,当首页用到job store,打包只会把用到的store和页面合并输出1个js chunk,其他2个store不耦合在其中。Pinia能做到这点,是因为它的设计就是store分离的,解决了项目的耦合问题。
Pinia的常规用法
事不宜迟,直接开始使用Pinia「本文默认使用Vue3的setup Composition API开发模式」。
假如你对Pinia使用熟悉,可以略过这part
1. 安装
yarn add pinia
# or with npm
npm install pinia
2. 挂载全局实例
import { createPinia } from 'pinia'
app.use(createPinia())
3. 创建第一个store
在src/store/counterForOptions.ts创建你的store。定义store模式有2种:
使用options API模式定义,这种方式和vue2的组件模型形式类似,也是对vue2技术栈开发者较为友好的编程模式。
import { defineStore } from 'pinia';
// 使用options API模式定义
export const useCounterStoreForOption = defineStore('counterForOptions', {
  // 定义state
  state: () => {
    return { count1: 1 };
  },
  // 定义action
  actions: {
    increment() {
      this.count1++;
    }
  },
  // 定义getters
  getters: {
    doubleCount(state) {
      return state.count1 * 2;
    }
  }
});
使用setup模式定义,符合Vue3 setup的编程模式,让结构更加扁平化,个人推荐推荐使用这种方式。
import { ref } from 'vue';
import { defineStore } from 'pinia';
// 使用setup模式定义
export const useCounterStoreForSetup = defineStore('counterForSetup', () => {
  const count = ref<number>(1);
  function increment() {
    count.value++;
  }
  function doubleCount() {
    return count.value * 2;
  }
  return { count, increment, doubleCount };
});
上面2种定义方式效果都是一样的,我们用defineStore方法定义一个store,里面分别定义1个count的state,1个increment action 和1个doubleCount的getters。其中state是要共享的全局状态,而action则是让业务方调用来改变state的入口,getters是获取state的计算结果。
之所以用第一种方式定义是还要额外写getters、action关键字来区分,是因为在options API模式下可以通过mapState()、mapActions()等方法获取对应项;但第二种方式就可以直接获取了(下面会细述)。
4. 业务组件对store的调用
在src/components/PiniaBasicSetup.vue目录下创建个组件。
<script setup lang="ts" name="component-PiniaBasicSetup">
import { storeToRefs } from 'pinia';
import { useCounterStoreForSetup } from '@/store/counterForSetup';
// setup composition API模式
const counterStoreForSetup = useCounterStoreForSetup();
const { count } = storeToRefs(counterStoreForSetup);
const { increment, doubleCount } = counterStoreForSetup;
</script>
<template>
  <div class="box-styl">
    <h2>Setup模式</h2>
    <p class="section-box">
      Pinia的state: count = <b>{{ count }}</b>
    </p>
    <p class="section-box">
      Pinia的getters: doubleCount() = <b>{{ doubleCount() }}</b>
    </p>
    <div class="section-box">
      <p>Pinia的action: increment()</p>
      <button @click="increment">点我</button>
    </div>
  </div>
</template>
<style lang="less" scoped>
  .box-styl {
    margin: 10px;
    .section-box {
      margin: 20px auto;
      width: 300px;
      background-color: #d7ffed;
      border: 1px solid #000;
    }
  }
</style>
- Pinia在setup模式下的调用机制是先install再调用。
- install这样写:
const counterStoreForSetup = useCounterStoreForSetup();,其中useCounterStoreForSetup就是你定义store的变量; - 调用就直接用
counterStoreForSetup.xxx(xxx包括:state、getters、action)就好。 - 代码中获取state是用了解构赋值,为了保持state的响应式特性,需要用
storeToRefs进行包裹。
兼容Vue2的Options API调用方式
<script lang="ts">
import { mapState, mapActions } from 'pinia';
import { useCounterStoreForOption } from '@/store/counterForOptions';
// setup composition API模式
export default {
  name: 'component-PiniaBasicOptions',
  computed: {
    // 获取state和getters
    ...mapState(useCounterStoreForOption, ['count', 'doubleCount'])
  },
  methods: {
    // 获取action
    ...mapActions(useCounterStoreForOption, {
      increment: 'increment',
      reset: 'reset'
    })
  }
};
</script>
<template>
  <div class="box-styl">
    <h2>Options模式</h2>
    <p class="section-box">
      Pinia的state: count = <b>{{ this.count }}</b>
    </p>
    <p class="section-box">
      Pinia的getters: doubleCount() = <b>{{ this.doubleCount }}</b>
    </p>
    <div class="section-box">
      <p>Pinia的action: increment()</p>
      <button @click="this.increment">点我</button>
    </div>
    <div class="section-box">
      <p>Pinia的action: reset()</p>
      <button @click="this.reset">点我</button>
    </div>
  </div>
</template>
<style lang="less" scoped>
.box-styl {
  margin: 10px;
  .section-box {
    margin: 20px auto;
    width: 300px;
    background-color: #d7ffed;
    border: 1px solid #000;
  }
}
</style>
5. 良好的编程习惯
state的改变交给action去处理: 上面例子,counterStoreForSetup有个pinia实例属性叫$state是可以直接改变state的值,但不建议怎么做。一是难维护,在组件繁多情况下,一处隐蔽state更改,整个开发组帮你排查;二是破坏store封装,难以移植到其他地方。所以,为了你的声誉和安全着想,请停止游离之外的coding
相关推荐
-

关于vue3中setup函数的使用
概述 一. 初识setup函数 组件中所用到的:数据.方法等等均要配置在setup中,这也就意味着在Vue2中写的data.methods在这里都不再推荐使用. 这样的配置让对象式编程趋近于了函数式编程. <script>export default { name: 'App', // 最为原始的对象写法是这样,但是通过es6我们可以简写 // setup: function(){} setup () { // 数据 let name = '黑猫几绛' let age = 20 // 方法 f
-
详解如何在Vue3使用<script lang=“ts“ setup>语法糖
目录 迁移组件 隐式返回 defineProps defineEmits 默认关闭和defineExpose Vue 3.2 引入了语法,这是一种稍微不那么冗长的声明组件的方式.您可以通过向 SFC 的元素添加属性来启用它,然后可以删除组件中的一些样板.script setupsetupscript 让我们举一个实际的例子,并将其迁移到这个语法! 迁移组件 以下组件有两个道具(要显示的和一个标志).基于这两个道具,计算模板中显示的小马图像的URL(通过另一个组件).该组件还会在用户单击它时发出一
-
强烈推荐!Vue3.2中的setup语法糖
目录 前文 1.什么是setup语法糖 2.使用setup组件自动注册 3.使用setup后新增API 3.1 defineProps 3.2 defineEmits 3.3 defineExpose vue3项目如何开启setup语法糖 总结: 前文 作为一个前端程序员,说起 Vue 3肯定不会陌生,作为时下最火的前端框架之一,很多人将它作为入门框架. 但是尽管 Vue 3很久之前就已经开始投入使用,也不免会有人抱怨 Vue 3的知识点太多太杂,更新太快.这不,最近 Vue 3又定稿了一项新技
-
vue3基于script setup语法$refs的使用
目录 一.vue2语法 二.vue3使用 1. 组件设置ref值 2. 组件实例获取 3. 子组件内设置对外公开的变量 一.vue2语法 vue2语法在组件上设置ref属性后,在代码里可以通过 this.$refs.ref值 访问到对应的子组件. 一个设置ref值的组件: <base-input ref="usernameInput"></base-input> 在js代码中可以通过如下代码访问到这个组件: this.$refs.usernameInput 可以
-
Vue3使用setup如何定义组件的name属性详解
目录 问题: 描述: 解决: 第一种: 第二种: 总结 问题: 解决Vue3中使用setup如何定义组件的name属性 描述: 这几天在尝试改写基于vue2的组件至vue3版本,使用了最新的setup也就是如下这种方式编写组件 <script lang="ts" setup> // ...代码块 </script> 由于个人还是比较喜欢Element那种组件注册方式,也就是如下 import TButton from './src/index.vue'; TBu
-
vue3 setup() 高级用法示例详解
目录 一.选项式API 和 组合式API 区别 二.setup 具体怎么用? 2.1.setup 什么时候执行? 2.2.setup 数据和方法如何使用? 2.3.setup 内部有 this 吗? 2.5.setup与钩子函数关系 三.setup 参数 3.1.props 3.2.context 四.setup 特性总结 本篇文章干货较多,建议收藏! 从 vue2 升级到 vue3,vue3 是可以兼容 vue2 的,所以 vue3 可以采用 vue2 的选项式API.由于选项式API一个变量
-
Pinia进阶setup函数式写法封装到企业项目
目录 开场 认识Pinia Pinia与Vuex代码分割机制 Pinia的常规用法 1. 安装 2. 挂载全局实例 3. 创建第一个store 4. 业务组件对store的调用 5. 良好的编程习惯 企业项目封装攻略 1. 全局注册机 重复打包问题 创建总入口 总线注册 打包解耦 2. Store组管理 场景分析 组级Store创建 单元Store 业务组件调用 效果 落幕 开场 Hello大家好,相信在座各位假如使用Vue生态开发项目情况下,对Pinia状态管理库应该有所听闻或正在使用,假如还
-
Pinia 的 Setup Stores 语法使用实例详解
目录 关于大菠萝 最常见的 Option Stores 语法 安利 Setup Stores 语法 如果在 Vue3 的 Setup 语法外使用 Pinia 呢? 关于大菠萝 如果你还不了解 Pinia,那你可以将它理解为 Vuex5(因为 Vuex 5 不会出了),是 Vue3 全家桶成员之一. 这里是它的英文官方文档,中文文档好像不是官方的,并且当前翻译的不全面(比如 Setup Stores 就没有在中文文档中出现),不是很推荐. 最常见的 Option Stores 语法 传递带有 st
-
函数式组件劫持替代json封装element表格
目录 背景 思路 想法与实践 el-table-column获取 如何渲染表格 操作表格 组件代码 表格函数式组件 问题点与优化 hf-table.vue table.js 后话 背景 系统有个整改需求,要求系统内的所有表格支持本地动态列显隐,拖拽排序列位置,固定列功能,涉及的页面很多 上效果图: 思路 其实最开始想的肯定是json配置表单的形式,再由循环出来的列去控制对应的位置和属性 但是!很多页面啊!每个页面都要去转json配置意味着大量的工作量和极高的风险 能不能我就写个自己的组件来包一层
-
简单聊聊vue3.0 sfc中setup的变化
目录 前言 标准的sfc写法 script-setup 变量暴露 组件挂载 props 自定义事件 总结 前言 在vue中,sfc(单文件组件)指的是文件后缀名为.vue的特殊文件格式,它允许将 Vue 组件中的模板.逻辑 与 样式封装在单个文件中. 以下是一个基本的sfc <script> export default { data() { return { greeting: 'Hello World!' } } } </script> &l
-
还在用vuex?来了解一下pinia
目录 1.什么是pinia 2.优势 3.使用(非常简单) 总结 1. 什么是pinia 通俗的讲 : ① vuex精简版 ,而且vue官方更加推荐使用. ②优势又完胜于vuex ,下面我们来了解下pinia. 2.优势 pina vuex pinia 同时支持vue2和vue3 vue2要用vuex 3 版本vue3要用vuex 4 版本 不分同步异步,更好的ts支持 分同步异步,不太兼容ts 享受自动补全… 需要注入,导入函数,调用他们… 3. 使用 (非常简单) ① 安装 npm inst
-
vue中使用 pinia 全局状态管理的实现
目录 与vuex的区别 安装 引入pinia 创建状态目录 pinia模块组成 创建pinia模块 在组件中使用该状态机 pinia模块实例中的api讲解 状态持久化 与vuex的区别 去除了 mutation 选项.省去了复杂的disptach和commit流程,直接通过模块实例调用实例的actions中的方法即可触发对应action:在组件中直接可以通过模块实例的$patch修改store状态或者通过action来间接修改store状态.响应式数据原理是proxy,使得数据的增加或者删除字段
-
React组件的三种写法总结
React 专注于 view 层,组件化则是 React 的基础,也是其核心理念之一,一个完整的应用将由一个个独立的组件拼装而成. 截至目前 React 已经更新到 v15.4.2,由于 ES6 的普及和不同业务场景的影响,我们会发现目前主要有三种创建 React 组件的写法:1. ES5写法React.createClass,2. ES6写法React.Component,3. 无状态的函数式写法(纯组件-SFC). 你们最钟爱哪种写法呢?萝卜青菜各有所爱~ 每个团队都有自己的代码规范和开发模
-
浅谈VUE防抖与节流的最佳解决方案(函数式组件)
前言 有echarts使用经验的同学可能遇到过这样的场景,在window.onresize事件回调里触发echartsBox.resize()方法来达到重绘的目的,resize事件是连续触发的这意味着echarts实例会连续的重绘这是非常耗性能的.还有一个常见的场景在input标签的input事件里请求后端接口,input事件也是连续触发的,假设我输入了"12"就会请求两次接口参数分别是"1"和"12",比浪费网络资源更要命的是如果参数为&quo
-
PHP中用Trait封装单例模式的实现
单例模式的定义 确保某一个类只有一个实例,不能重复实例,只能它自己实例化,而且向整个系统提供这个实例. 解决的问题 即一个类只被实例化一次,当其他人对其再次实例化时,返回第一次实例化的对象,可以避免大量的 new 操作,减少资源的消耗. 原则:四步走,三私一公 私有化静态属性 私有化构造方法 私有化克隆方法 公有化静态方法 封装背景 当项目中有多个单例类,每新建一个类,都得做三私一公的定义,就显得有些做重复工作了,不仅仅浪费时间浪费精力,而且代码臃肿且难维护,有没有 更优雅 的写法呢? Trai
-
java中lambda(函数式编程)一行解决foreach循环问题
java lambda(函数式编程)一行解决foreach循环 首先给大家推荐<精通lambda表达式:java多核编程> 这本书详细介绍了lambda表达式从入门到理解.应用 下面介绍用以前的循环方式进行对比,来更加清晰地java函数式编程中foreach的用法 一.以前我们使用的for循环 /** * for循环 */ @Test public void forTest() { // 实例化一个List List<Point> points = Arrays.asList(ne