Android实现院系专业三级联动
Android实现院系专业三级联动,供大家参考,具体内容如下
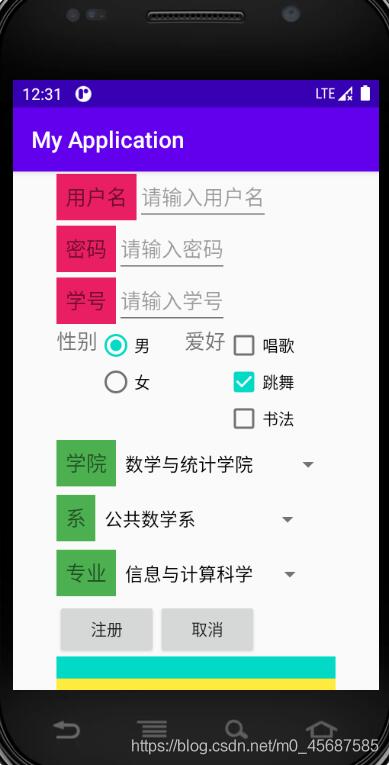
设计一个注册页面
注册项:用户名、密码、学号、性别、爱好、学院、系、专业。
具体要求如下
1、学号只能输入数字
2、密码框要隐藏,8-24位之间
3、性别用单选框,默认选中男
4、爱好用多选框,默认选中第二个选项
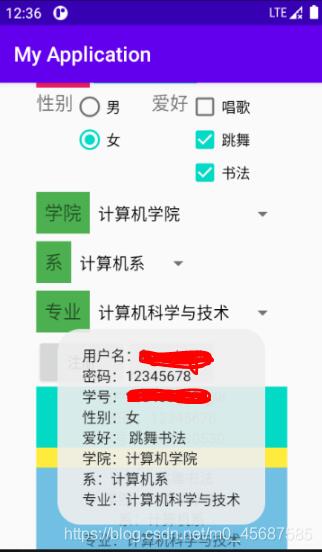
5、院、系和专业选择使用下拉列表框(先院,后系、最后专业。要求院系专业之间是联动的,例如:选中了计算机学院,第二个系列表框里只能有该学院的几个系,选中了某一个系,第三个专业列表框里只能有该系对应的专业)
6、点击注册按钮,在TextView中显示所有注册信息,同时用Toast显示所有注册信息
效果图:

点击注册按钮,在TextView中显示所有注册信息,同时用Toast显示所有注册信息

activity_main.xml代码:
<?xml version="1.0" encoding="utf-8"?>
<LinearLayout
 xmlns:android="http://schemas.android.com/apk/res/android"
 xmlns:app="http://schemas.android.com/apk/res-auto"
 xmlns:tools="http://schemas.android.com/tools"
 android:layout_width="match_parent"
 android:layout_height="match_parent"
 android:orientation="vertical"
 android:gravity="center"
 tools:context=".MainActivity">
 <ScrollView
 android:layout_width="wrap_content"
 android:layout_height="wrap_content"
 android:scrollbars="none">
 <LinearLayout
  android:layout_width="wrap_content"
  android:layout_height="wrap_content"
  android:orientation="vertical">
  <LinearLayout
  android:layout_width="wrap_content"
  android:layout_height="wrap_content">
  <TextView
   android:layout_width="wrap_content"
   android:layout_height="wrap_content"
   android:text="用户名"
   android:textSize="18dp"
   android:background="#E91E63"
   android:padding="8dp"
   />
  <EditText
   android:layout_width="wrap_content"
   android:layout_height="wrap_content"
   android:id="@+id/edt1"
   android:hint="请输入用户名"
   />
  </LinearLayout>
  <LinearLayout
  android:layout_width="wrap_content"
  android:layout_height="wrap_content">
  <TextView
   android:layout_width="wrap_content"
   android:layout_height="wrap_content"
   android:text="密码"
   android:textSize="18dp"
   android:background="#E91E63"
   android:padding="8dp"
   />
  <EditText
   android:layout_width="wrap_content"
   android:layout_height="wrap_content"
   android:id="@+id/edt2"
   android:hint="请输入密码"
   android:inputType="numberPassword"
   />
  </LinearLayout>
  <LinearLayout
  android:layout_width="wrap_content"
  android:layout_height="wrap_content">
  <TextView
   android:layout_width="wrap_content"
   android:layout_height="wrap_content"
   android:text="学号"
   android:textSize="18dp"
   android:background="#E91E63"
   android:padding="8dp"
   />
  <EditText
   android:layout_width="wrap_content"
   android:layout_height="wrap_content"
   android:id="@+id/edt3"
   android:hint="请输入学号"
   android:inputType="number"
   />
  </LinearLayout>
  <LinearLayout
  android:layout_width="wrap_content"
  android:layout_height="wrap_content">
  <TextView
   android:layout_width="wrap_content"
   android:layout_height="wrap_content"
   android:text="性别"
   android:textSize="18dp"
   />
  <RadioGroup
   android:layout_width="wrap_content"
   android:layout_height="wrap_content"
   android:id="@+id/rg1"
   android:orientation="vertical">
   <RadioButton
   android:layout_width="wrap_content"
   android:layout_height="wrap_content"
   android:id="@+id/rb1"
   android:text="男"
   android:checked="true"
   />
   <RadioButton
   android:layout_width="wrap_content"
   android:layout_height="wrap_content"
   android:id="@+id/rb2"
   android:text="女"
   />
  </RadioGroup>
  <TextView
   android:layout_width="wrap_content"
   android:layout_height="wrap_content"
   android:text="爱好"
   android:textSize="18dp"
   android:layout_marginLeft="30dp"
   />
  <LinearLayout
   android:layout_width="wrap_content"
   android:layout_height="wrap_content"
   android:orientation="vertical"
   >
   <CheckBox
   android:layout_width="wrap_content"
   android:layout_height="wrap_content"
   android:text="唱歌"
   android:id="@+id/cb1"
   />
   <CheckBox
   android:layout_width="wrap_content"
   android:layout_height="wrap_content"
   android:text="跳舞"
   android:checked="true"
   android:id="@+id/cb2"
   />
   <CheckBox
   android:layout_width="wrap_content"
   android:layout_height="wrap_content"
   android:text="书法"
   android:id="@+id/cb3"
   />
  </LinearLayout>
  </LinearLayout>
  <LinearLayout
  android:layout_width="wrap_content"
  android:layout_height="wrap_content">

  <TextView
   android:layout_width="wrap_content"
   android:layout_height="wrap_content"
   android:text="学院"
   android:textSize="18dp"
   android:background="#4CAF50"
   android:padding="8dp"

   />

  <Spinner
   android:id="@+id/sp1"
   android:layout_width="wrap_content"
   android:layout_height="wrap_content" />
  </LinearLayout>
  <LinearLayout
  android:layout_width="wrap_content"
  android:layout_height="wrap_content">
  <TextView
   android:layout_width="wrap_content"
   android:layout_height="wrap_content"
   android:text="系"
   android:textSize="18dp"
   android:background="#4CAF50"
   android:padding="8dp"
   />

  <Spinner
   android:id="@+id/sp2"
   android:layout_width="wrap_content"
   android:layout_height="wrap_content" />
  </LinearLayout>
  <LinearLayout
  android:layout_width="wrap_content"
  android:layout_height="wrap_content">
  <TextView
   android:layout_width="wrap_content"
   android:layout_height="wrap_content"
   android:text="专业"
   android:textSize="18dp"
   android:background="#4CAF50"
   android:padding="8dp" />

  <Spinner
   android:id="@+id/sp3"
   android:layout_width="wrap_content"
   android:layout_height="wrap_content" />
  </LinearLayout>
  <LinearLayout
  android:layout_width="wrap_content"
  android:layout_height="wrap_content">
  <Button
   android:id="@+id/btn1"
   android:layout_width="wrap_content"
   android:layout_height="wrap_content"
   android:text="注册" />
  <Button
   android:id="@+id/btn2"
   android:layout_width="wrap_content"
   android:layout_height="wrap_content"
   android:text="取消" />
  </LinearLayout>
  <TextView
  android:layout_width="match_parent"
  android:layout_height="wrap_content"
  android:id="@+id/id1"
  android:gravity="center"
  android:background="@color/colorAccent"/>
  <TextView
  android:layout_width="match_parent"
  android:layout_height="wrap_content"
  android:id="@+id/id2"
  android:gravity="center"
  android:background="#FFEB3B"/>
  <TextView
  android:layout_width="match_parent"
  android:layout_height="wrap_content"
  android:id="@+id/id3"
  android:gravity="center"
  android:background="#71BFE3"/>
 </LinearLayout>
 </ScrollView>
</LinearLayout>
代码:
package com.example.test;

import androidx.appcompat.app.AppCompatActivity;

import android.os.Bundle;
import android.provider.MediaStore;
import android.text.method.ScrollingMovementMethod;
import android.view.View;
import android.widget.AdapterView;
import android.widget.ArrayAdapter;
import android.widget.Button;
import android.widget.CheckBox;
import android.widget.EditText;
import android.widget.RadioButton;
import android.widget.RadioGroup;
import android.widget.Spinner;
import android.widget.TextView;
import android.widget.Toast;

public class MainActivity extends AppCompatActivity {
 Spinner sp1,sp2,sp3;
 Button btn1;
 EditText edt1,edt2,edt3;
 RadioGroup rg1;
 CheckBox cb1,cb2,cb3;
 TextView id1,id2,id3;
 static int index;
 @Override
 protected void onCreate(Bundle savedInstanceState) {
 super.onCreate(savedInstanceState);
 setContentView(R.layout.activity_main);
 final String []college={"数学与统计学院","化学材料与工程","轻工科学技术学院","电商与物流学院","生态环境学院","计算机学院"};
 final String [][]depart=
  {
   {"公共数学系","应用统计系","经济统计系","数学与应用数学系"},
   {"化学系","材料科学与工程系","化妆品系"},
   {"应用化学系","生物工程系"},
   {"物流管理系","信息管理系"},
   {"环境科学与工程系"},
   {"计算机系"}
  };
 final String [][][]major=
  {
   {{"信息与计算科学"},{"应用统计学"},{"经济统计学"},{"数据科学与大数据技术"}},
   {{"化学技术与工程"},{"高分子材料与工程","功能材料"},{"化妆品技术与工程"}},
   {{"化学"},{"生物工程"}},
   {{"物流管理","供应链管理"},{"电子商务","信息管理与信息系统"}},
   {{"环境科学与工程"}},
   {{"计算机科学与技术","软件工程","物联网工程"}}
  };
 ArrayAdapter<String> colAdapter=new ArrayAdapter<String>(this,R.layout.support_simple_spinner_dropdown_item,college);
 ArrayAdapter<String> depAdapter=new ArrayAdapter<String>(this,R.layout.support_simple_spinner_dropdown_item,depart[0]);
 ArrayAdapter<String> morAdapter=new ArrayAdapter<String>(this,R.layout.support_simple_spinner_dropdown_item,major[0][0]);
 edt1=(EditText)findViewById(R.id.edt1);
 edt2=(EditText)findViewById(R.id.edt2);
 edt3=(EditText)findViewById(R.id.edt3);
 rg1=(RadioGroup) findViewById(R.id.rg1);
 cb1=(CheckBox)findViewById(R.id.cb1);
 cb2=(CheckBox)findViewById(R.id.cb2);
 cb3=(CheckBox)findViewById(R.id.cb3);
 sp1=(Spinner)findViewById(R.id.sp1);
 sp2=(Spinner)findViewById(R.id.sp2);
 sp3=(Spinner)findViewById(R.id.sp3);
 btn1=(Button)findViewById(R.id.btn1);
 id1=(TextView)findViewById(R.id.id1);
 id2=(TextView)findViewById(R.id.id2);
 id3=(TextView)findViewById(R.id.id3);
 sp1.setAdapter(colAdapter);
 sp1.setOnItemSelectedListener(new AdapterView.OnItemSelectedListener() {
  @Override
  public void onItemSelected(AdapterView<?> parent, View view, int position, long id) {
  index=position;
  ArrayAdapter<String> depAdapter=new ArrayAdapter<String>(MainActivity.this,R.layout.support_simple_spinner_dropdown_item,depart[position]);
  sp2.setAdapter(depAdapter);
  }

  @Override
  public void onNothingSelected(AdapterView<?> parent) {

  }
 });
 sp2.setAdapter(depAdapter);
 sp2.setOnItemSelectedListener(new AdapterView.OnItemSelectedListener() {
  @Override
  public void onItemSelected(AdapterView<?> parent, View view, int position, long id) {
  ArrayAdapter<String> morAdapter=new ArrayAdapter<String>(MainActivity.this,R.layout.support_simple_spinner_dropdown_item,major[index][position]);
  sp3.setAdapter(morAdapter);
  }

  @Override
  public void onNothingSelected(AdapterView<?> parent) {

  }
 });
 btn1.setOnClickListener(new View.OnClickListener() {
  @Override
  public void onClick(View v) {
  String likes=" ";
  String name=edt1.getText().toString();
  String password=edt2.getText().toString();
  String num=edt3.getText().toString();
  String str1="用户名:"+name+"\n"+"密码:"+password+"\n"+"学号:"+num;
  String str2=" ";
  if(password.length()<8||password.length()>24)
  {
   Toast.makeText(MainActivity.this,"密码需8-24位",Toast.LENGTH_SHORT).show();
  }
  else{
   id1.setText(str1);
  }
  for(int i=0;i<rg1.getChildCount();i++)
  {
   RadioButton r=(RadioButton)rg1.getChildAt(i);
   if(r.isChecked())
   {
   str2="性别:"+r.getText().toString();
   id2.setText(str2);
   break;
   }
  }
  if(cb1.isChecked())
  {
   likes=likes+cb1.getText().toString();
  }
  if(cb2.isChecked())
  {
   likes=likes+cb2.getText().toString();
  }
  if(cb3.isChecked())
  {
   likes=likes+cb3.getText().toString();
  }
  String str3="爱好:"+likes+"\n"+"学院:"+sp1.getSelectedItem().toString()+"\n"+"系:"+sp2.getSelectedItem().toString()+"\n"+"专业:"+sp3.getSelectedItem().toString();
  Toast.makeText(MainActivity.this,str1+"\n"+str2+"\n"+str3,Toast.LENGTH_SHORT).show();
  id3.setText(str3);
  }
 });
 }
}
以上就是本文的全部内容,希望对大家的学习有所帮助,也希望大家多多支持我们。
赞 (0)

