Spring集成Mybatis过程详细讲解
目录
- 为啥学习集成Mybatis ORM框架
- 实现步骤
为啥学习集成Mybatis ORM框架
虽然Spring中提供了JDBCTemplate模块,已经很大程度了解决了JDBC代码的复杂度,但它仍然是和Java代码写在一起的。反观 Mybatis 将 Sql 语句写在配置文件中,使得SQL语句和程序实现了松耦合。而且提供了些许标签,使得SQL可以是动态的。在ORM基础上想要更好的用Spring的DI、AOP、事务处理、Junit支持等实现成果,学会使用 Spring 框架集成 Mybatis 是大势所趋。
实现步骤
第一步:准备数据库表
第二步:IDEA中创建一个模块,并引入以下依赖
- spring-context
- spring-jdbc
- mysql驱动
- mybatis
- mybatis-spring:
mybatis提供的与spring框架集成的依赖 - druid:德鲁伊连接池
- junit
    <dependencies>
        <dependency>
            <groupId>org.springframework</groupId>
            <artifactId>spring-context</artifactId>
            <version>6.0.5</version>
        </dependency>
        <dependency>
            <groupId>org.springframework</groupId>
            <artifactId>spring-jdbc</artifactId>
            <version>6.0.5</version>
        </dependency>
        <dependency>
            <groupId>mysql</groupId>
            <artifactId>mysql-connector-java</artifactId>
            <version>8.0.31</version>
        </dependency>
        <dependency>
            <groupId>org.mybatis</groupId>
            <artifactId>mybatis</artifactId>
            <version>3.5.11</version>
        </dependency>
        <dependency>
            <groupId>org.mybatis</groupId>
            <artifactId>mybatis-spring</artifactId>
            <version>3.0.1</version>
        </dependency>
        <dependency>
            <groupId>com.alibaba</groupId>
            <artifactId>druid</artifactId>
            <version>1.2.16</version>
        </dependency>
        <dependency>
            <groupId>junit</groupId>
            <artifactId>junit</artifactId>
            <version>4.13</version>
            <scope>test</scope>
        </dependency>
    </dependencies>
第三步:基于三层架构实现,所以提前创建好所有的包
- XXXX.mapper
- XXXX.service
- XXXX.service.impl
- XXXX.bean

第四步:编写bean
Account,按bean规范创建

第五步:编写Mapper接口
AccountMapper接口,定义与数据库交互的方法
package com.ncpowernode.spring.mappers;
import com.ncpowernode.spring.bean.Account;
import java.util.List;
public interface AccountMapper {
    List<Account> selectAll();
    Account selectByActno(String actno);
    int insert(Account account);
    int deleteByActno(String actno);
    int update(Account account);
}
第六步:编写mapper配置文件
<?xml version="1.0" encoding="UTF-8" ?>
<!DOCTYPE mapper
        PUBLIC "-//mybatis.org//DTD Mapper 3.0//EN"
        "http://mybatis.org/dtd/mybatis-3-mapper.dtd">
<mapper namespace="com.ncpowernode.spring.mappers.AccountMapper">
    <select id="selectAll" resultType="account">
        select * from t_act;
    </select>
    <insert id="insert">
        insert into t_act values(#{actno},#{balance})
    </insert>
    <delete id="deleteByActno">
        delete from t_act where actno = #{actno};
    </delete>
    <select id="selectByActno" resultType="account">
        select * from t_act where actno = #{actno};
    </select>
    <update id="update">
        update t_act set balance = #{balance} where actno = #{actno};
    </update>
</mapper>
第七步:编写service接口和service接口的实现类
service接口
package com.ncpowernode.spring.service;
import com.ncpowernode.spring.bean.Account;
import java.util.List;
public interface AccountService {
    int save(Account act);
    int deleteByActno(String actno);
    List<Account> getAll();
    void transfer(String fromActno,String toActno,double money);
}
service实现
package com.ncpowernode.spring.service.impl;
import com.ncpowernode.spring.bean.Account;
import com.ncpowernode.spring.mappers.AccountMapper;
import com.ncpowernode.spring.service.AccountService;
import org.springframework.beans.factory.annotation.Autowired;
import org.springframework.beans.factory.annotation.Qualifier;
import java.util.List;
@Service("accountService")
@Transactional
public class AccountServiceImpl implements AccountService {
    @Autowired
    @Qualifier("accountMapper")
    private AccountMapper accountMapper;
    @Override
    public int save(Account act) {
        return accountMapper.insert(act);
    }
    @Override
    public int deleteByActno(String actno) {
        return accountMapper.deleteByActno(actno);
    }
    @Override
    public List<Account> getAll() {
        return accountMapper.selectAll();
    }
    @Override
    public void transfer(String fromActno, String toActno, double money) {
        // 判断余额
        Account fromAccount = accountMapper.selectByActno(fromActno);
        if (fromAccount.getBalance()<money) throw new RuntimeException("余额不足");
        // 更新数据库
        Account toAccount = accountMapper.selectByActno(toActno);
        fromAccount.setBalance(fromAccount.getBalance()-money);
        toAccount.setBalance(toAccount.getBalance()+money);
        int cnt = accountMapper.update(fromAccount);
        cnt += accountMapper.update(toAccount);
        // 判断业务是否实现成功
        if(cnt!=2) throw new RuntimeException("转账失败");
    }
}
第八步:编写jdbc.properties配置文件
数据库连接池相关信息
jdbc.driver=com.mysql.cj.jdbc.Driver
jdbc.url=jdbc:mysql://localhost:3306/???
jdbc.username=???
jdbc.password=???
第九步:编写mybatis-config.xml核心配置文件
<?xml version="1.0" encoding="UTF-8" ?>
<!DOCTYPE configuration
        PUBLIC "-//mybatis.org//DTD Config 3.0//EN"
        "http://mybatis.org/dtd/mybatis-3-config.dtd">
<configuration>
    <settings>
        <!--驼峰命名自动映射,默认false-->
        <setting name="mapUnderscoreToCamelCase" value="false"/>
        <!--设置懒加载-->
        <setting name="lazyLoadingEnabled" value="true"/>
        <!--配置日志,可以帮助我们查看sql执行信息-->
        <setting name="logImpl" value="STDOUT_LOGGING"/>
    </settings>
</configuration>
第十步:编写spring.xml配置文件
组件扫描
引入外部的属性文件
数据源
SqlSessionFactoryBean配置(注入mybatis核心配置文件路径,指明别名包,注入数据源)
Mapper扫描配置器(指定扫描的包)
事务管理器(DataSourceTransactionManager,注入数据源)
启动事务注解(注入事务管理器)
<?xml version="1.0" encoding="UTF-8"?>
<beans xmlns="http://www.springframework.org/schema/beans"
       xmlns:xsi="http://www.w3.org/2001/XMLSchema-instance"
       xmlns:context="http://www.springframework.org/schema/context"
       xmlns:tx="http://www.springframework.org/schema/tx"
       xsi:schemaLocation="http://www.springframework.org/schema/beans http://www.springframework.org/schema/beans/spring-beans.xsd
                            http://www.springframework.org/schema/context http://www.springframework.org/schema/context/spring-context.xsd
                            http://www.springframework.org/schema/tx http://www.springframework.org/schema/tx/spring-tx.xsd">
    <!--组件扫描-->
    <context:component-scan base-package="com.ncpowernode.spring.service"/>
    <!--引入外部的属性文件-->
    <context:property-placeholder location="jdbc.properties"/>
    <!--数据源-->
    <bean id="dataSource" class="com.alibaba.druid.pool.DruidDataSource">
        <property name="driverClassName" value="${jdbc.driver}"/>
        <property name="url" value="${jdbc.url}"/>
        <property name="username" value="${jdbc.username}"/>
        <property name="password" value="${jdbc.password}"/>
    </bean>
    <!--配置SqlSessionFactoryBean-->
    <bean class="org.mybatis.spring.SqlSessionFactoryBean">
        <!--注入数据源-->
        <property name="dataSource" ref="dataSource"/>
        <!--指定别名包-->
        <property name="typeAliasesPackage" value="com.ncpowernode.spring.bean"/>
        <!--指定mybatis核心配置文件-->
        <property name="configLocation" value="mybatis-config.xml"/>
    </bean>
    <!--配置Mapper扫描配置器-->
    <!--主要扫描mapper接口,生成代理类-->
    <bean class="org.mybatis.spring.mapper.MapperScannerConfigurer">
        <property name="basePackage" value="com.ncpowernode.spring.mappers"/>
    </bean>
    <!--事务管理器-->
    <bean id="txManager" class="org.springframework.jdbc.datasource.DataSourceTransactionManager">
        <property name="dataSource" ref="dataSource"/>
    </bean>
    <!--启动事务注解-->
    <tx:annotation-driven transaction-manager="txManager"/>
</beans>
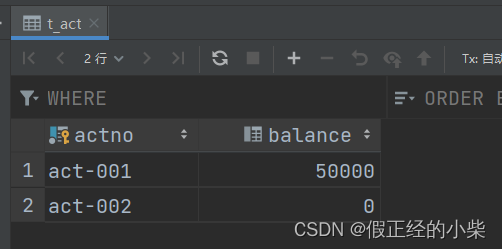
第十一步:编写测试程序,并添加事务,进行测试。
	@Test
    public void testSM(){
        ApplicationContext applicationContext = new ClassPathXmlApplicationContext("spring.xml");
        AccountService accountService = applicationContext.getBean("accountService", AccountServiceImpl.class);
        accountService.getAll().forEach(System.out::println);
        accountService.transfer("act-001","act-002",10000.0);
    }
测试结果


到此这篇关于Spring集成Mybatis过程详细讲解的文章就介绍到这了,更多相关Spring集成Mybatis内容请搜索我们以前的文章或继续浏览下面的相关文章希望大家以后多多支持我们!
相关推荐
-

Springboot集成mybatis与jsp过程详解
目录 什么是Spring Boot? springboot特点 springboot快速搭建项目 新建项目springboot_mybatis_jsp 项目配置 配置项目目录 配置工作目录(working directory) 配置pom.xml 配置application.properties 编写代码 建表t_user 编写User.java 编写UserMapper.xml 编写UserService.java.UserServiceImpl.java 编写Controller 什么是Sp
-
Springboot集成mybatis实现多数据源配置详解流程
新建springboot工程,引入web.mysql.mybatis依赖 <dependency> <groupId>org.springframework.boot</groupId> <artifactId>spring-boot-starter-web</artifactId> </dependency> <dependency> <groupId>org.mybatis.spring.boot</
-
SpringBoot集成Mybatis并测试
目录 1.SpringBoot链接druid连接池 2.SpringBoot集成Mybatis 2.1.引入Mybatis-generator 2.2.集成mybatis并测试 3.其它 3.1.自定义druid链接池 3.2.SpringBoot的Mybatis其它配置 首先我们先新建一个项目,需要选择以下依赖: 1.SpringBoot链接druid连接池 1.在pom文件中加入druid连接池场景启动器,如下所示: <!-- druid 场景启动器 --> <dependency&
-
SpringBoot集成Mybatis-Plus多租户架构实现
目录 一. 什么是多租户 二. 多租户架构以及数据隔离方案 1. 独立数据库 2. 共享数据库,独立 Schema 3. 共享数据库,共享 Schema,共享数据表 三.多租户架构适用场景? 四. 技术实现 正式进入主题 1. 创建Spring Boot项目 2. 单元测试 目前公司产品就是对外企业服务,入职后了解到SaaS模式和私有部署,当我第一次听到SaaS时,我不是很理解.经过查阅资料,以及在后续研发功能时,不断的加深了对多租户的理解. 那么接下来让我们问自己几个问题: 1.什么是多租户架
-
springboot集成Mybatis的详细教程
springboot集成Mybatis 第一步: 添加Mybatis依赖 <!--mybatis整合springboot框架的起步依赖--> <dependency> <groupId>org.mybatis.spring.boot</groupId> <artifactId>mybatis-spring-boot-starter</artifactId> <version>2.0.0</version> &l
-
SpringBoot集成mybatis连接oracle的图文教程
目录 一.背景 原始的连接数据库的步骤 二.整合过程 springboot集成mybatis连接oracle数据库的过程 个人感悟 一.背景 在实际开发过程中是离不开数据库的,如果不使用任何框架,那么连接数据库的代码会散落在项目的各个地方,且容易出现各种连接数据库问题. 原始的连接数据库的步骤 1.加载驱动(什么数据库,就记载什么驱动) 2.获取连接 3.编写sql 4.创建statement 5.执行sql语句并处理结果 6.自下而上一次关闭连接(容易出现异常) 在实际开发中,操作数据库还是很
-
spring 集成 mybatis的实例详解
环境配置 1>先创建maven的quickstart项目;并且创建dao层,service层,controller层,po层,mapper,resources以及下面的配置文件(db.properties,log4j.properties,mybatis.xml,spring.xml). 2>配置pom.xml 修改jdk版本; 添加依赖: junit版本改为4.12;spring-context;spring-test;spring-jdbc;spring-tx(事务);aspe
-
Spring集成Mybatis过程详细讲解
目录 为啥学习集成Mybatis ORM框架 实现步骤 为啥学习集成Mybatis ORM框架 虽然Spring中提供了JDBCTemplate模块,已经很大程度了解决了JDBC代码的复杂度,但它仍然是和Java代码写在一起的.反观 Mybatis 将 Sql 语句写在配置文件中,使得SQL语句和程序实现了松耦合.而且提供了些许标签,使得SQL可以是动态的.在ORM基础上想要更好的用Spring的DI.AOP.事务处理.Junit支持等实现成果,学会使用 Spring 框架集成 Mybatis
-
MyBatis5中Spring集成MyBatis事物管理
单独使用MyBatis对事物进行管理 前面MyBatis的文章有写过相关内容,这里继续写一个最简单的Demo,算是复习一下之前MyBatis的内容吧,先是建表,建立一个简单的Student表: create table student ( student_id int auto_increment, student_name varchar(20) not null, primary key(student_id) ) 建立实体类Student.java: public class Studen
-
Spring集成MyBatis框架
Java在写数据库查询时,我接触过四种方式: 1.纯Java代码,引用对应的数据库驱动包,自己写连接与释放逻辑(可以用连接池) 这种模式实际上性能是非常不错的,但是使用起来并不是非常方便:一是要手工为Connection做获取与释放,大量的冗余代码也容易出错:另一个是,复杂的SQL用字符串写起来简直不可维护(换行.可视长度.参数都是问题). 2.使用Spring JdbcTemplate 这个其实还是挺不错的,配置比较简单,功能丰富上比手工管理Connection要舒服多了,而且代码也比较简洁.
-
Spring+SpringMVC+MyBatis整合详细教程(SSM)
使用SSM(Spring.SpringMVC和Mybatis)已经有三个多月了,项目在技术上已经没有什么难点了,基于现有的技术就可以实现想要的功能,当然肯定有很多可以改进的地方.之前没有记录SSM整合的过程,这次刚刚好基于自己的一个小项目重新搭建了一次,而且比项目搭建的要更好一些.以前解决问题的过程和方法并没有及时记录,以后在自己的小项目中遇到我再整理分享一下.这次,先说说三大框架整合过程.个人认为使用框架并不是很难,关键要理解其思想,这对于我们提高编程水平很有帮助.不过,如果用都不会,谈思想就
-
MyBatis超详细讲解如何实现分页功能
目录 概述: 一般用法: student表: Student.java StudentMapper.xml StudentService.java StudentServiceImpl.java AppTest.java 测试结果: 使用分页参数RowBound StudentMapper.xml 概述: 当希望能直接在数据库语言中只检索符合条件的记录,不需要再通过程序对其做处理时,SQL语句分页技术便横空出世了,通过SQL语句实现分页只需要改变查询语句就能实现,即在SQL语句后面添加limit
-
SpringMVC执行过程详细讲解
目录 SpringMVC常用组件 DispatcherServlet初始化过程 SpringMVC的执行流程 SpringMVC常用组件 DispatcherServlet:前端控制器,不需要工程师开发,由框架提供 作用:统一处理请求和响应,整个流程控制的中心,由它调用其它组件处理用户的请求 HandlerMapping:处理器映射器,不需要工程师开发,由框架提供 作用:根据请求的url.method等信息查找Handler,即控制器方法 Handler:处理器,需要工程师开发 作用:在Disp
-
Spring Service功能作用详细讲解
目录 1. Spring项目中的核心组成部分 2. Spring项目中的Service 2.1 Service的功能作用 2.2 Service的实现 1. Spring项目中的核心组成部分 项目的核心组成部分图解: 2. Spring项目中的Service 2.1 Service的功能作用 Service是项目中用于处理业务逻辑的,因为每种数据在做某种操作时,应该都有某些规则: 例如用户尝试登录时,涉及的规则可能包含:用户名对应的用户信息必须存在.提交的密码必须与数据库中存储的密码是匹配的……
-
SpringBean和Controller实现动态注册与注销过程详细讲解
目录 说明 注册和注销工具类 编写测试用例 测试结果 注册Service 注册controller 注销Controller 部分场景下可能需要下载远程jar包,然后注册jar包中的Bean和Controller 说明 这里的Bean 一般特指 Service层的服务类,Controller本质上也是Bean 注册和注销工具类 这里用了一些 hutool的工具类,hutools是一个不错的基础工具集. package cn.guzt.utils; import cn.hutool.extra.s
-
Spring集成MyBatis完整实例(分享)
为了梳理前面学习的<Spring整合MyBatis(Maven+MySQL)一>与<Spring整合MyBatis(Maven+MySQL)二>中的内容,准备做一个完整的示例完成一个简单的图书管理功能,主要使用到的技术包含Spring.MyBatis.Maven与MySQL等.最后的运行效果如下: 项目结构如下: 一.新建一个基于Maven的Web项目 1.1.创建一个简单的Maven项目,项目信息如下: 1.2.修改层面信息,在项目上右键选择属性,再选择"Project