SpringBoot自定义MessageConverter与内容协商管理器contentNegotiationManager详解
目录
- 1、自定义消息转换器MessageConverter
- 2、自定义内容协商管理器contentNegotiationManager
1、自定义消息转换器MessageConverter
在WebMvcAutoConfiguration类中有一个方法configureMessageConverters(),它会配置默认的MessageConverter
public void configureMessageConverters(List<HttpMessageConverter<?>> converters) {
	this.messageConvertersProvider.ifAvailable((customConverters) -> {
		converters.addAll(customConverters.getConverters());
	});
}
假设我们现在有一个新的需求
想要后端返回我们自己定义的格式的数据,就叫x-decade,格式为使用分号拼接Person对象属性值
那么就要新建一个MessageConverter了
package com.decade.converters;
import com.decade.pojo.Person;
import org.springframework.http.HttpInputMessage;
import org.springframework.http.HttpOutputMessage;
import org.springframework.http.MediaType;
import org.springframework.http.converter.HttpMessageConverter;
import org.springframework.http.converter.HttpMessageNotReadableException;
import org.springframework.http.converter.HttpMessageNotWritableException;
import java.io.IOException;
import java.io.OutputStream;
import java.util.List;
public class DecadeConverter implements HttpMessageConverter<Person> {
	// 只考虑写出,所以这里默认写false
    @Override
    public boolean canRead(Class<?> clazz, MediaType mediaType) {
        return false;
    }
    @Override
    public boolean canWrite(Class<?> clazz, MediaType mediaType) {
        return clazz.isAssignableFrom(Person.class);
    }
    /**
     * 统计当前converter能支持哪些类型
     * @return 返回支持的媒体类型
     */
    @Override
    public List<MediaType> getSupportedMediaTypes() {
        return MediaType.parseMediaTypes("application/x-decade");
    }
	// 只考虑写出,所以这里默认写null
    @Override
    public Person read(Class<? extends Person> clazz, HttpInputMessage inputMessage) throws IOException, HttpMessageNotReadableException {
        return null;
    }
    @Override
    public void write(Person person, MediaType contentType, HttpOutputMessage outputMessage) throws IOException, HttpMessageNotWritableException {
        // 自定义想要写出的数据格式
        String result = person.getName() + ";" + person.getAge() + ";" + person.getBirth();
        // 写出
        final OutputStream body = outputMessage.getBody();
        body.write(result.getBytes());
    }
}
我们发现,WebMvcConfigurer接口类下面有2个关于配置MessageConverter的方法
// 会覆盖默认的MessageConverter
default void configureMessageConverters(List<HttpMessageConverter<?>> converters) {
}
// 不会覆盖,只会在默认的MessageConverter后面追加我们自定义的
default void extendMessageConverters(List<HttpMessageConverter<?>> converters) {
}
所以,我们选择在自定义配置类中重写extendMessageConverters()方法
package com.decade.config;
import com.decade.converters.DecadeConverter;
import org.springframework.context.annotation.Bean;
import org.springframework.context.annotation.Configuration;
import org.springframework.http.converter.HttpMessageConverter;
import org.springframework.web.servlet.config.annotation.WebMvcConfigurer;
import java.util.List;
@Configuration(proxyBeanMethods = false)
public class MyMvcConfig implements WebMvcConfigurer {
    @Bean
    public WebMvcConfigurer createConvert() {
        return new WebMvcConfigurer() {
            @Override
            public void extendMessageConverters(List<HttpMessageConverter<?>> converters) {
                converters.add(new DecadeConverter());
            }
        };
    }
}
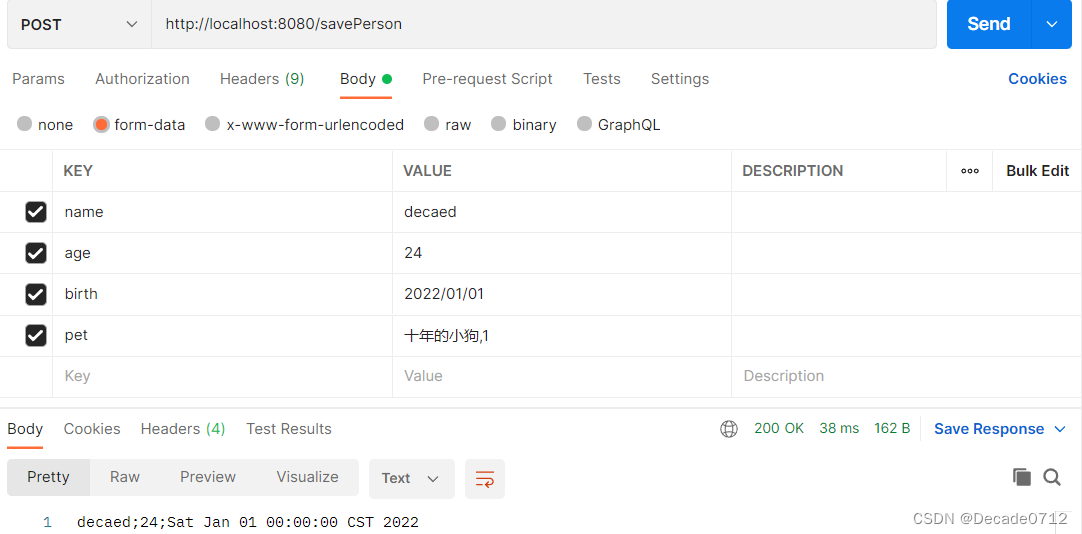
我们在请求头中设置Accept为我们自定义的格式application/x-decade
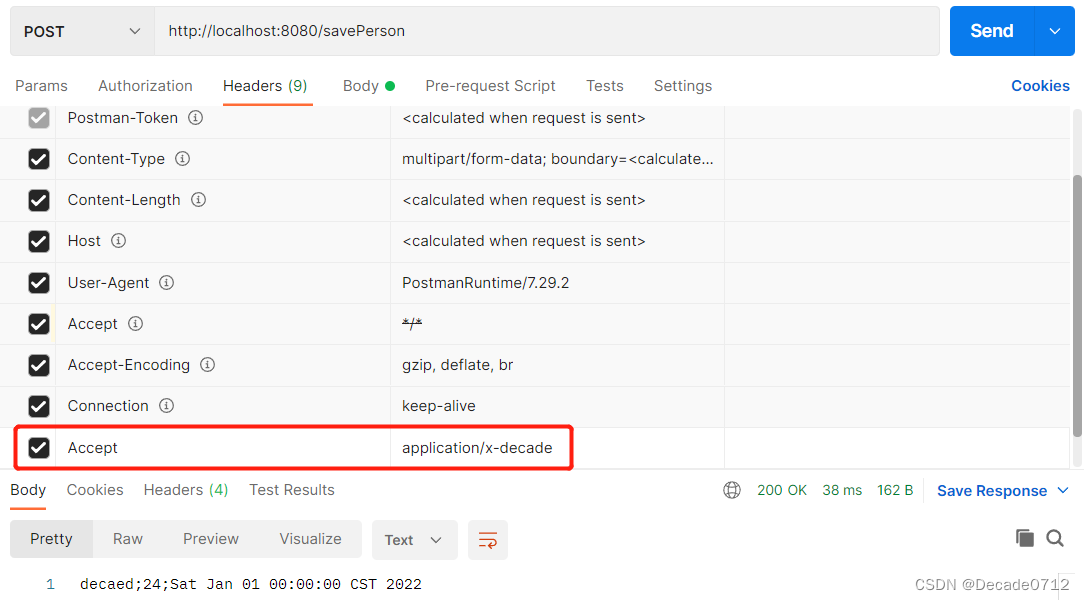
验证结果如下
2、自定义内容协商管理器contentNegotiationManager
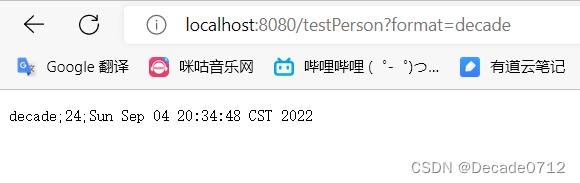
问题:我们新建的x-decade格式是否只能通过postman调用才会生效呢?如果我们要使用浏览器参数方式,怎么才能生效呢?
因为我们之前的【Spring Boot】响应处理
它默认只能处理xml和json格式,所以为了解决这个问题,我们就要自定义内容协商管理器了
首先我们还是要在自定义配置类中重写相关方法
package com.decade.config;
import org.springframework.context.annotation.Bean;
import org.springframework.context.annotation.Configuration;
import org.springframework.http.MediaType;
import org.springframework.web.accept.HeaderContentNegotiationStrategy;
import org.springframework.web.accept.ParameterContentNegotiationStrategy;
import org.springframework.web.servlet.config.annotation.ContentNegotiationConfigurer;
import org.springframework.web.servlet.config.annotation.WebMvcConfigurer;
import java.util.Arrays;
import java.util.HashMap;
import java.util.Map;
@Configuration(proxyBeanMethods = false)
public class MyMvcConfig implements WebMvcConfigurer {
    @Bean
    public WebMvcConfigurer createConvert() {
        return new WebMvcConfigurer() {
            @Override
            public void configureContentNegotiation(ContentNegotiationConfigurer configurer) {
                // 设置支持的浏览器参数类型
                Map<String, MediaType> mediaTypes = new HashMap<>();
                mediaTypes.put("json", MediaType.APPLICATION_JSON);
                mediaTypes.put("xml", MediaType.APPLICATION_XML);
                mediaTypes.put("decade", MediaType.parseMediaType("application/x-decade"));
                final ParameterContentNegotiationStrategy strategy = new ParameterContentNegotiationStrategy(mediaTypes);
                // 为了继续支持请求头参数类型,还需要往里面塞请求头内容协商管理器
                final HeaderContentNegotiationStrategy headerContentNegotiationStrategy = new HeaderContentNegotiationStrategy();
                configurer.strategies(Arrays.asList(strategy, headerContentNegotiationStrategy));
            }
        };
    }
}
可以看到,系统中的内容协商管理器下面还是原来的2种:获取请求头中的Accept和获取请求参数中的format
但是获取请求参数format,除了能识别原来的json和xml,还能识别我们自定义的application/x-decade,它使用decade与之对应
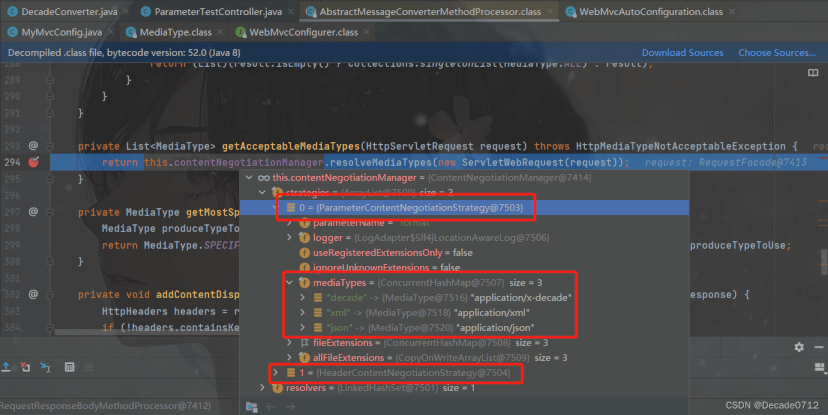
可以看到,我们自定义的媒体类型成功加入服务器能解析出来的类型
我们写一个接口进行验证
@GetMapping(value = "/testPerson")
@ResponseBody
public Person testPerson() {
	Person person = new Person();
	person.setName("decade");
	person.setAge(24);
	person.setBirth(new Date());
	return person;
}
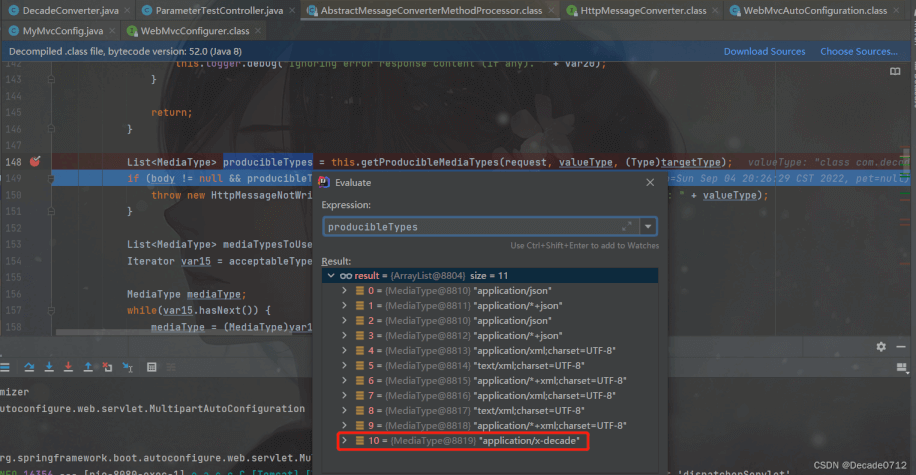
由验证结果可以知道,我们从postman和浏览器都可以获得我们指定格式的数据

到此这篇关于SpringBoot自定义MessageConverter与内容协商管理器contentNegotiationManager详解的文章就介绍到这了,更多相关SpringBoot MessageConverter内容请搜索我们以前的文章或继续浏览下面的相关文章希望大家以后多多支持我们!
相关推荐
-

SpringBoot基于HttpMessageConverter实现全局日期格式化
还在为日期格式化的问题头痛?赶紧阅览文章寻找答案吧! 学习目标 快速学会使用Jackson消息转换器并实现日期的全局格式化. 快速查阅 源码下载:SpringBoot-Date-Format 开始教程 一.全局日期格式化(基于自动配置) 关于日期格式化,很多人会想到使用Jackson的自动配置: spring.jackson.date-format=yyyy-MM-dd HH:mm:ss spring.jackson.timeZone: GMT+8 这种全局日期格式化固然方便,但在消息传递时只能
-
SpringBoot HttpMessageConverter消息转换器的使用详解
目录 消息转化器的作用 消息转化器的主要方法 默认配置的消息转化器 注意事项 消息转化器的作用 将请求报文转化为Java对象 将Java对象转化为响应报文 消息转化器的主要方法 getSupportedMediaTypes:获取支持的MediaType集合(如:text/html,text/plain,application/json) canRead:判断是否能读(请求) read:将请求数据进行格式转换(canRead方法返回值为true时调用) canWrite:判断是否能写(响应) wr
-
SpringBoot自定义HttpMessageConverter操作
目录 简介 MediaType @RequestBody的简单实用 1.解析json 2.解析xml 3.原理 @ResponseBody 自定义HttpMessageConverter 1.目的 2.步骤 3.自定义MediaType 问题 解决办法: 总结 简介 我们使用**@RequestBody可以将请求体中的JSON字符串绑定到相应的bean,使用@ResponseBody**可以使返回结果不会被解析为跳转路径,而是直接写入 HTTP response body 中,而整个数据绑定的过
-
SpringBoot自定义MessageConverter与内容协商管理器contentNegotiationManager详解
目录 1.自定义消息转换器MessageConverter 2.自定义内容协商管理器contentNegotiationManager 1.自定义消息转换器MessageConverter 在WebMvcAutoConfiguration类中有一个方法configureMessageConverters(),它会配置默认的MessageConverter public void configureMessageConverters(List<HttpMessageConverter<?>
-
Node.js基础入门之模块与npm包管理器使用详解
目录 require函数 模块分类 第三方模块 1. 安装第三方模块 2. 引入第三方模块 3. 示例测试 系统模块 require注意事项 exports导出对象 1. exports示例 2. exports注意事项 module模块对象 package.json包描述文件 1. 什么是package.json ? 2. 如何创建package.json文件? NPM基础 1. 常用npm命令 2. npm 示例 cnpm基础 1. 什么是cnpm ? 2. 使用cnpm 控制台输出 1.
-
SpringBoot使用AOP统一日志管理的方法详解
目录 前言 实现 1.引入依赖 2.定义logback配置 3.编写切面类 4.测试 前言 请问今天您便秘了吗?程序员坐久了真的会便秘哦,如果偶然点进了这篇小干货,就麻烦您喝杯水然后去趟厕所一边用左手托起对准嘘嘘,一边用右手滑动手机看完本篇吧. 实现 本篇AOP统一日志管理写法来源于国外知名开源框架JHipster的AOP日志管理方式 1.引入依赖 <!-- spring aop --> <dependency> <groupId>org.springframework
-
Vue中状态管理器(vuex)详解以及实际应用场景
目录 Vue中 常见的组件通信方式可分为三类 Vuex简介 1. State 2. Getters 3. Mutations 4. Actions 5. 使用 mapState.mapGetters.mapActions 简化 总结 传送门:Vue中 子组件向父组件传值 及 .sync 修饰符 详解 传送门:Vue中 $ attrs.$ listeners 详解及使用 传送门:Vue中 事件总线(eventBus)详解及使用 传送门:Vue中 provide.inject 详解及使用 Vue中
-
python中with语句结合上下文管理器操作详解
前言 所谓上下文管理器即在一个类中重写了__enter__方法和__exit__方法的类就可以成为上下文管理器类. 我们可以通过with语句结合上下文管理器简化一些操作. 使用with语句结合自定义上下文管理器完成数据库相应的操作,代码实现如下: # 1. 导入模块 import pymysql # 创建自定义上下文管理器对象 class MyDatabase(object): # 接收参数并创建数据库连接对象 def __init__(self, host, port, user, passw
-
Node.js安装教程和NPM包管理器使用详解
2009年的JSCOnf大会上,一个叫Ryan Dahl的年轻程序员向人们展示了一个他正在做的项目,一个基于Google V8引擎的JavaScript运行平台,它提供了一套事件循环和低IO的应用程序编程接口(API).和其他的服务端平台不同, JavaScript天生就是事件驱动IO,而这个项目又大大降低了编写事件驱动应用程序的复杂度,因此它很快就以不可思议的速度的成长流行起来,并应用到实际项目中.(Jack:这段翻译的不太靠谱,原文:This project was not like oth
-
SpringBoot自定义注解之实现AOP切面日志详解
通过自定义注解的方式(如:@SysLog(obj = "操作对象", text = "操作内容"),在 SpringBoot 中来实现 AOP 切面统一打印出入参日志. 一.先看下项目结构 二.Maven JAR依赖 <!-- AOP --> <dependency> <groupId>org.springframework.boot</groupId> <
-
SpringBoot面试突击之过滤器和拦截器区别详解
目录 实现过滤器和拦截器 a) 实现过滤器 b) 实现拦截器 过滤器 VS 拦截器 1.出身不同 2.触发时机不同 3.实现不同 4.支持的项目类型不同 5.使用的场景不同 总结 实现过滤器和拦截器 首先,我们先来看一下二者在 Spring Boot 项目中的具体实现,这对后续理解二者的区别有很大的帮助. a) 实现过滤器 过滤器可以使用 Servlet 3.0 提供的 @WebFilter 注解,配置过滤的 URL 规则,然后再实现 Filter 接口,重写接口中的 doFilter 方法,具
-
SpringBoot集成本地缓存性能之王Caffeine示例详解
目录 引言 Spring Cache 是什么 集成 Caffeine 核心原理 引言 使用缓存的目的就是提高性能,今天码哥带大家实践运用 spring-boot-starter-cache 抽象的缓存组件去集成本地缓存性能之王 Caffeine. 大家需要注意的是:in-memeory 缓存只适合在单体应用,不适合与分布式环境. 分布式环境的情况下需要将缓存修改同步到每个节点,需要一个同步机制保证每个节点缓存数据最终一致. Spring Cache 是什么 不使用 Spring Cache 抽象
-
SpringBoot使用Shiro实现动态加载权限详解流程
目录 一.序章 二.SpringBoot集成Shiro 1.引入相关maven依赖 2.自定义Realm 3.Shiro配置类 三.shiro动态加载权限处理方法 四.shiro中自定义角色与权限过滤器 1.自定义uri权限过滤器 zqPerms 2.自定义角色权限过滤器 zqRoles 3.自定义token过滤器 五.项目中会用到的一些工具类常量等 1.Shiro工具类 2.Redis常量类 3.Spring上下文工具类 六.案例demo源码 一.序章 基本环境 spring-boot 2.1