SpringBoot操作Redis三种方案全解析
使用 Java 操作 Redis 的方案很多,Jedis 是目前较为流行的一种方案,除了 Jedis ,还有很多其他解决方案,如下:
除了这些方案之外,还有一个使用也相当多的方案,就是 Spring Data Redis。
在传统的 SSM 中,需要开发者自己来配置 Spring Data Redis ,这个配置比较繁琐,主要配置 3 个东西:连接池、连接器信息以及 key 和 value 的序列化方案。
在 Spring Boot 中,默认集成的 Redis 就是 Spring Data Redis,默认底层的连接池使用了 lettuce ,开发者可以自行修改为自己的熟悉的,例如 Jedis。
Spring Data Redis 针对 Redis 提供了非常方便的操作模板 RedisTemplate 。这是 Spring Data 擅长的事情,那么接下来我们就来看看 Spring Boot 中 Spring Data Redis 的具体用法。
方案一:Spring Data Redis创建工程
创建工程,引入 Redis 依赖:

创建成功后,还需要手动引入 commos-pool2 的依赖,因此最终完整的 pom.xml 依赖如下:
<dependencies>
 <dependency>
  <groupId>org.springframework.boot</groupId>
  <artifactId>spring-boot-starter-data-redis</artifactId>
 </dependency>
 <dependency>
  <groupId>org.springframework.boot</groupId>
  <artifactId>spring-boot-starter-web</artifactId>
 </dependency>
</dependencies>
<dependency>
 <groupId>org.apache.commons</groupId>
 <artifactId>commons-pool2</artifactId>
</dependency>
这里主要就是引入了 Spring Data Redis + 连接池。
配置 Redis 信息
接下来配置 Redis 的信息,信息包含两方面,一方面是 Redis 的基本信息,另一方面则是连接池信息:
spring.redis.database=0
spring.redis.password=123
spring.redis.port=6379
spring.redis.host=192.168.66.128
spring.redis.lettuce.pool.min-idle=5
spring.redis.lettuce.pool.max-idle=10
spring.redis.lettuce.pool.max-active=8
spring.redis.lettuce.pool.max-wait=1ms
spring.redis.lettuce.shutdown-timeout=100ms
自动配置
当开发者在项目中引入了 Spring Data Redis ,并且配置了 Redis 的基本信息,此时,自动化配置就会生效。
我们从 Spring Boot 中 Redis 的自动化配置类中就可以看出端倪:
@Configuration
@ConditionalOnClass(RedisOperations.class)
@EnableConfigurationProperties(RedisProperties.class)
@Import({ LettuceConnectionConfiguration.class, JedisConnectionConfiguration.class })
public class RedisAutoConfiguration {
  @Bean
  @ConditionalOnMissingBean(name = "redisTemplate")
  public RedisTemplate<Object, Object> redisTemplate(
      RedisConnectionFactory redisConnectionFactory) throws UnknownHostException {
    RedisTemplate<Object, Object> template = new RedisTemplate<>();
    template.setConnectionFactory(redisConnectionFactory);
    return template;
  }
  @Bean
  @ConditionalOnMissingBean
  public StringRedisTemplate stringRedisTemplate(
      RedisConnectionFactory redisConnectionFactory) throws UnknownHostException {
    StringRedisTemplate template = new StringRedisTemplate();
    template.setConnectionFactory(redisConnectionFactory);
    return template;
  }
}
这个自动化配置类很好理解:
- 首先标记这个是一个配置类,同时该配置在 RedisOperations 存在的情况下才会生效(即项目中引入了 Spring Data Redis)
- 然后导入在 application.properties 中配置的属性
- 然后再导入连接池信息(如果存在的话)
- 最后,提供了两个 Bean ,RedisTemplate 和 StringRedisTemplate ,其中 StringRedisTemplate 是 RedisTemplate 的子类,两个的方法基本一致,不同之处主要体现在操作的数据类型不同,RedisTemplate 中的两个泛型都是 Object ,意味者存储的 key 和 value 都可以是一个对象,而 StringRedisTemplate 的 两个泛型都是 String ,意味者 StringRedisTemplate 的 key 和 value 都只能是字符串。如果开发者没有提供相关的 Bean ,这两个配置就会生效,否则不会生效。
使用
接下来,可以直接在 Service 中注入 StringRedisTemplate 或者 RedisTemplate 来使用:
@Service
public class HelloService {
 @Autowired
 RedisTemplate redisTemplate;
 public void hello() {
  ValueOperations ops = redisTemplate.opsForValue();
  ops.set("k1", "v1");
  Object k1 = ops.get("k1");
  System.out.println(k1);
 }
}
Redis 中的数据操作,大体上来说,可以分为两种:
- 针对 key 的操作,相关的方法就在 RedisTemplate 中
- 针对具体数据类型的操作,相关的方法需要首先获取对应的数据类型,获取相应数据类型的操作方法是 opsForXXX
调用该方法就可以将数据存储到 Redis 中去了,如下:
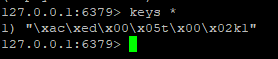
k1 前面的字符是由于使用了 RedisTemplate 导致的,RedisTemplate 对 key 进行序列化之后的结果。
RedisTemplate 中,key 默认的序列化方案是 JdkSerializationRedisSerializer 。
而在 StringRedisTemplate 中,key 默认的序列化方案是 StringRedisSerializer ,因此,如果使用 StringRedisTemplate ,默认情况下 key 前面不会有前缀。
不过开发者也可以自行修改 RedisTemplate 中的序列化方案,如下:
@Service
public class HelloService {
 @Autowired
 RedisTemplate redisTemplate;
 public void hello() {
  redisTemplate.setKeySerializer(new StringRedisSerializer());
  ValueOperations ops = redisTemplate.opsForValue();
  ops.set("k1", "v1");
  Object k1 = ops.get("k1");
  System.out.println(k1);
 }
}
当然也可以直接使用 StringRedisTemplate:
@Service
public class HelloService {
 @Autowired
 StringRedisTemplate stringRedisTemplate;
 public void hello2() {
  ValueOperations ops = stringRedisTemplate.opsForValue();
  ops.set("k2", "v2");
  Object k1 = ops.get("k2");
  System.out.println(k1);
 }
}
另外需要注意 ,Spring Boot 的自动化配置,只能配置单机的 Redis ,如果是 Redis 集群,则所有的东西都需要自己手动配置,关于如何操作 Redis 集群,松哥以后再来和大家分享。
方案二:Spring Cache
通过 Spring Cache 的形式来操作 Redis,Spring Cache 统一了缓存江湖的门面,这种方案,松哥之前有过一篇专门的文章介绍,小伙伴可以移步这里:Spring Boot中,Redis缓存还能这么用!。
方案三:回归原始时代
第三种方案,就是直接使用 Jedis 或者 其他的客户端工具来操作 Redis ,这种方案在 Spring Boot 中也是支持的,虽然操作麻烦,但是支持
总结
Spring Boot 中,Redis 的操作,这里松哥给大家总结了三种方案,实际上前两个使用广泛一些,直接使用 Jedis 还是比较少,基本上 Spring Boot 中没见过有人直接这么搞。
以上就是本文的全部内容,希望对大家的学习有所帮助,也希望大家多多支持我们。
相关推荐
-
Spring Boot 基于注解的 Redis 缓存使用详解
看文本之前,请先确定你看过上一篇文章<Spring Boot Redis 集成配置>并保证 Redis 集成后正常可用,因为本文是基于上文继续增加的代码. 一.创建 Caching 配置类 RedisKeys.Java package com.shanhy.example.redis; import java.util.HashMap; import java.util.Map; import javax.annotation.PostConstruct; import org.springf
-
Springboot2.X集成redis集群(Lettuce)连接的方法
前提:搭建好redis集群环境,搭建方式请看:https://www.jb51.net/article/143749.htm 1. 新建工程,pom.xml文件中添加redis支持 <dependency> <groupId>org.springframework.boot</groupId> <artifactId>spring-boot-starter-data-redis</artifactId> </dependency> 2
-
SpringBoot利用redis集成消息队列的方法
一.pom文件依赖 <dependency> <groupId>org.springframework.boot</groupId> <artifactId>spring-boot-starter-data-redis</artifactId> </dependency> 二.创建消息接收者 变量.方法及构造函数进行标注,完成自动装配的工作. 通过 @Autowired的使用来消除 set ,get方法. @Autowired pub
-
详解Spring Boot使用redis实现数据缓存
基于spring Boot 1.5.2.RELEASE版本,一方面验证与Redis的集成方法,另外了解使用方法. 集成方法 1.配置依赖 修改pom.xml,增加如下内容. <dependency> <groupId>org.springframework.boot</groupId> <artifactId>spring-boot-starter-data-redis</artifactId> </dependency> 2.配置R
-
springboot整合redis进行数据操作(推荐)
redis是一种常见的nosql,日常开发中,我们使用它的频率比较高,因为它的多种数据接口,很多场景中我们都可以用到,并且redis对分布式这块做的非常好. springboot整合redis比较简单,并且使用redistemplate可以让我们更加方便的对数据进行操作. 1.添加依赖 <dependency> <groupId>org.springframework.boot</groupId> <artifactId>spring-boot-starte
-
详解springboot配置多个redis连接
一.springboot nosql 简介 Spring Data提供其他项目,用来帮你使用各种各样的NoSQL技术,包括MongoDB, Neo4J, Elasticsearch, Solr, Redis,Gemfire, Couchbase和Cassandra.Spring Boot为Redis, MongoDB, Elasticsearch, Solr和Gemfire提供自动配置.你可以充分利用其他项目,但你需要自己配置它们. 1.1.Redis Redis是一个缓存,消息中间件及具有丰富
-
Spring Boot Redis 集成配置详解
spring Boot 熟悉后,集成一个外部扩展是一件很容易的事,集成Redis也很简单,看下面步骤配置: 一.添加pom依赖 <dependency> <groupId>org.springframework.boot</groupId> <artifactId>spring-boot-starter-redis</artifactId> </dependency> 二.创建 RedisClient.java 注意该类存放的pack
-
详解Spring boot使用Redis集群替换mybatis二级缓存
1 . pom.xml添加相关依赖 <parent> <groupId>org.springframework.boot</groupId> <artifactId>spring-boot-starter-parent</artifactId> <version>1.5.1.RELEASE</version> </parent> <!-- 依赖 --> <dependencies> &l
-

详解Spring-Boot集成Spring session并存入redis
spring Session 提供了一套用于管理用户 session 信息的API和实现. Spring Session为企业级Java应用的session管理带来了革新,使得以下的功能更加容易实现: 编写可水平扩展的原生云应用. 将session所保存的状态卸载到特定的外部session存储中,如Redis或Apache Geode中,它们能够以独立于应用服务器的方式提供高质量的集群. 当用户使用WebSocket发送请求的时候,能够保持HttpSession处于活跃状态. 在非Web请求的处
-
SpringBoot项目中使用redis缓存的方法步骤
本文介绍了SpringBoot项目中使用redis缓存的方法步骤,分享给大家,具体如下: Spring Data Redis为我们封装了Redis客户端的各种操作,简化使用. - 当Redis当做数据库或者消息队列来操作时,我们一般使用RedisTemplate来操作 - 当Redis作为缓存使用时,我们可以将它作为Spring Cache的实现,直接通过注解使用 1.概述 在应用中有效的利用redis缓存可以很好的提升系统性能,特别是对于查询操作,可以有效的减少数据库压力. 具体的代码参照该