TensorFlow车牌识别完整版代码(含车牌数据集)
在之前发布的一篇博文《MNIST数据集实现车牌识别--初步演示版》中,我们演示了如何使用TensorFlow进行车牌识别,但是,当时采用的数据集是MNIST数字手写体,只能分类0-9共10个数字,无法分类省份简称和字母,局限性较大,无实际意义。
经过图像定位分割处理,博主收集了相关省份简称和26个字母的图片数据集,结合前述博文中贴出的python+TensorFlow代码,实现了完整的车牌识别功能。本着分享精神,在此送上全部代码和车牌数据集。
车牌数据集下载地址(约4000张图片):tf_car_license_dataset_jb51.rar
省份简称训练+识别代码(保存文件名为train-license-province.py)(拷贝代码请务必注意python文本缩进,只要有一处缩进错误,就无法得到正确结果,或者出现异常):
#!/usr/bin/python3.5
# -*- coding: utf-8 -*-

import sys
import os
import time
import random

import numpy as np
import tensorflow as tf

from PIL import Image

SIZE = 1280
WIDTH = 32
HEIGHT = 40
NUM_CLASSES = 6
iterations = 300

SAVER_DIR = "train-saver/province/"

PROVINCES = ("京","闽","粤","苏","沪","浙")
nProvinceIndex = 0

time_begin = time.time()

# 定义输入节点,对应于图片像素值矩阵集合和图片标签(即所代表的数字)
x = tf.placeholder(tf.float32, shape=[None, SIZE])
y_ = tf.placeholder(tf.float32, shape=[None, NUM_CLASSES])

x_image = tf.reshape(x, [-1, WIDTH, HEIGHT, 1])

# 定义卷积函数
def conv_layer(inputs, W, b, conv_strides, kernel_size, pool_strides, padding):
  L1_conv = tf.nn.conv2d(inputs, W, strides=conv_strides, padding=padding)
  L1_relu = tf.nn.relu(L1_conv + b)
  return tf.nn.max_pool(L1_relu, ksize=kernel_size, strides=pool_strides, padding='SAME')

# 定义全连接层函数
def full_connect(inputs, W, b):
  return tf.nn.relu(tf.matmul(inputs, W) + b)

if __name__ =='__main__' and sys.argv[1]=='train':
  # 第一次遍历图片目录是为了获取图片总数
  input_count = 0
  for i in range(0,NUM_CLASSES):
    dir = './train_images/training-set/chinese-characters/%s/' % i      # 这里可以改成你自己的图片目录,i为分类标签
    for rt, dirs, files in os.walk(dir):
      for filename in files:
        input_count += 1

  # 定义对应维数和各维长度的数组
  input_images = np.array([[0]*SIZE for i in range(input_count)])
  input_labels = np.array([[0]*NUM_CLASSES for i in range(input_count)])

  # 第二次遍历图片目录是为了生成图片数据和标签
  index = 0
  for i in range(0,NUM_CLASSES):
    dir = './train_images/training-set/chinese-characters/%s/' % i     # 这里可以改成你自己的图片目录,i为分类标签
    for rt, dirs, files in os.walk(dir):
      for filename in files:
        filename = dir + filename
        img = Image.open(filename)
        width = img.size[0]
        height = img.size[1]
        for h in range(0, height):
          for w in range(0, width):
            # 通过这样的处理,使数字的线条变细,有利于提高识别准确率
            if img.getpixel((w, h)) > 230:
              input_images[index][w+h*width] = 0
            else:
              input_images[index][w+h*width] = 1
        input_labels[index][i] = 1
        index += 1

  # 第一次遍历图片目录是为了获取图片总数
  val_count = 0
  for i in range(0,NUM_CLASSES):
    dir = './train_images/validation-set/chinese-characters/%s/' % i      # 这里可以改成你自己的图片目录,i为分类标签
    for rt, dirs, files in os.walk(dir):
      for filename in files:
        val_count += 1

  # 定义对应维数和各维长度的数组
  val_images = np.array([[0]*SIZE for i in range(val_count)])
  val_labels = np.array([[0]*NUM_CLASSES for i in range(val_count)])

  # 第二次遍历图片目录是为了生成图片数据和标签
  index = 0
  for i in range(0,NUM_CLASSES):
    dir = './train_images/validation-set/chinese-characters/%s/' % i     # 这里可以改成你自己的图片目录,i为分类标签
    for rt, dirs, files in os.walk(dir):
      for filename in files:
        filename = dir + filename
        img = Image.open(filename)
        width = img.size[0]
        height = img.size[1]
        for h in range(0, height):
          for w in range(0, width):
            # 通过这样的处理,使数字的线条变细,有利于提高识别准确率
            if img.getpixel((w, h)) > 230:
              val_images[index][w+h*width] = 0
            else:
              val_images[index][w+h*width] = 1
        val_labels[index][i] = 1
        index += 1

  with tf.Session() as sess:
    # 第一个卷积层
    W_conv1 = tf.Variable(tf.truncated_normal([8, 8, 1, 16], stddev=0.1), name="W_conv1")
    b_conv1 = tf.Variable(tf.constant(0.1, shape=[16]), name="b_conv1")
    conv_strides = [1, 1, 1, 1]
    kernel_size = [1, 2, 2, 1]
    pool_strides = [1, 2, 2, 1]
    L1_pool = conv_layer(x_image, W_conv1, b_conv1, conv_strides, kernel_size, pool_strides, padding='SAME')

    # 第二个卷积层
    W_conv2 = tf.Variable(tf.truncated_normal([5, 5, 16, 32], stddev=0.1), name="W_conv2")
    b_conv2 = tf.Variable(tf.constant(0.1, shape=[32]), name="b_conv2")
    conv_strides = [1, 1, 1, 1]
    kernel_size = [1, 1, 1, 1]
    pool_strides = [1, 1, 1, 1]
    L2_pool = conv_layer(L1_pool, W_conv2, b_conv2, conv_strides, kernel_size, pool_strides, padding='SAME')

    # 全连接层
    W_fc1 = tf.Variable(tf.truncated_normal([16 * 20 * 32, 512], stddev=0.1), name="W_fc1")
    b_fc1 = tf.Variable(tf.constant(0.1, shape=[512]), name="b_fc1")
    h_pool2_flat = tf.reshape(L2_pool, [-1, 16 * 20*32])
    h_fc1 = full_connect(h_pool2_flat, W_fc1, b_fc1)

    # dropout
    keep_prob = tf.placeholder(tf.float32)

    h_fc1_drop = tf.nn.dropout(h_fc1, keep_prob)

    # readout层
    W_fc2 = tf.Variable(tf.truncated_normal([512, NUM_CLASSES], stddev=0.1), name="W_fc2")
    b_fc2 = tf.Variable(tf.constant(0.1, shape=[NUM_CLASSES]), name="b_fc2")

    # 定义优化器和训练op
    y_conv = tf.matmul(h_fc1_drop, W_fc2) + b_fc2
    cross_entropy = tf.reduce_mean(tf.nn.softmax_cross_entropy_with_logits(labels=y_, logits=y_conv))
    train_step = tf.train.AdamOptimizer((1e-4)).minimize(cross_entropy)

    correct_prediction = tf.equal(tf.argmax(y_conv, 1), tf.argmax(y_, 1))
    accuracy = tf.reduce_mean(tf.cast(correct_prediction, tf.float32))

    # 初始化saver
    saver = tf.train.Saver()

    sess.run(tf.global_variables_initializer())

    time_elapsed = time.time() - time_begin
    print("读取图片文件耗费时间:%d秒" % time_elapsed)
    time_begin = time.time()

    print ("一共读取了 %s 个训练图像, %s 个标签" % (input_count, input_count))

    # 设置每次训练op的输入个数和迭代次数,这里为了支持任意图片总数,定义了一个余数remainder,譬如,如果每次训练op的输入个数为60,图片总数为150张,则前面两次各输入60张,最后一次输入30张(余数30)
    batch_size = 60
    iterations = iterations
    batches_count = int(input_count / batch_size)
    remainder = input_count % batch_size
    print ("训练数据集分成 %s 批, 前面每批 %s 个数据,最后一批 %s 个数据" % (batches_count+1, batch_size, remainder))

    # 执行训练迭代
    for it in range(iterations):
      # 这里的关键是要把输入数组转为np.array
      for n in range(batches_count):
        train_step.run(feed_dict={x: input_images[n*batch_size:(n+1)*batch_size], y_: input_labels[n*batch_size:(n+1)*batch_size], keep_prob: 0.5})
      if remainder > 0:
        start_index = batches_count * batch_size;
        train_step.run(feed_dict={x: input_images[start_index:input_count-1], y_: input_labels[start_index:input_count-1], keep_prob: 0.5})

      # 每完成五次迭代,判断准确度是否已达到100%,达到则退出迭代循环
      iterate_accuracy = 0
      if it%5 == 0:
        iterate_accuracy = accuracy.eval(feed_dict={x: val_images, y_: val_labels, keep_prob: 1.0})
        print ('第 %d 次训练迭代: 准确率 %0.5f%%' % (it, iterate_accuracy*100))
        if iterate_accuracy >= 0.9999 and it >= 150:
          break;

    print ('完成训练!')
    time_elapsed = time.time() - time_begin
    print ("训练耗费时间:%d秒" % time_elapsed)
    time_begin = time.time()

    # 保存训练结果
    if not os.path.exists(SAVER_DIR):
      print ('不存在训练数据保存目录,现在创建保存目录')
      os.makedirs(SAVER_DIR)
    saver_path = saver.save(sess, "%smodel.ckpt"%(SAVER_DIR))

if __name__ =='__main__' and sys.argv[1]=='predict':
  saver = tf.train.import_meta_graph("%smodel.ckpt.meta"%(SAVER_DIR))
  with tf.Session() as sess:
    model_file=tf.train.latest_checkpoint(SAVER_DIR)
    saver.restore(sess, model_file)

    # 第一个卷积层
    W_conv1 = sess.graph.get_tensor_by_name("W_conv1:0")
    b_conv1 = sess.graph.get_tensor_by_name("b_conv1:0")
    conv_strides = [1, 1, 1, 1]
    kernel_size = [1, 2, 2, 1]
    pool_strides = [1, 2, 2, 1]
    L1_pool = conv_layer(x_image, W_conv1, b_conv1, conv_strides, kernel_size, pool_strides, padding='SAME')

    # 第二个卷积层
    W_conv2 = sess.graph.get_tensor_by_name("W_conv2:0")
    b_conv2 = sess.graph.get_tensor_by_name("b_conv2:0")
    conv_strides = [1, 1, 1, 1]
    kernel_size = [1, 1, 1, 1]
    pool_strides = [1, 1, 1, 1]
    L2_pool = conv_layer(L1_pool, W_conv2, b_conv2, conv_strides, kernel_size, pool_strides, padding='SAME')

    # 全连接层
    W_fc1 = sess.graph.get_tensor_by_name("W_fc1:0")
    b_fc1 = sess.graph.get_tensor_by_name("b_fc1:0")
    h_pool2_flat = tf.reshape(L2_pool, [-1, 16 * 20*32])
    h_fc1 = full_connect(h_pool2_flat, W_fc1, b_fc1)

    # dropout
    keep_prob = tf.placeholder(tf.float32)

    h_fc1_drop = tf.nn.dropout(h_fc1, keep_prob)

    # readout层
    W_fc2 = sess.graph.get_tensor_by_name("W_fc2:0")
    b_fc2 = sess.graph.get_tensor_by_name("b_fc2:0")

    # 定义优化器和训练op
    conv = tf.nn.softmax(tf.matmul(h_fc1_drop, W_fc2) + b_fc2)

    for n in range(1,2):
      path = "test_images/%s.bmp" % (n)
      img = Image.open(path)
      width = img.size[0]
      height = img.size[1]

      img_data = [[0]*SIZE for i in range(1)]
      for h in range(0, height):
        for w in range(0, width):
          if img.getpixel((w, h)) < 190:
            img_data[0][w+h*width] = 1
          else:
            img_data[0][w+h*width] = 0

      result = sess.run(conv, feed_dict = {x: np.array(img_data), keep_prob: 1.0})
      max1 = 0
      max2 = 0
      max3 = 0
      max1_index = 0
      max2_index = 0
      max3_index = 0
      for j in range(NUM_CLASSES):
        if result[0][j] > max1:
          max1 = result[0][j]
          max1_index = j
          continue
        if (result[0][j]>max2) and (result[0][j]<=max1):
          max2 = result[0][j]
          max2_index = j
          continue
        if (result[0][j]>max3) and (result[0][j]<=max2):
          max3 = result[0][j]
          max3_index = j
          continue

      nProvinceIndex = max1_index
      print ("概率: [%s %0.2f%%]  [%s %0.2f%%]  [%s %0.2f%%]" % (PROVINCES[max1_index],max1*100, PROVINCES[max2_index],max2*100, PROVINCES[max3_index],max3*100))

    print ("省份简称是: %s" % PROVINCES[nProvinceIndex])
城市代号训练+识别代码(保存文件名为train-license-letters.py):
#!/usr/bin/python3.5
# -*- coding: utf-8 -*-

import sys
import os
import time
import random

import numpy as np
import tensorflow as tf

from PIL import Image

SIZE = 1280
WIDTH = 32
HEIGHT = 40
NUM_CLASSES = 26
iterations = 500

SAVER_DIR = "train-saver/letters/"

LETTERS_DIGITS = ("A","B","C","D","E","F","G","H","J","K","L","M","N","P","Q","R","S","T","U","V","W","X","Y","Z","I","O")
license_num = ""

time_begin = time.time()

# 定义输入节点,对应于图片像素值矩阵集合和图片标签(即所代表的数字)
x = tf.placeholder(tf.float32, shape=[None, SIZE])
y_ = tf.placeholder(tf.float32, shape=[None, NUM_CLASSES])

x_image = tf.reshape(x, [-1, WIDTH, HEIGHT, 1])

# 定义卷积函数
def conv_layer(inputs, W, b, conv_strides, kernel_size, pool_strides, padding):
  L1_conv = tf.nn.conv2d(inputs, W, strides=conv_strides, padding=padding)
  L1_relu = tf.nn.relu(L1_conv + b)
  return tf.nn.max_pool(L1_relu, ksize=kernel_size, strides=pool_strides, padding='SAME')

# 定义全连接层函数
def full_connect(inputs, W, b):
  return tf.nn.relu(tf.matmul(inputs, W) + b)

if __name__ =='__main__' and sys.argv[1]=='train':
  # 第一次遍历图片目录是为了获取图片总数
  input_count = 0
  for i in range(0+10,NUM_CLASSES+10):
    dir = './train_images/training-set/letters/%s/' % i      # 这里可以改成你自己的图片目录,i为分类标签
    for rt, dirs, files in os.walk(dir):
      for filename in files:
        input_count += 1

  # 定义对应维数和各维长度的数组
  input_images = np.array([[0]*SIZE for i in range(input_count)])
  input_labels = np.array([[0]*NUM_CLASSES for i in range(input_count)])

  # 第二次遍历图片目录是为了生成图片数据和标签
  index = 0
  for i in range(0+10,NUM_CLASSES+10):
    dir = './train_images/training-set/letters/%s/' % i     # 这里可以改成你自己的图片目录,i为分类标签
    for rt, dirs, files in os.walk(dir):
      for filename in files:
        filename = dir + filename
        img = Image.open(filename)
        width = img.size[0]
        height = img.size[1]
        for h in range(0, height):
          for w in range(0, width):
            # 通过这样的处理,使数字的线条变细,有利于提高识别准确率
            if img.getpixel((w, h)) > 230:
              input_images[index][w+h*width] = 0
            else:
              input_images[index][w+h*width] = 1
        #print ("i=%d, index=%d" % (i, index))
        input_labels[index][i-10] = 1
        index += 1

  # 第一次遍历图片目录是为了获取图片总数
  val_count = 0
  for i in range(0+10,NUM_CLASSES+10):
    dir = './train_images/validation-set/%s/' % i      # 这里可以改成你自己的图片目录,i为分类标签
    for rt, dirs, files in os.walk(dir):
      for filename in files:
        val_count += 1

  # 定义对应维数和各维长度的数组
  val_images = np.array([[0]*SIZE for i in range(val_count)])
  val_labels = np.array([[0]*NUM_CLASSES for i in range(val_count)])

  # 第二次遍历图片目录是为了生成图片数据和标签
  index = 0
  for i in range(0+10,NUM_CLASSES+10):
    dir = './train_images/validation-set/%s/' % i     # 这里可以改成你自己的图片目录,i为分类标签
    for rt, dirs, files in os.walk(dir):
      for filename in files:
        filename = dir + filename
        img = Image.open(filename)
        width = img.size[0]
        height = img.size[1]
        for h in range(0, height):
          for w in range(0, width):
            # 通过这样的处理,使数字的线条变细,有利于提高识别准确率
            if img.getpixel((w, h)) > 230:
              val_images[index][w+h*width] = 0
            else:
              val_images[index][w+h*width] = 1
        val_labels[index][i-10] = 1
        index += 1

  with tf.Session() as sess:
    # 第一个卷积层
    W_conv1 = tf.Variable(tf.truncated_normal([8, 8, 1, 16], stddev=0.1), name="W_conv1")
    b_conv1 = tf.Variable(tf.constant(0.1, shape=[16]), name="b_conv1")
    conv_strides = [1, 1, 1, 1]
    kernel_size = [1, 2, 2, 1]
    pool_strides = [1, 2, 2, 1]
    L1_pool = conv_layer(x_image, W_conv1, b_conv1, conv_strides, kernel_size, pool_strides, padding='SAME')

    # 第二个卷积层
    W_conv2 = tf.Variable(tf.truncated_normal([5, 5, 16, 32], stddev=0.1), name="W_conv2")
    b_conv2 = tf.Variable(tf.constant(0.1, shape=[32]), name="b_conv2")
    conv_strides = [1, 1, 1, 1]
    kernel_size = [1, 1, 1, 1]
    pool_strides = [1, 1, 1, 1]
    L2_pool = conv_layer(L1_pool, W_conv2, b_conv2, conv_strides, kernel_size, pool_strides, padding='SAME')

    # 全连接层
    W_fc1 = tf.Variable(tf.truncated_normal([16 * 20 * 32, 512], stddev=0.1), name="W_fc1")
    b_fc1 = tf.Variable(tf.constant(0.1, shape=[512]), name="b_fc1")
    h_pool2_flat = tf.reshape(L2_pool, [-1, 16 * 20*32])
    h_fc1 = full_connect(h_pool2_flat, W_fc1, b_fc1)

    # dropout
    keep_prob = tf.placeholder(tf.float32)

    h_fc1_drop = tf.nn.dropout(h_fc1, keep_prob)

    # readout层
    W_fc2 = tf.Variable(tf.truncated_normal([512, NUM_CLASSES], stddev=0.1), name="W_fc2")
    b_fc2 = tf.Variable(tf.constant(0.1, shape=[NUM_CLASSES]), name="b_fc2")

    # 定义优化器和训练op
    y_conv = tf.matmul(h_fc1_drop, W_fc2) + b_fc2
    cross_entropy = tf.reduce_mean(tf.nn.softmax_cross_entropy_with_logits(labels=y_, logits=y_conv))
    train_step = tf.train.AdamOptimizer((1e-4)).minimize(cross_entropy)

    correct_prediction = tf.equal(tf.argmax(y_conv, 1), tf.argmax(y_, 1))
    accuracy = tf.reduce_mean(tf.cast(correct_prediction, tf.float32))

    sess.run(tf.global_variables_initializer())

    time_elapsed = time.time() - time_begin
    print("读取图片文件耗费时间:%d秒" % time_elapsed)
    time_begin = time.time()

    print ("一共读取了 %s 个训练图像, %s 个标签" % (input_count, input_count))

    # 设置每次训练op的输入个数和迭代次数,这里为了支持任意图片总数,定义了一个余数remainder,譬如,如果每次训练op的输入个数为60,图片总数为150张,则前面两次各输入60张,最后一次输入30张(余数30)
    batch_size = 60
    iterations = iterations
    batches_count = int(input_count / batch_size)
    remainder = input_count % batch_size
    print ("训练数据集分成 %s 批, 前面每批 %s 个数据,最后一批 %s 个数据" % (batches_count+1, batch_size, remainder))

    # 执行训练迭代
    for it in range(iterations):
      # 这里的关键是要把输入数组转为np.array
      for n in range(batches_count):
        train_step.run(feed_dict={x: input_images[n*batch_size:(n+1)*batch_size], y_: input_labels[n*batch_size:(n+1)*batch_size], keep_prob: 0.5})
      if remainder > 0:
        start_index = batches_count * batch_size;
        train_step.run(feed_dict={x: input_images[start_index:input_count-1], y_: input_labels[start_index:input_count-1], keep_prob: 0.5})

      # 每完成五次迭代,判断准确度是否已达到100%,达到则退出迭代循环
      iterate_accuracy = 0
      if it%5 == 0:
        iterate_accuracy = accuracy.eval(feed_dict={x: val_images, y_: val_labels, keep_prob: 1.0})
        print ('第 %d 次训练迭代: 准确率 %0.5f%%' % (it, iterate_accuracy*100))
        if iterate_accuracy >= 0.9999 and it >= iterations:
          break;

    print ('完成训练!')
    time_elapsed = time.time() - time_begin
    print ("训练耗费时间:%d秒" % time_elapsed)
    time_begin = time.time()

    # 保存训练结果
    if not os.path.exists(SAVER_DIR):
      print ('不存在训练数据保存目录,现在创建保存目录')
      os.makedirs(SAVER_DIR)
    # 初始化saver
    saver = tf.train.Saver()
    saver_path = saver.save(sess, "%smodel.ckpt"%(SAVER_DIR))

if __name__ =='__main__' and sys.argv[1]=='predict':
  saver = tf.train.import_meta_graph("%smodel.ckpt.meta"%(SAVER_DIR))
  with tf.Session() as sess:
    model_file=tf.train.latest_checkpoint(SAVER_DIR)
    saver.restore(sess, model_file)

    # 第一个卷积层
    W_conv1 = sess.graph.get_tensor_by_name("W_conv1:0")
    b_conv1 = sess.graph.get_tensor_by_name("b_conv1:0")
    conv_strides = [1, 1, 1, 1]
    kernel_size = [1, 2, 2, 1]
    pool_strides = [1, 2, 2, 1]
    L1_pool = conv_layer(x_image, W_conv1, b_conv1, conv_strides, kernel_size, pool_strides, padding='SAME')

    # 第二个卷积层
    W_conv2 = sess.graph.get_tensor_by_name("W_conv2:0")
    b_conv2 = sess.graph.get_tensor_by_name("b_conv2:0")
    conv_strides = [1, 1, 1, 1]
    kernel_size = [1, 1, 1, 1]
    pool_strides = [1, 1, 1, 1]
    L2_pool = conv_layer(L1_pool, W_conv2, b_conv2, conv_strides, kernel_size, pool_strides, padding='SAME')

    # 全连接层
    W_fc1 = sess.graph.get_tensor_by_name("W_fc1:0")
    b_fc1 = sess.graph.get_tensor_by_name("b_fc1:0")
    h_pool2_flat = tf.reshape(L2_pool, [-1, 16 * 20*32])
    h_fc1 = full_connect(h_pool2_flat, W_fc1, b_fc1)

    # dropout
    keep_prob = tf.placeholder(tf.float32)

    h_fc1_drop = tf.nn.dropout(h_fc1, keep_prob)

    # readout层
    W_fc2 = sess.graph.get_tensor_by_name("W_fc2:0")
    b_fc2 = sess.graph.get_tensor_by_name("b_fc2:0")

    # 定义优化器和训练op
    conv = tf.nn.softmax(tf.matmul(h_fc1_drop, W_fc2) + b_fc2)

    for n in range(2,3):
      path = "test_images/%s.bmp" % (n)
      img = Image.open(path)
      width = img.size[0]
      height = img.size[1]

      img_data = [[0]*SIZE for i in range(1)]
      for h in range(0, height):
        for w in range(0, width):
          if img.getpixel((w, h)) < 190:
            img_data[0][w+h*width] = 1
          else:
            img_data[0][w+h*width] = 0

      result = sess.run(conv, feed_dict = {x: np.array(img_data), keep_prob: 1.0})

      max1 = 0
      max2 = 0
      max3 = 0
      max1_index = 0
      max2_index = 0
      max3_index = 0
      for j in range(NUM_CLASSES):
        if result[0][j] > max1:
          max1 = result[0][j]
          max1_index = j
          continue
        if (result[0][j]>max2) and (result[0][j]<=max1):
          max2 = result[0][j]
          max2_index = j
          continue
        if (result[0][j]>max3) and (result[0][j]<=max2):
          max3 = result[0][j]
          max3_index = j
          continue

      if n == 3:
        license_num += "-"
      license_num = license_num + LETTERS_DIGITS[max1_index]
      print ("概率: [%s %0.2f%%]  [%s %0.2f%%]  [%s %0.2f%%]" % (LETTERS_DIGITS[max1_index],max1*100, LETTERS_DIGITS[max2_index],max2*100, LETTERS_DIGITS[max3_index],max3*100))

    print ("城市代号是: 【%s】" % license_num)
车牌编号训练+识别代码(保存文件名为train-license-digits.py):
#!/usr/bin/python3.5
# -*- coding: utf-8 -*-

import sys
import os
import time
import random

import numpy as np
import tensorflow as tf

from PIL import Image

SIZE = 1280
WIDTH = 32
HEIGHT = 40
NUM_CLASSES = 34
iterations = 1000

SAVER_DIR = "train-saver/digits/"

LETTERS_DIGITS = ("0","1","2","3","4","5","6","7","8","9","A","B","C","D","E","F","G","H","J","K","L","M","N","P","Q","R","S","T","U","V","W","X","Y","Z")
license_num = ""

time_begin = time.time()

# 定义输入节点,对应于图片像素值矩阵集合和图片标签(即所代表的数字)
x = tf.placeholder(tf.float32, shape=[None, SIZE])
y_ = tf.placeholder(tf.float32, shape=[None, NUM_CLASSES])

x_image = tf.reshape(x, [-1, WIDTH, HEIGHT, 1])

# 定义卷积函数
def conv_layer(inputs, W, b, conv_strides, kernel_size, pool_strides, padding):
  L1_conv = tf.nn.conv2d(inputs, W, strides=conv_strides, padding=padding)
  L1_relu = tf.nn.relu(L1_conv + b)
  return tf.nn.max_pool(L1_relu, ksize=kernel_size, strides=pool_strides, padding='SAME')

# 定义全连接层函数
def full_connect(inputs, W, b):
  return tf.nn.relu(tf.matmul(inputs, W) + b)

if __name__ =='__main__' and sys.argv[1]=='train':
  # 第一次遍历图片目录是为了获取图片总数
  input_count = 0
  for i in range(0,NUM_CLASSES):
    dir = './train_images/training-set/%s/' % i      # 这里可以改成你自己的图片目录,i为分类标签
    for rt, dirs, files in os.walk(dir):
      for filename in files:
        input_count += 1

  # 定义对应维数和各维长度的数组
  input_images = np.array([[0]*SIZE for i in range(input_count)])
  input_labels = np.array([[0]*NUM_CLASSES for i in range(input_count)])

  # 第二次遍历图片目录是为了生成图片数据和标签
  index = 0
  for i in range(0,NUM_CLASSES):
    dir = './train_images/training-set/%s/' % i     # 这里可以改成你自己的图片目录,i为分类标签
    for rt, dirs, files in os.walk(dir):
      for filename in files:
        filename = dir + filename
        img = Image.open(filename)
        width = img.size[0]
        height = img.size[1]
        for h in range(0, height):
          for w in range(0, width):
            # 通过这样的处理,使数字的线条变细,有利于提高识别准确率
            if img.getpixel((w, h)) > 230:
              input_images[index][w+h*width] = 0
            else:
              input_images[index][w+h*width] = 1
        input_labels[index][i] = 1
        index += 1

  # 第一次遍历图片目录是为了获取图片总数
  val_count = 0
  for i in range(0,NUM_CLASSES):
    dir = './train_images/validation-set/%s/' % i      # 这里可以改成你自己的图片目录,i为分类标签
    for rt, dirs, files in os.walk(dir):
      for filename in files:
        val_count += 1

  # 定义对应维数和各维长度的数组
  val_images = np.array([[0]*SIZE for i in range(val_count)])
  val_labels = np.array([[0]*NUM_CLASSES for i in range(val_count)])

  # 第二次遍历图片目录是为了生成图片数据和标签
  index = 0
  for i in range(0,NUM_CLASSES):
    dir = './train_images/validation-set/%s/' % i     # 这里可以改成你自己的图片目录,i为分类标签
    for rt, dirs, files in os.walk(dir):
      for filename in files:
        filename = dir + filename
        img = Image.open(filename)
        width = img.size[0]
        height = img.size[1]
        for h in range(0, height):
          for w in range(0, width):
            # 通过这样的处理,使数字的线条变细,有利于提高识别准确率
            if img.getpixel((w, h)) > 230:
              val_images[index][w+h*width] = 0
            else:
              val_images[index][w+h*width] = 1
        val_labels[index][i] = 1
        index += 1

  with tf.Session() as sess:
    # 第一个卷积层
    W_conv1 = tf.Variable(tf.truncated_normal([8, 8, 1, 16], stddev=0.1), name="W_conv1")
    b_conv1 = tf.Variable(tf.constant(0.1, shape=[16]), name="b_conv1")
    conv_strides = [1, 1, 1, 1]
    kernel_size = [1, 2, 2, 1]
    pool_strides = [1, 2, 2, 1]
    L1_pool = conv_layer(x_image, W_conv1, b_conv1, conv_strides, kernel_size, pool_strides, padding='SAME')

    # 第二个卷积层
    W_conv2 = tf.Variable(tf.truncated_normal([5, 5, 16, 32], stddev=0.1), name="W_conv2")
    b_conv2 = tf.Variable(tf.constant(0.1, shape=[32]), name="b_conv2")
    conv_strides = [1, 1, 1, 1]
    kernel_size = [1, 1, 1, 1]
    pool_strides = [1, 1, 1, 1]
    L2_pool = conv_layer(L1_pool, W_conv2, b_conv2, conv_strides, kernel_size, pool_strides, padding='SAME')

    # 全连接层
    W_fc1 = tf.Variable(tf.truncated_normal([16 * 20 * 32, 512], stddev=0.1), name="W_fc1")
    b_fc1 = tf.Variable(tf.constant(0.1, shape=[512]), name="b_fc1")
    h_pool2_flat = tf.reshape(L2_pool, [-1, 16 * 20*32])
    h_fc1 = full_connect(h_pool2_flat, W_fc1, b_fc1)

    # dropout
    keep_prob = tf.placeholder(tf.float32)

    h_fc1_drop = tf.nn.dropout(h_fc1, keep_prob)

    # readout层
    W_fc2 = tf.Variable(tf.truncated_normal([512, NUM_CLASSES], stddev=0.1), name="W_fc2")
    b_fc2 = tf.Variable(tf.constant(0.1, shape=[NUM_CLASSES]), name="b_fc2")

    # 定义优化器和训练op
    y_conv = tf.matmul(h_fc1_drop, W_fc2) + b_fc2
    cross_entropy = tf.reduce_mean(tf.nn.softmax_cross_entropy_with_logits(labels=y_, logits=y_conv))
    train_step = tf.train.AdamOptimizer((1e-4)).minimize(cross_entropy)

    correct_prediction = tf.equal(tf.argmax(y_conv, 1), tf.argmax(y_, 1))
    accuracy = tf.reduce_mean(tf.cast(correct_prediction, tf.float32))

    sess.run(tf.global_variables_initializer())

    time_elapsed = time.time() - time_begin
    print("读取图片文件耗费时间:%d秒" % time_elapsed)
    time_begin = time.time()

    print ("一共读取了 %s 个训练图像, %s 个标签" % (input_count, input_count))

    # 设置每次训练op的输入个数和迭代次数,这里为了支持任意图片总数,定义了一个余数remainder,譬如,如果每次训练op的输入个数为60,图片总数为150张,则前面两次各输入60张,最后一次输入30张(余数30)
    batch_size = 60
    iterations = iterations
    batches_count = int(input_count / batch_size)
    remainder = input_count % batch_size
    print ("训练数据集分成 %s 批, 前面每批 %s 个数据,最后一批 %s 个数据" % (batches_count+1, batch_size, remainder))

    # 执行训练迭代
    for it in range(iterations):
      # 这里的关键是要把输入数组转为np.array
      for n in range(batches_count):
        train_step.run(feed_dict={x: input_images[n*batch_size:(n+1)*batch_size], y_: input_labels[n*batch_size:(n+1)*batch_size], keep_prob: 0.5})
      if remainder > 0:
        start_index = batches_count * batch_size;
        train_step.run(feed_dict={x: input_images[start_index:input_count-1], y_: input_labels[start_index:input_count-1], keep_prob: 0.5})

      # 每完成五次迭代,判断准确度是否已达到100%,达到则退出迭代循环
      iterate_accuracy = 0
      if it%5 == 0:
        iterate_accuracy = accuracy.eval(feed_dict={x: val_images, y_: val_labels, keep_prob: 1.0})
        print ('第 %d 次训练迭代: 准确率 %0.5f%%' % (it, iterate_accuracy*100))
        if iterate_accuracy >= 0.9999 and it >= iterations:
          break;

    print ('完成训练!')
    time_elapsed = time.time() - time_begin
    print ("训练耗费时间:%d秒" % time_elapsed)
    time_begin = time.time()

    # 保存训练结果
    if not os.path.exists(SAVER_DIR):
      print ('不存在训练数据保存目录,现在创建保存目录')
      os.makedirs(SAVER_DIR)
    # 初始化saver
    saver = tf.train.Saver()
    saver_path = saver.save(sess, "%smodel.ckpt"%(SAVER_DIR))

if __name__ =='__main__' and sys.argv[1]=='predict':
  saver = tf.train.import_meta_graph("%smodel.ckpt.meta"%(SAVER_DIR))
  with tf.Session() as sess:
    model_file=tf.train.latest_checkpoint(SAVER_DIR)
    saver.restore(sess, model_file)

    # 第一个卷积层
    W_conv1 = sess.graph.get_tensor_by_name("W_conv1:0")
    b_conv1 = sess.graph.get_tensor_by_name("b_conv1:0")
    conv_strides = [1, 1, 1, 1]
    kernel_size = [1, 2, 2, 1]
    pool_strides = [1, 2, 2, 1]
    L1_pool = conv_layer(x_image, W_conv1, b_conv1, conv_strides, kernel_size, pool_strides, padding='SAME')

    # 第二个卷积层
    W_conv2 = sess.graph.get_tensor_by_name("W_conv2:0")
    b_conv2 = sess.graph.get_tensor_by_name("b_conv2:0")
    conv_strides = [1, 1, 1, 1]
    kernel_size = [1, 1, 1, 1]
    pool_strides = [1, 1, 1, 1]
    L2_pool = conv_layer(L1_pool, W_conv2, b_conv2, conv_strides, kernel_size, pool_strides, padding='SAME')

    # 全连接层
    W_fc1 = sess.graph.get_tensor_by_name("W_fc1:0")
    b_fc1 = sess.graph.get_tensor_by_name("b_fc1:0")
    h_pool2_flat = tf.reshape(L2_pool, [-1, 16 * 20*32])
    h_fc1 = full_connect(h_pool2_flat, W_fc1, b_fc1)

    # dropout
    keep_prob = tf.placeholder(tf.float32)

    h_fc1_drop = tf.nn.dropout(h_fc1, keep_prob)

    # readout层
    W_fc2 = sess.graph.get_tensor_by_name("W_fc2:0")
    b_fc2 = sess.graph.get_tensor_by_name("b_fc2:0")

    # 定义优化器和训练op
    conv = tf.nn.softmax(tf.matmul(h_fc1_drop, W_fc2) + b_fc2)

    for n in range(3,8):
      path = "test_images/%s.bmp" % (n)
      img = Image.open(path)
      width = img.size[0]
      height = img.size[1]

      img_data = [[0]*SIZE for i in range(1)]
      for h in range(0, height):
        for w in range(0, width):
          if img.getpixel((w, h)) < 190:
            img_data[0][w+h*width] = 1
          else:
            img_data[0][w+h*width] = 0

      result = sess.run(conv, feed_dict = {x: np.array(img_data), keep_prob: 1.0})

      max1 = 0
      max2 = 0
      max3 = 0
      max1_index = 0
      max2_index = 0
      max3_index = 0
      for j in range(NUM_CLASSES):
        if result[0][j] > max1:
          max1 = result[0][j]
          max1_index = j
          continue
        if (result[0][j]>max2) and (result[0][j]<=max1):
          max2 = result[0][j]
          max2_index = j
          continue
        if (result[0][j]>max3) and (result[0][j]<=max2):
          max3 = result[0][j]
          max3_index = j
          continue

      license_num = license_num + LETTERS_DIGITS[max1_index]
      print ("概率: [%s %0.2f%%]  [%s %0.2f%%]  [%s %0.2f%%]" % (LETTERS_DIGITS[max1_index],max1*100, LETTERS_DIGITS[max2_index],max2*100, LETTERS_DIGITS[max3_index],max3*100))

    print ("车牌编号是: 【%s】" % license_num)
保存好上面三个python脚本后,我们首先进行省份简称训练。在运行代码之前,需要先把数据集解压到训练脚本所在目录。然后,在命令行中进入脚本所在目录,输入执行如下命令:
python train-license-province.py train
训练结果如下:

然后进行省份简称识别,在命令行输入执行如下命令:
python train-license-province.py predict

执行城市代号训练(相当于训练26个字母):
python train-license-letters.py train

识别城市代号:
python train-license-letters.py predict

执行车牌编号训练(相当于训练24个字母+10个数字,我国交通法规规定车牌编号中不包含字母I和O):
python train-license-digits.py train

识别车牌编号:
python train-license-digits.py predict
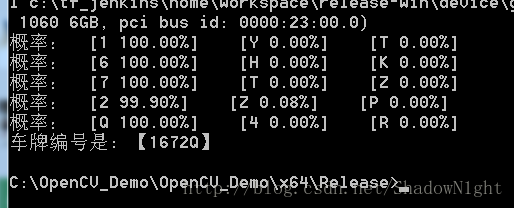
可以看到,在测试图片上,识别准确率很高。识别结果是闽O-1672Q。
下图是测试图片的车牌原图:

以上就是本文的全部内容,希望对大家的学习有所帮助,也希望大家多多支持我们。
相关推荐
-
TensorFlow基于MNIST数据集实现车牌识别(初步演示版)
在前几天写的一篇博文<如何从TensorFlow的mnist数据集导出手写体数字图片>中,我们介绍了如何通过TensorFlow将mnist手写体数字集导出到本地保存为bmp文件. 车牌识别在当今社会中广泛存在,其应用场景包括各类交通监控和停车场出入口收费系统,在自动驾驶中也得到一定应用,其原理也不难理解,故很适合作为图像处理+机器学习的入门案例. 现在我们不妨酝酿一个大胆的想法:在TensorFlow中通过卷积神经网络+mnist数字集实现车牌识别. 实际上车牌字符除了数字0-9,还有字母A
-
TensorFlow车牌识别完整版代码(含车牌数据集)
在之前发布的一篇博文<MNIST数据集实现车牌识别--初步演示版>中,我们演示了如何使用TensorFlow进行车牌识别,但是,当时采用的数据集是MNIST数字手写体,只能分类0-9共10个数字,无法分类省份简称和字母,局限性较大,无实际意义. 经过图像定位分割处理,博主收集了相关省份简称和26个字母的图片数据集,结合前述博文中贴出的python+TensorFlow代码,实现了完整的车牌识别功能.本着分享精神,在此送上全部代码和车牌数据集. 车牌数据集下载地址(约4000张图片):tf_ca
-
Python+Tensorflow+CNN实现车牌识别的示例代码
一.项目概述 本次项目目标是实现对自动生成的带有各种噪声的车牌识别.在噪声干扰情况下,车牌字符分割较困难,此次车牌识别是将车牌7个字符同时训练,字符包括31个省份简称.10个阿拉伯数字.24个英文字母('O'和'I'除外),共有65个类别,7个字符使用单独的loss函数进行训练. (运行环境:tensorflow1.14.0-GPU版) 二.生成车牌数据集 import os import cv2 as cv import numpy as np from math import * from
-
python实现车牌识别的示例代码
某天回家之时,听到有个朋友说起他正在做一个车牌识别的项目 于是对其定位车牌的位置算法颇有兴趣,今日有空得以研究,事实上车牌识别算是比较成熟的技术了, 这里我只是简单实现. 我的思路为: 对图片进行一些预处理,包括灰度化.高斯平滑.中值滤波.Sobel算子边缘检测等等. 利用OpenCV对预处理后的图像进行轮廓查找,然后根据一些参数判断该轮廓是否为车牌轮廓. 效果如下: test1: test2 实现代码如下(对图像预处理(滤波器等)的原理比较简单,这里只是对一些函数进行调包): import c
-
WebGame《逆转裁判》完整版 代码下载(1月24日更新)
特别提醒:您可以自由下载并更改代码,欢迎所有有志于WebGame领域的朋友给我写信或到我的Blog上留言. 演示地址:http://nzcp.gbq.cn/screen.width*0.7) {this.resized=true; this.width=screen.width*0.7; this.style.cursor='hand'; this.alt='Click here to open new window\nCTRL+Mouse wheel to zoom in/out';}" on
-

可能是你看过最全的十大排序算法详解(完整版代码)
目录 前言 交集排序 冒泡 简单 快速排序 插入排序 直接插入排序 希尔排序 选择排序 简单选择排序 堆排序 归并排序 二路 多路 非比较类 计数排序 桶排序 基数排序 最后 前言 兄弟们,应上篇数据结构的各位要求,今天我开始工作了,开始肝算法,剑指offer还在路上,我真想开车去接它,奈何码神没有驾照的开车,算了,弄排序算法吧,有点长,耐心看啊,原创不易,你们懂的,先上一张图 可以看出排序算法,还是比较多的,算了,不多说了,你我肝完就是出门自带4年实习经验的! 交集排序 冒泡 冒泡我一般也将它
-
python 实现的车牌识别项目
车牌识别在高速公路中有着广泛的应用,比如我们常见的电子收费(ETC)系统和交通违章车辆的检测,除此之外像小区或地下车库门禁也会用到,基本上凡是需要对车辆进行身份检测的地方都会用到. 简介 车牌识别系统(Vehicle License Plate Recognition)是计算机视频图像识别技术在车辆牌照识别中的一种应用,通常一个车牌识别系统主要包括以下这四个部分: 车辆图像获取 车牌定位 车牌字符分割 车牌字符识别 我们再来看一下百科中对车牌识别技术的描述: 车牌识别技术要求能够将运动中的汽车牌
-
OpenCV3实现车牌识别(C++版)
本文实例为大家分享了OpenCV3实现车牌识别的具体代码,供大家参考,具体内容如下 车牌识别(基于OpenCV3.4.7+VS2017) 视频识别 蓝色车牌识别 视觉入坑的第一个Demo(注释很详细),因为本人之前拖延,一直没能写详细实现博客,先将代码贴出来供大家交流,个人认为精华部分在字符切割(直接用指针遍历像素加限制条件切割),车牌模板已上传,整个工程也已上传,后续完善各环节实现步骤详解. 头文件:Global.h #ifdef GLOBAL extern int flag_1; exter
-
opencv实现车牌识别
本文实例为大家分享了opencv实现车牌识别的具体代码,供大家参考,具体内容如下 (1)提取车牌位置,将车牌从图中分割出来:(2)车牌字符的分割:(3)通过模版匹配识别字符:(4)将结果绘制在图片上显示出来. import cv2 from matplotlib import pyplot as plt import os import numpy as np # plt显示彩色图片 def plt_show0(img): # cv2与plt的图像通道不同:cv2为[b,g,r];plt
-
android车牌识别系统EasyPR使用详解
上篇文章介绍了身份证识别,现在我们来说说关于车牌识别. EasyPR是一个开源的中文车牌识别系统,gitHub地址 EasyPR有如下特点: 1. 它基于openCV这个开源库,这意味着所有它的代码都可以轻易的获取. 2. 它能够识别中文.例如车牌为苏EUK722的图片,它可以准确地输出std:string类型的"苏EUK722"的结果. 3. 它的识别率较高.目前情况下,字符识别已经可以达到90%以上的精度. 使用方法 package com.android.guocheng.eas