Kotlin coroutineContext源码层深入分析
目录
- 1.CoroutineContext
- 2.Element的作用
- 3.CoroutineContext相关的操作符原理解析
- 3.1.什么类型的集合
- 3.2.如何管理
- Element
- combinedContext
- 4.验证以及总结
1.CoroutineContext
表示一个元素或者是元素集合的接口。它有一个Key(索引)的Element实例集合,每一个Element的实例也是一个CoroutineContext,即集合中每个元素也是集合。
如下图所示,CoroutineContext的常见官方实现有以下几种(少见的或者自定义的实现就不列举,以后再聊):
- Job:协程实例,控制协程生命周期(new、acruve、completing、conpleted、cancelling、cancelled)。
- CoroutineDIspatcher:协程调度器,给指定线程分发协程任务(IO、Default、Main、Unconfined)。
- CoroutineName:协程名称,用于定义协程的名称,调试打印信息使用。
- CoroutineExceptionHandler:协程异常处理器,用于处理未捕获的异常。

2.Element的作用
Element类也是继承自CoroutineContext接口的,该类的作用是给子类保留一个Key成员变量,用于在集合查询的时候可以快速查找到目标coroutineContext,Key成员变量是一个泛型变量,每个继承自Element的子类都会去覆盖实现Key成员变量(一般是使用子类自己去覆盖Key),就比如拿最简单的CoroutineName类来举例子:
public data class CoroutineName(
    /**
     * User-defined coroutine name.
     */
    val name: String
) : AbstractCoroutineContextElement(CoroutineName) {
    /**
     * Key for [CoroutineName] instance in the coroutine context.
     */
    public companion object Key : CoroutineContext.Key<CoroutineName>
    /**
     * Returns a string representation of the object.
     */
    override fun toString(): String = "CoroutineName($name)"
}
@SinceKotlin("1.3")
public abstract class AbstractCoroutineContextElement(public override val key: Key<*>) : Element
/**
 * Key for the elements of [CoroutineContext]. [E] is a type of element with this key.
 */
public interface Key<E : Element>
/**
 * An element of the [CoroutineContext]. An element of the coroutine context is a singleton context by itself.
 */
public interface Element : CoroutineContext {
    /**
     * A key of this coroutine context element.
     */
    public val key: Key<*>
    public override operator fun <E : Element> get(key: Key<E>): E? =
        @Suppress("UNCHECKED_CAST")
        if (this.key == key) this as E else null
    public override fun <R> fold(initial: R, operation: (R, Element) -> R): R =
        operation(initial, this)
    public override fun minusKey(key: Key<*>): CoroutineContext =
        if (this.key == key) EmptyCoroutineContext else this
}
上面的CoroutineName构造函数定义为
public data class CoroutineName(
    /**
     * User-defined coroutine name.
     */
    val name: String
) : AbstractCoroutineContextElement(CoroutineName)
父类构造函数中传递的参数是CoroutineName,但是我们发现CoroutineName也不是Key接口public interface Key<E : Element>的实现,为啥可以这样直接传递呢?但是我们仔细看发现CoroutineName类定义了伴生对象: public companion object Key : CoroutineContext.Key<CoroutineName>,在kotlin中伴生对象是可以直接省略 类.companion.调用方式的,CoroutineName类也就代表着伴生对象,所以可以直接作为CoroutineName父类构造函数的参数,神奇的kotlin语法搞得我一愣一愣的。
类似的还有Job,CoroutineDIspatcher,CoroutineExceptionHandler的成员变量Key的覆盖实现:
//Job
public interface Job : CoroutineContext.Element {
    /**
     * Key for [Job] instance in the coroutine context.
     */
    public companion object Key : CoroutineContext.Key<Job> { //省略 }
     //省略
}
//CoroutineExceptionHandler
public interface CoroutineExceptionHandler : CoroutineContext.Element {
    /**
     * Key for [CoroutineExceptionHandler] instance in the coroutine context.
     */
    public companion object Key : CoroutineContext.Key<CoroutineExceptionHandler>
 	//省略
}
// CoroutineDIspatcher
@SinceKotlin("1.3")
public interface ContinuationInterceptor : CoroutineContext.Element {
    /**
     * The key that defines *the* context interceptor.
     */
    companion object Key : CoroutineContext.Key<ContinuationInterceptor>
}
3.CoroutineContext相关的操作符原理解析
CoroutineContext的操作符??有点莫名其妙的感觉,仅仅凭借我的直觉的话很难理解,但是平常使用协程的过程中,我们经常会使用这些相关的操作符,比如 +,[]等等符号,下面代码示例:
val comb = Job() + CoroutineName("")
val cName = comb[CoroutineName]
上面的+代表两个coroutineContext合并到集合中,这里的集合实际上是一个链表,后面会讲到。
上面的[]代表着从集合中索引出CoroutineName类型的CoroutineContext,这里也可以看出来仅仅通过key就查找出元素和map很相似,那么可以知道value是唯一的。key都是coroutineContext子类作为泛型类型的,具有唯一性,那也可以间接推断出上面+操作其实也会覆盖拥有相同key的value的值。
还有其他操作函数:fold展开操作, minusKey删除集合中存在的元素。
还有一个问题就是,这个集合到底是什么类型的集合,已经如何管理的,我们来一一解答:
3.1.什么类型的集合
CoroutineConetxt集合是链表结构的集合,是一个从本节点开始,向左遍历parent节点的一个链表,节点的都是CoroutineContext的子类,分为Element,CombinedContext,EmptyCoroutineContext三种。
有以下代码作为举例:
val scope = CoroutineScope(CoroutineName("") + Job() + CoroutineExceptionHandler{<!--{C}%3C!%2D%2D%20%2D%2D%3E--> _, _ -> } + Dispatchers.Default)
假如CoroutineScope自己的coroutineContext变量集合中是包含CoroutineName,Job,CoroutineExceptionHanlder,CoroutineDIspatcher四种上下文的,那么他们组成的集合结构可能就会是下图所示的链表结构,

使用scope查找对应的Job的话直接调用scope[Job]方法,替代Job的话调用 scope + Job(),看源码就是使用scope的上下文集合替换Job
public operator fun CoroutineScope.plus(context: CoroutineContext): CoroutineScope =
    ContextScope(coroutineContext + context)
为啥是链表结构的集合呢,接下来直接看源码就知道了。
3.2.如何管理
我们集合的链表结构,每个节点都是CombinedContext类型,里面包含了element,left两个成员变量,left指向链表的左边,element表示当前节点的上下文元素(一般是job,name,handler,dispatcher四种),链表的最左端节点一定是Element元素
Element
主要实现在combinedContext,Element元素的方法实现比较简单,不单独列举。
combinedContext
构造函数
@SinceKotlin("1.3")
internal class CombinedContext(
    private val left: CoroutineContext,
    private val element: Element
) : CoroutineContext, Serializable {
get函数:
	//Element
    public override operator fun <E : Element> get(key: Key<E>): E? =
          @Suppress("UNCHECKED_CAST")
          if (this.key == key) this as E else null
	//CombinedContext
    override fun <E : Element> get(key: Key<E>): E? {
        var cur = this
        while (true) {
            cur.element[key]?.let { return it }
            val next = cur.left
            if (next is CombinedContext) {
                cur = next
            } else {
                return next[key]
            }
        }
    }
在代码中一般不会使用get方法,而是使用context[key]来代替,类似于map集合的查询。上下文是Element类型,key是对应类型那么返回当前Element,不是当前类型,返回null;上下文是CombinedContext类型,指针cur指向当前节点,while循环开始,当前的element元素的key查找到了,那么就返回当前combinedContext,如果没找到,那么将指针指向left节点,如果left节点是combinedContext类型,那么重复上述操作,如果是Element类型直接判断是否可以查找到key值。那么从这里看出链表的最左端元素一定是Element节点。
contain函数
    private fun contains(element: Element): Boolean =
        get(element.key) == element
    private fun containsAll(context: CombinedContext): Boolean {
        var cur = context
        while (true) {
            if (!contains(cur.element)) return false
            val next = cur.left
            if (next is CombinedContext) {
                cur = next
            } else {
                return contains(next as Element)
            }
        }
    }
类似于get操作,contains函数直接调用get方法来判断元素是不是和传入参数相等。
containAll函数就是遍历参数的链表节点是不是都包含在当前链表中。
fold函数
   	//coroutineContext
    public fun <R> fold(initial: R, operation: (R, Element) -> R): R
从表面意思就是展开操作,第一个入参 CoroutineContext,第二个入参 lambda表达式 用表达式的两个参数CoroutineContext, Element 返回一个新的 CoroutineContext:
operation :(R , Element) -> R
	Job.fold(CoroutineName("测试"),{ coroutineContext , element ->
        TODO("return new CoroutineContext")
    }) //example
    //Element
	public override fun <R> fold(initial: R, operation: (R, Element) -> R): R =
    	operation(initial, this)
作为receiver的上下文是Element,调用fold的话,是让ELement和入参的CoroutineContext作为lambda表达式 的两个参数调用该lambda表达式返回结果。
    MainScope().coroutineContext.fold(Job(),{ coroutineContext , element ->
        TODO("return new CoroutineContext")
    }) //example
	//CombinedContext
	public override fun <R> fold(initial: R, operation: (R, Element) -> R): R =
        operation(left.fold(initial, operation), element)
作为receiver的上下文是CombinedContext,调用fold的话,是让left深度递归调用fold函数,一直到链表的最左端节点,我们知道链表的最左端节点一定是Element,那么根据上面的代码,Element的fold函数内调用operation返回一个CoroutineContext后,递归回溯到上一层,继续调用operation返回一个CoroutineContext,继续回溯,一直回溯到开始调用MainScope().coroutineContext.fold(Job的地方。如下图所示:

minusKey函数
该函数的意思是从上下文集合中删除key对应的上下文。
  	//Element
    public override fun minusKey(key: Key<*>): CoroutineContext =
            if (this.key == key) EmptyCoroutineContext else this
接收者receiver是Element类型的话,如果入参key和receiver是相等的话,那么返回EmptyCoroutineContext空上下文,否则返回receiver本身。(可见找到得到key的话会返回空上下文,找不到的话返回本身)
	//CombinedContext
	public override fun minusKey(key: Key<*>): CoroutineContext {
	    element[key]?.let { return left }
	    val newLeft = left.minusKey(key)
	    return when {
	        newLeft === left -> this
	        newLeft === EmptyCoroutineContext -> element
	        else -> CombinedContext(newLeft, element)
	    }
	}
接收者receiver是CombinedContext类型的话,
- element[key]不为空说明当前节点就是要找的节点,直接返回该节点的left节点(代表着把当前节点跳过,也就是移除该节点)。
- element[key]为空那么说明当前节点不是要找的节点,需要向链表的左端left去寻找目标,深度递归遍历
left.minusKey(key),返回的newLeft有三种情况: - newLeft === left,在左边找不到目标Key(根据Element.minusKey函数发现,返回的是this的话就是key没有匹配到),从该节点到左端节点都可以返回。
- newLeft === EmptyCoroutineContext ,在左边找到了目标key(根据Element.minusKey函数发现,返回的是EmptyCoroutineContext 的话key匹配到了Element),找到了目标那么需要将目标跳过,那么从本节点开始返回,左边节点需要跳过移除,该节点就成了链表的最左端节点Element。
- 不是上述的情况,那么就是newLeft是触发了1.或者4.情况,返回的是left的element元素,或者是本节点的left节点跳过了,返回的是left.left节点,这样将newLeft和本节点的element构造出新的CombinedContext节点。
上述操作,都只是在链表上跳过节点,然后将跳过的节点左节点left和右节点创建新的CombinedContext,产生一个新的链表出来。
操作例子:
删除最左端节点

删除中间节点:

结论:minusKey的操作只是将原始链表集合中排除某一个节点,然后复制一个链表返回,所以并不会影响原始集合
plus函数
该函数重写+操作符,函数定义operator fun plus(context: CoroutineContext): CoroutineContext ,作用是对上下文集合进行添加(相同会覆盖)指定上下文操作。这个函数只有CoroutineContext实现了,代码如下:
    /**
     * Returns a context containing elements from this context and elements from  other [context].
     * The elements from this context with the same key as in the other one are dropped.
     */
    public operator fun plus(context: CoroutineContext): CoroutineContext =
        if (context === EmptyCoroutineContext) this else // fast path -- avoid lambda creation
            context.fold(this) { acc, element ->
                val removed = acc.minusKey(element.key)
                if (removed === EmptyCoroutineContext) element else {
                    // make sure interceptor is always last in the context (and thus is fast to get when present)
                    val interceptor = removed[ContinuationInterceptor]
                    if (interceptor == null) CombinedContext(removed, element) else {
                        val left = removed.minusKey(ContinuationInterceptor)
                        if (left === EmptyCoroutineContext) CombinedContext(element, interceptor) else
                            CombinedContext(CombinedContext(left, element), interceptor)
                    }
                }
            }
入参如果是EmptyContext,那么直接返回;不是空的话,对入参进行fold操作,上面讲了fold操作是将context链表展开,从链表最左端开始向context回溯调用fold函数的入参lambda表达式。那么我们就知道了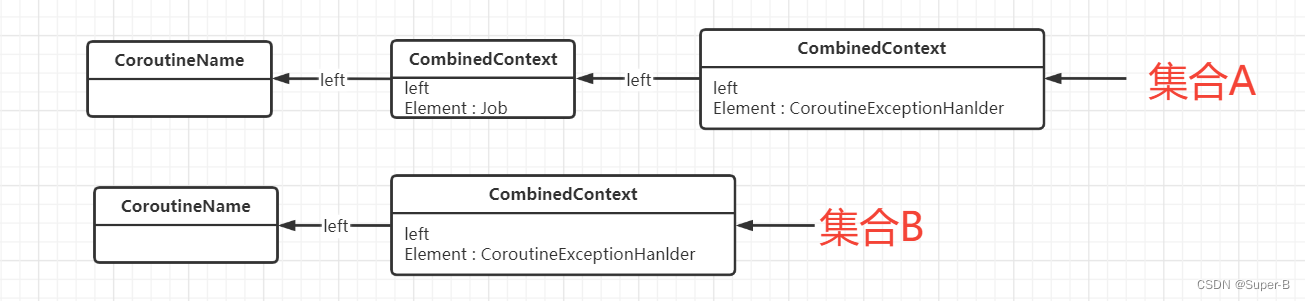 是如何操作的了,首先B作为plus的入参,那么B先展开到B链表结构的最左端,然后执行lambda操作{ acc, element -> ... }, 这个lambda里面
第一步
context.fold(this) { acc, element ->
	acc.minusKey(Element.Key)
	// ...
}
//CombineContext的实现
public override fun <R> fold(initial: R, operation: (R, Element) -> R): R =
    operation(left.fold(initial, operation), element)
根据CombineContext的实现,知道lambda的acc参数是A (CombineContext),element参数是B(CombineContext)的fold递归的当前位置的element的元素,acc.minusKey(Element.Key)所做的事情就是移除A (CombineContext)链表中的B(CombineContext)的element元素。
第二步
if (removed === EmptyCoroutineContext) element else {
	// make sure interceptor is always last in the context (and thus is fast to get when present)
	val interceptor = removed[ContinuationInterceptor]
	// ...
}
第一步移除掉element之后,判断剩余的removed链表是不是empty的,如果为空,返回B(CombineContext)的fold递归位置的element元素;不为空,接着从removed链表中获取ContinuationInterceptor上下文(也就是dispatcher)。
第三步
if (interceptor == null) CombinedContext(removed, element) else {
    val left = removed.minusKey(ContinuationInterceptor)
    if (left === EmptyCoroutineContext) CombinedContext(element, interceptor) else
        CombinedContext(CombinedContext(left, element), interceptor)
}
获取的interceptor为空,那将element和removed链表构造出一个新的CombinedContext节点返回;如果不为空,从removed链表中移除interceptor返回一个不包含interceptor的链表left;移除后left链表为空,那么将element和interceptor构造出一个新的CombinedContext节点返回;left链表不为空,那么将left, element构造出一个新的CombinedContext节点,将新的CombinedContext节点和interceptor早构造出一个新的节点返回。
每一层递归fold操作结束后,返回一个新的context给上一层继续递归,直到结束为止。
操作例子图如下:
有如下两个集合A (CombineContext) + B(CombineContext):

第一次递归回溯:

第二次递归回溯:

回溯深度取决于入参B的链表长度,B有多长回溯就会发生几次,这里没有加入interceptor上下文元素,减少画图复杂度。
plus操作结论:
1.发现每次返回节点的时候,都会将interceptor移除后,放到节点的最右边的位置,可以知道interceptor一定在链表的头部;
2.lambda表达式中,一定会先移除掉相同key的上下文元素,然后用后加入的element和left链表新建一个CombinedContext节点插入到头部
3.plus操作会覆盖掉有相同key的上下文元素
4.验证以及总结
经过对上面的源码的分析,可以推断出一些上下文元素的操作符操作后,集合的元素排列状态。比如下面操作:
    private fun test() {
        val coroutineContext = Job() + CoroutineName("name1") + Dispatchers.IO + CoroutineExceptionHandler{ c,e -> }
        Log.i(TAG, "coroutineContext $coroutineContext")
        val newContext = coroutineContext + SupervisorJob()
        Log.i(TAG, "newContext $newContext")
        val newContext2 = newContext + (Job() + CoroutineName("name2"))
        Log.i(TAG, "newContext2 $newContext2")
        Log.i(TAG, "newContext2[CoroutineName] ${newContext2[CoroutineName]}")
    }
打印的日志如下:
I/MainActivity: coroutineContext [
JobImpl{Active}@b32c44,
CoroutineName(name1),
com.meeting.kotlinapplication.MainActivity$test$$inlined$CoroutineExceptionHandler$1@45ec12d,
Dispatchers.IO
]I/MainActivity: newContext [
CoroutineName(name1),
com.meeting.kotlinapplication.MainActivity$test$$inlined$CoroutineExceptionHandler$1@45ec12d,
SupervisorJobImpl{Active}@1022662,
Dispatchers.IO
]
I/MainActivity: newContext2 [
com.meeting.kotlinapplication.MainActivity$test$$inlined$CoroutineExceptionHandler$1@45ec12d,
JobImpl{Active}@76863f3,
CoroutineName(name2),
Dispatchers.IO
]I/MainActivity: newContext2[CoroutineName] CoroutineName(name2)
I/MainActivity: coroutineContext [
JobImpl{Active}@b32c44,
CoroutineName(name1),
com.meeting.kotlinapplication.MainActivity$test$$inlined$CoroutineExceptionHandler$1@45ec12d,
Dispatchers.IO
]
可以看出来:
1. Dispatchers元素一定是在链表的头部;
2. 重复key的元素会被后加入的元素覆盖,集合中不存在重复key的元素;
3. +操作后返回新的链表集合,不会影响原始集合链表结构
上面总结的这些性质,可以很好的为job协程的父子关系,子job继承父job的上下文集合这些特性,下一篇我将讲解 协程Job父子关系的原理。
到此这篇关于Kotlin coroutineContext源码层深入分析的文章就介绍到这了,更多相关Kotlin coroutineContext内容请搜索我们以前的文章或继续浏览下面的相关文章希望大家以后多多支持我们!
相关推荐
-
Kotlin 协程思维模型的引入使用建立
目录 1.协程 2.Kotlin协程 1.引入Kotlin协程 2.Kotlin协程的使用 3.Kotlin协程的轻量(总结的还不够清晰) 4.协程的“非阻塞式” 5.建立思维模型 1.协程 协程不是进程或线程,它的执行过程更类似于子例程或者说不带返回值的函数调用. 一个程序可以包含多个协程,类似于一个进程包含多个线程.线程有自己的上下文多个线程存在时它们相对独立,切换受系统控制,而协程也相对独立,也有自己的上下文,但是切换是由自己控制的,当需要切换到其他协程时是由当前协程控制的. 线程 协程
-
Kotlin协程Flow生命周期及异常处理浅析
目录 正文 Flow基本概念 Flow生命周期 处理异常 上游或者中间异常使用catch 下游使用try-catch 切换执行线程 终止操作符 "冷的数据流"从何而来 正文 Kotlin协程中的Flow主要用于处理复杂的异步数据,以一种”流“的方式,从上到下依次处理,和RxJava的处理方式类型,但是比后者更加强大. Flow基本概念 Flow中基本上有三个概念,即 发送方,处理中间层,接收方,可以类比水利发电站中的上游,发电站,下游的概念, 数据从上游开始发送”流淌“至中间站被”处理
-
Kotlin协程Context应用使用示例详解
目录 1.Context的应用 2.万物皆有 Context 1.CoroutineScope 2.Job 3.Dispatcher 4.CoroutineExceptionHandler 1.Context的应用 Context在启动协程模式中就已经遇到过叫CoroutineContext,它的意思就是协程上下文,线程的切换离不开它. 在启动协程模式中也说明过为什么不用传递Context,因为它有一个默认值EmptyCoroutineContext,需要注意的是这个Context是不可以切换线
-
kotlin Context使用详解
在activity级下使用this表示context kotlin中取消了xxxActivity.this的用法,所以我们可以在activity下新建一个Context属性--instance指向它本身.然后在其他地方使用.如果使用的地方是在activity这一级则可以直接使用this指向它本身 override fun onCreate(savedInstanceState: Bundle?) { super.onCreate(savedInstanceState) setContentVie
-
Kotlin协程Channel特点及使用细节详解
目录 正文 1.认识Channel 2.Channel使用中的细节 3.Channe的特点 正文 在协程启动模式中已经知道async是可以返回结果的,但是只返回一个,那么在复杂场景下就会不够用了,所以Channel就出现了. 1.认识Channel Channel的意思是管道.通道,用图表示如下: Channel的左边是发送方,右边是接收方,中间则是消息,那么代码表示就是下面这样: fun main() { channelTest() } fun channelTest() = runBlock
-
Kotlin协程launch启动流程原理详解
目录 1.launch启动流程 反编译后的Java代码 2.协程是如何被启动的 1.launch启动流程 已知协程的启动方式之一是Globalscope.launch,那么Globalscope.launch的流程是怎样的呢,直接进入launch的源码开始看起. fun main() { coroutineTest() Thread.sleep(2000L) } val block = suspend { println("Hello") delay(1000L) println(&q
-

Kotlin协程Job生命周期结构化并发详解
目录 1.Job的生命周期 2.Deffered 3.Job与结构化并发 4.launch和async的使用场景 前面在学习协程启动方式的时候在launch的源码中有一个返回值是Job,async的返回Deferred也是实现了Job,那么而也就是说launch和async在创建一个协程的时候也会创建一个对应的Job对象.还提到过Job是协程的句柄,那么Job到底是什么?它有什么用? 1.Job的生命周期 先看一下Job的源码,这里只保留了跟标题相关的内容 public interface Jo
-
Kotlin1.6.20新功能Context Receivers使用技巧揭秘
目录 前言 扩展函数的局限性 什么是 Context Receivers 如何使用 Context Receivers 引入 Context Receivers 导致可读性问题 Context Receivers 应用范围及注意事项 总结 前言 这篇文章我们一起来聊一下 Kotlin 1.6.20 的新功能 Context Receivers,来看看它为我们解决了什么问题. 通过这篇文章将会学习到以下内容: 扩展函数的局限性 什么是 Context Receivers,以及如何使用 Contex
-
Kotlin coroutineContext源码层深入分析
目录 1.CoroutineContext 2.Element的作用 3.CoroutineContext相关的操作符原理解析 3.1.什么类型的集合 3.2.如何管理 Element combinedContext 4.验证以及总结 1.CoroutineContext 表示一个元素或者是元素集合的接口.它有一个Key(索引)的Element实例集合,每一个Element的实例也是一个CoroutineContext,即集合中每个元素也是集合. 如下图所示,CoroutineContext的常
-
react源码层探究setState作用
目录 前言 为什么setState看起来是异步的 从first paint开始 触发组件更新 更新渲染fiber tree 写在最后 前言 在深究 React 的 setState 原理的时候,我们先要考虑一个问题:setState 是异步的吗? 首先以 class component 为例,请看下述代码(demo-0) class App extends React.Component { state = { count: 0 } handleCountClick = () => { this
-
react源码层深入刨析babel解析jsx实现
目录 jsx v16.x及以前版本 v17及之后版本 ReactElement React.createElement ReactElement React.Component 总结 经过多年的发展,React已经更新了大版本16.17.18,本系列主要讲的是 version:17.0.2,在讲这个版本之前,我们先看一看在babel的编译下,每个大版本之下会有什么样的变化. jsx <div className='box'> <h1 className='title' style={{'
-
react源码层分析协调与调度
目录 requestEventTime requestUpdateLane findUpdateLane lanePriority LanePriority createUpdate enqueueUpdate 总结 协调与调度 reconciler流程 同步任务类型执行机制 异步任务类型执行机制 shouldYield performUnitOfWork beginWork completeUnitOfWork scheduler流程 performWorkUntilDeadline 总结 r
-
Redis对象与redisObject超详细分析源码层
目录 一.对象 二.对象的类型及编码 redisObject 结构体 三.不同对象编码规则 四.redisObject结构各字段使用范例 4.1 类型检查(type字段) 4.2 多态命令的实现(encoding) 4.3 内存回收和共享对象(refcount) 4.4 对象的空转时长(lru) 五.对象在源码中的使用 5.1 字符串对象 5.1.1字符串对象创建 5.1.2 字符串对象编码 5.1.3 字符串对象解码 5.1.4 redis对象引用计数及自动清理 六.总结 以下内容是基于Red
-
kotlin源码结构层次详解
目录 协程源码的结构 基础层 中间层 平台层 协程源码的结构 在研究Kotlin源码之前,得先搞懂Kotlin源码结构分布.不然找不到该看哪里的代码.看源码之前当然先得有一个目标,最好是带着这个目标去看源码才比较有针对性,抓主流程,不然可能会陷入浩瀚的源码细节中. 协程源码,按道理可以分成2个仓库,一个是Kotlin仓库,一个是Kotlin协程仓库. Kotlin仓库 https://github.com/JetBrains/kotlin 协程仓库 kotlinx.coroutines http
-
React Fiber源码深入分析
目录 前言 React架构前世今生 React@15及之前 React@16及之后 Fiber Fiber简单理解 Fiber结构 Fiber工作原理 mount update 前言 本次React源码参考版本为17.0.3. React架构前世今生 查阅文档了解到, React@16.x是个分水岭. React@15及之前 在16之前,React架构大致可以分为两层: Reconciler: 主要职责是对比查找更新前后的变化的组件: Renderer: 主要职责是基于变化渲染页面: 但是Rea
-
jQuery+AJAX实现遮罩层登录验证界面(附源码)
JQuery遮罩层登录界面效果的实现,AJAX实现登录验证,文章尾有完整示例源码下载,欢迎大家学习研究. 操作系统:Windwos7 Ultimate 开发工具:Visual Studio 2010 数据库:Sql Server 2005 测试浏览器:IE8.FF3.6.8.Google Chrome (IE8中弹出登录层后会出现竖拉条,其他两种没有出现,那个竖拉条可以在JS中通过修改数值让其不出现,但是下面会出现白边,越来越觉得IE有点那个了......) 1.预览 1)登录前 2)点击登录显
-
jQuery+CSS3+Html5实现弹出层效果实例代码(附源码下载)
弹出层用来向用户展示详细的信息,交互性非常强.弹出层有对话框.模态窗口等形式,这里我都把他们叫做弹出层,我的同事们也是这么叫的.一般我们喜欢使用比较成熟的弹出层插件如fancybox等,但在本文,我将先抛弃插件,给大家介绍如何使用jQuery+CSS3+Html5实现弹出层. 效果展示 源码下载 我们完全使用HTML5+CSS3+jQuery来实现一个基本的弹出层效果,因此我们可以在示例中任意修改弹出层外观样式.甚至js方法调用.我们最终做出来的弹出层效果应该是响应式的,也就是说可以
-
jQuery+Ajax+PHP弹出层异步登录效果(附源码下载)
弹出层主要用于展示丰富的页面信息,还有一个更好的应用是弹出表单层丰富交互应用.常见的应用有弹出登录表单层,用户提交登录信息,后台验证登录成功后,弹出层消失,主页面局部刷新用户信息.本文我们将给大家介绍如何使用jQuery+Ajax+PHP弹出层异步登录的应用. 效果展示 源码下载 HTML 由于本例UI部分使用了Bootstrap,以及使用jQuery插件,因此需要事先载入相关文件,推荐大家使用相关的CDN资源. <link rel="stylesheet" hre