Qt结合OpenCV部署yolov5的实现
目录
- 一、新建项目 UI设计
- 二、代码部分 mainwindow 类
- 三、效果演示
分别使用了openvino,opencv_cuda进行加速。
关于演示视频及代码讲解请查看:
https://www.bilibili.com/video/BV13S4y1c7ea/
https://www.bilibili.com/video/BV1Dq4y1x7r6/
https://www.bilibili.com/video/BV1kT4y1S7hz/
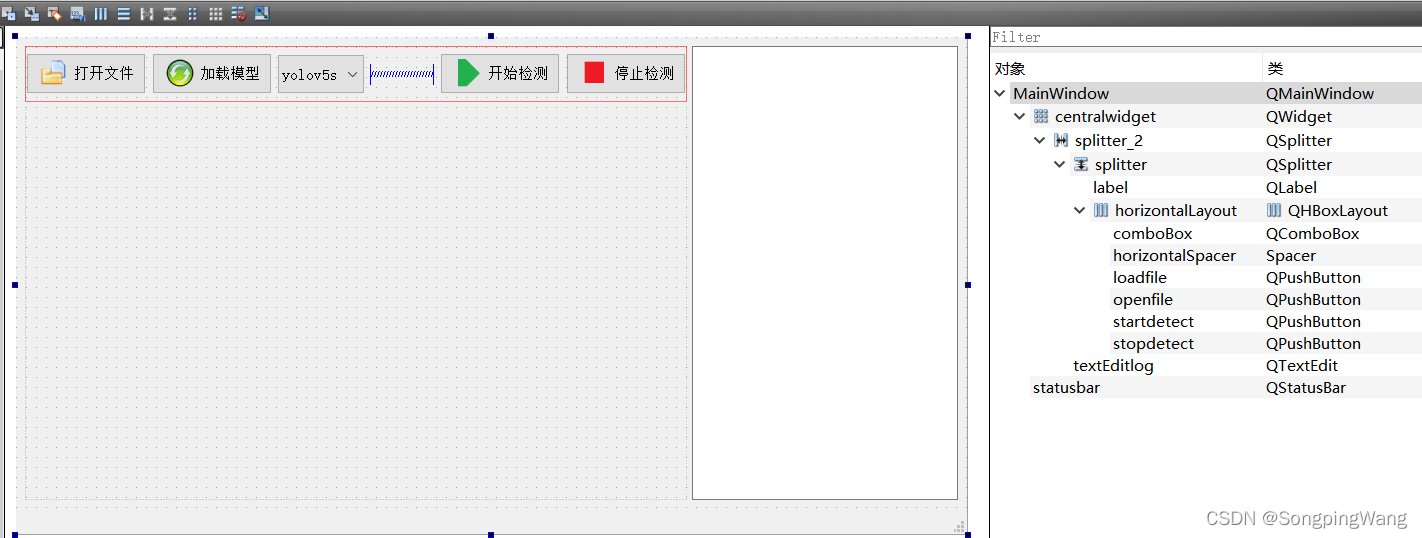
一、新建项目 UI设计
二、代码部分 mainwindow 类
mainwindow.h
#ifndef MAINWINDOW_H
#define MAINWINDOW_H
#include <QFileDialog>
#include <QFile>
#include <opencv2/opencv.hpp>
#include <opencv2/dnn.hpp>
#include <QMainWindow>
#include <QTimer>
#include <QImage>
#include <QPixmap>
#include <QDateTime>
#include <QMutex>
#include <QMutexLocker>
#include <QMimeDatabase>
#include <iostream>
#include <yolov5.h>
#include <chrono>

#pragma comment(lib,"C:\\Program Files (x86)\\Intel\\openvino_2021\\opencv\\lib\\opencv_core453.lib")
#pragma comment(lib,"C:\\Program Files (x86)\\Intel\\openvino_2021\\opencv\\lib\\opencv_imgcodecs453.lib")
#pragma comment(lib,"C:\\Program Files (x86)\\Intel\\openvino_2021\\opencv\\lib\\opencv_imgproc453.lib")
#pragma comment(lib,"C:\\Program Files (x86)\\Intel\\openvino_2021\\opencv\\lib\\opencv_videoio453.lib")
#pragma comment(lib,"C:\\Program Files (x86)\\Intel\\openvino_2021\\opencv\\lib\\opencv_objdetect453.lib")
#pragma comment(lib,"C:\\Program Files (x86)\\Intel\\openvino_2021\\opencv\\lib\\opencv_dnn453.lib")

#pragma comment(lib,"C:\\Program Files (x86)\\Intel\\openvino_2021\\deployment_tools\\inference_engine\\lib\\intel64\\Release\\inference_engine.lib")
#pragma comment(lib,"C:\\Program Files (x86)\\Intel\\openvino_2021\\deployment_tools\\inference_engine\\lib\\intel64\\Release\\inference_engine_c_api.lib")
#pragma comment(lib,"C:\\Program Files (x86)\\Intel\\openvino_2021\\deployment_tools\\inference_engine\\lib\\intel64\\Release\\inference_engine_transformations.lib")

//LIBS+= -L "C:\Program Files (x86)\Intel\openvino_2021\opencv\lib\*.lib"
//LIBS+= -L "C:\Program Files (x86)\Intel\openvino_2021\deployment_tools\inference_engine\lib\intel64\Release\*.lib"

//#ifdef QT_NO_DEBUG
//#pragma comment(lib,"C:\Program Files (x86)\Intel\openvino_2021\opencv\lib\opencv_core452.lib")
//#pragma comment(lib,"E:/opencv_build/install/x64/vc16/lib/opencv_imgcodecs452.lib")
//#pragma comment(lib,"E:/opencv_build/install/x64/vc16/lib/opencv_imgproc452.lib")
//#pragma comment(lib,"E:/opencv_build/install/x64/vc16/lib/opencv_imgcodecs452.lib")

//#pragma comment(lib,"E:/opencv_build/install/x64/vc16/lib/opencv_video452.lib")
//#pragma comment(lib,"E:/opencv_build/install/x64/vc16/lib/opencv_videoio452.lib")
//#pragma comment(lib,"E:/opencv_build/install/x64/vc16/lib/opencv_objdetect452.lib")
//#pragma comment(lib,"E:/opencv_build/install/x64/vc16/lib/opencv_shape452.lib")
//#pragma comment(lib,"E:/opencv_build/install/x64/vc16/lib/opencv_dnn452.lib")
//#pragma comment(lib,"E:/opencv_build/install/x64/vc16/lib/opencv_dnn_objdetect452.lib")
//#else
//#pragma comment(lib,"E:/opencv_build/install/x64/vc16/lib/opencv_core452d.lib")
//#pragma comment(lib,"E:/opencv_build/install/x64/vc16/lib/opencv_imgcodecs452d.lib")
//#pragma comment(lib,"E:/opencv_build/install/x64/vc16/lib/opencv_imgproc452d.lib")
//#pragma comment(lib,"E:/opencv_build/install/x64/vc16/lib/opencv_imgcodecs452d.lib")

//#pragma comment(lib,"E:/opencv_build/install/x64/vc16/lib/opencv_video452d.lib")
//#pragma comment(lib,"E:/opencv_build/install/x64/vc16/lib/opencv_videoio452d.lib")
//#pragma comment(lib,"E:/opencv_build/install/x64/vc16/lib/opencv_objdetect452d.lib")
//#pragma comment(lib,"E:/opencv_build/install/x64/vc16/lib/opencv_shape452d.lib")
//#pragma comment(lib,"E:/opencv_build/install/x64/vc16/lib/opencv_dnn452d.lib")
//#pragma comment(lib,"E:/opencv_build/install/x64/vc16/lib/opencv_dnn_objdetect452d.lib")
//#endif

//#ifdef QT_NO_DEBUG
//#pragma comment(lib,"E:/opencv452_cuda/install/x64/vc16/lib/opencv_core452.lib")
//#pragma comment(lib,"E:/opencv452_cuda/install/x64/vc16/lib/opencv_imgcodecs452.lib")
//#pragma comment(lib,"E:/opencv452_cuda/install/x64/vc16/lib/opencv_imgproc452.lib")
//#pragma comment(lib,"E:/opencv452_cuda/install/x64/vc16/lib/opencv_imgcodecs452.lib")

//#pragma comment(lib,"E:/opencv452_cuda/install/x64/vc16/lib/opencv_video452.lib")
//#pragma comment(lib,"E:/opencv452_cuda/install/x64/vc16/lib/opencv_videoio452.lib")
//#pragma comment(lib,"E:/opencv452_cuda/install/x64/vc16/lib/opencv_objdetect452.lib")
//#pragma comment(lib,"E:/opencv452_cuda/install/x64/vc16/lib/opencv_shape452.lib")
//#pragma comment(lib,"E:/opencv452_cuda/install/x64/vc16/lib/opencv_dnn452.lib")
//#pragma comment(lib,"E:/opencv452_cuda/install/x64/vc16/lib/opencv_dnn_objdetect452.lib")
//#endif

QPixmap Mat2Image(cv::Mat src);

QT_BEGIN_NAMESPACE
namespace Ui { class MainWindow; }
QT_END_NAMESPACE

class MainWindow : public QMainWindow
{
    Q_OBJECT

public:
    MainWindow(QWidget *parent = nullptr);
    void Init();
    ~MainWindow();

private slots:
    void readFrame(); //自定义信号处理函数

    void on_openfile_clicked();

    void on_loadfile_clicked();

    void on_startdetect_clicked();

    void on_stopdetect_clicked();

    void on_comboBox_activated(const QString &arg1);

private:
    Ui::MainWindow *ui;
    QTimer *timer;
    cv::VideoCapture *capture;

    YOLOV5 *yolov5;
    NetConfig conf;
    NetConfig *yolo_nets;
    std::vector<cv::Rect> bboxes;
    int IsDetect_ok = 0;
};
#endif // MAINWINDOW_H
mainwindow.cpp
#include "mainwindow.h"
#include "ui_mainwindow.h"

MainWindow::MainWindow(QWidget *parent)
    : QMainWindow(parent)
    , ui(new Ui::MainWindow)
{
    ui->setupUi(this);
    setWindowTitle(QStringLiteral("YoloV5目标检测软件"));

    timer = new QTimer(this);
    timer->setInterval(33);
    connect(timer,SIGNAL(timeout()),this,SLOT(readFrame()));
    ui->startdetect->setEnabled(false);
    ui->stopdetect->setEnabled(false);
    Init();
}

MainWindow::~MainWindow()
{

    capture->release();
    delete capture;
    delete [] yolo_nets;
    delete yolov5;
    delete ui;
}

void MainWindow::Init()
{
    capture = new cv::VideoCapture();
    yolo_nets = new NetConfig[4]{
                                {0.5, 0.5, 0.5, "yolov5s"},
                                {0.6, 0.6, 0.6, "yolov5m"},
                                {0.65, 0.65, 0.65, "yolov5l"},
                                {0.75, 0.75, 0.75, "yolov5x"}
                            };
    conf = yolo_nets[0];
    yolov5 = new YOLOV5();
    yolov5->Initialization(conf);
            ui->textEditlog->append(QStringLiteral("默认模型类别:yolov5s args: %1 %2 %3")
                                    .arg(conf.nmsThreshold)
                                    .arg(conf.objThreshold)
                                    .arg(conf.confThreshold));
}

void MainWindow::readFrame()
{
    cv::Mat frame;
    capture->read(frame);
    if (frame.empty()) return;

    auto start = std::chrono::steady_clock::now();
    yolov5->detect(frame);
    auto end = std::chrono::steady_clock::now();
    std::chrono::duration<double, std::milli> elapsed = end - start;
    ui->textEditlog->append(QString("cost_time: %1 ms").arg(elapsed.count()));

//    double t0 = static_cast<double>(cv::getTickCount());
//    yolov5->detect(frame);
//    double t1 = static_cast<double>(cv::getTickCount());
//    ui->textEditlog->append(QStringLiteral("cost_time: %1 ").arg((t1 - t0) / cv::getTickFrequency()));

    cv::cvtColor(frame, frame, cv::COLOR_BGR2RGB);
    QImage rawImage = QImage((uchar*)(frame.data),frame.cols,frame.rows,frame.step,QImage::Format_RGB888);
    ui->label->setPixmap(QPixmap::fromImage(rawImage));
}

void MainWindow::on_openfile_clicked()
{
    QString filename = QFileDialog::getOpenFileName(this,QStringLiteral("打开文件"),".","*.mp4 *.avi;;*.png *.jpg *.jpeg *.bmp");
    if(!QFile::exists(filename)){
        return;
    }
    ui->statusbar->showMessage(filename);

    QMimeDatabase db;
    QMimeType mime = db.mimeTypeForFile(filename);
    if (mime.name().startsWith("image/")) {
        cv::Mat src = cv::imread(filename.toLatin1().data());
        if(src.empty()){
            ui->statusbar->showMessage("图像不存在!");
            return;
        }
        cv::Mat temp;
        if(src.channels()==4)
            cv::cvtColor(src,temp,cv::COLOR_BGRA2RGB);
        else if (src.channels()==3)
            cv::cvtColor(src,temp,cv::COLOR_BGR2RGB);
        else
            cv::cvtColor(src,temp,cv::COLOR_GRAY2RGB);

        auto start = std::chrono::steady_clock::now();
        yolov5->detect(temp);
        auto end = std::chrono::steady_clock::now();
        std::chrono::duration<double, std::milli> elapsed = end - start;
        ui->textEditlog->append(QString("cost_time: %1 ms").arg(elapsed.count()));
        QImage img = QImage((uchar*)(temp.data),temp.cols,temp.rows,temp.step,QImage::Format_RGB888);
        ui->label->setPixmap(QPixmap::fromImage(img));
        ui->label->resize(ui->label->pixmap()->size());
        filename.clear();
    }else if (mime.name().startsWith("video/")) {
        capture->open(filename.toLatin1().data());
        if (!capture->isOpened()){
            ui->textEditlog->append("fail to open MP4!");
            return;
        }
        IsDetect_ok +=1;
        if (IsDetect_ok ==2)
            ui->startdetect->setEnabled(true);
        ui->textEditlog->append(QString::fromUtf8("Open video: %1 succesfully!").arg(filename));

        //获取整个帧数QStringLiteral
        long totalFrame = capture->get(cv::CAP_PROP_FRAME_COUNT);
        ui->textEditlog->append(QStringLiteral("整个视频共 %1 帧").arg(totalFrame));
        ui->label->resize(QSize(capture->get(cv::CAP_PROP_FRAME_WIDTH), capture->get(cv::CAP_PROP_FRAME_HEIGHT)));

        //设置开始帧()
        long frameToStart = 0;
        capture->set(cv::CAP_PROP_POS_FRAMES, frameToStart);
        ui->textEditlog->append(QStringLiteral("从第 %1 帧开始读").arg(frameToStart));

        //获取帧率
        double rate = capture->get(cv::CAP_PROP_FPS);
        ui->textEditlog->append(QStringLiteral("帧率为: %1 ").arg(rate));
    }
}

void MainWindow::on_loadfile_clicked()
{
    QString onnxFile = QFileDialog::getOpenFileName(this,QStringLiteral("选择模型"),".","*.onnx");
    if(!QFile::exists(onnxFile)){
        return;
    }
    ui->statusbar->showMessage(onnxFile);
    if (!yolov5->loadModel(onnxFile.toLatin1().data())){
        ui->textEditlog->append(QStringLiteral("加载模型失败!"));
        return;
    }
    IsDetect_ok +=1;
    ui->textEditlog->append(QString::fromUtf8("Open onnxFile: %1 succesfully!").arg(onnxFile));
    if (IsDetect_ok ==2)
        ui->startdetect->setEnabled(true);
}

void MainWindow::on_startdetect_clicked()
{
    timer->start();
    ui->startdetect->setEnabled(false);
    ui->stopdetect->setEnabled(true);
    ui->openfile->setEnabled(false);
    ui->loadfile->setEnabled(false);
    ui->comboBox->setEnabled(false);
    ui->textEditlog->append(QStringLiteral("================\n"
                                           "    开始检测\n"
                                           "================\n"));
}

void MainWindow::on_stopdetect_clicked()
{
    ui->startdetect->setEnabled(true);
    ui->stopdetect->setEnabled(false);
    ui->openfile->setEnabled(true);
    ui->loadfile->setEnabled(true);
    ui->comboBox->setEnabled(true);
    timer->stop();
    ui->textEditlog->append(QStringLiteral("================\n"
                                           "    停止检测\n"
                                           "================\n"));
}

void MainWindow::on_comboBox_activated(const QString &arg1)
{
    if (arg1.contains("s")){
        conf = yolo_nets[0];
    }else if (arg1.contains("m")) {
        conf = yolo_nets[1];
    }else if (arg1.contains("l")) {
        conf = yolo_nets[2];
    }else if (arg1.contains("x")) {
        conf = yolo_nets[3];}
    yolov5->Initialization(conf);
    ui->textEditlog->append(QStringLiteral("使用模型类别:%1 args: %2 %3 %4")
                            .arg(arg1)
                            .arg(conf.nmsThreshold)
                            .arg(conf.objThreshold)
                            .arg(conf.confThreshold));
}
yolov5类
yolov5.h
#ifndef YOLOV5_H
#define YOLOV5_H
#include <opencv2/opencv.hpp>
#include <opencv2/dnn.hpp>
#include <fstream>
#include <sstream>
#include <iostream>
#include <exception>
#include <QMessageBox>

struct NetConfig
{
    float confThreshold; // class Confidence threshold
    float nmsThreshold;  // Non-maximum suppression threshold
    float objThreshold;  //Object Confidence threshold
    std::string netname;
};

class YOLOV5
{
public:
    YOLOV5(){}
    void Initialization(NetConfig conf);
    bool loadModel(const char* onnxfile);
    void detect(cv::Mat& frame);
private:
    const float anchors[3][6] = {{10.0, 13.0, 16.0, 30.0, 33.0, 23.0}, {30.0, 61.0, 62.0, 45.0, 59.0, 119.0},{116.0, 90.0, 156.0, 198.0, 373.0, 326.0}};
    const float stride[3] = { 8.0, 16.0, 32.0 };
    std::string classes[80] = {"person", "bicycle", "car", "motorbike", "aeroplane", "bus",
                              "train", "truck", "boat", "traffic light", "fire hydrant",
                              "stop sign", "parking meter", "bench", "bird", "cat", "dog",
                              "horse", "sheep", "cow", "elephant", "bear", "zebra", "giraffe",
                              "backpack", "umbrella", "handbag", "tie", "suitcase", "frisbee",
                              "skis", "snowboard", "sports ball", "kite", "baseball bat",
                              "baseball glove", "skateboard", "surfboard", "tennis racket",
                              "bottle", "wine glass", "cup", "fork", "knife", "spoon", "bowl",
                              "banana", "apple", "sandwich", "orange", "broccoli", "carrot",
                              "hot dog", "pizza", "donut", "cake", "chair", "sofa", "pottedplant",
                              "bed", "diningtable", "toilet", "tvmonitor", "laptop", "mouse",
                              "remote", "keyboard", "cell phone", "microwave", "oven", "toaster",
                              "sink", "refrigerator", "book", "clock", "vase", "scissors",
                              "teddy bear", "hair drier", "toothbrush"};
    const int inpWidth = 640;
    const int inpHeight = 640;
    float confThreshold;
    float nmsThreshold;
    float objThreshold;

    cv::Mat blob;
    std::vector<cv::Mat> outs;
    std::vector<int> classIds;
    std::vector<float> confidences;
    std::vector<cv::Rect> boxes;
    cv::dnn::Net net;
    void drawPred(int classId, float conf, int left, int top, int right, int bottom, cv::Mat& frame);
    void sigmoid(cv::Mat* out, int length);
};

static inline float sigmoid_x(float x)
{
    return static_cast<float>(1.f / (1.f + exp(-x)));
}
#endif // YOLOV5_H
yolov5.cpp
#include "yolov5.h"
using namespace std;
using namespace cv;

void YOLOV5::Initialization(NetConfig conf)
{
    this->confThreshold = conf.confThreshold;
    this->nmsThreshold = conf.nmsThreshold;
    this->objThreshold = conf.objThreshold;
    classIds.reserve(20);
    confidences.reserve(20);
    boxes.reserve(20);
    outs.reserve(3);
}

bool YOLOV5::loadModel(const char *onnxfile)
{
    try {
        this->net = cv::dnn::readNetFromONNX(onnxfile);
        return true;
    } catch (exception& e) {
        QMessageBox::critical(NULL,"Error",QStringLiteral("模型加载出错,请检查重试!\n %1").arg(e.what()),QMessageBox::Yes,QMessageBox::Yes);
        return false;
    }
    this->net.setPreferableBackend(cv::dnn::DNN_BACKEND_INFERENCE_ENGINE);
    this->net.setPreferableTarget(cv::dnn::DNN_TARGET_CPU);

//    this->net.setPreferableBackend(cv::dnn::DNN_BACKEND_CUDA);
//    this->net.setPreferableTarget(cv::dnn::DNN_TARGET_CUDA);
//    try {
//        this->net.setPreferableBackend(cv::dnn::DNN_BACKEND_CUDA);
//        this->net.setPreferableTarget(cv::dnn::DNN_TARGET_CUDA);
//    } catch (exception& e2) {
//        this->net.setPreferableBackend(cv::dnn::DNN_BACKEND_DEFAULT);
//        this->net.setPreferableTarget(cv::dnn::DNN_TARGET_CPU);
//        QMessageBox::warning(NULL,"warning",QStringLiteral("正在使用CPU推理!\n %1").arg(e2.what()),QMessageBox::Yes,QMessageBox::Yes);
//        return false;
//    }
}

void YOLOV5::detect(cv::Mat &frame)
{
    cv::dnn::blobFromImage(frame, blob, 1 / 255.0, Size(this->inpWidth, this->inpHeight), Scalar(0, 0, 0), true, false);
    this->net.setInput(blob);
    this->net.forward(outs, this->net.getUnconnectedOutLayersNames());

    /generate proposals
    classIds.clear();
    confidences.clear();
    boxes.clear();
    float ratioh = (float)frame.rows / this->inpHeight, ratiow = (float)frame.cols / this->inpWidth;
    int n = 0, q = 0, i = 0, j = 0, nout = 8 + 5, c = 0;
    for (n = 0; n < 3; n++)   ///尺度
    {
        int num_grid_x = (int)(this->inpWidth / this->stride[n]);
        int num_grid_y = (int)(this->inpHeight / this->stride[n]);
        int area = num_grid_x * num_grid_y;
        this->sigmoid(&outs[n], 3 * nout * area);
        for (q = 0; q < 3; q++)    ///anchor数
        {
            const float anchor_w = this->anchors[n][q * 2];
            const float anchor_h = this->anchors[n][q * 2 + 1];
            float* pdata = (float*)outs[n].data + q * nout * area;
            for (i = 0; i < num_grid_y; i++)
            {
                for (j = 0; j < num_grid_x; j++)
                {
                    float box_score = pdata[4 * area + i * num_grid_x + j];
                    if (box_score > this->objThreshold)
                    {
                        float max_class_socre = 0, class_socre = 0;
                        int max_class_id = 0;
                        for (c = 0; c < 80; c++)  get max socre
                        {
                            class_socre = pdata[(c + 5) * area + i * num_grid_x + j];
                            if (class_socre > max_class_socre)
                            {
                                max_class_socre = class_socre;
                                max_class_id = c;
                            }
                        }

                        if (max_class_socre > this->confThreshold)
                        {
                            float cx = (pdata[i * num_grid_x + j] * 2.f - 0.5f + j) * this->stride[n];  ///cx
                            float cy = (pdata[area + i * num_grid_x + j] * 2.f - 0.5f + i) * this->stride[n];   ///cy
                            float w = powf(pdata[2 * area + i * num_grid_x + j] * 2.f, 2.f) * anchor_w;   ///w
                            float h = powf(pdata[3 * area + i * num_grid_x + j] * 2.f, 2.f) * anchor_h;  ///h

                            int left = (cx - 0.5*w)*ratiow;
                            int top = (cy - 0.5*h)*ratioh;   ///坐标还原到原图上

                            classIds.push_back(max_class_id);
                            confidences.push_back(max_class_socre);
                            boxes.push_back(Rect(left, top, (int)(w*ratiow), (int)(h*ratioh)));
                        }
                    }
                }
            }
        }
    }

    // Perform non maximum suppression to eliminate redundant overlapping boxes with
    // lower confidences
    vector<int> indices;
    cv::dnn::NMSBoxes(boxes, confidences, this->confThreshold, this->nmsThreshold, indices);
    for (size_t i = 0; i < indices.size(); ++i)
    {
        int idx = indices[i];
        Rect box = boxes[idx];
        this->drawPred(classIds[idx], confidences[idx], box.x, box.y,
            box.x + box.width, box.y + box.height, frame);
    }
}

void YOLOV5::drawPred(int classId, float conf, int left, int top, int right, int bottom, Mat &frame)
{
    rectangle(frame, Point(left, top), Point(right, bottom), Scalar(0, 0, 255), 3);
    string label = format("%.2f", conf);
    label = this->classes[classId] + ":" + label;

    int baseLine;
    Size labelSize = getTextSize(label, FONT_HERSHEY_SIMPLEX, 0.5, 1, &baseLine);
    top = max(top, labelSize.height);
    putText(frame, label, Point(left, top), FONT_HERSHEY_SIMPLEX, 0.75, Scalar(0, 255, 0), 1);
}

void YOLOV5::sigmoid(Mat *out, int length)
{
    float* pdata = (float*)(out->data);
    int i = 0;
    for (i = 0; i < length; i++)
    {
        pdata[i] = 1.0 / (1 + expf(-pdata[i]));
    }
}
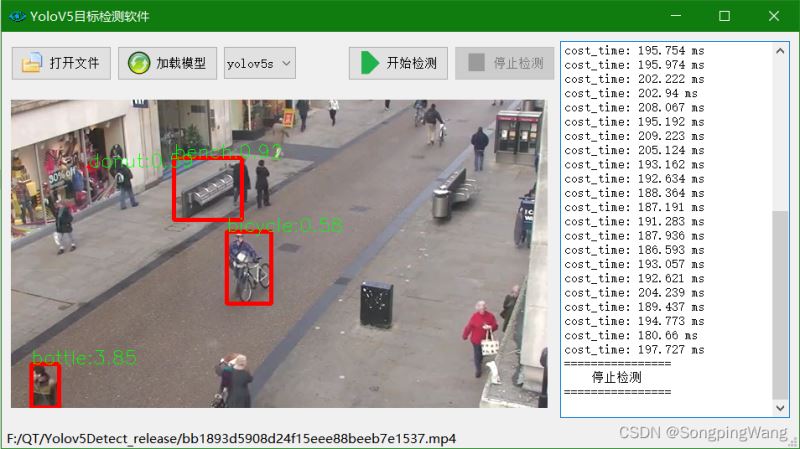
三、效果演示
到此这篇关于Qt结合OpenCV部署yolov5的实现的文章就介绍到这了,更多相关Qt OpenCV部署yolov5内容请搜索我们以前的文章或继续浏览下面的相关文章希望大家以后多多支持我们!
相关推荐
-

pyqt5+opencv 实现读取视频数据的方法
1.openCV读取视频数据 import cv2 if __name__ == '__main__': videoPath = "./dataSet/3700000000003_13-38-20.055.mp4" nameWindow = "Detection window" # 窗体名称 cv2.namedWindow(nameWindow) # 设置窗体 capture = cv2.VideoCapture(videoPath) if capture.isOp
-
Qt+OpenCV实现目标检测详解
目录 一.创建项目&UI设计 二.代码与演示 演示效果 拓展阅读 一.创建项目&UI设计 创建项目,UI设计如下 文件类型判断 简单的判断文件类型 QString file("sample.jpg"); if (file.contains(".jpg") || file.contains(".bmp") || file.contains(".png")) qDebug()<<"这是图片.&
-
利用python、tensorflow、opencv、pyqt5实现人脸实时签到系统
基于python opencv人脸识别的签到系统前言先看下效果实现的功能开始准备页面的构建功能实现代码部分总结 前言 一个基于opencv人脸识别和TensorFlow进行模型训练的人脸实时签到系统,作者某二本大学里的末流学生,写于2019/09/,python学习期间. 今年7月份开始接触python的,最近闲着无事就开始做了这个人脸识别的系统,一开始的话就想着简单的弄下,就去了百度智能云用的api接口实现的,写完以后我就想为什么我不自己写一个人脸识别签到,不去调用百度api接口,然后就诞生了
-
2020新版本pycharm+anaconda+opencv+pyqt环境配置学习笔记,亲测可用
一.pycharm介绍与安装 1.pycharm介绍 PyCharm是一种Python IDE,是Python语言开发时提高其效率的工具,比如调试.语法高亮.Project管理.代码跳转.智能提示.自动完成.单元测试.版本控制.其本身可以在线上更新和下载库,但本文未使用,使用的是anaconda进行管理 选择原因 开发项目,管理项目资源方便,可导入各种集成库进行开发,图像处理,界面设计,数据库管理等皆可融为一起,方便实际工程项目开发使用 2.安装教程 1.首先去Pycharm官网,或者直接输入网
-
Vs2019+Qt+Opencv环境配置心得(图文)
一.下载vs2019和qt (关于vs2019的配置方法不在赘述,上一篇已经讲解了,点击传送门) 1.下载vs2019,直接在官网点击下载即可,是免费的. 2. 下载qt,在官网站下载即可 关于vs和qt安装 vs2019安装到自定义的目录就行,根据个人需求选择需要的库,我选择的C++和python库 qt安装的话不需要太大改动,msvc2017或者2015选上就行,安装到自定义的目录一直下一步到安装完成. 二.将vs2019和qt添加到系统环境变量中 三.在vs2019中创建新项目并添加qt插
-
Python+OpenCV+pyQt5录制双目摄像头视频的实例
起因 说起来录制视频,我们可能有很多的软件,但是比较坑的是,好像很少的软件支持能够同时录制两个摄像头的视频,于是我们用python自己写一个.要是OpenCV+python.貌似很简单就能OK的事情,但是,我们的项目不是一般要展示给老师看嘛.谁愿意看一个没有界面的录制过程是吧~,最后会附上源代码~ 依赖的包 在这里,我直接把import的包写出来了各位可以进行对号入座,然后就能知道需要安装哪个包啦! import cv2 import numpy as np from PyQt5.QtWidge
-
PyQt5+Caffe+Opencv搭建人脸识别登录界面
最近开始学习Qt,结合之前学习过的caffe一起搭建了一个人脸识别登录系统的程序,新手可能有理解不到位的情况,还请大家多多指教. 我的想法是用opencv自带的人脸检测算法检测出面部,利用caffe训练好的卷积神经网络来提取特征,通过计算当前检测到的人脸与已近注册的所有用户的面部特征之间的相似度,如果最大的相似度大于一个阈值,就可以确定当前检测到的人脸对应为这个相似度最大的用户了. ###Caffe人脸识别 因为不断有新的用户加入,然而添加新用户后重新调整CNN的网络结构太费时间,所以不能用CN
-
关于Qt添加opencv和libtorch库的问题
1. 手动添加 INCLUDEPATH += \ D:/ProgramData/libtorch/include \ D:/ProgramData/libtorch/include/torch/csrc/api/include \ D:/ProgramData/opencv/build/include LIBS += \ -LD:/ProgramData/libtorch/lib \ -ltorch \ -ltorch_cpu \ -lc10 \ -lc10_cuda \ -lcaffe2_nv
-
Qt5.14 与 OpenCV4.5 教程之图片增强效果
文章参考<Qt5开发及实例(第4版)>陆文周 主编 一.建立Qt工程 1.选择类别 2.建立项目名称 3.选择Qt基类及修改名称 4.选择编译器(这边两个都选择,生成两个Debug文件) 5.选择运行环境,生成文件夹 生成的项目文件夹 6.将预先编译好的OpenCV4.5下路径F:\OpenCV4.5.0\opencv\buildmingw\install\x64\mingw\bin下所有文件复制到Qt 上面两个文件夹内 7.在项目的.pro文件中添加语句 INCLUDEPATH += F:\
-
Qt结合OpenCV部署yolov5的实现
目录 一.新建项目 UI设计 二.代码部分 mainwindow 类 三.效果演示 分别使用了openvino,opencv_cuda进行加速. 关于演示视频及代码讲解请查看:https://www.bilibili.com/video/BV13S4y1c7ea/https://www.bilibili.com/video/BV1Dq4y1x7r6/https://www.bilibili.com/video/BV1kT4y1S7hz/ 一.新建项目 UI设计 二.代码部分 mainwindow
-
基于Qt OpenCV的图像灰度化像素操作详解
效果图 实现代码 #ifndef WIDGET_H #define WIDGET_H #include <QWidget> #include<opencv2/opencv.hpp> using namespace cv; QT_BEGIN_NAMESPACE namespace Ui { class Widget; } QT_END_NAMESPACE class Widget : public QWidget { Q_OBJECT public: Widget(QWidget *
-
Qt 使用 canon edsdk 实现实时预览的示例代码
概述 想要使用 canon 的 sdk 进行实时的一个预览,即 LiveView 功能. 前期准备 前期的一些相机的连接,可以参考我之前写的文章QT 使用 canon sdk 拍照并保存到本机 实时预览步骤 StartLiveView 声明一个变量来标志 m_isLiveView 来标识 liveview 是否开启. 将实时预览输出到 PC 上 device |= kEdsEvfOutputDevice_PC; // ----------------------------- void Main
-
Ubuntu18.04下QT开发Android无法连接设备问题解决实现
目录 1. 需求 2. 问题现象 3. 解决办法 1. 需求 在Linux环境下搭建QT的Android开发环境,开发了一款APP想部署安装在实体手机设备上. Linux版本: ubuntu18.04 64位,运行在虚拟机环境下. QT版本: 5.12.6 测试手机: 小米10至尊版 系统版本是: Android 11 error: insufficient permissions for device: user in plugdev group; are your udev rules wr
-
Intellij Idea部署OpenCV 4.0.0环境
本文为大家分享了Intellij Idea部署OpenCV 4.0.0环境,供大家参考,具体内容如下 建议 OpenCV-4.0.0 的解压位置不要放在C盘 1. 首先下载并安装好Intellij Idea 2018.3 或者其他版本的Idea 2. 新建一个Java工程 2.1 点击File 2.2 点击Java直接点Next 2.3 可以选择或者不选择 2.4 填写好项目名称 3. 添加 OpenCV-4.0.0 库 3.1 添加OpenCV-4.0.0库 3.2 添加OpenCV-4.0.
-
QT+OpenCV实现录屏功能
本文使用QT+opencv来实现对指定窗体画面录制,并保存为avi文件. (1)获取窗体界面 QScreen类有一个grabWindow函数,可以用来获取窗体的画面,这个函数使用很简单,就是传入窗体句柄和要截取的坐标.但是这个函数有一个缺陷,它是通过截取桌面画面的方式,而不是通过 窗体获取界面,所以当你的窗体被其他窗体遮挡时,就无法截取完整的窗体界面,如果你是要录制整个桌面画面,那用这个函数就可以了,下面的方法调用GDI函数来实现,即使窗体被遮挡时仍然能够获取到完整界面,但是窗体最小化时也一样无
-
聊聊Qt+OpenCV联合开发之图像的创建与赋值问题
目录 一.Mat基本结构 二.图像的克隆及拷贝 1.clone函数 2.copyTo函数 3.示例 三.创建图像 1.创建空白图像: 2.创建通道都为1的图: 3.拷贝和赋值的区别 3.1用Scalar函数设置m3对象为绿色 3.2m3赋值给m4,m4改为黄色 3.3拷贝m3给m4,m4改为黄色 一.Mat基本结构 1.Mat不但是一个非常有用的图像容器类,同时也是一个通用的矩阵类,它mat分为头部(包括图像的大小.宽高.类型.通道数等)和数据部分(像素的值的集合) 2.获取的mat对象赋值给另