Unity shader实现移动端模拟深度水效果
本文实例为大家分享了Unity shader实现移动端模拟深度水的具体代码,供大家参考,具体内容如下
描述:
在网上看到很多效果很好的水,比如根据水的深度,颜色有深浅变化,能让水变得更真实,但是又会涉及到比较复杂的计算,在移动端上面还是有些吃力的。
最近研究了一下,想在移动端上面模拟这样的效果 :
1 水的深浅透明度变化
2 水的深浅颜色变化
3 水上的阴影模拟(大面积的水通过烘焙比较浪费烘焙图)
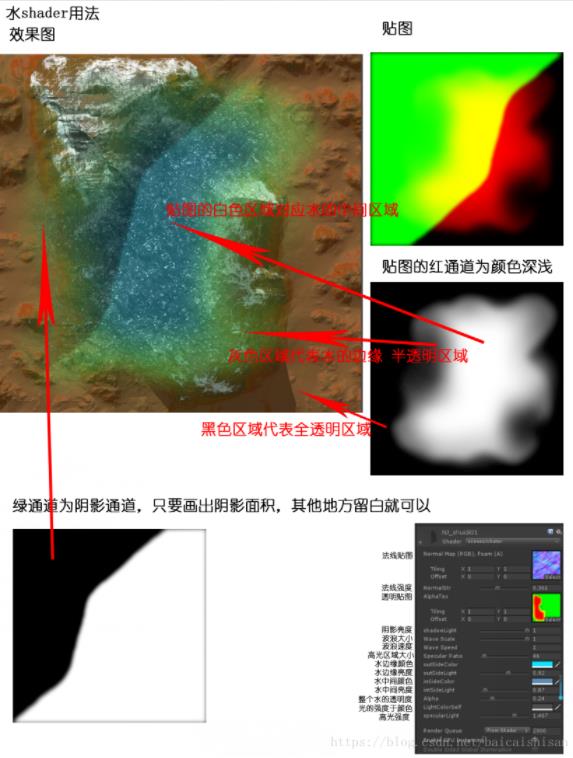
根据上面的3点,可以通过一张黑白图的rg通道来实现深浅以及阴影的模拟 效果如下
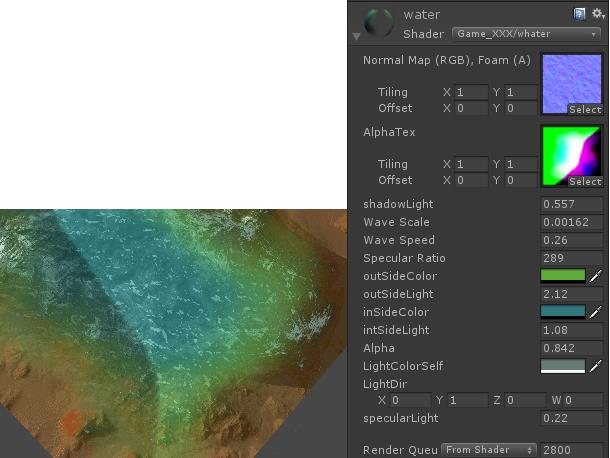
如图,浅色的偏绿,深色的偏蓝 ,颜色可以手动调节,左边为阴影位置
代码如下:
Shader "Game_XXX/whater"
{
 Properties
 {
 _WaterTex ("Normal Map (RGB), Foam (A)", 2D) = "white" {}
 _AlphaTex("AlphaTex", 2D) = "black" {}
 _shadowLight ("shadowLight",range(0,1)) = 0
 _Tiling ("Wave Scale", Range(0.00025, 0.007)) = 0.25
 _WaveSpeed("Wave Speed", Float) = 0.4
 _SpecularRatio ("Specular Ratio", Range(10,500)) = 200
 _outSideColor("outSideColor",Color) = (0,0,0,0)
 _outSideLight("outSideLight",Range(0,10))=1
 _inSideColor("inSideColor",Color) = (0,0,0,0)
 _inSideLight("intSideLight",Range(0,10))=1
 _Alpha("Alpha",Range(0,1)) = 1
 //模拟灯光颜色
 _LightColorSelf ("LightColorSelf",Color) = (1,1,1,1)
 //模拟灯光方向
 _LightDir ("LightDir",vector) = (0,1,0,0)
 //高光强度
 _specularLight("specularLight",range(0.1,2)) =1
 }

 SubShader {
 Tags {
  "Queue"="Transparent-200"
  "RenderType"="Transparent"
  "IgnoreProjector" = "True"
  "LightMode" = "ForwardBase"
 }
 LOD 250
 Pass
 {

  ZWrite Off
  Blend SrcAlpha OneMinusSrcAlpha
  CGPROGRAM

  #pragma vertex Vert
  #pragma fragment Frag
  #include "UnityCG.cginc"

  float _Tiling;
  float _WaveSpeed;
  float _SpecularRatio;
  sampler2D _WaterTex;
  sampler2D _AlphaTex;
  float4 _LightColorSelf;
  float4 _LightDir;
  float4 _outSideColor;
  float _outSideLight;
  float4 _inSideColor;
  float _inSideLight;
  float _shadowLight;
  float _specularLight;
  float _Alpha;

  struct v2f
  {
  float4 position : POSITION;
  float3 worldView : TEXCOORD0;
  float3 tilingAndOffset:TEXCOORD2;
  float3x3 tangentTransform:TEXCOORD4;
  float2 alphaUV :TEXCOORD7;

  };

  v2f Vert(appdata_full v)
  {
  v2f o;
  float4 worldPos = mul(unity_ObjectToWorld, v.vertex);
  //视向量(世界空间)
  o.worldView = -normalize(worldPos - _WorldSpaceCameraPos);
  o.position = UnityObjectToClipPos(v.vertex);
  //uv动画
  o.tilingAndOffset.z =frac( _Time.x * _WaveSpeed);//frac :返回标量或矢量的小数
  o.tilingAndOffset.xy = worldPos.xz*_Tiling;
  o.alphaUV = v.texcoord;
  //求世界法线三件套
  float3 normal =normalize( UnityObjectToWorldNormal(v.normal));
       float3 tangentDir = normalize( mul( unity_ObjectToWorld, float4( v.tangent.xyz, 0.0 ) ).xyz );//切线空间转化为世界空间
       float3 bitangentDir = normalize(cross(normal, tangentDir) * v.tangent.w);//切线 法线 计算副切线

  o.tangentTransform = float3x3( tangentDir, bitangentDir, normal);
  return o;
  }

  float4 Frag(v2f i):COLOR
  {

   //法线采样
   fixed3 BumpMap01 = UnpackNormal(tex2D(_WaterTex,i.tilingAndOffset.xy + i.tilingAndOffset.z ));
   fixed3 BumpMap02 = UnpackNormal(tex2D(_WaterTex,i.tilingAndOffset.xy*1.1 - i.tilingAndOffset.z));
   //两张法线相混合
   //fixed3 N1 =saturate( normalize(mul( BumpMap01.rgb, i.tangentTransform )));
   //fixed3 N2 =saturate( normalize(mul( BumpMap02.rgb, i.tangentTransform )));
   //fixed3 worldNormal = N1 - float3(N2.x,0,N2.z);

   fixed3 N1 = normalize(mul( BumpMap01.rgb, i.tangentTransform ));
   fixed3 N2 = normalize(mul( BumpMap02.rgb, i.tangentTransform ));
   fixed3 worldNormal = N1*0.5 +N2*0.5;

   float LdotN = dot(worldNormal, _LightDir.xyz); //_LightDir为模拟灯光

   //高光
   float dotSpecular = dot(worldNormal, normalize( i.worldView+_LightDir.xyz));
   fixed3 specularReflection = pow(saturate(dotSpecular), _SpecularRatio)*_specularLight;

   //通道贴图采样
   fixed4 alphaTex = tex2D (_AlphaTex,i.alphaUV);
   //模拟灯光的颜色 * 漫反射系数= 基础水的颜色
   fixed4 col =_LightColorSelf*2 * saturate (LdotN) ;
   //用alpha贴图的r通道来模拟水的深浅的颜色,白色为深色,黑色为浅色 ,同时乘以想要的颜色
   col.rgb = col.rgb * alphaTex.r *_inSideColor * _inSideLight + col.rgb * (1-alphaTex.r) * _outSideColor *_outSideLight + specularReflection;

   //控制透明度,根据alpha的r通道 来控制深浅的透明度,深色的透明度小 浅色的透明度大
   col.a = _Alpha * alphaTex.r;

   //手动绘制阴影 用alpha贴图的g通道 跟col相乘 来模拟阴影
   alphaTex.g = saturate(alphaTex.g + _shadowLight);
   col.rgb *= alphaTex.g;
   return col;
  }
    ENDCG
   }
 }

 FallBack "Diffuse"
}
以上就是本文的全部内容,希望对大家的学习有所帮助,也希望大家多多支持我们。
相关推荐
-
Unity Shader实现水墨效果
Unity Shader学习:水墨效果 偶然在网上看到9级铁甲蛹大神的水墨风格后处理觉得挺有意思,参照着实现一下,还是涉及到之前油画效果的算法,叫什么滤波暂时不清楚,应该用来处理手绘效果挺多的. 水墨风格基本原理:高斯模糊原始图像,用深度算出边缘进行描边,最后用画笔效果的滤波完成最终图像. 有需要可以用Post Proces改变颜色范围,更接近水墨的颜色. C#部分: //屏幕后处理基类 using UnityEngine; using System.Collections; //非运行时也触发
-
unity实现透明水波纹扭曲
本文实例为大家分享了unity实现透明水波纹扭曲的具体代码,供大家参考,具体内容如下 需要挂一个摄像机把脚本挂在一个物体上 可随意在物体上面点击 shader: Shader "Unlit/Water" { Properties { _MainTex ("Texture", 2D) = "white" {} _WaterUV("WaterUV",2D)="while"{} _WaterIntensity(&
-
Unity Shader实现2D水流效果
水流的模拟主要运用了顶点变换和纹理动画的结合: 顶点变换中,利用正弦函数模拟河流的大致形态,例如波长,振幅等. 纹理动画中,将纹理坐标朝某一方向持续滚动以形成流动的效果. 脚本如下: Shader "MyUnlit/ScrollWater" { Properties { _MainTex ("Texture", 2D) = "white" {} _Color("Color Tint",color)=(1,1,1,1) //控制
-
Unity Shader实现水波纹效果
本文实例为大家分享了Unity Shader实现水波纹的具体代码,供大家参考,具体内容如下 效果: Shader代码: Shader "Custom/shuibowen"{ Properties{ _MainTex("Base (RGB)",2D)="white"{} _distanceFactor("Distancefactor",float)=1 _timeFactor("time factor",fl
-
Unity实现图片水印生成
本文实例为大家分享了Unity实现图片水印生成的具体代码,供大家参考,具体内容如下 用于图片分享时添加logo水印的功能,之前用来做你画我猜的方法,核心是用Texture2D中的 SetPixels方法 具体实现如下 效果图: 上代码,比较简单不多说了 using UnityEngine; using System.Collections; using UnityEngine.UI; public class WaterMarkAdd : MonoBehaviour { public Image
-
Unity shader实现移动端模拟深度水效果
本文实例为大家分享了Unity shader实现移动端模拟深度水的具体代码,供大家参考,具体内容如下 描述: 在网上看到很多效果很好的水,比如根据水的深度,颜色有深浅变化,能让水变得更真实,但是又会涉及到比较复杂的计算,在移动端上面还是有些吃力的. 最近研究了一下,想在移动端上面模拟这样的效果 : 1 水的深浅透明度变化 2 水的深浅颜色变化 3 水上的阴影模拟(大面积的水通过烘焙比较浪费烘焙图) 根据上面的3点,可以通过一张黑白图的rg通道来实现深浅以及阴影的模拟 效果如下 如图,浅色的偏绿,
-
Unity Shader模拟玻璃效果
本文实例为大家分享了Unity Shader实现玻璃效果的具体代码,供大家参考,具体内容如下 Shader "Glass Refraction" { Properties { _MainTex ("Main Tex", 2D) = "white" {} _BumpMap ("Normal Map", 2D) = "bump" {} _Cubemap ("Environment Cubemap&qu
-
Unity Shader实现序列帧动画效果
本文实例为大家分享了Unity Shader序列帧动画效果的具体代码,供大家参考,具体内容如下 实现原理 主要的思想是设置显示UV纹理的大小,并逐帧修改图片的UV坐标.(可分为以下四步) 1.我们首先把 _Time.y 和速度属性_Speed 相乘来得到模拟的时间,并使用CG 的floor 函数对结果值取整来得到整数时间time 2.然后,我们使用time 除以_HorizontalAmount 的结果值的商来作为当前对应的行索引,除法结果的余数则是列索引. 3.接下来,我们需要使用行列索引
-
Unity shader实现百叶窗特效
本文实例为大家分享了Unity shader百叶窗展示的具体代码,供大家参考,具体内容如下 1.将图片划分为水平N栏,代码如下: Shader "Unlit/BYCShader" { Properties { [PerRendererData] _MainTex ("Sprite Texture", 2D) = "white" {} _Color ("Tint", Color) = (1,1,1,1) _StencilComp
-
Unity Shader相交算法实现简易防能量盾
Unity Shader学习:相交算法实现简易防能量盾 主要思路:对比物体和场景深度图在观察空间下的深度差值,深度差越小表示相交,颜色越深,在加上边缘光勾出轮廓. shader部分: Shader "Unlit/DepthOutline" { Properties{ _MainTex("MainTex",2D) = "white"{} _RimFactor("RimFactor",Range(0.0,5.0))=1.0 _Di
-

Unity Shader实现3D翻页效果
本文实例为大家分享了Unity Shader实现3D翻页效果的具体代码,供大家参考,具体内容如下 参考文章:UnityShader使用Plane实现翻书效果 效果图: 原理:Shader顶点动画 在顶点着色器进行对顶点Y值的偏移(使用了Sin函数模拟翻页时产生的弯曲),对顶点X值的偏移实现纸张在翻页时的收缩(一般是不用收缩),最后对顶点进行围绕Z轴旋转实现Plane翻页(Z轴是本例的旋转轴,请根据你具体情况修改,上面的两个偏移同理). Shader "Unlit/PaperTurnMilkSha
-
Unity shader实现遮罩效果
本文实例为大家分享了Unity shader实现遮罩效果的具体代码,供大家参考,具体内容如下 效果: shader代码: Shader "Custom/Mask" { Properties { _MainTex ("Base (RGB)", 2D) = "white" {}//目标图片,即需要被遮罩的图片 _MaskLayer("Culling Mask",2D) = "white"{}//混合的图片,设置
-
Unity shader实现消融效果
本文实例为大家分享了Unity shader实现消融效果的具体代码,供大家参考,具体内容如下 效果图: shader代码: // Upgrade NOTE: replaced 'mul(UNITY_MATRIX_MVP,*)' with 'UnityObjectToClipPos(*)' Shader "Custom/EdgeColo" { Properties { _MainTex ("Texture", 2D) = "white" {} _N
-
Unity shader实现高斯模糊效果
本文实例为大家分享了Unity shader实现高斯模糊效果的具体代码,供大家参考,具体内容如下 正常图: 高斯模糊效果图: shader代码: Shader "Custom/GaoSiMoHu" { Properties { _MainTex ("Texture", 2D) = "white" {} _BlurSize("Blur size",Float)=1.0 } SubShader { ZTest Always cul
-
Unity shader实现自由放大缩小效果
本文实例为大家分享了Unity shader实现自由放大缩小效果的具体代码,供大家参考,具体内容如下 代码: 以下实现的shader代码: Shader "Hidden/Wave" { Properties { _MainTex ("Texture", 2D) = "white" {} _WaveWidth("Wave Width",float) = 0.5 _CenterX("CenterX",float