在Visual Studio Code中使用CSSComb格式化CSS文件的教程
Microsoft在2015年4月30日Build 开发者大会上正式宣布了 Visual Studio Code 项目:一个运行于 Mac OS X、Windows和 Linux 之上的,针对于编写现代 Web 和云应用的跨平台源代码编辑器。
今天通过本文给大家介绍在Visual Studio Code中使用CSSComb格式化CSS文件。
最近在使用Visual Studio Code,开始逐渐上手,发现非常好用。
不管是在JS文件还是在HTML文件中,右键点击,都有“格式化文件”的菜单,帮助我们排版。可是在CSS文件中,却没有这样的选项。
在网上搜了一下,需要安装一个插件,名字叫“CSSComb”,就是CSS的梳子啦,它不但可以排版CSS文件,还可以对样式进行排序。
一、安装插件
在Visual Studio Code的左侧工具栏中,最后一个工具就是扩展,在搜索栏中输入“csscomb”,就可以找到该插件并安装了。

二、配置
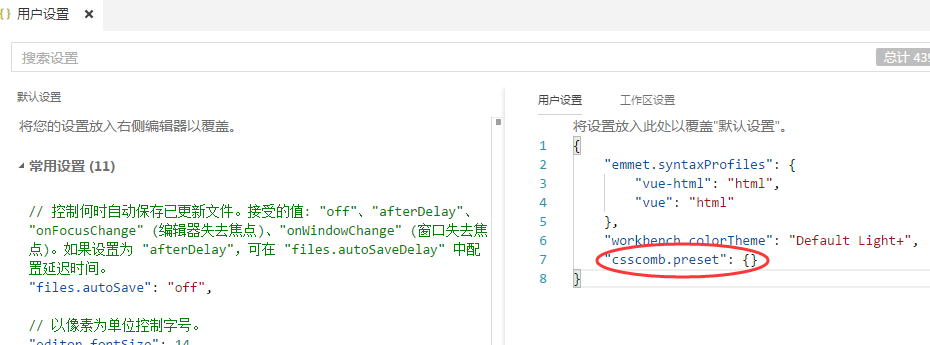
在Visual Studio Code的“文件”->“首选项”->“设置”中,添加一行如下:
然后,在项目的根目录下,添加一个文件,名为“.csscomb.json”,修改内容如下:
{
 "exclude": [
  ".git/**",
  "node_modules/**",
  "bower_components/**"
 ],
 "always-semicolon": true,
 "block-indent": " ",
 "color-case": "lower",
 "color-shorthand": true,
 "element-case": "lower",
 "eof-newline": true,
 "leading-zero": false,
 "lines-between-rulesets": 1,
 "quotes": "single",
 "remove-empty-rulesets": true,
 "space-after-colon": " ",
 "space-after-combinator": " ",
 "space-after-opening-brace": "\n",
 "space-after-selector-delimiter": "\n",
 "space-before-closing-brace": "\n",
 "space-before-colon": "",
 "space-before-combinator": " ",
 "space-before-opening-brace": " ",
 "space-before-selector-delimiter": "",
 "space-between-declarations": "\n",
 "strip-spaces": true,
 "unitless-zero": true,
 "vendor-prefix-align": true,
 "sort-order": [
  [
   "font",
   "font-family",
   "font-size",
   "font-weight",
   "font-style",
   "font-variant",
   "font-size-adjust",
   "font-stretch",
   "font-effect",
   "font-emphasize",
   "font-emphasize-position",
   "font-emphasize-style",
   "font-smooth",
   "line-height"
  ],
  [
   "position",
   "z-index",
   "top",
   "right",
   "bottom",
   "left"
  ],
  [
   "display",
   "visibility",
   "float",
   "clear",
   "overflow",
   "overflow-x",
   "overflow-y",
   "-ms-overflow-x",
   "-ms-overflow-y",
   "clip",
   "zoom",
   "-webkit-align-content",
   "-ms-flex-line-pack",
   "align-content",
   "-webkit-box-align",
   "-moz-box-align",
   "-webkit-align-items",
   "align-items",
   "-ms-flex-align",
   "-webkit-align-self",
   "-ms-flex-item-align",
   "-ms-grid-row-align",
   "align-self",
   "-webkit-box-flex",
   "-webkit-flex",
   "-moz-box-flex",
   "-ms-flex",
   "flex",
   "-webkit-flex-flow",
   "-ms-flex-flow",
   "flex-flow",
   "-webkit-flex-basis",
   "-ms-flex-preferred-size",
   "flex-basis",
   "-webkit-box-orient",
   "-webkit-box-direction",
   "-webkit-flex-direction",
   "-moz-box-orient",
   "-moz-box-direction",
   "-ms-flex-direction",
   "flex-direction",
   "-webkit-flex-grow",
   "-ms-flex-positive",
   "flex-grow",
   "-webkit-flex-shrink",
   "-ms-flex-negative",
   "flex-shrink",
   "-webkit-flex-wrap",
   "-ms-flex-wrap",
   "flex-wrap",
   "-webkit-box-pack",
   "-moz-box-pack",
   "-ms-flex-pack",
   "-webkit-justify-content",
   "justify-content",
   "-webkit-box-ordinal-group",
   "-webkit-order",
   "-moz-box-ordinal-group",
   "-ms-flex-order",
   "order"
  ],
  [
   "-webkit-box-sizing",
   "-moz-box-sizing",
   "box-sizing",
   "width",
   "min-width",
   "max-width",
   "height",
   "min-height",
   "max-height",
   "margin",
   "margin-top",
   "margin-right",
   "margin-bottom",
   "margin-left",
   "padding",
   "padding-top",
   "padding-right",
   "padding-bottom",
   "padding-left"
  ],
  [
   "table-layout",
   "empty-cells",
   "caption-side",
   "border-spacing",
   "border-collapse",
   "list-style",
   "list-style-position",
   "list-style-type",
   "list-style-image"
  ],
  [
   "content",
   "quotes",
   "counter-reset",
   "counter-increment",
   "resize",
   "cursor",
   "-webkit-user-select",
   "-moz-user-select",
   "-ms-user-select",
   "user-select",
   "nav-index",
   "nav-up",
   "nav-right",
   "nav-down",
   "nav-left",
   "-webkit-transition",
   "-moz-transition",
   "-ms-transition",
   "-o-transition",
   "transition",
   "-webkit-transition-delay",
   "-moz-transition-delay",
   "-ms-transition-delay",
   "-o-transition-delay",
   "transition-delay",
   "-webkit-transition-timing-function",
   "-moz-transition-timing-function",
   "-ms-transition-timing-function",
   "-o-transition-timing-function",
   "transition-timing-function",
   "-webkit-transition-duration",
   "-moz-transition-duration",
   "-ms-transition-duration",
   "-o-transition-duration",
   "transition-duration",
   "-webkit-transition-property",
   "-moz-transition-property",
   "-ms-transition-property",
   "-o-transition-property",
   "transition-property",
   "-webkit-transform",
   "-moz-transform",
   "-ms-transform",
   "-o-transform",
   "transform",
   "-webkit-transform-origin",
   "-moz-transform-origin",
   "-ms-transform-origin",
   "-o-transform-origin",
   "transform-origin",
   "-webkit-animation",
   "-moz-animation",
   "-ms-animation",
   "-o-animation",
   "animation",
   "-webkit-animation-name",
   "-moz-animation-name",
   "-ms-animation-name",
   "-o-animation-name",
   "animation-name",
   "-webkit-animation-duration",
   "-moz-animation-duration",
   "-ms-animation-duration",
   "-o-animation-duration",
   "animation-duration",
   "-webkit-animation-play-state",
   "-moz-animation-play-state",
   "-ms-animation-play-state",
   "-o-animation-play-state",
   "animation-play-state",
   "-webkit-animation-timing-function",
   "-moz-animation-timing-function",
   "-ms-animation-timing-function",
   "-o-animation-timing-function",
   "animation-timing-function",
   "-webkit-animation-delay",
   "-moz-animation-delay",
   "-ms-animation-delay",
   "-o-animation-delay",
   "animation-delay",
   "-webkit-animation-iteration-count",
   "-moz-animation-iteration-count",
   "-ms-animation-iteration-count",
   "-o-animation-iteration-count",
   "animation-iteration-count",
   "-webkit-animation-direction",
   "-moz-animation-direction",
   "-ms-animation-direction",
   "-o-animation-direction",
   "animation-direction",
   "text-align",
   "-webkit-text-align-last",
   "-moz-text-align-last",
   "-ms-text-align-last",
   "text-align-last",
   "vertical-align",
   "white-space",
   "text-decoration",
   "text-emphasis",
   "text-emphasis-color",
   "text-emphasis-style",
   "text-emphasis-position",
   "text-indent",
   "-ms-text-justify",
   "text-justify",
   "letter-spacing",
   "word-spacing",
   "-ms-writing-mode",
   "text-outline",
   "text-transform",
   "text-wrap",
   "text-overflow",
   "-ms-text-overflow",
   "text-overflow-ellipsis",
   "text-overflow-mode",
   "-ms-word-wrap",
   "word-wrap",
   "word-break",
   "-ms-word-break",
   "-moz-tab-size",
   "-o-tab-size",
   "tab-size",
   "-webkit-hyphens",
   "-moz-hyphens",
   "hyphens",
   "pointer-events"
  ],
  [
   "opacity",
   "filter:progid:DXImageTransform.Microsoft.Alpha(Opacity",
   "-ms-filter:\\'progid:DXImageTransform.Microsoft.Alpha",
   "-ms-interpolation-mode",
   "color",
   "border",
   "border-width",
   "border-style",
   "border-color",
   "border-top",
   "border-top-width",
   "border-top-style",
   "border-top-color",
   "border-right",
   "border-right-width",
   "border-right-style",
   "border-right-color",
   "border-bottom",
   "border-bottom-width",
   "border-bottom-style",
   "border-bottom-color",
   "border-left",
   "border-left-width",
   "border-left-style",
   "border-left-color",
   "-webkit-border-radius",
   "-moz-border-radius",
   "border-radius",
   "-webkit-border-top-left-radius",
   "-moz-border-radius-topleft",
   "border-top-left-radius",
   "-webkit-border-top-right-radius",
   "-moz-border-radius-topright",
   "border-top-right-radius",
   "-webkit-border-bottom-right-radius",
   "-moz-border-radius-bottomright",
   "border-bottom-right-radius",
   "-webkit-border-bottom-left-radius",
   "-moz-border-radius-bottomleft",
   "border-bottom-left-radius",
   "-webkit-border-image",
   "-moz-border-image",
   "-o-border-image",
   "border-image",
   "-webkit-border-image-source",
   "-moz-border-image-source",
   "-o-border-image-source",
   "border-image-source",
   "-webkit-border-image-slice",
   "-moz-border-image-slice",
   "-o-border-image-slice",
   "border-image-slice",
   "-webkit-border-image-width",
   "-moz-border-image-width",
   "-o-border-image-width",
   "border-image-width",
   "-webkit-border-image-outset",
   "-moz-border-image-outset",
   "-o-border-image-outset",
   "border-image-outset",
   "-webkit-border-image-repeat",
   "-moz-border-image-repeat",
   "-o-border-image-repeat",
   "border-image-repeat",
   "outline",
   "outline-width",
   "outline-style",
   "outline-color",
   "outline-offset",
   "background",
   "filter:progid:DXImageTransform.Microsoft.AlphaImageLoader",
   "background-color",
   "background-image",
   "background-repeat",
   "background-attachment",
   "background-position",
   "background-position-x",
   "-ms-background-position-x",
   "background-position-y",
   "-ms-background-position-y",
   "-webkit-background-clip",
   "-moz-background-clip",
   "background-clip",
   "background-origin",
   "-webkit-background-size",
   "-moz-background-size",
   "-o-background-size",
   "background-size",
   "box-decoration-break",
   "-webkit-box-shadow",
   "-moz-box-shadow",
   "box-shadow",
   "filter:progid:DXImageTransform.Microsoft.gradient",
   "-ms-filter:\\'progid:DXImageTransform.Microsoft.gradient",
   "text-shadow"
  ]
 ]
}
现在,我们就可以对CSS文件排版了。
打开一个CSS文件,按“F1”,选择“CSSComb: Format styles”,排版成功!
三、说明
几个重要的参数说明一下:
"always-semicolon": true, // 在每个样式后面加“;”
"block-indent": " ", // 缩进两个空格
"color-case": "lower",
"color-shorthand": true,
"element-case": "lower",
"eof-newline": true,
"leading-zero": false,
"lines-between-rulesets": 1, // 每组规则后加一个空行
"quotes": "single",
"remove-empty-rulesets": true,
"space-after-colon": " ",
"space-after-combinator": " ",
"space-after-opening-brace": "\n", // 在开始的{后换行
"space-after-selector-delimiter": "\n",
"space-before-closing-brace": "\n", // 在结束的}后换行
"space-before-colon": "",
"space-before-combinator": " ",
"space-before-opening-brace": " ", // 在开始的{前加空格
"space-before-selector-delimiter": "",
"space-between-declarations": "\n", // 每个样式后换行
"strip-spaces": true,
"unitless-zero": true,
"vendor-prefix-align": true,
总结
到此这篇关于在Visual Studio Code中使用CSSComb格式化CSS文件的文章就介绍到这了,更多相关Visual Studio Code 格式化CSS文件内容请搜索我们以前的文章或继续浏览下面的相关文章希望大家以后多多支持我们!
相关推荐
-
Visual Studio Code配置C、C++环境并编写运行的方法
弄了半天,总算弄好了,结合网上的教程,整理分享一下~ 总体流程: 下载安装vscode 安装cpptools插件 安装编译.调试环境 修改vscode调试配置文件 下载安装vscode https://code.visualstudio.com/Download Visual Studio Code 64位 v1.26.0 官方最新安装版:https://www.jb51.net/softs/606746.html Visual Studio Code 32位 v1.26.0 官方最新安装版:
-
Visual Studio Code (vscode) 配置 C / C++ 环境的流程
昨天突发奇想,想使用vscode配置C++环境,因为不想下载 Dev OR codeblock,然后借助了很多网上教程,用了昨天整整一下午的时间最后终于成功了(哈哈哈哈哈--).今天跟大家分享一下~~~ 因为还只是个编程小白,参考资料有点多 ↓ ↓ ↓ 官方文档 -- 参考配置过程CSDN原创文章 -- 参考主要配置过程知乎达人 -- 参考环境准备 ➺➻➸ 主要流程: 1. 下载VScode 2. 安装cpptools工具 3. 下载MinGW 4. 配置环境变量 5. 使用简单的.cpp文件配
-
visual studio code 编译运行html css js文件的教程
运行html文件 1.添加插件扩展 2.安装 open in browser 3.在对应的html 文件处右击,选择open in default browser 或者直接 总结 到此这篇关于visual studio code 编译运行html css js文件的教程的文章就介绍到这了,更多相关visual studio code 运行html css js文件内容请搜索我们以前的文章或继续浏览下面的相关文章希望大家以后多多支持我们!
-
使用 Visual Studio Code(VSCode)搭建简单的Python+Django开发环境的方法步骤
写在前面的话 作为有个 Python 菜逼,之前一直用的 Pycharm,但是在主题这一块怎么调整都感觉要么太骚,看起来不舒服,要么就是简直不能看.似乎用大 JB 公司 IDE 的人似乎都不怎么重视主题这个东西. 我个人是那种"喜新厌旧"的,所以看久了 Pycharm 就感觉很难受了,再加上 Pycharm 太笨重了,就换成了以前短时间用过的 VSCode,以前没用是懒得折腾插件,现在闲下来准备折腾一下! 这里放一张我现在的 Pycharm 的配色主题: 闲话少说,进入正题! 创建 D
-

在Visual Studio Code中配置GO开发环境的详细教程
一.GO语言安装 详情查看:GO语言下载.安装.配置 二.GoLang插件介绍 对于Visual Studio Code开发工具,有一款优秀的GoLang插件,它的主页为:https://github.com/microsoft/vscode-go 这款插件的特性包括: Colorization 代码着彩色 Completion Lists 代码自动完成(使用gocode) Snippets 代码片段 Quick Info 快速提示信息(使用godef) Goto Definition 跳转到定
-
浅析Visual Studio Code断点调试Vue
很多人习惯在 Chrome 的调试窗口中调试 Vue 代码, 或者直接使用 console.log 来观察变量值, 这是非常痛苦的一件事,需要同时打开至少 3 个窗体.个人还是更加习惯于断点调试.这篇文章将介绍如何配置 Visual Studio Code 和 Chrome 来完成直接在 VS Code 断点调试代码, 并且在VS Code的调试窗口看到Chrome中console相同的值. 设置 Chrome 远程调试端口 首先我们需要在远程调试打开的状态下启动 Chrome, 这样 VS C
-
在Visual Studio Code中使用CSSComb格式化CSS文件的教程
Microsoft在2015年4月30日Build 开发者大会上正式宣布了 Visual Studio Code 项目:一个运行于 Mac OS X.Windows和 Linux 之上的,针对于编写现代 Web 和云应用的跨平台源代码编辑器. 今天通过本文给大家介绍在Visual Studio Code中使用CSSComb格式化CSS文件. 最近在使用Visual Studio Code,开始逐渐上手,发现非常好用. 不管是在JS文件还是在HTML文件中,右键点击,都有"格式化文件"的
-
在Visual Studio Code中配置C++编译环境的问题
目录 一.简介 二.准备工具 三.配置文件 一.简介 大学期间用的C++编译环境一直是Visual Studio 2010,最近碰到了一个赛题,需要用C++11的环境,且给了基础代码.基础代码在Visual Studio 2010不能成功运行,显示以下错误: 后经查询,是因为Visual Studio 2010 至 2013这几个版本仅支持部分的C++11特性,所以报错,又想到Visual Studio Code和其都是一家,也有很多人推荐,就想着能不能通过它来实现C++环境的编译,毕竟
-
Visual Studio Code运行程序时输出中文成乱码问题及解决方法
今天写代码,需要输出一些中文,于是就顺势发现了这个问题:VS Code输出中文成乱码.上网查询了一番后,我找到了解决方法,我决定将我看到的方法整理出来,帮助更多朋友.(windows10系统下) 1. 打开控制面板 可以点击电脑桌面上的相应图标打开 也可以点击桌面左下角开始按钮,找到W开头文件列表下的windows系统文件夹中的控制面板 2.选择时钟和区域下的更改日期.时间或数字格式 3.点击管理,然后点选择更改系统区域设置 4. 勾选Beta版:使用Unicode UTF-8提供全球语言支持,
-
Visual Studio Code 从简介、安装到配置所需插件详细介绍
提到visualstudiocode,想必你也听说过visualstudio(vs) 那就从查阅过的资料大致总结以下几点,关于这两个产品的区别: 首先总的来看,它们都是微软公司的产品 名字不一样当然会有不一样的用法或者解释 区别: ①先来介绍vs,它是微软公司开发发工具包系列产品,是一个基本完整的开发工具集,它包括了整个软件生命周期中所需要的大部分工具,如UML工具.代码管控工具.集成开发环境(IDE)等.通俗的讲,是一款编译器. 而vscode是微软公司的一个项目,是针对于编写现代web和云应
-
一文教你将Visual Studio Code变成Python开发神器
目录 安装 Visual Studio Code 在 VS Code 中创建和运行 Python 文件 使用 REPL 格式化 Python 代码 重构 Python 代码 Python 交互窗口 Visual Studio Code 是一款功能强大.可扩展且轻量级的代码编辑器,经过多年的发展,已经成为 Python 社区的首选代码编辑器之一 下面我们将学习如何安装 Visual Studio Code 并将其设置为 Python 开发工具,以及如何使用 VS Code 提高编程工作效率 Let
-
Visual Studio Code运行C++代码时显示CLOCKS_PER_SEC未定义的问题及解决方法
今天写代码,突然想知道程序运行时间,于是我在代码里包含了time头文件,include没有标红,但是在出现CLOCKS_PER_SEC的地方却标了红,显示未定义标识符CLOCKS_PER_SEC 我寻思,这不对劲,time文件里不定义着吗?怎么会未定义,但是我看到上方的提示,原来CLOCKS_PER_SEC是一个整型量,数值为1000,那我不妨自己定义.于是我在代码的顶部进行宏定义,没有标红了,且程序的运行结果和在Visual Studio 2019中运行的结果一样,那应该就没毛病了. 另外,本
-
在Visual Studio Code环境中使用SVN的方案
SVN(Subversion的简称),是开发人员经常使用的源代码版本控制系统之一,其它同类型的平台产品还有Git.CVS等等.根据现在SVN的实际使用情况来看,使用SVN的公司或者研发项目还是非常众多的.那么,学习并掌握SVN的使用,就成为了开发人员必须掌握的重要技能之一. 根据使用环境的不同,SVN的常规使用,分为直接使用SVN客户端.使用IDE中的SVN集成插件两种大的类型.本文所着重讲述的是后一种情况. Visual Studio Code是由Microsoft出品的,当下非常流行的一款I
-
吐血推荐珍藏的Visual Studio Code插件(推荐)
作为一名Java工程师,由于工作需要,最近一个月一直在写NodeJS,这种经历可以说是一部辛酸史了.好在有神器Visual Studio Code陪伴,让我的这段经历没有更加困难.眼看这段经历要告一段落了,今天就来给大家分享一下我常用的一些VSC的插件. VSC的插件安装方法很简单,只需要点击左侧最下方的插件栏选项,然后就可以搜索你想要的插件了. 下面我们进入正题 Material Theme 第一个是Material Theme,这个插件可以帮助我们修改主题色,帮助你摆脱只有黑色和白色的世界.
-
利用Typings为Visual Studio Code实现智能提示功能
前言 相信大家都知道在IDE中代码的智能提示几乎都是标配,虽然一些文本编辑器也有一些简单的提示,但这是通过代码片段提供的.功能上远不能和IDE相比.不过最近兴起的文本编辑器的新锐 Visual Studio Code 可以通过 Typings 来对 JavaScript 实现智能提示功能,对于一个文本编辑器来说,这点很难得.所以Visual Studio Code 特别适合用来编写 JavaScript(Node.js)程序; 同时,如果我们需要编写一些尝试性的小代码片段,例如:Lodash.j