Pytorch 图像变换函数集合小结
一、必要的 python 模块
PyTorch 的 Vision 模块提供了图像变换的很多函数.
torchvision/transforms/functional.py
from __future__ import division
import torch
import sys
import math
from PIL import Image, ImageOps, ImageEnhance, PILLOW_VERSION
try:
 import accimage
except ImportError:
 accimage = None
import numpy as np
import numbers
import collections
import warnings
import matplotlib as plt

if sys.version_info < (3, 3):
 Sequence = collections.Sequence
 Iterable = collections.Iterable
else:
 Sequence = collections.abc.Sequence
 Iterable = collections.abc.Iterable
以下图为例:
img_file = "test.jpe"
img = Image.open(img_file)
width, height = img.size #(750, 815)
img.show()

二、PyTorch 图像变换函数
2.1 判断图像数据类型
# 图像格式检查,如,pil, tensor, numpy
def _is_pil_image(img):
 if accimage is not None:
  return isinstance(img, (Image.Image, accimage.Image))
 else:
  return isinstance(img, Image.Image)

def _is_tensor_image(img):
 return torch.is_tensor(img) and img.ndimension() == 3

def _is_numpy_image(img):
 return isinstance(img, np.ndarray) and (img.ndim in {2, 3})
# example:
_is_pil_image(img)
# True

_is_tensor_image(img)
# False

_is_numpy_image(img)
# False

_is_numpy_image(np.array(img))
# True
2.2 to_tensor(pic)
将 PIL Image 或 nupy.ndarray 转换为 tensor
def to_tensor(pic):
 """
 Args:
  pic (PIL Image or numpy.ndarray): Image to be converted to tensor.

 Returns:
  Tensor: Converted image.
 """
 if not(_is_pil_image(pic) or _is_numpy_image(pic)):
  raise TypeError('pic should be PIL Image or ndarray. Got {}'.format(type(pic)))

 if isinstance(pic, np.ndarray):
  # handle numpy array
  img = torch.from_numpy(pic.transpose((2, 0, 1)))
  # backward compatibility
  if isinstance(img, torch.ByteTensor):
   return img.float().div(255)
  else:
   return img

 if accimage is not None and isinstance(pic, accimage.Image):
  nppic = np.zeros([pic.channels, pic.height, pic.width], dtype=np.float32)
  pic.copyto(nppic)
  return torch.from_numpy(nppic)

 # handle PIL Image
 if pic.mode == 'I':
  img = torch.from_numpy(np.array(pic, np.int32, copy=False))
 elif pic.mode == 'I;16':
  img = torch.from_numpy(np.array(pic, np.int16, copy=False))
 elif pic.mode == 'F':
  img = torch.from_numpy(np.array(pic, np.float32, copy=False))
 elif pic.mode == '1':
  img = 255 * torch.from_numpy(np.array(pic, np.uint8, copy=False))
 else:
  img = torch.ByteTensor(torch.ByteStorage.from_buffer(pic.tobytes()))
 # PIL image mode: L, P, I, F, RGB, YCbCr, RGBA, CMYK
 if pic.mode == 'YCbCr':
  nchannel = 3
 elif pic.mode == 'I;16':
  nchannel = 1
 else:
  nchannel = len(pic.mode)
 img = img.view(pic.size[1], pic.size[0], nchannel)
 # put it from HWC to CHW format
 # yikes, this transpose takes 80% of the loading time/CPU
 img = img.transpose(0, 1).transpose(0, 2).contiguous()
 if isinstance(img, torch.ByteTensor):
  return img.float().div(255)
 else:
  return img
2.3 to_pil_image(pic, mode=None)
将 tensor 或 ndarray 转换为 PIL Image
def to_pil_image(pic, mode=None):
 """
 Args:
  pic (Tensor or numpy.ndarray): Image to be converted to PIL Image.
  mode (`PIL.Image mode`_): color space and pixel depth of input data (optional).

 .. _PIL.Image mode: https://pillow.readthedocs.io/en/latest/handbook/concepts.html#concept-modes

 Returns:
  PIL Image: Image converted to PIL Image.
 """
 if not(isinstance(pic, torch.Tensor) or isinstance(pic, np.ndarray)):
  raise TypeError('pic should be Tensor or ndarray. Got {}.'.format(type(pic)))

 elif isinstance(pic, torch.Tensor):
  if pic.ndimension() not in {2, 3}:
   raise ValueError('pic should be 2/3 dimensional. Got {} '\
        'dimensions.'.format(pic.ndimension()))

  elif pic.ndimension() == 2:
   # if 2D image, add channel dimension (CHW)
   pic.unsqueeze_(0)

 elif isinstance(pic, np.ndarray):
  if pic.ndim not in {2, 3}:
   raise ValueError('pic should be 2/3 dimensional. Got {} '\
        'dimensions.'.format(pic.ndim))

  elif pic.ndim == 2:
   # if 2D image, add channel dimension (HWC)
   pic = np.expand_dims(pic, 2)

 npimg = pic
 if isinstance(pic, torch.FloatTensor):
  pic = pic.mul(255).byte()
 if isinstance(pic, torch.Tensor):
  npimg = np.transpose(pic.numpy(), (1, 2, 0))

 if not isinstance(npimg, np.ndarray):
  raise TypeError('Input pic must be a torch.Tensor or NumPy ndarray, ' +
      'not {}'.format(type(npimg)))

 if npimg.shape[2] == 1:
  expected_mode = None
  npimg = npimg[:, :, 0]
  if npimg.dtype == np.uint8:
   expected_mode = 'L'
  elif npimg.dtype == np.int16:
   expected_mode = 'I;16'
  elif npimg.dtype == np.int32:
   expected_mode = 'I'
  elif npimg.dtype == np.float32:
   expected_mode = 'F'
  if mode is not None and mode != expected_mode:
   raise ValueError("Incorrect mode ({}) supplied for input type {}. Should be {}"
        .format(mode, np.dtype, expected_mode))
  mode = expected_mode

 elif npimg.shape[2] == 4:
  permitted_4_channel_modes = ['RGBA', 'CMYK']
  if mode is not None and mode not in permitted_4_channel_modes:
   raise ValueError("Only modes {} are supported for 4D inputs".format(permitted_4_channel_modes))

  if mode is None and npimg.dtype == np.uint8:
   mode = 'RGBA'
 else:
  permitted_3_channel_modes = ['RGB', 'YCbCr', 'HSV']
  if mode is not None and mode not in permitted_3_channel_modes:
   raise ValueError("Only modes {} are supported for 3D inputs".format(permitted_3_channel_modes))
  if mode is None and npimg.dtype == np.uint8:
   mode = 'RGB'

 if mode is None:
  raise TypeError('Input type {} is not supported'.format(npimg.dtype))

 return Image.fromarray(npimg, mode=mode)
2.4 normalize(tensor, mean, std)
归一化 tensor 的图像. in-place 计算.
def normalize(tensor, mean, std):
 """
 Args:
  tensor (Tensor): Tensor image of size (C, H, W) to be normalized.
  mean (sequence): Sequence of means for each channel.
  std (sequence): Sequence of standard deviations for each channely.

 Returns:
  Tensor: Normalized Tensor image.
 """
 if not _is_tensor_image(tensor):
  raise TypeError('tensor is not a torch image.')

 # This is faster than using broadcasting, don't change without benchmarking
 for t, m, s in zip(tensor, mean, std):
  t.sub_(m).div_(s)
 return tensor
# example
mean = [0.485, 0.456, 0.406]
std = [0.229, 0.224, 0.225]
img_normalize = normalize(img_tensor, mean, std)

# vis
ax1 = plt.subplot(1, 2, 1)
ax1.imshow(img)
ax1.axis("off")
ax1.set_title("orig img")
ax2 = plt.subplot(1, 2, 2)
ax2.imshow(to_pil_image(img_normalize))
ax2.axis("off")
ax2.set_title("normalize img")
plt.show()

2.5 resize(img, size, interpolation=Image.BILINEAR)
对输入的 PIL Image 进行 resize 到给定尺寸.
参数 size 为调整后的尺寸.
如果 size 是数组(h, w),则直接调整到该 (h, w) 尺寸.
如果 size 是一个 int 值,则调整后图像的最短边是该值,且保持固定的长宽比.
def resize(img, size, interpolation=Image.BILINEAR):
 """
 Args:
  img (PIL Image): Image to be resized.
  size (sequence or int): Desired output size.
  interpolation (int, optional): Desired interpolation. Default is
   ``PIL.Image.BILINEAR``
 Returns:
  PIL Image: Resized image.
 """
 if not _is_pil_image(img):
  raise TypeError('img should be PIL Image. Got {}'.format(type(img)))
 if not (isinstance(size, int) or (isinstance(size, Iterable) and len(size) == 2)):
  raise TypeError('Got inappropriate size arg: {}'.format(size))

 if isinstance(size, int):
  w, h = img.size
  if (w <= h and w == size) or (h <= w and h == size):
   return img
  if w < h:
   ow = size
   oh = int(size * h / w)
   return img.resize((ow, oh), interpolation)
  else:
   oh = size
   ow = int(size * w / h)
   return img.resize((ow, oh), interpolation)
 else:
  return img.resize(size[::-1], interpolation)
# example:
img_resize_256x256 = resize(img, (256, 256)) # (256, 256)
img_resize_256 = resize(img, 256) # (256, 278)

# vis
ax1 = plt.subplot(1, 3, 1)
ax1.imshow(img)
ax1.axis("off")
ax1.set_title("orig img")
ax2 = plt.subplot(1, 3, 2)
ax2.imshow(img_resize_256x256)
ax2.axis("off")
ax2.set_title("resize_256x256 img")
ax3 = plt.subplot(1, 3, 3)
ax3.imshow(img_resize_256)
ax3.axis("off")
ax3.set_title("resize_256 img")
plt.show()

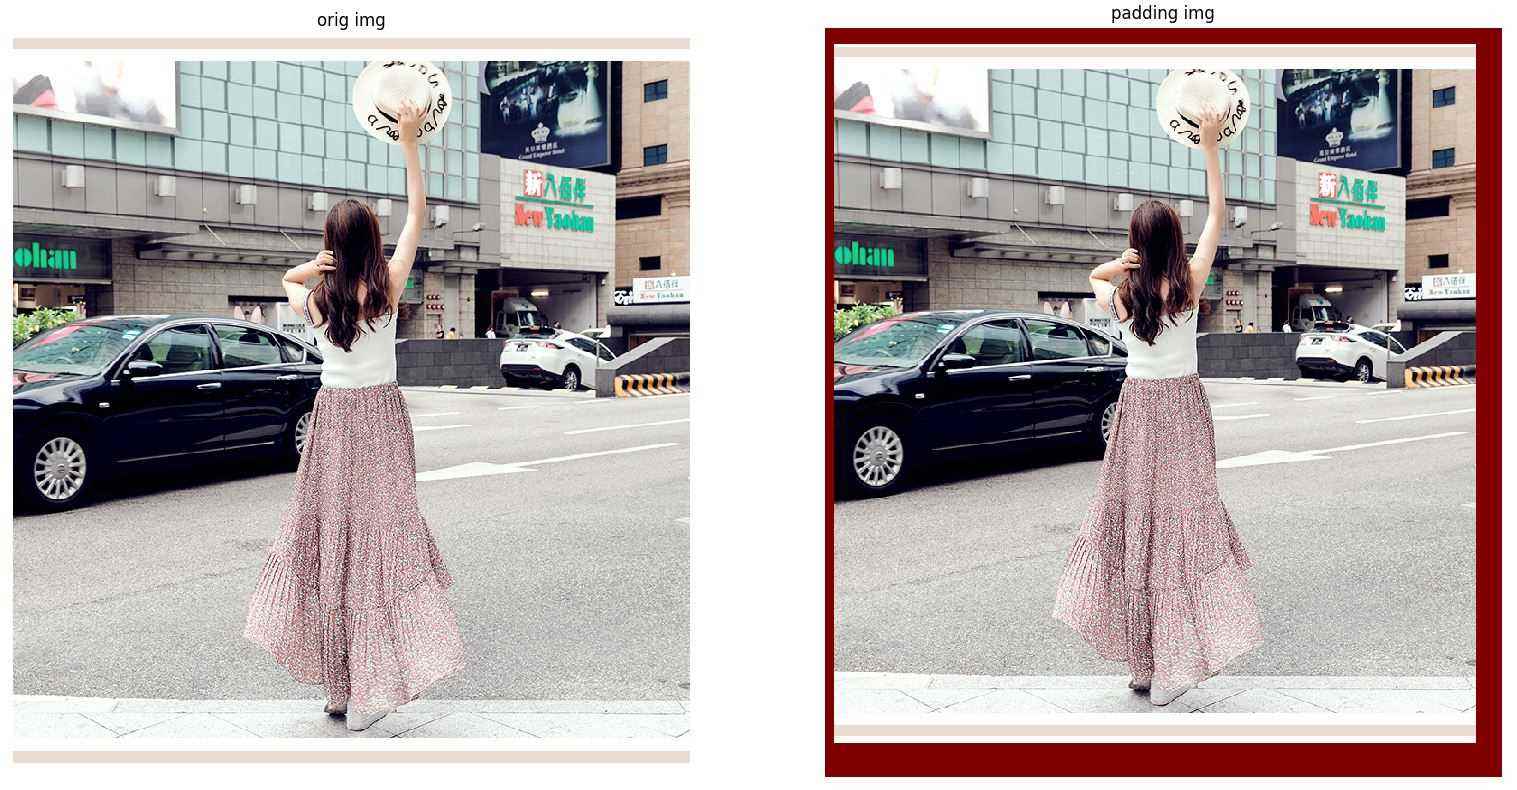
2.6 pad(img, padding, fill=0, padding_mode=‘constant')
根据指定的 padding 模式和填充值,对给定的 PIL Image 的所有边进行 pad 处理.
参数 padding - int 或 tuple 形式.
padding:
- 如果是 int 值 ,则对所有的边都 padding 该 int 值.
- 如果是长度为 2 的tuple,则对 left/right 和 top/bottom 分别进行 padding.
- 如果是长度为 4 的 tuple,则对 left,top,right, bottom 边分别进行 padding.
参数 fill - 像素填充值,默认为 0. 如果值是长度为 3 的 tuple,则分别对 R,G,B 通道进行填充. 仅用于当 padding_mode='constant' 的情况.
参数 padding_mode - 填充的类型,可选:constant,edge,reflect,symmetric. 默认为 constant. 填充常数值.
constant - padding 填充常数值 fill.
edge - padding 图像边缘的最后一个值.
reflect - padding 图像的反射(reflection)值,(不对图像边缘的最后一个像素值进行重复)
如,[1, 2, 3, 4] 在 reflect 模式下在 两边 padding 2 个元素值,会得到:
[3, 2, 1, 2, 3, 4, 3, 2]
symmetric - padding 图像的反射(reflection)值,(对图像边缘的最后一个像素值进行重复).
如,[1, 2, 3, 4] 在 symmetric 模式下在 两边 padding 2 个元素值,会得到:
[2, 1, 1, 2, 3, 4, 4, 3]
def pad(img, padding, fill=0, padding_mode='constant'):
 """
 Args:
  img (PIL Image): Image to be padded.
  padding (int or tuple): Padding on each border.
  fill: Pixel fill value for constant fill. Default is 0.
  padding_mode: Type of padding. Should be: constant, edge, reflect or symmetric.
      Default is constant.
 Returns:
  PIL Image: Padded image.
 """
 if not _is_pil_image(img):
  raise TypeError('img should be PIL Image. Got {}'.format(type(img)))

 if not isinstance(padding, (numbers.Number, tuple)):
  raise TypeError('Got inappropriate padding arg')
 if not isinstance(fill, (numbers.Number, str, tuple)):
  raise TypeError('Got inappropriate fill arg')
 if not isinstance(padding_mode, str):
  raise TypeError('Got inappropriate padding_mode arg')

 if isinstance(padding, Sequence) and len(padding) not in [2, 4]:
  raise ValueError("Padding must be an int or a 2, or 4 element tuple, not a " +
       "{} element tuple".format(len(padding)))

 assert padding_mode in ['constant', 'edge', 'reflect', 'symmetric'], \
  'Padding mode should be either constant, edge, reflect or symmetric'

 if padding_mode == 'constant':
  if img.mode == 'P':
   palette = img.getpalette()
   image = ImageOps.expand(img, border=padding, fill=fill)
   image.putpalette(palette)
   return image

  return ImageOps.expand(img, border=padding, fill=fill)
 else:
  if isinstance(padding, int):
   pad_left = pad_right = pad_top = pad_bottom = padding
  if isinstance(padding, Sequence) and len(padding) == 2:
   pad_left = pad_right = padding[0]
   pad_top = pad_bottom = padding[1]
  if isinstance(padding, Sequence) and len(padding) == 4:
   pad_left = padding[0]
   pad_top = padding[1]
   pad_right = padding[2]
   pad_bottom = padding[3]

  if img.mode == 'P':
   palette = img.getpalette()
   img = np.asarray(img)
   img = np.pad(img,
       ((pad_top, pad_bottom), (pad_left, pad_right)),
       padding_mode)
   img = Image.fromarray(img)
   img.putpalette(palette)
   return img

  img = np.asarray(img)
  # RGB image
  if len(img.shape) == 3:
   img = np.pad(img,
       ((pad_top, pad_bottom),
       (pad_left, pad_right),
       (0, 0)),
       padding_mode)
  # Grayscale image
  if len(img.shape) == 2:
   img = np.pad(img,
       ((pad_top, pad_bottom), (pad_left, pad_right)),
       padding_mode)

  return Image.fromarray(img)
# example:
img_padding = pad(img, (10, 20, 30 ,40), fill=128)	# (750, 815) -> (790, 875)

# vis
ax1 = plt.subplot(1, 2, 1)
ax1.imshow(img)
ax1.axis("off")
ax1.set_title("orig img")
ax2 = plt.subplot(1, 2, 2)
ax2.imshow(img_padding)
ax2.axis("off")
ax2.set_title("padding img")
plt.show()
2.7 crop(img, i, j, h, w)
裁剪给定的 PIL Image.
def crop(img, i, j, h, w):
 """
 Args:
  img (PIL Image): Image to be cropped.
  i: Upper pixel coordinate.
  j: Left pixel coordinate.
  h: Height of the cropped image.
  w: Width of the cropped image.

 Returns:
  PIL Image: Cropped image.
 """
 if not _is_pil_image(img):
  raise TypeError('img should be PIL Image. Got {}'.format(type(img)))

 return img.crop((j, i, j + w, i + h))
# example
img_crop = crop(img, 100, 100, 500, 500)	# (750, 815) -> (500, 500)

ax1 = plt.subplot(1, 2, 1)
ax1.imshow(img)
ax1.axis("off")
ax1.set_title("orig img")
ax2 = plt.subplot(1, 2, 2)
ax2.imshow(img_crop)
ax2.axis("off")
ax2.set_title("crop img")
plt.show()

2.8 center_crop(img, output_size)
def center_crop(img, output_size):
 if isinstance(output_size, numbers.Number):
  output_size = (int(output_size), int(output_size))
 w, h = img.size
 th, tw = output_size
 i = int(round((h - th) / 2.))
 j = int(round((w - tw) / 2.))
 return crop(img, i, j, th, tw)
#example
img_centercrop = center_crop(img, (256, 256))	# (750, 815) -> (256, 256)

ax1 = plt.subplot(1, 2, 1)
ax1.imshow(img)
ax1.axis("off")
ax1.set_title("orig img")
ax2 = plt.subplot(1, 2, 2)
ax2.imshow(img_centercrop)
ax2.axis("off")
ax2.set_title("centercrop img")
plt.show()
2.9 resized_crop(img, i, j, h, w, size, interpolation=Image.BILINEAR)
对给定 PIL Image 进行裁剪,并 resize 到特定尺寸.
def resized_crop(img, i, j, h, w, size, interpolation=Image.BILINEAR):
 """
 Args:
  img (PIL Image): Image to be cropped.
  i: Upper pixel coordinate.
  j: Left pixel coordinate.
  h: Height of the cropped image.
  w: Width of the cropped image.
  size (sequence or int): Desired output size. Same semantics as ``resize``.
  interpolation (int, optional): Desired interpolation. Default is
   ``PIL.Image.BILINEAR``.
 Returns:
  PIL Image: Cropped image.
 """
 assert _is_pil_image(img), 'img should be PIL Image'
 img = crop(img, i, j, h, w)
 img = resize(img, size, interpolation)
 return img
# example
img_resizedcrop = resized_crop(img, 100, 100, 500, 500, (256, 256))	# (750, 815) -> (500, 500) -> (256, 256)

ax1 = plt.subplot(1, 2, 1)
ax1.imshow(img)
ax1.axis("off")
ax1.set_title("orig img")
ax2 = plt.subplot(1, 2, 2)
ax2.imshow(img_resizedcrop)
ax2.axis("off")
ax2.set_title("resizedcrop img")
plt.show()

2.10 hflip(img)
水平翻转 (Horizontally flip) 给定的 PIL Image.
def hflip(img):
 """
 Args:
  img (PIL Image): Image to be flipped.

 Returns:
  PIL Image: Horizontall flipped image.
 """
 if not _is_pil_image(img):
  raise TypeError('img should be PIL Image. Got {}'.format(type(img)))

 return img.transpose(Image.FLIP_LEFT_RIGHT)
2.11 vflip(img)
垂直翻转 (Vertically flip) 给定的 PIL Image.
def vflip(img):
 """
 Args:
  img (PIL Image): Image to be flipped.

 Returns:
  PIL Image: Vertically flipped image.
 """
 if not _is_pil_image(img):
  raise TypeError('img should be PIL Image. Got {}'.format(type(img)))

 return img.transpose(Image.FLIP_TOP_BOTTOM)
# example:
img_hflip = hflip(img)
img_vflip = vflip(img)

ax1 = plt.subplot(1, 3, 1)
ax1.imshow(img)
ax1.axis("off")
ax1.set_title("orig img")
ax2 = plt.subplot(1, 3, 2)
ax2.imshow(img_hflip)
ax2.axis("off")
ax2.set_title("hflip img")
ax3 = plt.subplot(1, 3, 3)
ax3.imshow(img_vflip)
ax3.axis("off")
ax3.set_title("vflip img")
plt.show()

2.12 five_crop(img, size)
Crop the given PIL Image into four corners and the central crop.
从给定 PIL Image 的四个角和中间裁剪出五个子图像.
def five_crop(img, size):
 """
 Args:
  size (sequence or int): Desired output size of the crop. If size is an
   int instead of sequence like (h, w), a square crop (size, size) is
   made.

 Returns:
  tuple: tuple (tl, tr, bl, br, center)
    Corresponding top left, top right, bottom left,
    bottom right and center crop.
 """
 if isinstance(size, numbers.Number):
  size = (int(size), int(size))
 else:
  assert len(size) == 2, "Please provide only two dimensions (h, w) for size."

 w, h = img.size
 crop_h, crop_w = size
 if crop_w > w or crop_h > h:
  raise ValueError("Requested crop size {} is bigger than input size {}".format(size,
                      (h, w)))
 tl = img.crop((0, 0, crop_w, crop_h))
 tr = img.crop((w - crop_w, 0, w, crop_h))
 bl = img.crop((0, h - crop_h, crop_w, h))
 br = img.crop((w - crop_w, h - crop_h, w, h))
 center = center_crop(img, (crop_h, crop_w))
 return (tl, tr, bl, br, center)
# example:
img_tl, img_tr, img_bl, img_br, img_center = five_crop(img, (400, 400))

ax1 = plt.subplot(2, 3, 1)
ax1.imshow(img)
ax1.axis("off")
ax1.set_title("orig img")
ax2 = plt.subplot(2, 3, 2)
ax2.imshow(img_tl)
ax2.axis("off")
ax2.set_title("tl img")
ax3 = plt.subplot(2, 3, 3)
ax3.imshow(img_tr)
ax3.axis("off")
ax3.set_title("tr img")
ax4 = plt.subplot(2, 3, 4)
ax4.imshow(img_bl)
ax4.axis("off")
ax4.set_title("bl img")
ax5 = plt.subplot(2, 3, 5)
ax5.imshow(img_br)
ax5.axis("off")
ax5.set_title("br img")
ax6 = plt.subplot(2, 3, 6)
ax6.imshow(img_center)
ax6.axis("off")
ax6.set_title("center img")
plt.show()

2.13 ten_crop(img, size, vertical_flip=False)
将给定 PIL Image 裁剪出的四个角和中间部分的五个子图像,每个子图像进行翻转处理. 默认时水平翻转.
def ten_crop(img, size, vertical_flip=False):
 """
 Args:
  size (sequence or int): Desired output size of the crop. If size is an
   int instead of sequence like (h, w), a square crop (size, size) is
   made.
  vertical_flip (bool): Use vertical flipping instead of horizontal

 Returns:
  tuple: tuple (tl, tr, bl, br, center, tl_flip, tr_flip, bl_flip, br_flip, center_flip)
  Corresponding top left, top right, bottom left, bottom right and center crop
  and same for the flipped image.
 """
 if isinstance(size, numbers.Number):
  size = (int(size), int(size))
 else:
  assert len(size) == 2, "Please provide only two dimensions (h, w) for size."

 first_five = five_crop(img, size)

 if vertical_flip:
  img = vflip(img)
 else:
  img = hflip(img)

 second_five = five_crop(img, size)
 return first_five + second_five
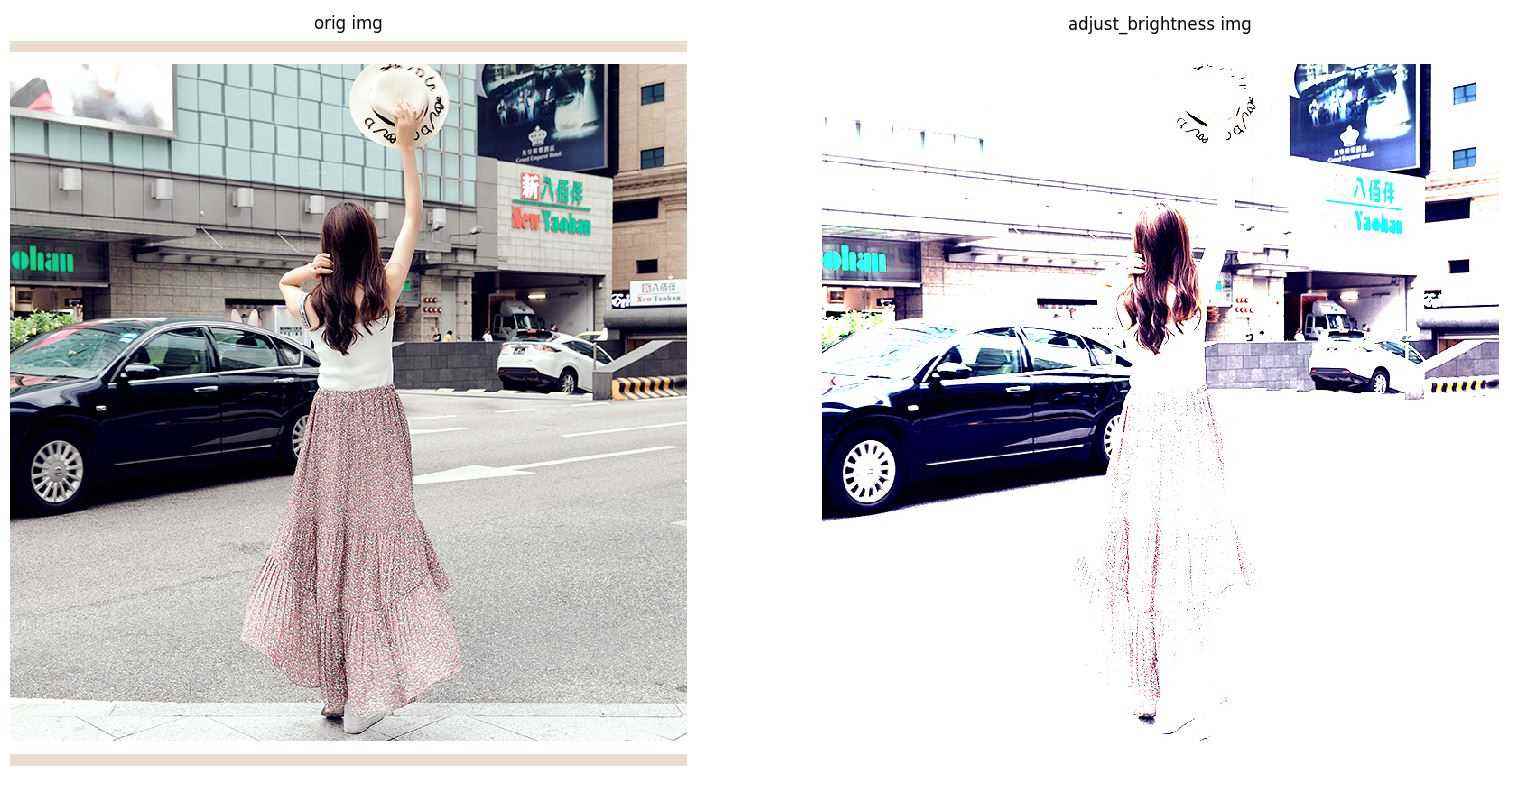
2.14 adjust_brightness(img, brightness_factor)
def adjust_brightness(img, brightness_factor):
 """
 Args:
  img (PIL Image): PIL Image to be adjusted.
  brightness_factor (float): How much to adjust the brightness.
   Can be any non negative number.
   0 gives a black image,
   1 gives the original image,
   2 increases the brightness by a factor of 2.

 Returns:
  PIL Image: Brightness adjusted image.
 """
 if not _is_pil_image(img):
  raise TypeError('img should be PIL Image. Got {}'.format(type(img)))

 enhancer = ImageEnhance.Brightness(img)
 img = enhancer.enhance(brightness_factor)
 return img
# example:
img_adjust_brightness = adjust_brightness(img, 2.5)

# vis
ax1 = plt.subplot(1, 2, 1)
ax1.imshow(img)
ax1.axis("off")
ax1.set_title("orig img")
ax2 = plt.subplot(1, 2, 2)
ax2.imshow(img_adjust_brightness)
ax2.axis("off")
ax2.set_title("adjust_brightness img")
plt.show()
2.15 adjust_contrast(img, contrast_factor)
调整对比度.
def adjust_contrast(img, contrast_factor):
 """
 Args:
  img (PIL Image): PIL Image to be adjusted.
  contrast_factor (float): How much to adjust the contrast.
   Can be any non negative number.
   0 gives a solid gray image,
   1 gives the original image,
   2 increases the contrast by a factor of 2.

 Returns:
  PIL Image: Contrast adjusted image.
 """
 if not _is_pil_image(img):
  raise TypeError('img should be PIL Image. Got {}'.format(type(img)))

 enhancer = ImageEnhance.Contrast(img)
 img = enhancer.enhance(contrast_factor)
 return img
# example:
img_adjust_contrast = adjust_contrast(img, 2.5)

# vis
ax1 = plt.subplot(1, 2, 1)
ax1.imshow(img)
ax1.axis("off")
ax1.set_title("orig img")
ax2 = plt.subplot(1, 2, 2)
ax2.imshow(img_adjust_contrast)
ax2.axis("off")
ax2.set_title("adjust_contrast img")
plt.show()

2.16 adjust_saturation(img, saturation_factor)
调整颜色饱和度.
def adjust_saturation(img, saturation_factor):
 """
 Args:
  img (PIL Image): PIL Image to be adjusted.
  saturation_factor (float): How much to adjust the saturation.
   0 will give a black and white image,
   1 will give the original image while
   2 will enhance the saturation by a factor of 2.

 Returns:
  PIL Image: Saturation adjusted image.
 """
 if not _is_pil_image(img):
  raise TypeError('img should be PIL Image. Got {}'.format(type(img)))

 enhancer = ImageEnhance.Color(img)
 img = enhancer.enhance(saturation_factor)
 return img
# example
img_adjust_saturation = adjust_saturation(img, 2.5)

# vis
ax1 = plt.subplot(1, 2, 1)
ax1.imshow(img)
ax1.axis("off")
ax1.set_title("orig img")
ax2 = plt.subplot(1, 2, 2)
ax2.imshow(img_adjust_saturation)
ax2.axis("off")
ax2.set_title("adjust_saturation img")
plt.show()

2.17 adjust_hue(img, hue_factor)
调整图像 HUE.
通过将图像转换为 HSV 空间,并周期地移动在 hue 通道(H) 的强度,以实现图像 hue 的调整.
最后,再将结果转换回原始的图像模式.参数 hue_factor - H 通道平移的因子,其值必须在区间 [-0.5, 0.5].
def adjust_hue(img, hue_factor):
 """
 Args:
  img (PIL Image): PIL Image to be adjusted.
  hue_factor (float): How much to shift the hue channel.
   Should be in [-0.5, 0.5].
   0.5 and -0.5 give complete reversal of hue channel in
   HSV space in positive and negative direction respectively.
   0 means no shift.
   Therefore, both -0.5 and 0.5 will give an image
   with complementary colors while 0 gives the original image.

 Returns:
  PIL Image: Hue adjusted image.
 """
 if not(-0.5 <= hue_factor <= 0.5):
  raise ValueError('hue_factor is not in [-0.5, 0.5].'.format(hue_factor))

 if not _is_pil_image(img):
  raise TypeError('img should be PIL Image. Got {}'.format(type(img)))

 input_mode = img.mode
 if input_mode in {'L', '1', 'I', 'F'}:
  return img

 h, s, v = img.convert('HSV').split()

 np_h = np.array(h, dtype=np.uint8)
 # uint8 addition take cares of rotation across boundaries
 with np.errstate(over='ignore'):
  np_h += np.uint8(hue_factor * 255)
 h = Image.fromarray(np_h, 'L')

 img = Image.merge('HSV', (h, s, v)).convert(input_mode)
 return img
# example:
img_adjust_hue = adjust_hue(img, 0.5)

# vis
ax1 = plt.subplot(1, 2, 1)
ax1.imshow(img)
ax1.axis("off")
ax1.set_title("orig img")
ax2 = plt.subplot(1, 2, 2)
ax2.imshow(img_adjust_hue)
ax2.axis("off")
ax2.set_title("adjust_hue img")
plt.show()

2.18 adjust_gamma(img, gamma, gain=1)
对图像进行伽马校正(gamma correction). 也被叫作 Power Law Transform.
def adjust_gamma(img, gamma, gain=1):
 """
 Args:
  img (PIL Image): PIL Image to be adjusted.
  gamma (float): Non negative real number, 如公式中的 \gamma 值.
   gamma larger than 1 make the shadows darker,
   while gamma smaller than 1 make dark regions lighter.
  gain (float): The constant multiplier.
 """
 if not _is_pil_image(img):
  raise TypeError('img should be PIL Image. Got {}'.format(type(img)))

 if gamma < 0:
  raise ValueError('Gamma should be a non-negative real number')

 input_mode = img.mode
 img = img.convert('RGB')

 gamma_map = [255 * gain * pow(ele / 255., gamma) for ele in range(256)] * 3
 img = img.point(gamma_map) # use PIL's point-function to accelerate this part

 img = img.convert(input_mode)
 return img
# example:
img_adjust_gamma = adjust_gamma(img, 0.5)

# vis
ax1 = plt.subplot(1, 2, 1)
ax1.imshow(img)
ax1.axis("off")
ax1.set_title("orig img")
ax2 = plt.subplot(1, 2, 2)
ax2.imshow(img_adjust_gamma)
ax2.axis("off")
ax2.set_title("adjust_gamma img")
plt.show()

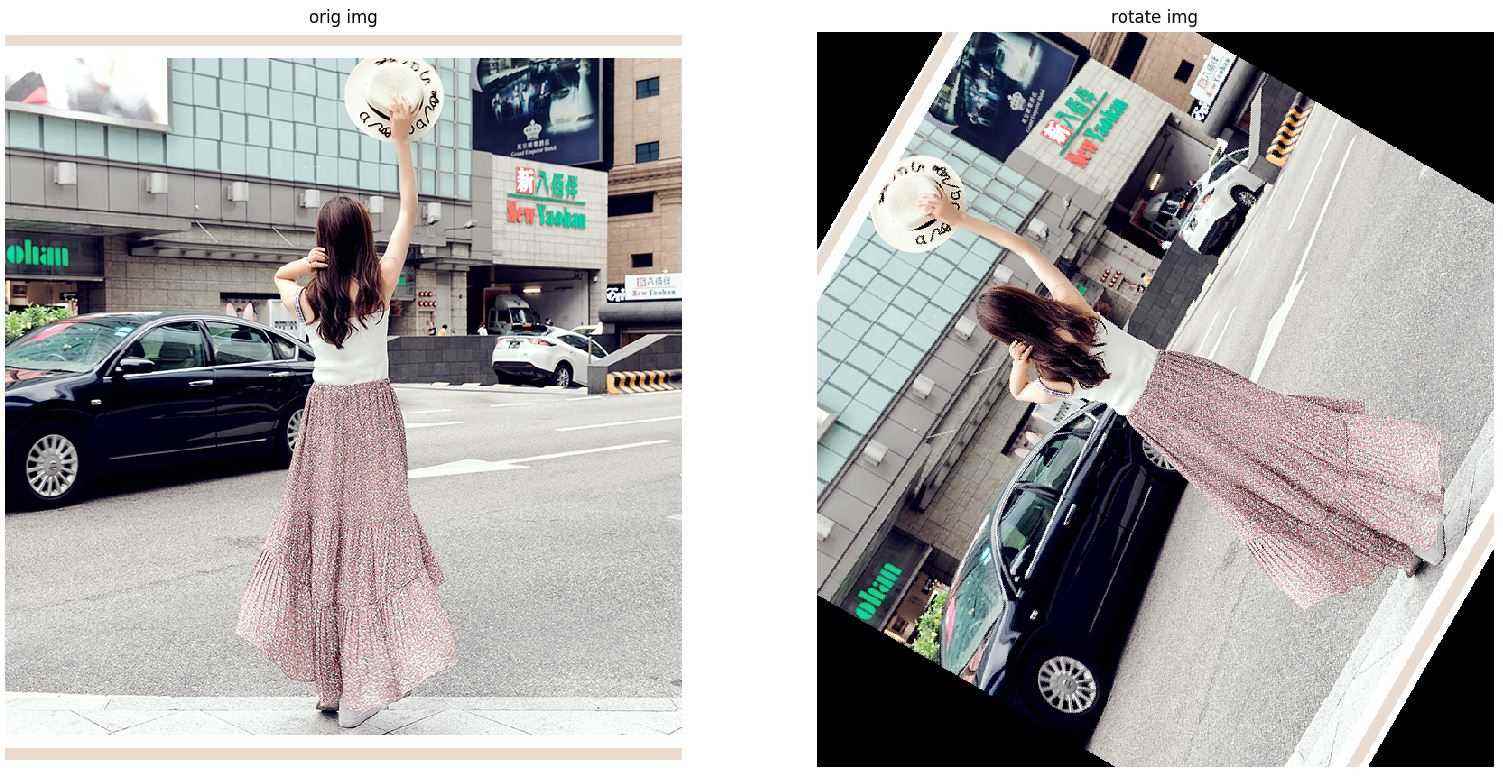
2.19 rotate(img, angle, resample=False, expand=False, center=None)
旋转图像.
参数 resample
可选值:PIL.Image.NEAREST, PIL.Image.BILINEAR, PIL.Image.BICUBIC.
如果参数 resample 被忽略,或图像的模式是 1 或 P,则resample=PIL.Image.NEAREST.
参数 expand
如果 expand=True,则延展输出图像,以能包含旋转后的全部图像.
如果 expand=False 或被忽略,则保持输出图像与输入图像的尺寸一致.
expand 假设旋转是以中心进行旋转,且没有平移.
def rotate(img, angle, resample=False, expand=False, center=None):
 """
 Args:
  img (PIL Image): PIL Image to be rotated.
  angle (float or int): In degrees degrees counter clockwise order.
  resample (``PIL.Image.NEAREST`` or ``PIL.Image.BILINEAR`` or
     ``PIL.Image.BICUBIC``, optional):
  expand (bool, optional): Optional expansion flag.
  center (2-tuple, optional): Optional center of rotation.
   Origin is the upper left corner.
   Default is the center of the image.
 """

 if not _is_pil_image(img):
  raise TypeError('img should be PIL Image. Got {}'.format(type(img)))

 return img.rotate(angle, resample, expand, center)
# example:
img_rotate = rotate(img, 60)

# vis
ax1 = plt.subplot(1, 2, 1)
ax1.imshow(img)
ax1.axis("off")
ax1.set_title("orig img")
ax2 = plt.subplot(1, 2, 2)
ax2.imshow(img_rotate)
ax2.axis("off")
ax2.set_title("rotate img")
plt.show()
2.20 affine(img, angle, translate, scale, shear, resample=0, fillcolor=None)
保持图像中心不变,进行仿射变换.
def _get_inverse_affine_matrix(center, angle, translate, scale, shear):
 # Helper method to compute inverse matrix for affine transformation

 # As it is explained in PIL.Image.rotate
 # We need compute INVERSE of affine transformation matrix: M = T * C * RSS * C^-1
 # where T is translation matrix: [1, 0, tx | 0, 1, ty | 0, 0, 1]
 #  C is translation matrix to keep center: [1, 0, cx | 0, 1, cy | 0, 0, 1]
 #  RSS is rotation with scale and shear matrix
 #  RSS(a, scale, shear) = [ cos(a)*scale -sin(a + shear)*scale  0]
 #        [ sin(a)*scale cos(a + shear)*scale  0]
 #        [  0     0   1]
 # Thus, the inverse is M^-1 = C * RSS^-1 * C^-1 * T^-1

 angle = math.radians(angle)
 shear = math.radians(shear)
 scale = 1.0 / scale

 # Inverted rotation matrix with scale and shear
 d = math.cos(angle + shear) * math.cos(angle) + math.sin(angle + shear) * math.sin(angle)
 matrix = [
  math.cos(angle + shear), math.sin(angle + shear), 0,
  -math.sin(angle), math.cos(angle), 0
 ]
 matrix = [scale / d * m for m in matrix]

 # Apply inverse of translation and of center translation: RSS^-1 * C^-1 * T^-1
 matrix[2] += matrix[0] * (-center[0] - translate[0]) + matrix[1] * (-center[1] - translate[1])
 matrix[5] += matrix[3] * (-center[0] - translate[0]) + matrix[4] * (-center[1] - translate[1])

 # Apply center translation: C * RSS^-1 * C^-1 * T^-1
 matrix[2] += center[0]
 matrix[5] += center[1]
 return matrix

def affine(img, angle, translate, scale, shear, resample=0, fillcolor=None):
 """
 Args:
  img (PIL Image): PIL Image to be rotated.
  angle (float or int): rotation angle in degrees between -180 and 180,
        clockwise direction.
  translate (list or tuple of integers): horizontal and vertical translations
        (post-rotation translation)
  scale (float): overall scale
  shear (float): shear angle value in degrees between -180 to 180,
      clockwise direction.
  resample (``PIL.Image.NEAREST`` or ``PIL.Image.BILINEAR`` or
     ``PIL.Image.BICUBIC``, optional):
  fillcolor (int): Optional fill color for the area outside the transform in the output image. (Pillow>=5.0.0)
 """
 if not _is_pil_image(img):
  raise TypeError('img should be PIL Image. Got {}'.format(type(img)))

 assert isinstance(translate, (tuple, list)) and len(translate) == 2, \
  "Argument translate should be a list or tuple of length 2"

 assert scale > 0.0, "Argument scale should be positive"

 output_size = img.size
 center = (img.size[0] * 0.5 + 0.5, img.size[1] * 0.5 + 0.5)
 matrix = _get_inverse_affine_matrix(center, angle, translate, scale, shear)
 kwargs = {"fillcolor": fillcolor} if PILLOW_VERSION[0] == '5' else {}
 return img.transform(output_size, Image.AFFINE, matrix, resample, **kwargs)
2.21 to_grayscale(img, num_output_channels=1)
将图像转换为灰度图.
def to_grayscale(img, num_output_channels=1):
 """
 Args:
  img (PIL Image): Image to be converted to grayscale.

 Returns:
  PIL Image: Grayscale version of the image.
   if num_output_channels = 1 :
    returned image is single channel
   if num_output_channels = 3 :
    returned image is 3 channel with r = g = b
 """
 if not _is_pil_image(img):
  raise TypeError('img should be PIL Image. Got {}'.format(type(img)))

 if num_output_channels == 1:
  img = img.convert('L')
 elif num_output_channels == 3:
  img = img.convert('L')
  np_img = np.array(img, dtype=np.uint8)
  np_img = np.dstack([np_img, np_img, np_img])
  img = Image.fromarray(np_img, 'RGB')
 else:
  raise ValueError('num_output_channels should be either 1 or 3')

 return img

参考链接
https://www.aiuai.cn/aifarm759.html
到此这篇关于Pytorch 图像变换函数集合小结的文章就介绍到这了,更多相关Pytorch 图像变换函数内容请搜索我们以前的文章或继续浏览下面的相关文章希望大家以后多多支持我们!
相关推荐
-
pytorch 彩色图像转灰度图像实例
pytorch 库 pytorch 本身具有载入cifar10等数据集的函数,但是载入的是3*200*200的张量,当碰到要使用灰度图像时,可以使用他本身的函数进行修改,以较快速的完成彩色图像转灰度图像 pytorch函数 dataset = dset.CIFAR10(root='../train/data', download=True,transform=transforms.Compose([ transforms.Scale(200), transforms.ToTensor(), tr
-
python、PyTorch图像读取与numpy转换实例
Tensor转为numpy np.array(Tensor) numpy转换为Tensor torch.Tensor(numpy.darray) PIL.Image.Image转换成numpy np.array(PIL.Image.Image) numpy 转换成PIL.Image.Image Image.fromarray(numpy.ndarray) 首先需要保证numpy.ndarray 转换成np.uint8型 numpy.astype(np.uint8),像素值[0,255]. 同时灰
-
pytorch 图像中的数据预处理和批标准化实例
目前数据预处理最常见的方法就是中心化和标准化. 中心化相当于修正数据的中心位置,实现方法非常简单,就是在每个特征维度上减去对应的均值,最后得到 0 均值的特征. 标准化也非常简单,在数据变成 0 均值之后,为了使得不同的特征维度有着相同的规模,可以除以标准差近似为一个标准正态分布,也可以依据最大值和最小值将其转化为 -1 ~ 1 之间 批标准化:BN 在数据预处理的时候,我们尽量输入特征不相关且满足一个标准的正态分布,这样模型的表现一般也较好.但是对于很深的网路结构,网路的非线性层会使得输出的结
-
pytorch加载自己的图像数据集实例
之前学习深度学习算法,都是使用网上现成的数据集,而且都有相应的代码.到了自己开始写论文做实验,用到自己的图像数据集的时候,才发现无从下手 ,相信很多新手都会遇到这样的问题. 参考文章https://www.jb51.net/article/177613.htm 下面代码实现了从文件夹内读取所有图片,进行归一化和标准化操作并将图片转化为tensor.最后读取第一张图片并显示. # 数据处理 import os import torch from torch.utils import data fr
-
Pytorch 使用CNN图像分类的实现
需求 在4*4的图片中,比较外围黑色像素点和内圈黑色像素点个数的大小将图片分类 如上图图片外围黑色像素点5个大于内圈黑色像素点1个分为0类反之1类 想法 通过numpy.PIL构造4*4的图像数据集 构造自己的数据集类 读取数据集对数据集选取减少偏斜 cnn设计因为特征少,直接1*1卷积层 或者在4*4外围添加padding成6*6,设计2*2的卷积核得出3*3再接上全连接层 代码 import torch import torchvision import torchvision.transf
-
Pytorch中Tensor与各种图像格式的相互转化详解
前言 在pytorch中经常会遇到图像格式的转化,例如将PIL库读取出来的图片转化为Tensor,亦或者将Tensor转化为numpy格式的图片.而且使用不同图像处理库读取出来的图片格式也不相同,因此,如何在pytorch中正确转化各种图片格式(PIL.numpy.Tensor)是一个在调试中比较重要的问题. 本文主要说明在pytorch中如何正确将图片格式在各种图像库读取格式以及tensor向量之间转化的问题.以下代码经过测试都可以在Pytorch-0.4.0或0.3.0版本直接使用. 对py
-
使用pytorch进行图像的顺序读取方法
产生此次实验的原因:当我使用pytorch进行神经网络的训练时,需要每次向CNN传入一组图像,并且这些图片的存放位置是在两个文件夹中: A文件夹:图片1a,图片2a,图片3a--图片1000a B文件夹:图片1b, 图片2b,图片3b--图片1000b 所以在每个循环里,我都希望能从A中取出图片Na,同时从B文件夹中取出对应的图片Nb. 测试一:通过pytorch官方文档中的dataloader搭配python中的迭代器iterator dataset = dset.ImageFolder( r
-
pytorch实现mnist数据集的图像可视化及保存
如何将pytorch中mnist数据集的图像可视化及保存 导出一些库 import torch import torchvision import torch.utils.data as Data import scipy.misc import os import matplotlib.pyplot as plt BATCH_SIZE = 50 DOWNLOAD_MNIST = True 数据集的准备 #训练集测试集的准备 train_data = torchvision.datasets.M
-
使用PyTorch训练一个图像分类器实例
如下所示: import torch import torchvision import torchvision.transforms as transforms import matplotlib.pyplot as plt import numpy as np print("torch: %s" % torch.__version__) print("tortorchvisionch: %s" % torchvision.__version__) print(&
-

Pytorch 图像变换函数集合小结
一.必要的 python 模块 PyTorch 的 Vision 模块提供了图像变换的很多函数. torchvision/transforms/functional.py from __future__ import division import torch import sys import math from PIL import Image, ImageOps, ImageEnhance, PILLOW_VERSION try: import accimage except Import
-
pytorch 图像预处理之减去均值,除以方差的实例
如下所示: #coding=gbk ''' GPU上面的环境变化太复杂,这里我直接给出在笔记本CPU上面的运行时间结果 由于方式3需要将tensor转换到GPU上面,这一过程很消耗时间,大概需要十秒,故而果断抛弃这样的做法 img (168, 300, 3) sub div in numpy,time 0.0110 sub div in torch.tensor,time 0.0070 sub div in torch.tensor with torchvision.transforms,tim
-
PowerShell 指令操作集合(小结)
PowerShell 命令 集合 操作[含义] 命令 打印工作目录[检查当前 所在位置] pwd[print working directory] 查看 计算机 在网络中的名称 ?待填充 创建目录[只能是文件夹] mkdir 新建文件夹名称[DOS 指令] 列出 目录内容 ls [list] 列出 目录内容 dir[DOS 指令] 更改目录 cd 目录 /盘符 [change document][盘符切换的格式:?待填充] 返回 上一目录 cd -[是两个 英文句号][返回home :cd ~]
-
关于pytorch相关部分矩阵变换函数的问题分析
目录 1.tensor 维度顺序变换 BCHW顺序的调整 2.矩阵乘法相关函数,矩阵乘,点乘 3.求取矩阵对角线元素,或非对角线元素 1.tensor 维度顺序变换 BCHW顺序的调整 tensor.permute(dims) 将tensor的维度换位.参数是一系列的整数,代表原来张量的维度.比如三维就有0,1,2这些dimension. import torch a = torch.rand(8,256,256,3) #---> n,h,w,c print(a.shape) b = a.per
-
JQuery选择器特辑 详细小结
这是看<锋利的jquery>时,整理出来的一些东西,很多方法,需要大家亲自实践一下,才会理解得更加深刻,切莫眼高手低哦-- Jquery选择器分类:基本选择器,层次选择器,过滤选择器,表单选择器 一.基本选择器:jquery中最常用的选择器,也是最简单的选择器.通过元素id.class和标签名等来查找DOM元素. 表-基本选择器 选择器 描述 返回 示例 #id 根据给定的id匹配一个元素 单个元素 $("#test")选取id为test的元素 .class 根据给定的类名
-
C++函数pyrUp和pyrDown来实现图像金字塔功能
目标 本文档尝试解答如下问题: 如何使用OpenCV函数 pyrUp 和 pyrDown 对图像进行向上和向下采样. 原理 Note 以下内容来自于Bradski和Kaehler的大作: Learning OpenCV . 当我们需要将图像转换到另一个尺寸的时候, 有两种可能: 放大 图像 或者 缩小 图像. 尽管OpenCV 几何变换 部分提供了一个真正意义上的图像缩放函数(resize, 在以后的教程中会学到),不过在本篇我们首先学习一下使用 图像金字塔 来做图像缩放, 图像金字塔是视觉运用
-
PyTorch的Debug指南
一.ipdb 介绍 很多初学 python 的同学会使用 print 或 log 调试程序,但是这只在小规模的程序下调试很方便,更好的调试应该是在一边运行的时候一边检查里面的变量和方法. 感兴趣的可以去了解 pycharm 的 debug 模式,功能也很强大,能够满足一般的需求,这里不多做赘述,我们这里介绍一个更适用于 pytorch 的一个灵活的 pdb 交互式调试工具. Pdb 是一个交互式的调试工具,集成与 Python 标准库中,它能让你根据需求跳转到任意的 Python 代码断点.查看
-
JavaScript 学习笔记(十一)
document对象 下表列出了BOM的document对象的一些通用属性: 属 性 说 明 alinkColor 激活的链接的颜色,如<body alink="color">定义的* bgColor 页面的背景颜色,如<body bgcolor="color">定义的* fgColor 页面的文本颜色,如<body text="color">定义的* lastModified 最后修改页面的日期,