vue3使用vue-count-to组件的实现
项目场景:
数据可视化大屏开发的过程中,需要实现一种滚动数字的效果,在使用vue2时,使用vue-count-to完全没有问题,功能也比较完善(滚动时长,开始值,结束值,前缀,后缀,千分隔符,小数分隔符等等),但是在vue3中使用会出现问题。
<template>
 <div id="nav">
 <router-link to="/">Home</router-link> |
 <router-link to="/about">About</router-link>
 </div>
 <count-to :startVal="0" :endVal="2045" :duration="4000"></count-to>
 <router-view/>
</template>
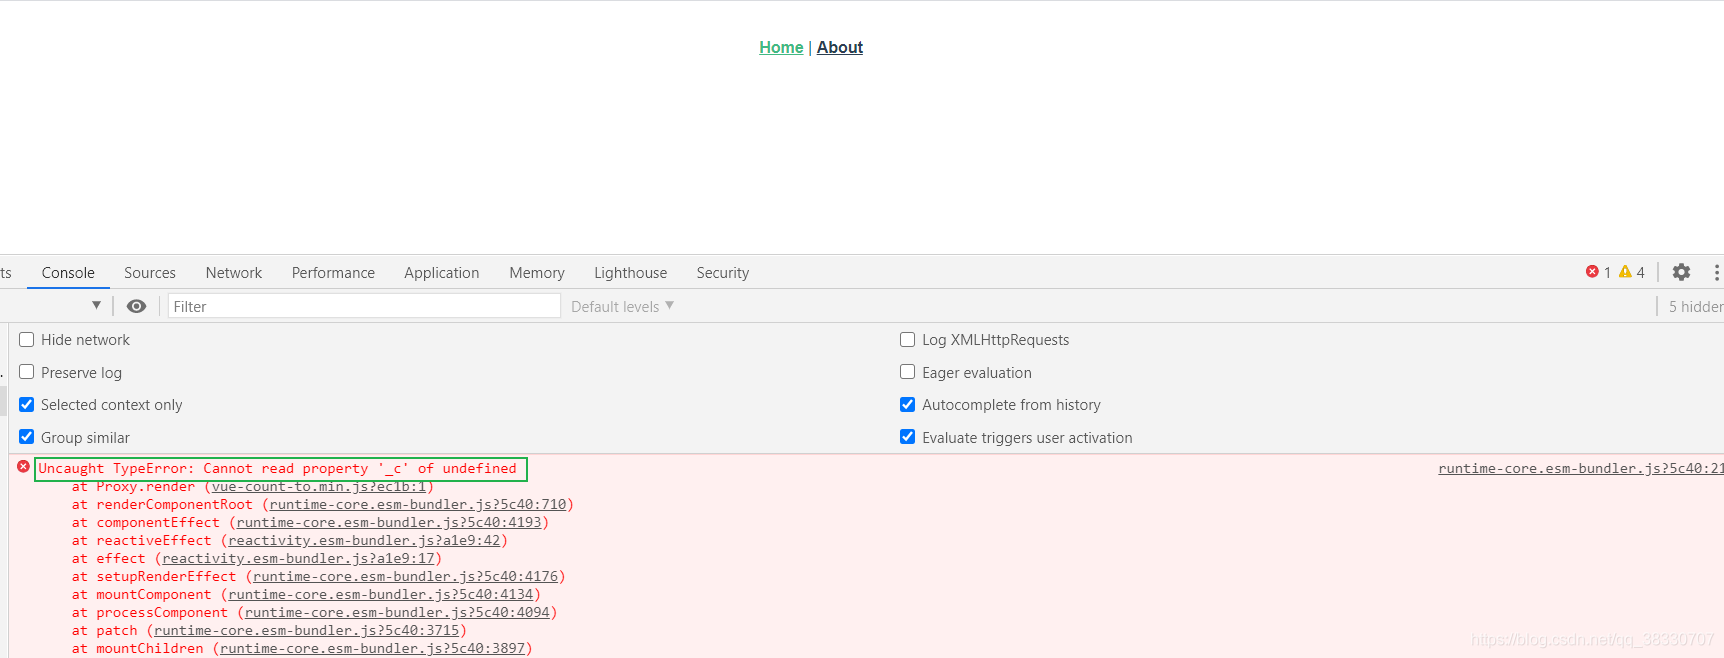
展示的效果

问题描述:
出现的错误时 == Cannot read property ‘_c' of undefined== 这是一个_c的属性没有找到,具体的情况也不是很清楚。在vue-count-to打包后的源码中可以大致看出来,这是在render函数中出现的错误。但是还是没法下手。

解决方案:
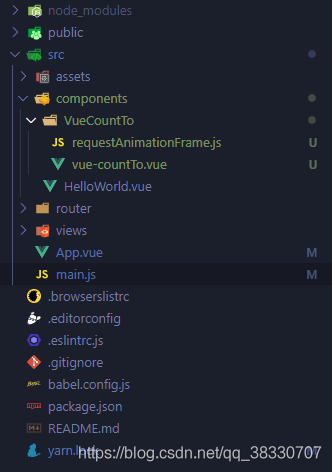
采用的方法是直接复制node_modules下vue-count-to的源文件(src下),到自己项目的components下。如图

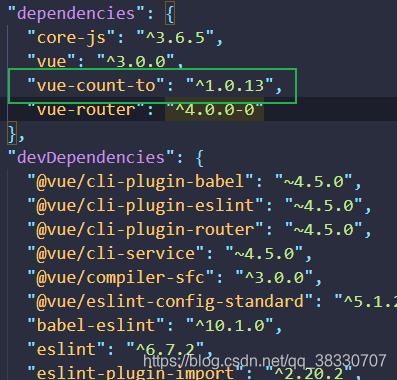
然后根据eslint的检查,修改代码,直到不报错,且记删除package.json下刚刚引入的vue-count-to的依赖。如图

最后重启项目。
vue-count-to源码
let lastTime = 0
const prefixes = 'webkit moz ms o'.split(' ') // 各浏览器前缀

let requestAnimationFrame
let cancelAnimationFrame

const isServer = typeof window === 'undefined'
if (isServer) {
 requestAnimationFrame = function () {
 }
 cancelAnimationFrame = function () {
 }
} else {
 requestAnimationFrame = window.requestAnimationFrame
 cancelAnimationFrame = window.cancelAnimationFrame
 let prefix
 // 通过遍历各浏览器前缀,来得到requestAnimationFrame和cancelAnimationFrame在当前浏览器的实现形式
 for (let i = 0; i < prefixes.length; i++) {
 if (requestAnimationFrame && cancelAnimationFrame) { break }
 prefix = prefixes[i]
 requestAnimationFrame = requestAnimationFrame || window[prefix + 'RequestAnimationFrame']
 cancelAnimationFrame = cancelAnimationFrame || window[prefix + 'CancelAnimationFrame'] || window[prefix + 'CancelRequestAnimationFrame']
 }

 // 如果当前浏览器不支持requestAnimationFrame和cancelAnimationFrame,则会退到setTimeout
 if (!requestAnimationFrame || !cancelAnimationFrame) {
 requestAnimationFrame = function (callback) {
 const currTime = new Date().getTime()
 // 为了使setTimteout的尽可能的接近每秒60帧的效果
 const timeToCall = Math.max(0, 16 - (currTime - lastTime))
 const id = window.setTimeout(() => {
 const time = currTime + timeToCall
 callback(time)
 }, timeToCall)
 lastTime = currTime + timeToCall
 return id
 }

 cancelAnimationFrame = function (id) {
 window.clearTimeout(id)
 }
 }
}

export { requestAnimationFrame, cancelAnimationFrame }
<template>
 <span>
 {{displayValue}}
 </span>
</template>
<script>
import { requestAnimationFrame, cancelAnimationFrame } from './requestAnimationFrame.js'
export default {
 props: {
 startVal: {
 type: Number,
 required: false,
 default: 0
 },
 endVal: {
 type: Number,
 required: false,
 default: 2017
 },
 duration: {
 type: Number,
 required: false,
 default: 3000
 },
 autoplay: {
 type: Boolean,
 required: false,
 default: true
 },
 decimals: {
 type: Number,
 required: false,
 default: 0,
 validator (value) {
 return value >= 0
 }
 },
 decimal: {
 type: String,
 required: false,
 default: '.'
 },
 separator: {
 type: String,
 required: false,
 default: ','
 },
 prefix: {
 type: String,
 required: false,
 default: ''
 },
 suffix: {
 type: String,
 required: false,
 default: ''
 },
 useEasing: {
 type: Boolean,
 required: false,
 default: true
 },
 easingFn: {
 type: Function,
 default (t, b, c, d) {
 return c * (-Math.pow(2, -10 * t / d) + 1) * 1024 / 1023 + b
 }
 }
 },
 data () {
 return {
 localStartVal: this.startVal,
 displayValue: this.formatNumber(this.startVal),
 printVal: null,
 paused: false,
 localDuration: this.duration,
 startTime: null,
 timestamp: null,
 remaining: null,
 rAF: null
 }
 },
 computed: {
 countDown () {
 return this.startVal > this.endVal
 }
 },
 watch: {
 startVal () {
 if (this.autoplay) {
 this.start()
 }
 },
 endVal () {
 if (this.autoplay) {
 this.start()
 }
 }
 },
 mounted () {
 if (this.autoplay) {
 this.start()
 }
 this.$emit('mountedCallback')
 },
 methods: {
 start () {
 this.localStartVal = this.startVal
 this.startTime = null
 this.localDuration = this.duration
 this.paused = false
 this.rAF = requestAnimationFrame(this.count)
 },
 pauseResume () {
 if (this.paused) {
 this.resume()
 this.paused = false
 } else {
 this.pause()
 this.paused = true
 }
 },
 pause () {
 cancelAnimationFrame(this.rAF)
 },
 resume () {
 this.startTime = null
 this.localDuration = +this.remaining
 this.localStartVal = +this.printVal
 requestAnimationFrame(this.count)
 },
 reset () {
 this.startTime = null
 cancelAnimationFrame(this.rAF)
 this.displayValue = this.formatNumber(this.startVal)
 },
 count (timestamp) {
 if (!this.startTime) this.startTime = timestamp
 this.timestamp = timestamp
 const progress = timestamp - this.startTime
 this.remaining = this.localDuration - progress

 if (this.useEasing) {
 if (this.countDown) {
 this.printVal = this.localStartVal - this.easingFn(progress, 0, this.localStartVal - this.endVal, this.localDuration)
 } else {
 this.printVal = this.easingFn(progress, this.localStartVal, this.endVal - this.localStartVal, this.localDuration)
 }
 } else {
 if (this.countDown) {
 this.printVal = this.localStartVal - ((this.localStartVal - this.endVal) * (progress / this.localDuration))
 } else {
 this.printVal = this.localStartVal + (this.endVal - this.localStartVal) * (progress / this.localDuration)
 }
 }
 if (this.countDown) {
 this.printVal = this.printVal < this.endVal ? this.endVal : this.printVal
 } else {
 this.printVal = this.printVal > this.endVal ? this.endVal : this.printVal
 }

 this.displayValue = this.formatNumber(this.printVal)
 if (progress < this.localDuration) {
 this.rAF = requestAnimationFrame(this.count)
 } else {
 this.$emit('callback')
 }
 },
 isNumber (val) {
 return !isNaN(parseFloat(val))
 },
 formatNumber (num) {
 num = num.toFixed(this.decimals)
 num += ''
 const x = num.split('.')
 let x1 = x[0]
 const x2 = x.length > 1 ? this.decimal + x[1] : ''
 const rgx = /(\d+)(\d{3})/
 if (this.separator && !this.isNumber(this.separator)) {
 while (rgx.test(x1)) {
 x1 = x1.replace(rgx, '$1' + this.separator + '$2')
 }
 }
 return this.prefix + x1 + x2 + this.suffix
 }
 },
 unmounted () {
 cancelAnimationFrame(this.rAF)
 }
}
</script>
到此这篇关于vue3使用vue-count-to组件的文章就介绍到这了,更多相关vue3 vue-count-to组件内容请搜索我们以前的文章或继续浏览下面的相关文章希望大家以后多多支持我们!
赞 (0)

