SpringBoot Application注解原理及代码详解

1、SpringBoot 启动main()

@SpringBootApplication
public class TomcatdebugApplication {

  public static void main(String[] args) {
    SpringApplication.run(TomcatdebugApplication.class, args);
  }

}

1.1 @SpringBootApplication 注解,其实主要是@ComponentScan,@EnableAutoConfiguration,@SpringBootConfiguration三个注解
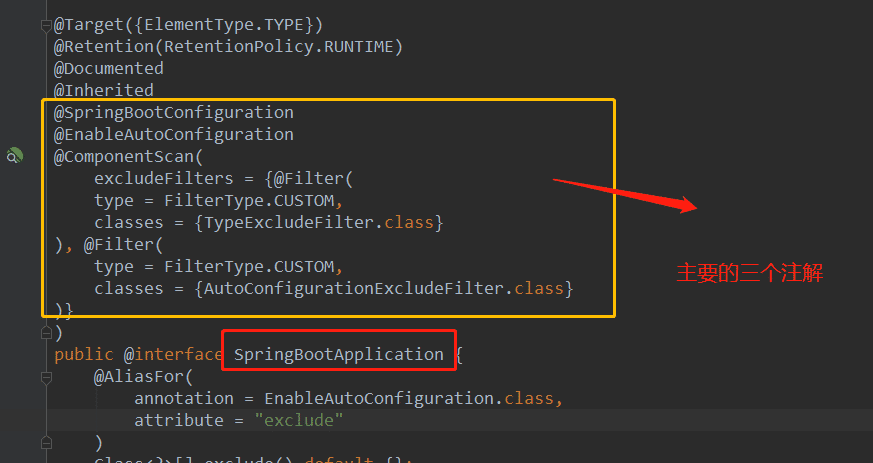
@ComponentScan 注解:

spring里有四大注解:@Service,@Repository,@Component,@Controller用来定义一个bean.@ComponentScan注解就是用来自动扫描被这些注解标识的类,最终生成ioc容器里的bean.

可以通过设置@ComponentScan basePackages,includeFilters,excludeFilters属性来动态确定自动扫描范围,类型已经不扫描的类型.

 默认情况下:它扫描所有类型,并且扫描范围是@ComponentScan注解所在配置类包及子包的类

@SpringBootConfiguration 注解:

@SpringBootConfiguration继承自@Configuration,二者功能也一致,标注当前类是配置类,
并会将当前类内声明的一个或多个以@Bean注解标记的方法的实例纳入到spring容器中,并且实例名就是方法名。

demo 说明:

(1) 注入spring ioc bean

@SpringBootConfiguration
public class Config {
  @Bean
  public Map createMap(){
    Map map = new HashMap();
    map.put("username","gxz");
    map.put("age",27);
    return map;
  }
}

(2)调用:

public static void main( String[] args )
  {
    //方式1 获取context
    ConfigurableApplicationContext context = SpringApplication.run(App.class, args);
    context.getBean(Runnable.class).run();
    context.getBean("createMap");  //注意这里直接获取到这个方法bean
    int age = (int) map.get("age");
    System.out.println("age=="+age);
//方式2. 使用@Autowired注解,应用bean
// @Autowired// Map createMap
}

@EnableAutoConfiguration 注解

@EnableAutoConfiguration作用:从classpath中搜索所有的META-INF/spring.factories配置文件,然后将其中key为org.springframework.boot.autoconfigure.EnableAutoConfiguration的value加载到spring容器中。
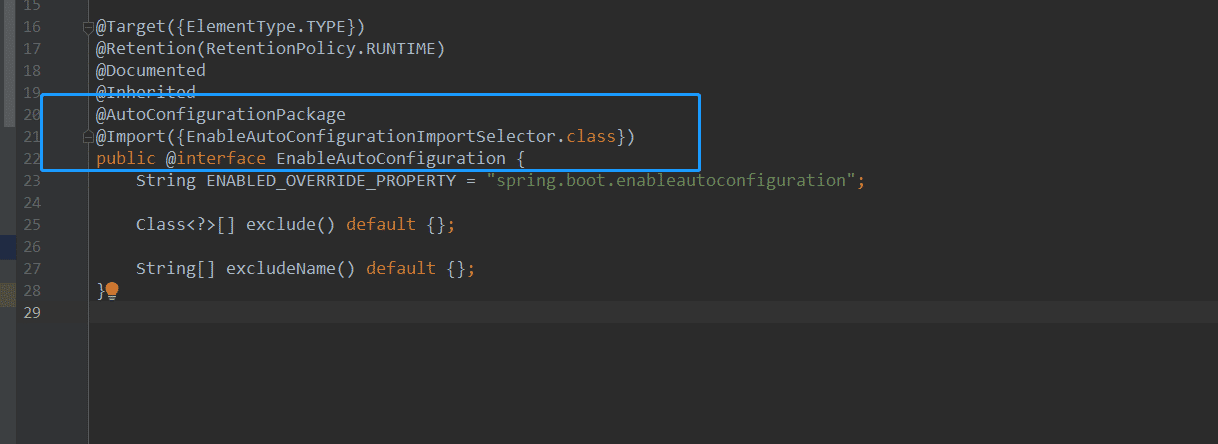
上图分析源码可知: @EnableAutoConfiguration = @Import + @AutoConfigurationPackage

@AutoConfigurationPackage:主要作用是自动配置包

@Import: Spring底层注解@Import,给容器中导入一个组件;导入的组件由AutoConfigurationPackages.Registrar.class将主配置类(@SpringBootApplication标注的类)的所在包以及下面所有子包里面的所有组件扫描到Spring容器。

AutoConfigurationImportSelector的作用是导入哪些组件的选择器。将所有需要导入的组件以全类名的方式返回,这些组件就会被添加到容器中;也会给容器导入非常多的自动配置类(xxxAutoConfiguration),就是给容器中导入这个场景需要的所有组件,并配置好这些组件。

  有了自动配置类,免去了我们手动编写配置注入功能组件等的工作

具体工作流程图:
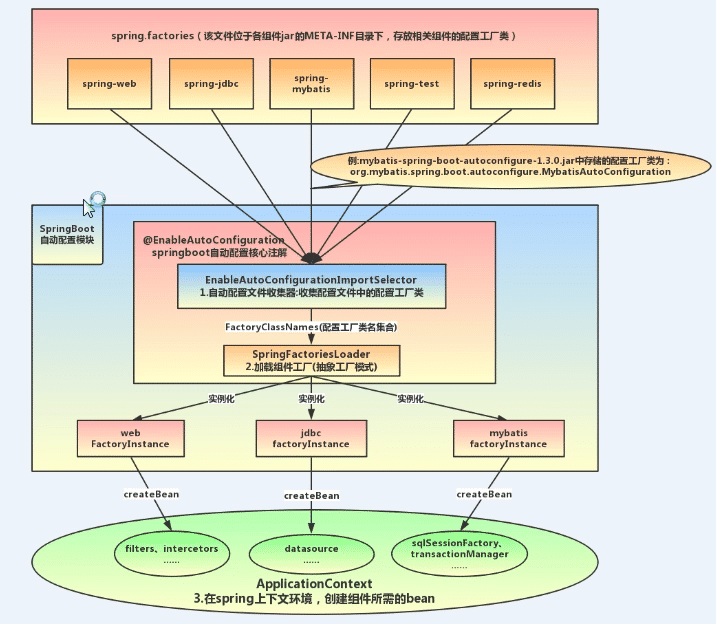
@EnableAutoConfiguration加载过程

 自动配置主要由AutoConfigurationImportSelector实现的,我们主要从这个类开始讲起。AutoConfigurationImportSelector是@EnableAutoConfiguration“@Import”的DeferredImportSelector实现类,由于DeferredImportSelector作为ImportSelector的子接口,所以组件自动配置逻辑均在selectImports(AnnotationMetadata)方法中实现

源码分析:  

AutoConfigurationImportSelector.java

根据以上代码分析自动配置加载过程主要分为以下几个步骤:

1.判断是否开启自动配置

2.从META-INF/spring-autoconfigure-metadata.properties文件中载入属性配置

3.获取所有的配置列表

public String[] selectImports(AnnotationMetadata annotationMetadata) {
    //1.是否开启自动配置,默认开启
  if (!this.isEnabled(annotationMetadata)) {
    return NO_IMPORTS;
  } else {
    try {
        //2.从META-INF/spring-autoconfigure-metadata.properties文件中载入属性配置(有一些有默认值),获取注解信息

      AutoConfigurationMetadata autoConfigurationMetadata = AutoConfigurationMetadataLoader.loadMetadata(this.beanClassLoader);
       
       //3.获取所有的配置列表
      AnnotationAttributes attributes = this.getAttributes(annotationMetadata);
      List<String> configurations = this.getCandidateConfigurations(annotationMetadata, attributes);
      configurations = this.removeDuplicates(configurations);
      configurations = this.sort(configurations, autoConfigurationMetadata);
      Set<String> exclusions = this.getExclusions(annotationMetadata, attributes);
      this.checkExcludedClasses(configurations, exclusions);
      configurations.removeAll(exclusions);
      configurations = this.filter(configurations, autoConfigurationMetadata);
      this.fireAutoConfigurationImportEvents(configurations, exclusions);
      return (String[])configurations.toArray(new String[configurations.size()]);
    } catch (IOException var6) {
      throw new IllegalStateException(var6);
    }
  }
}

1.是否开启自动配置,默认开启

 protected boolean isEnabled(AnnotationMetadata metadata) {
    return true;
  }

2.从META-INF/spring-autoconfigure-metadata.properties文件中载入属性配置

protected static final String PATH = "META-INF/spring-autoconfigure-metadata.properties";

  private AutoConfigurationMetadataLoader() {
  }

  public static AutoConfigurationMetadata loadMetadata(ClassLoader classLoader) {
    return loadMetadata(classLoader, "META-INF/spring-autoconfigure-metadata.properties");
  }
  static AutoConfigurationMetadata loadMetadata(ClassLoader classLoader, String path) {
    try {
      Enumeration<URL> urls = classLoader != null ? classLoader.getResources(path) : ClassLoader.getSystemResources(path);
      Properties properties = new Properties();
      while(urls.hasMoreElements()) {
        properties.putAll(PropertiesLoaderUtils.loadProperties(new UrlResource((URL)urls.nextElement())));
      }
      return loadMetadata(properties);
    } catch (IOException var4) {
      throw new IllegalArgumentException("Unable to load @ConditionalOnClass location [" + path + "]", var4);
    }
  }

3、获取所有的配置列表

protected AnnotationAttributes getAttributes(AnnotationMetadata metadata) {
    String name = this.getAnnotationClass().getName();
    AnnotationAttributes attributes = AnnotationAttributes.fromMap(metadata.getAnnotationAttributes(name, true));
    Assert.notNull(attributes, "No auto-configuration attributes found. Is " + metadata.getClassName() + " annotated with " + ClassUtils.getShortName(name) + "?");
    return attributes;
  }

总结:

springboot底层实现自动配置的步骤:

1.springboot应用启动

2.@SpringBootApplication起作用

3.@EnableAutoConfiguration

4.@AutoConfigurationPackage:这个组合注解主要是@Import(AutoConfigurationPackages.Registrar.class),它通过将Registrar类导入到容器中,而Registrar类作用是扫描主配置类同级目录以及子包,并将相应的组件导入到springboot创建管理的容器中

5.@Import(AutoConfigurationImportSelector.class):它通过将AutoConfigurationImportSelector类导入到容器中,AutoConfigurationImportSelector类作用是通过selectImports方法实现将配置类信息交给SpringFactory加载器进行一系列的容器创建过程,具体实现可查看上面的源码

以上就是本文的全部内容,希望对大家的学习有所帮助,也希望大家多多支持我们。

(0)

相关推荐

  • Spring Boot 中application.yml与bootstrap.yml的区别

    yml与properties 其实yml和properties文件是一样的原理,且一个项目上要么yml或者properties,二选一的存在. 推荐使用yml,更简洁. bootstrap与application 1.加载顺序 这里主要是说明application和bootstrap的加载顺序. •bootstrap.yml(bootstrap.properties)先加载 •application.yml(application.properties)后加载 bootstrap.yml 用于应

  • SpringBoot获取ApplicationContext的3种方式

    ApplicationContext是什么? 简单来说就是Spring中的容器,可以用来获取容器中的各种bean组件,注册监听事件,加载资源文件等功能. Application Context获取的几种方式 1 直接使用Autowired注入 @Component public class Book1 { @Autowired private ApplicationContext applicationContext; public void show (){ System.out.printl

  • SpringBoot项目application.yml文件数据库配置密码加密的方法

    在Spring boot开发中,需要在application.yml文件里配置数据库的连接信息,或者在启动时传入数据库密码,如果不加密,传明文,数据库就直接暴露了,相当于"裸奔"了,因此需要进行加密处理才行. 使用@SpringBootApplication注解启动的项目,只需增加maven依赖 我们对信息加解密是使用这个jar包的: 编写加解密测试类: package cn.linjk.ehome; import org.jasypt.encryption.pbe.StandardP

  • 详解spring boot 使用application.properties 进行外部配置

    application.properties大家都不陌生,我们在开发的时候,经常使用它来配置一些可以手动修改而且不用编译的变量,这样的作用在于,打成war包或者jar用于生产环境时,我们可以手动修改环境变量而不用再重新编译. spring boo默认已经配置了很多环境变量,例如,tomcat的默认端口是8080,项目的contextpath是"/"等等,可以在这里看spring boot默认的配置信息http://docs.spring.io/spring-boot/docs/curr

  • Spring Boot中配置文件application.properties使用

    一.配置文档配置项的调用 启动后在浏览器直接输入http://localhost:18080/user/test,就直接打印出配置文件中的配置内容. 二.绑定对象bean调用 有时候属性太多了,一个个绑定到属性字段上太累,官方提倡绑定一个对象的bean,这里我们建一个ConfigBean.java类,顶部需要使用注解@ConfigurationProperties(prefix = "com")来指明使用哪个 @ConfigurationProperties(prefix = &quo

  • Springboot为什么加载不上application.yml的配置文件

    调试源代码,配置文件加载代码位置是: org.springframework.boot.context.config.ConfigFileApplicationListener public void postProcessEnvironment(ConfigurableEnvironment environment,SpringApplication application)方法 这个方法执行完,enviroment->propertySources从4个,变成6个,最终加载完成 先读取pro

  • springboot如何读取配置文件(application.yml)中的属性值

    在spring boot中,简单几步,读取配置文件(application.yml)中各种不同类型的属性值: 1.引入依赖: <!-- 支持 @ConfigurationProperties 注解 --> <dependency> <groupId>org.springframework.boot</groupId> <artifactId>spring-boot-configuration-processor</artifactId>

  • 详解SpringBoot 发布ApplicationEventPublisher和监听ApplicationEvent事件

    资料地址 Spring @Aync 实现方法 自定义需要发布的事件类,需要继承ApplicationEvent类或PayloadApplicationEvent<T>(该类也仅仅是对ApplicationEvent的一层封装) 使用@EventListener来监听事件 使用ApplicationEventPublisher来发布自定义事件(@Autowired注入即可) /** * 自定义保存事件 * @author peter * 2019/1/27 14:59 */ public cla

  • SpringBoot Application注解原理及代码详解

    1.SpringBoot 启动main() @SpringBootApplication public class TomcatdebugApplication { public static void main(String[] args) { SpringApplication.run(TomcatdebugApplication.class, args); } } 1.1 @SpringBootApplication 注解,其实主要是@ComponentScan,@EnableAutoCo

  • SpringBoot Starter依赖原理与实例详解

    目录 1 Starter 2 了解 spring.factories机制 2.1 不同包路径下的依赖注入 2.2 spring.factories 机制 3 spring.factories 机制的实现源码分析 4 程序运行入口run() 1 Starter 在开发 SpringBoot 项目的时候,我们常常通过 Maven 导入自动各种依赖,其中很多依赖都是以 xxx-starter 命名的. 像这种 starter 依赖是怎么工作的呢? 2 了解 spring.factories机制 导入一

  • spring boot application properties配置实例代码详解

    废话不多说了,直接给大家贴代码了,具体代码如下所示: # =================================================================== # COMMON SPRING BOOT PROPERTIES # # This sample file is provided as a guideline. Do NOT copy it in its # entirety to your own application. ^^^ # ========

  • springboot ehcache 配置使用方法代码详解

    EhCache是一个比较成熟的Java缓存框架,最早从hibernate发展而来, 是进程中的缓存系统,它提供了用内存,磁盘文件存储,以及分布式存储方式等多种灵活的cache管理方案,快速简单. Springboot对ehcache的使用非常支持,所以在Springboot中只需做些配置就可使用,且使用方式也简易. 下面通过本文给大家介绍springboot ehcache 配置使用方法,具体内容如下所示: 1. pom 引入依赖 <!-- Ehcache --> <dependency

  • SpringBoot中注解@AliasFor的使用详解

    目录 简介 用法1:注解的属性互为别名 简介 实例 用法2.继承父注解的属性,不重写属性名 简介 代码 用法3:继承父注解的属性,并重写属性名 简介 代码 简介 本文用示例介绍@AliasFor(别名)注解的用法. 用法1:注解的属性互为别名 简介 它可以注解到自定义注解的两个属性上,表示这两个互为别名,也就是说这两个属性其实同一个含义. 其中一个属性名必须是"value" 无论指明设置哪个属性名设置属性值,另一个属性名也是同样属性值,也可以缺省属性名. 若两个都指明属性值,要求值必须

  • SpringBoot Jpa 自定义查询实现代码详解

    这篇文章主要介绍了SpringBoot Jpa 自定义查询实现代码详解,文中通过示例代码介绍的非常详细,对大家的学习或者工作具有一定的参考学习价值,需要的朋友可以参考下 持久层Domain public interface BaomingDao extends JpaRepository<BaomingBean,Integer> { @Query(value = "select distinct t.actid from BaomingBean t where t.belongs=?

  • Spring的组合注解和元注解原理与用法详解

    本文实例讲述了Spring的组合注解和元注解原理与用法.分享给大家供大家参考,具体如下: 一 点睛 从Spring 2开始,为了相应JDK 1.5推出的注解功能,Spring开始加入注解来替代xml配置.Spring的注解主要用来配置和注入Bean,以及AOP相关配置.随着注解的大量使用,尤其相同的多个注解用到各个类或方法中,会相当繁琐.出现了所谓的样本代码,这是Spring设计要消除的代码. 元注解:可以注解到别的注解上去的注解. 组合注解:被注解的注解,组合注解具备其上的元注解的功能. Sp

  • SpringBoot日志注解与缓存优化详解

    目录 日志注解: 缓存的优化: 总结 日志注解: 关于SpringBoot中的日志处理,在之前的文章中页写过: 点击进入 这次通过注解+Aop的方式来实现日志的输出: 首先需要定义一个注解类:  @Target(ElementType.METHOD)  @Retention(RetentionPolicy.RUNTIME)  @Documented  public @interface LogAnnotation {      String module() default "";  

  • PHP快速排序算法实现的原理及代码详解

    算法原理 下列动图来自五分钟学算法,演示了快速排序算法的原理和步骤. 步骤: 从数组中选个基准值 将数组中大于基准值的放同一边.小于基准值的放另一边,基准值位于中间位置 递归的对分列两边的数组再排序 代码实现 function quickSort($arr) { $len = count($arr); if ($len <= 1) { return $arr; } $v = $arr[0]; $low = $up = array(); for ($i = 1; $i < $len; ++$i)

  • springboot扫描自定义的servlet和filter代码详解

    这几天使用spring boot编写公司一个应用,在编写了一个filter,用于指定编码的filter,如下: /** * Created by xiaxuan on 16/11/1. */ @WebFilter(urlPatterns = "/*",filterName="CharacterEncodeFilter", initParams={ @WebInitParam(name="encoding",value="UTF-8&qu

随机推荐