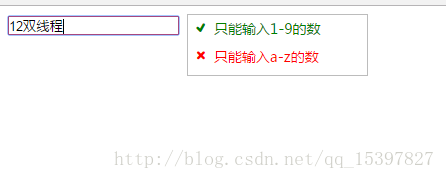
使用JS组件实现带ToolTip验证框的实例代码
本组件依赖JQuery
本人测试的JQuery 是1.8,
兼容IE8,IE9,谷歌,火狐等。
//验证输入框
function ValidateCompent(input){
  var _input = $(input).clone(true);
  _input.css("height",$(input).css("height"));
  _input.css("width", $(input).css("width"));
  var border =_input.css("border");
  this.successIconClass = "icon-tick";//验证通过时的样式
  this.validate = false;
  this.faileIconClass = "icon-times";//验证失败时的样式
  var $validateRoot = $('<div class="validate-v1-container"><div class="validate-v1-tooltip"></div></div>');
  var $tooltip = $validateRoot.children(".validate-v1-tooltip");
  var $input = _input;
  if($input != undefined){
    var maxWidth = $input.css("width");
    var maxHeight = $input.css("height");
    $validateRoot.css("display","inline");
    $validateRoot.css("position","relative");
    $validateRoot.css("width",maxWidth);
    $validateRoot.css("height",maxHeight);
    $tooltip.css("width",maxWidth);
    $tooltip.css("padding","0px 5px");
    $tooltip.css("position","absolute");
    $tooltip.css("top","0px");
    $tooltip.css("z-index","999999");
    $tooltip.css("background-color","white");
    $tooltip.css("border","solid 1px rgb(188,188,188)");
    $tooltip.css("left",parseInt(maxWidth) + 10+"px");
    $tooltip.hide();
    var validateOption = $input.attr("data-vali-option");
    if(validateOption != undefined){
      validateOption = JSON.parse(validateOption);
      var that = this;
      var regvali = new Array();
      $tooltip.hide();
      if(validateOption.length == 0){
        return;
      }
      for(var i = 0; i <validateOption.length;i++){
        var message = validateOption[i].message;
        var pattern = validateOption[i].pattern;
        var reg = new RegExp(pattern);
        var messageView = new ValidateMessage(message,that.faileIconClass);
        regvali.push({"reg":reg,"view":messageView});
        $tooltip.append(messageView.dom);
      }
      $tooltip.css("height",(parseInt(maxHeight) +15) * validateOption.length );
      $input.on("textchange focus",function(e){
        $tooltip.show();
        for(var i = 0 ; i < regvali.length; i++){
          if(regvali[i].reg.test($input.val())){
            regvali[i].view.setIconClass(that.successIconClass);
            regvali[i].view.dom.css("color","green");
          }else{
            regvali[i].view.setIconClass(that.faileIconClass);
            regvali[i].view.dom.css("color","red");
          }
        }
      })
      $input.on("blur", function(e) {
        $tooltip.hide();
        for(var i = 0 ; i < regvali.length; i++){
          if(regvali[i].reg.test($input.val())){
            regvali[i].view.setIconClass(that.successIconClass);
            $input.css("border",border);
            that.validate = true;
          }else{
            regvali[i].view.setIconClass(that.faileIconClass);
            $input.css("border","1px solid red");
            that.validate = false;
            break;
          }
        }
      });
      $validateRoot.append($input);
    }else{
      return;
    }
  }
  this.dom = function(){
    return $validateRoot;
  }
  function ValidateMessage(message,iconFontClass){
    var dom = $('<div class="validate-message"><span class="vticon"></span><span class="vmessage"></span></div>');
    var $icon = dom.children(".vticon");
    var $message = dom.children(".vmessage");
    $message.css("line-height","28px");
    $message.css("padding","5px 5px");
    $message.css("padding-right","10px");
    $message.css("word-break","break-all");
    $message.css("word-wrap","break-word");
    $message.css("font-size","14px");
    $message.css("position","relative");
    $message.css("z-index","999999");
    this.setIconClass = function(iconClass){
      $icon.removeClass();
      $icon.addClass("vticon");
      $icon.addClass(iconClass);
    }
    this.getIcon = function(){
      return $icon;
    }
    this.setMessageText = function(_message){
      $message.html(_message);
    }
    this.getMessageText = function(){
      return $message;
    }
    this.setIconClass(iconFontClass);
    this.setMessageText(message);
    this.dom = dom;
  }
  $validateRoot.insertAfter($(input));
  $(input).remove();
}
以下是HTML代码
<input id="test" data-vali-option='[{"pattern":"[1-9]+","message":"只能输入1-9的数"},{"pattern":"[a-z]+","message":"只能输入a-z的数"}]' />
使用方法如下
$(function(){
  var c = new ValidateCompent("#test");
});
依赖JQuery,
另外附上JQuery textchange事件的代码,textchange代码放在JQuery之后,在使用方法之前。
/**
 * jQuery "splendid textchange" plugin
 * http://benalpert.com/2013/06/18/a-near-perfect-oninput-shim-for-ie-8-and-9.html
 *
 * (c) 2013 Ben Alpert, released under the MIT license
 */
(function($) {
var testNode = document.createElement("input");
var isInputSupported = "oninput" in testNode &&
  (!("documentMode" in document) || document.documentMode > 9);
var hasInputCapabilities = function(elem) {
  // The HTML5 spec lists many more types than `text` and `password` on
  // which the input event is triggered but none of them exist in IE 8 or
  // 9, so we don't check them here.
  // TODO: <textarea> should be supported too but IE seems to reset the
  // selection when changing textarea contents during a selectionchange
  // event so it's not listed here for now.
  return elem.nodeName === "INPUT" &&
    (elem.type === "text" || elem.type === "password");
};
var activeElement = null;
var activeElementValue = null;
var activeElementValueProp = null;
/**
 * (For old IE.) Replacement getter/setter for the `value` property that
 * gets set on the active element.
 */
var newValueProp = {
  get: function() {
    return activeElementValueProp.get.call(this);
  },
  set: function(val) {
    activeElementValue = val;
    activeElementValueProp.set.call(this, val);
  }
};
/**
 * (For old IE.) Starts tracking propertychange events on the passed-in element
 * and override the value property so that we can distinguish user events from
 * value changes in JS.
 */
var startWatching = function(target) {
  activeElement = target;
  activeElementValue = target.value;
  activeElementValueProp = Object.getOwnPropertyDescriptor(
      target.constructor.prototype, "value");
  Object.defineProperty(activeElement, "value", newValueProp);
  activeElement.attachEvent("onpropertychange", handlePropertyChange);
};
/**
 * (For old IE.) Removes the event listeners from the currently-tracked
 * element, if any exists.
 */
var stopWatching = function() {
 if (!activeElement) return;
 // delete restores the original property definition
 delete activeElement.value;
 activeElement.detachEvent("onpropertychange", handlePropertyChange);
 activeElement = null;
 activeElementValue = null;
 activeElementValueProp = null;
};
/**
 * (For old IE.) Handles a propertychange event, sending a textChange event if
 * the value of the active element has changed.
 */
var handlePropertyChange = function(nativeEvent) {
  if (nativeEvent.propertyName !== "value") return;
  var value = nativeEvent.srcElement.value;
  if (value === activeElementValue) return;
  activeElementValue = value;
  $(activeElement).trigger("textchange");
};
if (isInputSupported) {
  $(document)
    .on("input", function(e) {
      // In modern browsers (i.e., not IE 8 or 9), the input event is
      // exactly what we want so fall through here and trigger the
      // event...
      if (e.target.nodeName !== "TEXTAREA") {
        // ...unless it's a textarea, in which case we don't fire an
        // event (so that we have consistency with our old-IE shim).
        $(e.target).trigger("textchange");
      }
    });
} else {
  $(document)
    .on("focusin", function(e) {
      // In IE 8, we can capture almost all .value changes by adding a
      // propertychange handler and looking for events with propertyName
      // equal to 'value'.
      // In IE 9, propertychange fires for most input events but is buggy
      // and doesn't fire when text is deleted, but conveniently,
      // selectionchange appears to fire in all of the remaining cases so
      // we catch those and forward the event if the value has changed.
      // In either case, we don't want to call the event handler if the
      // value is changed from JS so we redefine a setter for `.value`
      // that updates our activeElementValue variable, allowing us to
      // ignore those changes.
      if (hasInputCapabilities(e.target)) {
        // stopWatching() should be a noop here but we call it just in
        // case we missed a blur event somehow.
        stopWatching();
        startWatching(e.target);
      }
    })
    .on("focusout", function() {
      stopWatching();
    })
    .on("selectionchange keyup keydown", function() {
      // On the selectionchange event, e.target is just document which
      // isn't helpful for us so just check activeElement instead.
      //
      // 90% of the time, keydown and keyup aren't necessary. IE 8 fails
      // to fire propertychange on the first input event after setting
      // `value` from a script and fires only keydown, keypress, keyup.
      // Catching keyup usually gets it and catching keydown lets us fire
      // an event for the first keystroke if user does a key repeat
      // (it'll be a little delayed: right before the second keystroke).
      // Other input methods (e.g., paste) seem to fire selectionchange
      // normally.
      if (activeElement && activeElement.value !== activeElementValue) {
        activeElementValue = activeElement.value;
        $(activeElement).trigger("textchange");
      }
    });
}
})(jQuery);
获取验证结果
$(function(){
  var c = new ValidateCompent("#test");
  $("#test").click(function(){
    console.log(c.validate);
  });
});
自定义显示方案
$(function(){
  var c = new ValidateCompent("#test");
  $("#test").click(function(){
    console.log(c.validate);
  });
  c.dom().addClass("你的样式类");
});
设置图标字体样式
$(function(){
  var c = new ValidateCompent("#test");
  $("#test").click(function(){
    console.log(c.validate);
  });
  c.successIconClass = "";//成功时的样式
  c.faileIconClass = "";//失败时的样式
});
效果图如下
分别是成功,部分成功,全部失败选中,未选中的样式效果,(勾叉是用的字体css,建议自行寻找字体替代)


总结
以上所述是小编给大家介绍的使用JS组件实现带ToolTip验证框的实例代码,希望对大家有所帮助,如果大家有任何疑问请给我留言,小编会及时回复大家的。在此也非常感谢大家对我们网站的支持!
赞 (0)

