浅谈SpringBoot集成Redis实现缓存处理(Spring AOP实现)
第一章 需求分析
计划在Team的开源项目里加入Redis实现缓存处理,因为业务功能已经实现了一部分,通过写Redis工具类,然后引用,改动量较大,而且不可以实现解耦合,所以想到了Spring框架的AOP(面向切面编程)。
开源项目:https://github.com/u014427391/jeeplatform
第二章 SpringBoot简介
Spring框架作为JavaEE框架领域的一款重要的开源框架,在企业应用开发中有着很重要的作用,同时Spring框架及其子框架很多,所以知识量很广。
SpringBoot:一款Spring框架的子框架,也可以叫微框架,是2014年推出的一款使Spring框架开发变得容易的框架。学过Spring框架的都知识,Spring框架难以避免地需要配置不少XMl,而使用SpringBoot框架的话,就可以使用注解开发,极大地简化基于Spring框架的开发。SpringBoot充分利用了JavaConfig的配置模式以及“约定优于配置”的理念,能够极大的简化基于SpringMVC的Web应用和REST服务开发。
第三章 Redis简介
3.1 Redis安装部署(Linux)
Redis安装部署的可以参考我的博客(Redis是基于C编写的,所以安装前先安装gcc编译器):http://www.jb51.net/article/79096.htm
3.2 Redis简介
Redis如今已经成为Web开发社区最火热的内存数据库之一,随着Web2.0的快速发展,再加上半结构数据比重加大,网站对高效性能的需求也越来越多。
而且大型网站一般都有几百台或者更多Redis服务器。Redis作为一款功能强大的系统,无论是存储、队列还是缓存系统,都有其用武之地。
SpringBoot框架入门的可以参考之前的文章:http://www.jb51.net/article/111197.htm
第四章 Redis缓存实现
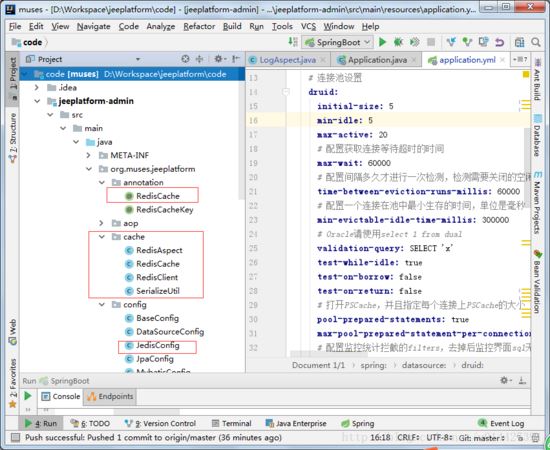
4.1下面结构图
项目结构图:

4.2 SpringBoot的yml文件配置
添加resource下面的application.yml配置,这里主要配置mysql,druid,redis
spring:
 datasource:
  # 主数据源
  shop:
   url: jdbc:mysql://127.0.0.1:3306/jeeplatform?autoReconnect=true&useUnicode=true&characterEncoding=utf8&characterSetResults=utf8&useSSL=false
   username: root
   password: root
  driver-class-name: com.mysql.jdbc.Driver
  type: com.alibaba.druid.pool.DruidDataSource

  # 连接池设置
  druid:
   initial-size: 5
   min-idle: 5
   max-active: 20
   # 配置获取连接等待超时的时间
   max-wait: 60000
   # 配置间隔多久才进行一次检测,检测需要关闭的空闲连接,单位是毫秒
   time-between-eviction-runs-millis: 60000
   # 配置一个连接在池中最小生存的时间,单位是毫秒
   min-evictable-idle-time-millis: 300000
   # Oracle请使用select 1 from dual
   validation-query: SELECT 'x'
   test-while-idle: true
   test-on-borrow: false
   test-on-return: false
   # 打开PSCache,并且指定每个连接上PSCache的大小
   pool-prepared-statements: true
   max-pool-prepared-statement-per-connection-size: 20
   # 配置监控统计拦截的filters,去掉后监控界面sql无法统计,'wall'用于防火墙
   filters: stat,wall,slf4j
   # 通过connectProperties属性来打开mergeSql功能;慢SQL记录
   connection-properties: druid.stat.mergeSql=true;druid.stat.slowSqlMillis=5000
   # 合并多个DruidDataSource的监控数据
   use-global-data-source-stat: true
 jpa:
  database: mysql
  hibernate:
   show_sql: true
   format_sql: true
   ddl-auto: none
   naming:
    physical-strategy: org.hibernate.boot.model.naming.PhysicalNamingStrategyStandardImpl
 mvc:
  view:
   prefix: /WEB-INF/jsp/
   suffix: .jsp
 #Jedis配置
 jedis :
  pool :
   host : 127.0.0.1
   port : 6379
   password : password
   timeout : 0
   config :
    maxTotal : 100
    maxIdle : 10
    maxWaitMillis : 100000
编写一个配置类启动配置JedisConfig.java:
package org.muses.jeeplatform.config;
import org.springframework.beans.factory.annotation.Autowired;
import org.springframework.beans.factory.annotation.Qualifier;
import org.springframework.beans.factory.annotation.Value;
import org.springframework.boot.autoconfigure.condition.ConditionalOnMissingBean;
import org.springframework.boot.context.properties.ConfigurationProperties;
import org.springframework.context.annotation.Bean;
import org.springframework.context.annotation.Configuration;
import redis.clients.jedis.JedisPool;
import redis.clients.jedis.JedisPoolConfig;
@Configuration
//@ConfigurationProperties(prefix = JedisConfig.JEDIS_PREFIX )
public class JedisConfig {
  //public static final String JEDIS_PREFIX = "jedis";
  @Bean(name= "jedisPool")
  @Autowired
  public JedisPool jedisPool(@Qualifier("jedisPoolConfig") JedisPoolConfig config,
                  @Value("${spring.jedis.pool.host}")String host,
                  @Value("${spring.jedis.pool.port}")int port,
                  @Value("${spring.jedis.pool.timeout}")int timeout,
                  @Value("${spring.jedis.pool.password}")String password) {
      return new JedisPool(config, host, port,timeout,password);
  }

  @Bean(name= "jedisPoolConfig")
  public JedisPoolConfig jedisPoolConfig (@Value("${spring.jedis.pool.config.maxTotal}")int maxTotal,
                        @Value("${spring.jedis.pool.config.maxIdle}")int maxIdle,
                        @Value("${spring.jedis.pool.config.maxWaitMillis}")int maxWaitMillis) {
      JedisPoolConfig config = new JedisPoolConfig();
      config.setMaxTotal(maxTotal);
      config.setMaxIdle(maxIdle);
      config.setMaxWaitMillis(maxWaitMillis);
      return config;
    }
}
4.3 元注解类编写
编写一个元注解类RedisCache.java,被改注解定义的类都自动实现AOP缓存处理
package org.muses.jeeplatform.annotation;
import org.muses.jeeplatform.common.RedisCacheNamespace;
import java.lang.annotation.*;

/**
 * 元注解 用来标识查询数据库的方法
 */
@Documented
@Target(ElementType.METHOD)
@Retention(RetentionPolicy.RUNTIME)
public @interface RedisCache {
//  RedisCacheNamespace nameSpace();
}
JDK 5提供的注解,除了Retention以外,还有另外三个,即Target 、Inherited 和 Documented。基于这个,我们可以实现自定义的元注解
我们设置RedisCache基于Method方法级别引用。
1.RetentionPolicy.SOURCE 这种类型的Annotations只在源代码级别保留,编译时就会被忽略
2.RetentionPolicy.CLASS 这种类型的Annotations编译时被保留,在class文件中存在,但JVM将会忽略
3.RetentionPolicy.RUNTIME 这种类型的Annotations将被JVM保留,所以他们能在运行时被JVM或其他使用反射机制的代码所读取和使用.
4.4 调用JedisPool实现Redis缓存处理
package org.muses.jeeplatform.cache;
import org.springframework.beans.factory.annotation.Autowired;
import org.springframework.stereotype.Component;
import org.springframework.stereotype.Service;
import redis.clients.jedis.Jedis;
import redis.clients.jedis.JedisPool;
import javax.annotation.Resource;
@Component("redisCache")
public class RedisCache {

  @Autowired
  private JedisPool jedisPool;
  private JedisPool getJedisPool(){
    return jedisPool;
  }
  public void setJedisPool(JedisPool jedisPool){
    this.jedisPool = jedisPool;
  }

  /**
   * 从Redis缓存获取数据
   * @param redisKey
   * @return
   */
  public Object getDataFromRedis(String redisKey){
    Jedis jedis = jedisPool.getResource();
    byte[] byteArray = jedis.get(redisKey.getBytes());

    if(byteArray != null){
      return SerializeUtil.unSerialize(byteArray);
    }
    return null;
  }

  /**
   * 保存数据到Redis
   * @param redisKey
   */
  public String saveDataToRedis(String redisKey,Object obj){
    byte[] bytes = SerializeUtil.serialize(obj);
    Jedis jedis = jedisPool.getResource();
    String code = jedis.set(redisKey.getBytes(), bytes);
    return code;
  }
}
对象序列化的工具类:
package org.muses.jeeplatform.cache;
import java.io.*;
public class SerializeUtil {
  /**
   * 序列化对象
   * @param obj
   * @return
   */
  public static byte[] serialize(Object obj){
    ObjectOutputStream oos = null;
    ByteArrayOutputStream baos = null;
    try{
      baos = new ByteArrayOutputStream();
      oos = new ObjectOutputStream(baos);

      oos.writeObject(obj);
      byte[] byteArray = baos.toByteArray();
      return byteArray;

    }catch(IOException e){
      e.printStackTrace();
    }
    return null;
  }

  /**
   * 反序列化对象
   * @param byteArray
   * @return
   */
  public static Object unSerialize(byte[] byteArray){
    ByteArrayInputStream bais = null;
    try {
      //反序列化为对象
      bais = new ByteArrayInputStream(byteArray);
      ObjectInputStream ois = new ObjectInputStream(bais);
      return ois.readObject();
    } catch (Exception e) {
      e.printStackTrace();
    }
    return null;
  }
}
这里记得Vo类都要实现Serializable
例如菜单信息VO类,这是一个JPA映射的实体类
package org.muses.jeeplatform.core.entity.admin;
import javax.persistence.*;
import java.io.Serializable;
import java.util.List;

/**
 * @description 菜单信息实体
 * @author Nicky
 * @date 2017年3月17日
 */
@Table(name="sys_menu")
@Entity
public class Menu implements Serializable {
  /** 菜单Id**/
  private int menuId;
  /** 上级Id**/
  private int parentId;
  /** 菜单名称**/
  private String menuName;
  /** 菜单图标**/
  private String menuIcon;
  /** 菜单URL**/
  private String menuUrl;
  /** 菜单类型**/
  private String menuType;
  /** 菜单排序**/
  private String menuOrder;
  /**菜单状态**/
  private String menuStatus;
  private List<Menu> subMenu;
  private String target;
  private boolean hasSubMenu = false;
  public Menu() {
    super();
  }

  @Id
  @GeneratedValue(strategy=GenerationType.IDENTITY)
  public int getMenuId() {
    return this.menuId;
  }

  public void setMenuId(int menuId) {
    this.menuId = menuId;
  }

  @Column(length=100)
  public int getParentId() {
    return parentId;
  }

  public void setParentId(int parentId) {
    this.parentId = parentId;
  }

  @Column(length=100)
  public String getMenuName() {
    return this.menuName;
  }

  public void setMenuName(String menuName) {
    this.menuName = menuName;
  }

  @Column(length=30)
  public String getMenuIcon() {
    return this.menuIcon;
  }

  public void setMenuIcon(String menuIcon) {
    this.menuIcon = menuIcon;
  }

  @Column(length=100)
  public String getMenuUrl() {
    return this.menuUrl;
  }

  public void setMenuUrl(String menuUrl) {
    this.menuUrl = menuUrl;
  }

  @Column(length=100)
  public String getMenuType() {
    return this.menuType;
  }

  public void setMenuType(String menuType) {
    this.menuType = menuType;
  }

  @Column(length=10)
  public String getMenuOrder() {
    return menuOrder;
  }

  public void setMenuOrder(String menuOrder) {
    this.menuOrder = menuOrder;
  }

  @Column(length=10)
  public String getMenuStatus(){
    return menuStatus;
  }

  public void setMenuStatus(String menuStatus){
    this.menuStatus = menuStatus;
  }

  @Transient
  public List<Menu> getSubMenu() {
    return subMenu;
  }

  public void setSubMenu(List<Menu> subMenu) {
    this.subMenu = subMenu;
  }

  public void setTarget(String target){
    this.target = target;
  }

  @Transient
  public String getTarget(){
    return target;
  }

  public void setHasSubMenu(boolean hasSubMenu){
    this.hasSubMenu = hasSubMenu;
  }

  @Transient
  public boolean getHasSubMenu(){
    return hasSubMenu;
  }
}
4.5 Spring AOP实现监控所有被@RedisCache注解的方法缓存
先从Redis里获取缓存,查询不到,就查询MySQL数据库,然后再保存到Redis缓存里,下次查询时直接调用Redis缓存
package org.muses.jeeplatform.cache;
import org.aspectj.lang.ProceedingJoinPoint;
import org.aspectj.lang.annotation.Around;
import org.aspectj.lang.annotation.Aspect;
import org.aspectj.lang.annotation.Pointcut;
import org.slf4j.Logger;
import org.slf4j.LoggerFactory;
import org.springframework.beans.factory.annotation.Autowired;
import org.springframework.beans.factory.annotation.Qualifier;
import org.springframework.stereotype.Component;
/**
 * AOP实现Redis缓存处理
 */
@Component
@Aspect
public class RedisAspect {
  private static final Logger LOGGER = LoggerFactory.getLogger(RedisAspect.class);
  @Autowired
  @Qualifier("redisCache")
  private RedisCache redisCache;

  /**
   * 拦截所有元注解RedisCache注解的方法
   */
  @Pointcut("@annotation(org.muses.jeeplatform.annotation.RedisCache)")
  public void pointcutMethod(){

  }

  /**
   * 环绕处理,先从Redis里获取缓存,查询不到,就查询MySQL数据库,
   * 然后再保存到Redis缓存里
   * @param joinPoint
   * @return
   */
  @Around("pointcutMethod()")
  public Object around(ProceedingJoinPoint joinPoint){
    //前置:从Redis里获取缓存
    //先获取目标方法参数
    long startTime = System.currentTimeMillis();
    String applId = null;
    Object[] args = joinPoint.getArgs();
    if (args != null && args.length > 0) {
      applId = String.valueOf(args[0]);
    }
    //获取目标方法所在类
    String target = joinPoint.getTarget().toString();
    String className = target.split("@")[0];
    //获取目标方法的方法名称
    String methodName = joinPoint.getSignature().getName();
    //redis中key格式:  applId:方法名称
    String redisKey = applId + ":" + className + "." + methodName;
    Object obj = redisCache.getDataFromRedis(redisKey);

    if(obj!=null){
      LOGGER.info("**********从Redis中查到了数据**********");
      LOGGER.info("Redis的KEY值:"+redisKey);
      LOGGER.info("REDIS的VALUE值:"+obj.toString());
      return obj;
    }
    long endTime = System.currentTimeMillis();
    LOGGER.info("Redis缓存AOP处理所用时间:"+(endTime-startTime));
    LOGGER.info("**********没有从Redis查到数据**********");
    try{
      obj = joinPoint.proceed();
    }catch(Throwable e){
      e.printStackTrace();
    }
    LOGGER.info("**********开始从MySQL查询数据**********");
    //后置:将数据库查到的数据保存到Redis
    String code = redisCache.saveDataToRedis(redisKey,obj);
    if(code.equals("OK")){
      LOGGER.info("**********数据成功保存到Redis缓存!!!**********");
      LOGGER.info("Redis的KEY值:"+redisKey);
      LOGGER.info("REDIS的VALUE值:"+obj.toString());
    }
    return obj;
  }
}
然后调用@RedisCache实现缓存
/**
   * 通过菜单Id获取菜单信息
   * @param id
   * @return
   */
  @Transactional
  @RedisCache
  public Menu findMenuById(@RedisCacheKey int id){
    return menuRepository.findMenuByMenuId(id);
  }
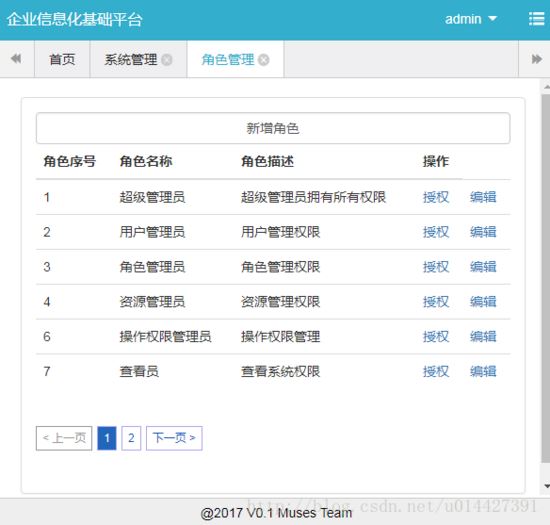
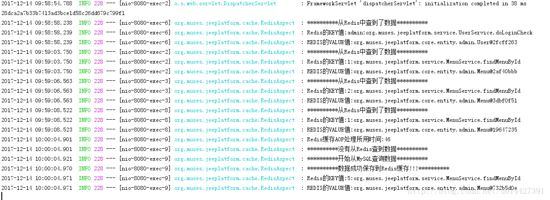
登录系统,然后加入@RedisCache注解的方法都会实现Redis缓存处理


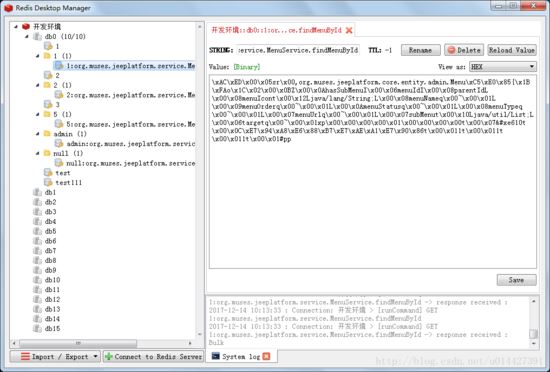
可以看到Redis里保存到了缓存

项目代码:https://github.com/u014427391/jeeplatform
以上就是本文的全部内容,希望对大家的学习有所帮助,也希望大家多多支持我们。

