JS+canvas画一个圆锥实例代码

以下是我们给大家分享是实例代码:

<html>
<head>
<title>我的第一个 HTML 页面</title>
</head>
<body>
<canvas id='cvs' width='1000' height="800">
</canvas>
<script>
const cvs =document.getElementById('cvs');

 // 计算画布的宽度
  const width = cvs.offsetWidth;
  // 计算画布的高度
 const  height = cvs.offsetHeight;
const ctx = cvs.getContext('2d');
  // 设置宽高
  cvs.width = width;
  cvs.height = height;
/**
ctx:context
x,y:偏移 纵横坐标
w:度
h:高
color:颜色 数组,可以把颜色提取出来方便自定义
*/
var Cone = function(ctx,x,y,w,h,d,color){
ctx.save();
ctx.translate(x, y);
var blockHeight=h;
// 中点
var x2 = 0;
var y2 = 20;
var k2 = 10;
var w2 = w;
var h2 = h;
// 递减度
var decrease = d;
 ctx.beginPath();
ctx.moveTo(x2+w2,y2);
// 椭圆加了边框,所以加1减1
ctx.bezierCurveTo(x2+w2, y2+k2, x2-w2, y2+k2, x2-w2-1, y2);

ctx.lineTo(x2-w2+decrease,y2+blockHeight);
ctx.bezierCurveTo(x2-w2+decrease, y2+blockHeight+k2, x2+w2-decrease, y2+blockHeight+k2, x2+w2-decrease, y2+blockHeight);
ctx.lineTo(x2+w2+1,y2);
var linear = ctx.createLinearGradient(x2-w2, y2,x2+w2-decrease, y2+blockHeight);
linear.addColorStop(0,color[0]);
linear.addColorStop(1,color[1]);
ctx.fillStyle = linear ;
ctx.strokeStyle=linear
ctx.fill();
//ctx.stroke();
ctx.closePath();
//画椭圆
ctx.beginPath();
ctx.moveTo(x2-w2, y2);
ctx.bezierCurveTo(x2-w2, y2-k2, x2+w2, y2-k2, x2+w2, y2);
ctx.bezierCurveTo(x2+w2, y2+k2, x2-w2, y2+k2, x2-w2, y2);
var linear = ctx.createLinearGradient(x2-w2, y2,x2+w2-decrease, y2+blockHeight);
linear.addColorStop(1,color[0]);
linear.addColorStop(0,color[1]);
ctx.fillStyle = linear ;
ctx.strokeStyle=linear
ctx.closePath();

ctx.fill();
ctx.stroke();

ctx.restore();
};
function dr(m){
const colorList =[
{
color:['#76e3ff','#2895ea'],
height:60
},
{
color:['#17ead9','#5d7ce9'],
height:30
},
{
color:['#1ca5e5','#d381ff'],
height:40
},
{
color:['#ffa867','#ff599e'],
height:70
},
{
color:['#ffa6e3','#ec6a70'],
height:50
},
{
color:['#f9c298','#d9436a'],
height:30
},
{
color:['#eb767b','#9971dc'],
height:30
},
{
color:['#f06af9','#5983ff'],
height:100
},
];
const space = 20;
let coneHeight = 0;
// 间隔
const gap = 20;
const x = 380;
const y = 20;
const angle = 30;
let coneWidth=0;
colorList.forEach((item)=>{
coneHeight += item.height +space;
});
// 最下面的先画(层级)
colorList.reverse().forEach((item,index)=>{
const decrease =Math.tan(Math.PI*angle/180)*(item.height+space);
coneWidth=coneWidth + decrease;
coneHeight = coneHeight-item.height - space;
//圆锥
Cone(ctx,x,coneHeight ,coneWidth ,item.height,decrease,item.color);
// 中点
const cX =parseInt(x)+0.5;
const cY = parseInt(coneHeight + space+ item.height/2)+0.5;
//文字
ctx.save();
ctx.translate(cX , cY );
ctx.textBaseline='top';
ctx.textAlign='center';
const fontSize = item.height/2>=40?40:item.height/2;
ctx.font = fontSize + 'px serif';
//const textMetrics = ctx.measureText('Hello World');
ctx.fillStyle = '#ffffff';
ctx.fillText('5000',0,-fontSize/3);
ctx.restore();
const xLineA =parseInt(coneWidth-decrease/2)+10;
const xLine =parseInt(m+xLineA )>=x?x:m+xLineA ;
//线
ctx.save();
ctx.translate(cX , cY );
ctx.setLineDash([3,2]);
ctx.strokeStyle = '#a4a4a4';
ctx.beginPath();
ctx.moveTo(xLineA , 0);
ctx.lineTo(xLine +20, 0);
ctx.stroke();
ctx.restore();
//描述文字
ctx.save();
ctx.translate(cX , cY );
ctx.textBaseline='middle';
ctx.textAlign='left';
ctx.font = '22px serif';
//const textMetrics = ctx.measureText('Hello World');
ctx.fillStyle = '#4a4a4a';
ctx.fillText('进入收件列表2',xLine+gap ,0);
ctx.restore();
//转化率文字
ctx.save();
ctx.translate(cX , cY );
ctx.textBaseline='middle';
ctx.textAlign='left';
ctx.font = '28px bold serif ';
ctx.fillStyle = '#007dfd';
ctx.fillText('20%',xLine+gap ,(item.height+gap)/2 );
ctx.restore();
});
}
let m=0;
let gravity =10;
(function drawFrame(){
      window.requestAnimationFrame(drawFrame,cvs);
      ctx.clearRect(0,0,cvs.width,cvs.height);
m += gravity;
      dr(m);
})();
</script>
</body>
</html>

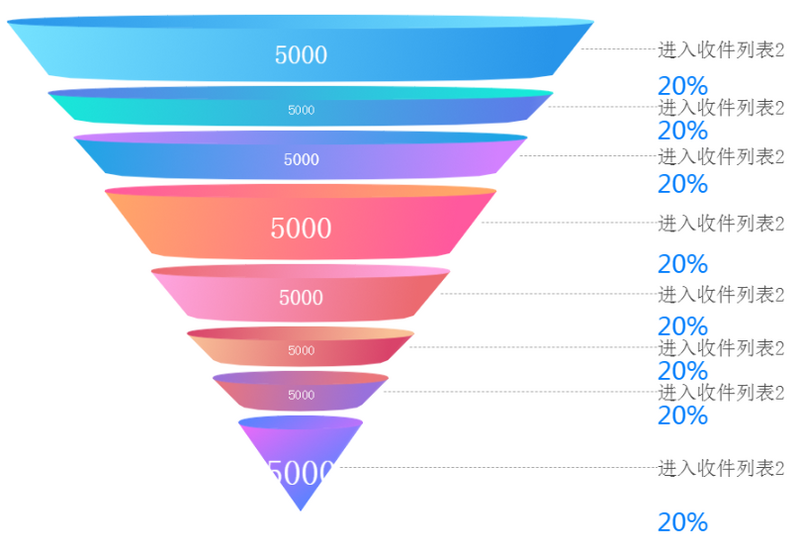
这是我们测试后的完成图:
(0)

相关推荐

  • 使用原生js+canvas实现模拟心电图的实例

    从2015年2月转行进入IT行业,到现在也有将近两年的时间了,从最开始的java到现在的前端,前进的路上一直靠自己摸索,一路走到现在,前端大神是绝对谈不上的,最多算一只刚入门的菜鸟. 从最开始的懵懵懂懂,到现在学着开始写github.写博客,其实技术上没有太多可写的,毕竟自己也才刚刚入门,只能说是按照自己的兴趣,写点有意思的小项目,项目上存在的问题,也希望大神能够予以指正,目前这个demo的功能已经实现,后期我会对样式.代码等方面进行优化. 项目运行效果: 项目简介:使用原生js+canvas制

  • 一步步教你利用Canvas对图片进行处理

    前言 Canvas,中文译为"画布",HTML5中新增了<canvas>元素,可以结合JavaScript动态地在画布中绘制图形. 今天,我们不讲Canvas的图形绘制,而是讲如何对图片进行处理,话不多说了,来一起看看详细的介绍吧. 大概流程非常简单,主要分为以下三个步骤: Canvas图片处理 是的,就像把大象装进冰箱一样简单,哈哈. 一.主要API 整个流程中所用到的主要Canvas API有: 绘制图像: drawImage() 获取图像数据: getImageDat

  • canvas基础绘制-绚丽倒计时的实例

    效果图: html: <!DOCTYPE html> <html lang="en"> <head> <meta charset="UTF-8"> <title>ball</title> <script src="digit_1.js"></script> <script src="countdown.js"></

  • 利用canvas中toDataURL()将图片转为dataURL(base64)的方法详解

    将图片转为base64的好处 将图片转换为Base64编码,可以让你很方便地在没有上传文件的条件下将图片插入其它的网页.编辑器中. 这对于一些小的图片是极为方便的,因为你不需要再去寻找一个保存图片的地方. 将图片转换成base64编码的,在web网上一般用于小图片上,不仅可以减少图片的请求数量(集合到js.css代码中),还可以防止因为一些相对路径等问题导致图片404错误. 引言 假设一个应用场景:由于某些特殊原因从服务端请求到图片路径,要求通过该路径获取对应图片的 base64 dataURL

  • JavaScript canvas实现围绕旋转动画

    使用canvas的convas来实现围绕旋转动画,外圈顺时针,里层逆时针 代码demo链接地址:代码demo链接地址 html文件 <!DOCTYPE html> <html> <head lang="en"> <meta charset="UTF-8"> <title></title> <style> body { margin: 0; padding: 0; overflow:

  • Js利用Canvas实现图片压缩功能

    最近做的APP项目涉及到手机拍照上传图片,因为手机拍照的图片通常都比较大,所以上传的时候就会很慢.为此,需要对图片进行压缩处理来优化上传功能.以下是具体实现: /* * 图片压缩 * img 原始图片 * width 压缩后的宽度 * height 压缩后的高度 * ratio 压缩比率 */ function compress(img, width, height, ratio) { var canvas, ctx, img64; canvas = document.createElement

  • JS+canvas画一个圆锥实例代码

    以下是我们给大家分享是实例代码: <html> <head> <title>我的第一个 HTML 页面</title> </head> <body> <canvas id='cvs' width='1000' height="800"> </canvas> <script> const cvs =document.getElementById('cvs'); // 计算画布的宽度

  • Android 画一个太极图实例代码

    今天练手一下,一起来画个太极图吧~ 最终效果如下: 最终效果 一般都是先讲原理,我就反其道而行,先讲实现吧. 1.继承实现初始化方法 继承View,实现基本的构造函数: public TestView(Context context) { this(context, null); } public TestView(Context context, AttributeSet attrs) { this(context, attrs, 0); } public TestView(Context c

  • JS判断输入字符串长度实例代码(汉字算两个字符,字母数字算一个)

    js判断输入字符串长度实例代码(汉字算两个字符,字母数字算一个) 文本输入时,由于数据库表字段长度限制会导致提交失败,因此想到了此方法验证. 废话不多说上代码: <html> <head> <title>js判断输入字符串长度(汉字算两个字符,字母数字算一个)</title> <style type="text/css"> .pbt { margin-bottom: 10px; } .ie6 .pbt .ftid a, .ie

  • 原生JS实现的放大镜效果实例代码

    这是我用原生js写的放大镜效果,与各种各样的框架技术相比,我喜欢使用原生的js,在这里,想和大家一起谈谈原生和框架技术的理解与个人喜好. <!DOCTYPE HTML> <html> <head> <title>js放大镜效果</title> <meta http-equiv="content-type" content="text/html;charset=utf-8"/> <style

  • Vue.js实现输入框绑定的实例代码

    实现效果如下: 实现代码及注释 <!DOCTYPE html> <html> <head> <title>vue.js数据动态编辑</title> <meta charset="utf-8"> <meta name="viewport" content="width=device-width, initial-scale=1.0"> <style type=

  • Angular.js 实现数字转换汉字实例代码

    AngularJS 简介 AngularJS 是一个 JavaScript 框架.它可通过 <script> 标签添加到 HTML 页面. AngularJS 通过 指令 扩展了 HTML,且通过 表达式 绑定数据到 HTML. 下面通过本文给大家介绍Angular.js 实现数字转换汉字实例代码,具体代码如下所示: // 1.实现输入数字输出对应汉字,要求使用angularjs,不准使用$watch函数,for循环:提示:ng-change指令 <div ng-app="my

  • js给table赋值的实例代码

    要求:用js实现给一个table赋值如上:(定义X=70 [HTML] <table class="table table-bordered"> <thead> <tr> <th colspan="5" class="active">经济条件较好地区学费表</th> </tr> <tr> <th></th> <th>4-8人班&

  • BootStrap fileinput.js文件上传组件实例代码

    1.首先我们下载好fileinput插件引入插件 <span style="font-size:14px;"><link type="text/css" rel="stylesheet" href="fileinput/css/fileinput.css" rel="external nofollow" /> <script type="text/javascript

  • js实现String.Fomat的实例代码

    引言 拼接字符串用习惯了C#的String.Format.今天看别人的代码在js中也封装了一个js的String.Format,用来拼接字符串和DOM. js实现和调用String.Format String.Format = function (str) { for (var i = 1; i < arguments.length; i++) { var parent = "\\{" + (i - 1) + "\\}"; var reg = new RegE

  • JS正则表达式判断有效数实例代码

    <script type="text/javascript"> function validate(){ var reg = new RegExp("^[0-9]*$"); var obj = document.getElementById("name"); if(!reg.test(obj.value)){ alert("请输入数字!"); } if(!/^[0-9]*$/.test(obj.value)){ a

随机推荐