ASP.NET Cookie是怎么生成的(推荐)
可能有人知道Cookie的生成由machineKey有关,machineKey用于决定Cookie生成的算法和密钥,并如果使用多台服务器做负载均衡时,必须指定一致的machineKey用于解密,那么这个过程到底是怎样的呢?
如果需要在.NET Core中使用ASP.NET Cookie,本文将提到的内容也将是一些必经之路。
抽丝剥茧,一步一步分析
首先用户通过AccountController->Login进行登录:
//
// POST: /Account/Login
public async Task<ActionResult> Login(LoginViewModel model, string returnUrl)
{
 if (!ModelState.IsValid)
 {
 return View(model);
 }

 var result = await SignInManager.PasswordSignInAsync(model.Email, model.Password, model.RememberMe, shouldLockout: false);
 switch (result)
 {
 case SignInStatus.Success:
  return RedirectToLocal(returnUrl);
 // ......省略其它代码
 }
}
它调用了SignInManager的PasswordSignInAsync方法,该方法代码如下(有删减):
public virtual async Task<SignInStatus> PasswordSignInAsync(string userName, string password, bool isPersistent, bool shouldLockout)
{
 // ...省略其它代码
 if (await UserManager.CheckPasswordAsync(user, password).WithCurrentCulture())
 {
 if (!await IsTwoFactorEnabled(user))
 {
  await UserManager.ResetAccessFailedCountAsync(user.Id).WithCurrentCulture();
 }
 return await SignInOrTwoFactor(user, isPersistent).WithCurrentCulture();
 }
 // ...省略其它代码
 return SignInStatus.Failure;
}
想浏览原始代码,可参见官方的Github链接:
可见它先需要验证密码,密码验证正确后,它调用了SignInOrTwoFactor方法,该方法代码如下:
private async Task<SignInStatus> SignInOrTwoFactor(TUser user, bool isPersistent)
{
 var id = Convert.ToString(user.Id);
 if (await IsTwoFactorEnabled(user) && !await AuthenticationManager.TwoFactorBrowserRememberedAsync(id).WithCurrentCulture())
 {
 var identity = new ClaimsIdentity(DefaultAuthenticationTypes.TwoFactorCookie);
 identity.AddClaim(new Claim(ClaimTypes.NameIdentifier, id));
 AuthenticationManager.SignIn(identity);
 return SignInStatus.RequiresVerification;
 }
 await SignInAsync(user, isPersistent, false).WithCurrentCulture();
 return SignInStatus.Success;
}
该代码只是判断了是否需要做双重验证,在需要双重验证的情况下,它调用了AuthenticationManager的SignIn方法;否则调用SignInAsync方法。SignInAsync的源代码如下:
public virtual async Task SignInAsync(TUser user, bool isPersistent, bool rememberBrowser)
{
 var userIdentity = await CreateUserIdentityAsync(user).WithCurrentCulture();
 // Clear any partial cookies from external or two factor partial sign ins
 AuthenticationManager.SignOut(DefaultAuthenticationTypes.ExternalCookie, DefaultAuthenticationTypes.TwoFactorCookie);
 if (rememberBrowser)
 {
 var rememberBrowserIdentity = AuthenticationManager.CreateTwoFactorRememberBrowserIdentity(ConvertIdToString(user.Id));
 AuthenticationManager.SignIn(new AuthenticationProperties { IsPersistent = isPersistent }, userIdentity, rememberBrowserIdentity);
 }
 else
 {
 AuthenticationManager.SignIn(new AuthenticationProperties { IsPersistent = isPersistent }, userIdentity);
 }
}
可见,最终所有的代码都是调用了AuthenticationManager.SignIn方法,所以该方法是创建Cookie的关键。
AuthenticationManager的实现定义在Microsoft.Owin中,因此无法在ASP.NET Identity中找到其源代码,因此我们打开Microsoft.Owin的源代码继续跟踪(有删减):
public void SignIn(AuthenticationProperties properties, params ClaimsIdentity[] identities)
{
 AuthenticationResponseRevoke priorRevoke = AuthenticationResponseRevoke;
 if (priorRevoke != null)
 {
 // ...省略不相关代码
 AuthenticationResponseRevoke = new AuthenticationResponseRevoke(filteredSignOuts);
 }

 AuthenticationResponseGrant priorGrant = AuthenticationResponseGrant;
 if (priorGrant == null)
 {
 AuthenticationResponseGrant = new AuthenticationResponseGrant(new ClaimsPrincipal(identities), properties);
 }
 else
 {
 // ...省略不相关代码

 AuthenticationResponseGrant = new AuthenticationResponseGrant(new ClaimsPrincipal(mergedIdentities), priorGrant.Properties);
 }
}
AuthenticationManager的Github链接如下:https://github.com/aspnet/AspNetKatana/blob/c33569969e79afd9fb4ec2d6bdff877e376821b2/src/Microsoft.Owin/Security/AuthenticationManager.cs
可见它用到了AuthenticationResponseGrant,继续跟踪可以看到它实际是一个属性:
public AuthenticationResponseGrant AuthenticationResponseGrant
{
 // 省略get
 set
 {
 if (value == null)
 {
  SignInEntry = null;
 }
 else
 {
  SignInEntry = Tuple.Create((IPrincipal)value.Principal, value.Properties.Dictionary);
 }
 }
}
发现它其实是设置了SignInEntry,继续追踪:
public Tuple<IPrincipal, IDictionary<string, string>> SignInEntry
{
 get { return _context.Get<Tuple<IPrincipal, IDictionary<string, string>>>(OwinConstants.Security.SignIn); }
 set { _context.Set(OwinConstants.Security.SignIn, value); }
}
其中,_context的类型为IOwinContext,OwinConstants.Security.SignIn的常量值为"security.SignIn"。
跟踪完毕……
啥?跟踪这么久,居然跟丢啦!?
当然没有!但接下来就需要一定的技巧了。
原来,ASP.NET是一种中间件(Middleware)模型,在这个例子中,它会先处理MVC中间件,该中间件处理流程到设置AuthenticationResponseGrant/SignInEntry为止。但接下来会继续执行CookieAuthentication中间件,该中间件的核心代码在aspnet/AspNetKatana仓库中可以看到,关键类是CookieAuthenticationHandler,核心代码如下:
protected override async Task ApplyResponseGrantAsync()
{
 AuthenticationResponseGrant signin = Helper.LookupSignIn(Options.AuthenticationType);
 // ... 省略部分代码

 if (shouldSignin)
 {
 var signInContext = new CookieResponseSignInContext(
  Context,
  Options,
  Options.AuthenticationType,
  signin.Identity,
  signin.Properties,
  cookieOptions);

 // ... 省略部分代码

 model = new AuthenticationTicket(signInContext.Identity, signInContext.Properties);
 // ... 省略部分代码

 string cookieValue = Options.TicketDataFormat.Protect(model);

 Options.CookieManager.AppendResponseCookie(
  Context,
  Options.CookieName,
  cookieValue,
  signInContext.CookieOptions);
 }
 // ... 又省略部分代码
}
这个原始函数有超过200行代码,这里我省略了较多,但保留了关键、核心部分,想查阅原始代码可以移步Github链接:https://github.com/aspnet/AspNetKatana/blob/0fc4611e8b04b73f4e6bd68263e3f90e1adfa447/src/Microsoft.Owin.Security.Cookies/CookieAuthenticationHandler.cs#L130-L313
这里挑几点最重要的讲。
与MVC建立关系
建立关系的核心代码就是第一行,它从上文中提到的位置取回了AuthenticationResponseGrant,该Grant保存了Claims、AuthenticationTicket等Cookie重要组成部分:
AuthenticationResponseGrant signin = Helper.LookupSignIn(Options.AuthenticationType);
继续查阅LookupSignIn源代码,可看到,它就是从上文中的AuthenticationManager中取回了AuthenticationResponseGrant(有删减):
public AuthenticationResponseGrant LookupSignIn(string authenticationType)
{
 // ...
 AuthenticationResponseGrant grant = _context.Authentication.AuthenticationResponseGrant;
 // ...

 foreach (var claimsIdentity in grant.Principal.Identities)
 {
 if (string.Equals(authenticationType, claimsIdentity.AuthenticationType, StringComparison.Ordinal))
 {
  return new AuthenticationResponseGrant(claimsIdentity, grant.Properties ?? new AuthenticationProperties());
 }
 }

 return null;
}
如此一来,柳暗花明又一村,所有的线索就立即又明朗了。
Cookie的生成
从AuthenticationTicket变成Cookie字节串,最关键的一步在这里:
string cookieValue = Options.TicketDataFormat.Protect(model);
在接下来的代码中,只提到使用CookieManager将该Cookie字节串添加到Http响应中,翻阅CookieManager可以看到如下代码:
public void AppendResponseCookie(IOwinContext context, string key, string value, CookieOptions options)
{
 if (context == null)
 {
 throw new ArgumentNullException("context");
 }
 if (options == null)
 {
 throw new ArgumentNullException("options");
 }

 IHeaderDictionary responseHeaders = context.Response.Headers;
 // 省去“1万”行计算chunk和处理细节的流程
 responseHeaders.AppendValues(Constants.Headers.SetCookie, chunks);
}
有兴趣的朋友可以访问Github看原始版本的代码:https://github.com/aspnet/AspNetKatana/blob/0fc4611e8b04b73f4e6bd68263e3f90e1adfa447/src/Microsoft.Owin/Infrastructure/ChunkingCookieManager.cs#L125-L215
可见这个实现比较……简单,就是往Response.Headers中加了个头,重点只要看TicketDataFormat.Protect方法即可。
逐渐明朗
该方法源代码如下:
public string Protect(TData data)
{
 byte[] userData = _serializer.Serialize(data);
 byte[] protectedData = _protector.Protect(userData);
 string protectedText = _encoder.Encode(protectedData);
 return protectedText;
}
可见它依赖于_serializer、_protector、_encoder三个类,其中,_serializer的关键代码如下:
public virtual byte[] Serialize(AuthenticationTicket model)
{
 using (var memory = new MemoryStream())
 {
 using (var compression = new GZipStream(memory, CompressionLevel.Optimal))
 {
  using (var writer = new BinaryWriter(compression))
  {
  Write(writer, model);
  }
 }
 return memory.ToArray();
 }
}
其本质是进行了一次二进制序列化,并紧接着进行了gzip压缩,确保Cookie大小不要失去控制(因为.NET的二进制序列化结果较大,并且微软喜欢搞xml,更大😂)。
然后来看一下_encoder源代码:
public string Encode(byte[] data)
{
 if (data == null)
 {
 throw new ArgumentNullException("data");
 }

 return Convert.ToBase64String(data).TrimEnd('=').Replace('+', '-').Replace('/', '_');
}
可见就是进行了一次简单的base64-url编码,注意该编码把=号删掉了,所以在base64-url解码时,需要补=号。
这两个都比较简单,稍复杂的是_protector,它的类型是IDataProtector。
IDataProtector
它在CookieAuthenticationMiddleware中进行了初始化,创建代码和参数如下:
IDataProtector dataProtector = app.CreateDataProtector(
 typeof(CookieAuthenticationMiddleware).FullName,
 Options.AuthenticationType, "v1");
注意它传了三个参数,第一个参数是CookieAuthenticationMiddleware的FullName,也就是"Microsoft.Owin.Security.Cookies.CookieAuthenticationMiddleware",第二个参数如果没定义,默认值是CookieAuthenticationDefaults.AuthenticationType,该值为定义为"Cookies"。
但是,在默认创建的ASP.NET MVC模板项目中,该值被重新定义为ASP.NET Identity的默认值,即"ApplicationCookie",需要注意。
然后来看看CreateDataProtector的源码:
public static IDataProtector CreateDataProtector(this IAppBuilder app, params string[] purposes)
{
 if (app == null)
 {
 throw new ArgumentNullException("app");
 }

 IDataProtectionProvider dataProtectionProvider = GetDataProtectionProvider(app);
 if (dataProtectionProvider == null)
 {
 dataProtectionProvider = FallbackDataProtectionProvider(app);
 }
 return dataProtectionProvider.Create(purposes);
}

public static IDataProtectionProvider GetDataProtectionProvider(this IAppBuilder app)
{
 if (app == null)
 {
 throw new ArgumentNullException("app");
 }
 object value;
 if (app.Properties.TryGetValue("security.DataProtectionProvider", out value))
 {
 var del = value as DataProtectionProviderDelegate;
 if (del != null)
 {
  return new CallDataProtectionProvider(del);
 }
 }
 return null;
}
可见它先从IAppBuilder的"security.DataProtectionProvider"属性中取一个IDataProtectionProvider,否则使用DpapiDataProtectionProvider。
我们翻阅代码,在OwinAppContext中可以看到,该值被指定为MachineKeyDataProtectionProvider:
builder.Properties[Constants.SecurityDataProtectionProvider] = new MachineKeyDataProtectionProvider().ToOwinFunction();
文中的Constants.SecurityDataProtectionProvider,刚好就被定义为"security.DataProtectionProvider"。
我们翻阅MachineKeyDataProtector的源代码,刚好看到它依赖于MachineKey:
internal class MachineKeyDataProtector
{
 private readonly string[] _purposes;

 public MachineKeyDataProtector(params string[] purposes)
 {
 _purposes = purposes;
 }

 public virtual byte[] Protect(byte[] userData)
 {
 return MachineKey.Protect(userData, _purposes);
 }

 public virtual byte[] Unprotect(byte[] protectedData)
 {
 return MachineKey.Unprotect(protectedData, _purposes);
 }
}
最终到了我们的老朋友MachineKey。
逆推过程,破解Cookie
首先总结一下这个过程,对一个请求在Mvc中的流程来说,这些代码集中在ASP.NET Identity中,它会经过:
- AccountController
- SignInManager
- AuthenticationManager
设置AuthenticatinResponseGrant
然后进入CookieAuthentication的流程,这些代码集中在Owin中,它会经过:
CookieAuthenticationMiddleware(读取AuthenticationResponseGrant)
ISecureDataFormat(实现类:SecureDataFormat<T>)
IDataSerializer(实现类:TicketSerializer)
IDataProtector(实现类:MachineKeyDataProtector)
ITextEncoder(实现类:Base64UrlTextEncoder)
这些过程,结果上文中找到的所有参数的值,我总结出的“祖传破解代码”如下:
string cookie = "nZBqV1M-Az7yJezhb6dUzS_urj1urB0GDufSvDJSa0pv27CnDsLHRzMDdpU039j6ApL-VNfrJULfE85yU9RFzGV_aAGXHVkGckYqkCRJUKWV8SqPEjNJ5ciVzW--uxsCBNlG9jOhJI1FJIByRzYJvidjTYABWFQnSSd7XpQRjY4lb082nDZ5lwJVK3gaC_zt6H5Z1k0lUFZRb6afF52laMc___7BdZ0mZSA2kRxTk1QY8h2gQh07HqlR_p0uwTFNKi0vW9NxkplbB8zfKbfzDj7usep3zAeDEnwofyJERtboXgV9gIS21fLjc58O-4rR362IcCi2pYjaKHwZoO4LKWe1bS4r1tyzW0Ms-39Njtiyp7lRTN4HUHMUi9PxacRNgVzkfK3msTA6LkCJA3VwRm_UUeC448Lx5pkcCPCB3lGat_5ttGRjKD_lllI-YE4esXHB5eJilJDIZlEcHLv9jYhTl17H0Jl_H3FqXyPQJR-ylQfh";
var bytes = TextEncodings.Base64Url.Decode(cookie);
var decrypted = MachineKey.Unprotect(bytes,
 "Microsoft.Owin.Security.Cookies.CookieAuthenticationMiddleware",
 "ApplicationCookie",
 "v1");
var serializer = new TicketSerializer();
var ticket = serializer.Deserialize(decrypted);
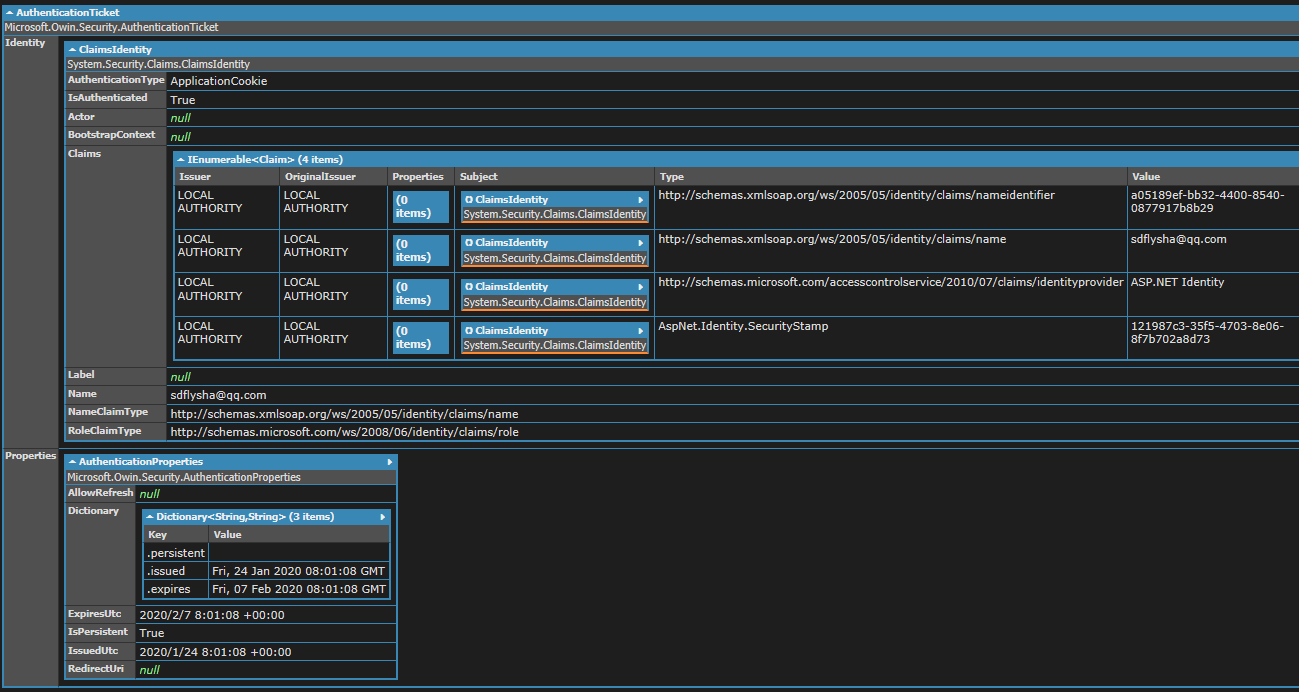
ticket.Dump(); // Dump为LINQPad专有函数,用于方便调试显示,此处可以用循环输出代替
运行前请设置好app.config/web.config中的machineKey节点,并安装NuGet包:Microsoft.Owin.Security,运行结果如下(完美破解):

总结
学习方式有很多种,其中看代码是我个人非常喜欢的一种方式,并非所有代码都会一马平川。像这个例子可能还需要有一定ASP.NET知识背景。
注意这个“祖传代码”是基于.NET Framework,由于其用到了MachineKey,因此无法在.NET Core中运行。我稍后将继续深入聊聊MachineKey这个类,看它底层代码是如何工作的,然后最终得以在.NET Core中直接破解ASP.NET Identity中的Cookie,敬请期待!
以上所述是小编给大家介绍的ASP.NET Cookie是怎么生成的,希望对大家有所帮助!

