IOS开发之tableView点击行跳转并带有“显示”更多功能
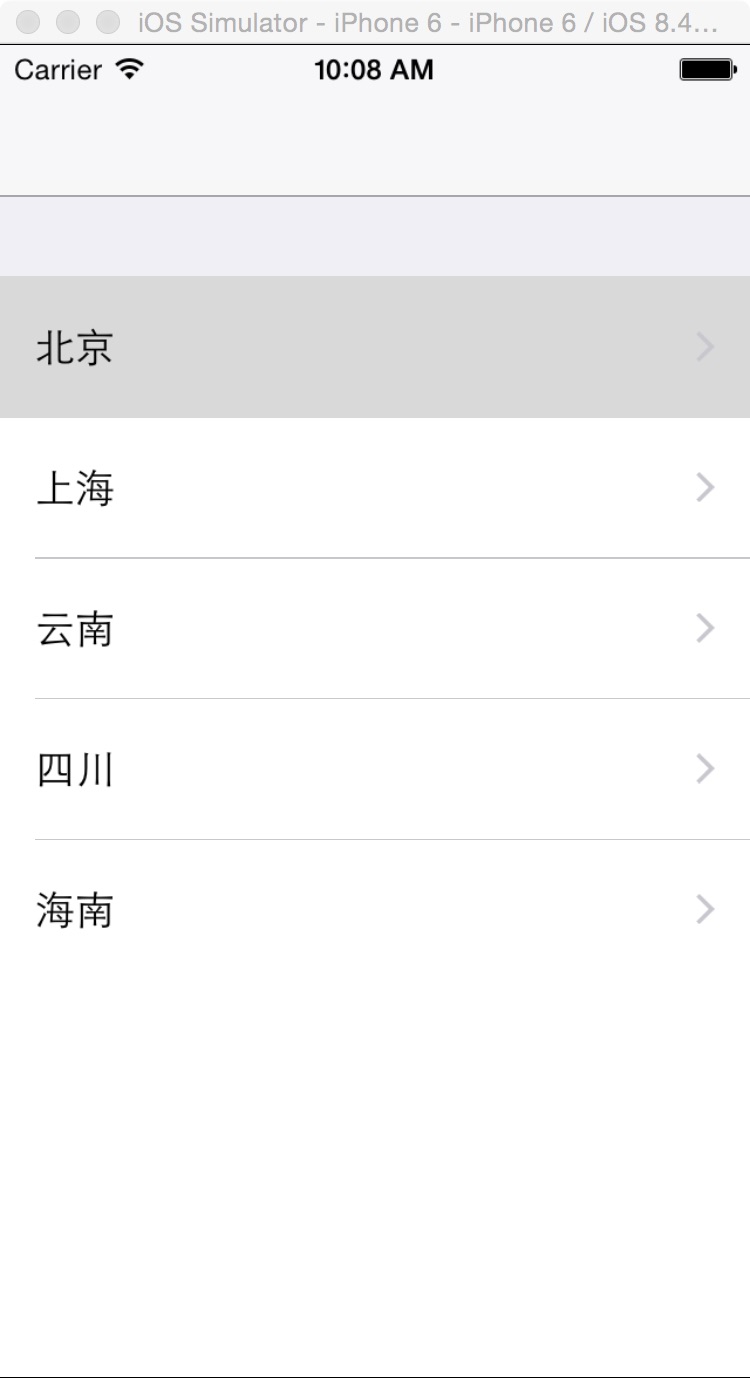
首先给大家展示下效果图,觉得还满意的话,请继续学习代码实现过程。

一,工程图。

二,代码。
RootViewController.h
#import <UIKit/UIKit.h>
@interface RootViewController : UIViewController
<UITableViewDelegate,UITableViewDataSource>
{
UITableView * _tableView;
NSMutableArray * provinceArray;
}
@end

RootViewController.m

#import "RootViewController.h"
//详细页面
#import "DetailViewController.h"
@interface RootViewController ()
@end
@implementation RootViewController
- (id)initWithNibName:(NSString *)nibNameOrNil bundle:(NSBundle *)nibBundleOrNil
{
self = [super initWithNibName:nibNameOrNil bundle:nibBundleOrNil];
if (self) {
// Custom initialization
}
return self;
}
- (void)viewDidLoad
{
[super viewDidLoad];
// Do any additional setup after loading the view.
provinceArray = [[NSMutableArray alloc] initWithObjects:@"北京", @"上海", @"云南",@"四川",@"海南", @"江苏", @"香港", @"澳门", @"西藏", nil];
_tableView = [[UITableView alloc] initWithFrame:CGRectMake(0, 0, 320, 380) style:UITableViewStyleGrouped];
_tableView.delegate = self;
_tableView.dataSource = self;
[self.view addSubview:_tableView];
}
#pragma -mark -UITableViewDelegate
- (UITableViewCell *)tableView:(UITableView *)tableView cellForRowAtIndexPath:(NSIndexPath *)indexPath {
UITableViewCell* cell = [tableView dequeueReusableCellWithIdentifier:@"ID"];
if (cell == nil) {
cell = [[UITableViewCell alloc] initWithStyle:UITableViewCellStyleValue1 reuseIdentifier:@"ID"] ;
}
cell.textLabel.text = [provinceArray objectAtIndex:indexPath.row];
cell.accessoryType = UITableViewCellAccessoryDisclosureIndicator;
return cell;
}
- (NSInteger)tableView:(UITableView *)tableView numberOfRowsInSection:(NSInteger)section {
return 9;
}
- (CGFloat)tableView:(UITableView *)tableView heightForRowAtIndexPath:(NSIndexPath *)indexPath {
return 60;
}
//点击进入下一页
- (void)tableView:(UITableView *)tableView didSelectRowAtIndexPath:(NSIndexPath *)indexPath {
DetailViewController* svc = [[DetailViewController alloc] init];
svc.title = [NSString stringWithFormat:@"%@",[provinceArray objectAtIndex:indexPath.row]];
[self.navigationController pushViewController:svc animated:NO];
}
- (void)didReceiveMemoryWarning
{
[super didReceiveMemoryWarning];
// Dispose of any resources that can be recreated.
}
/*
#pragma mark - Navigation
// In a storyboard-based application, you will often want to do a little preparation before navigation
- (void)prepareForSegue:(UIStoryboardSegue *)segue sender:(id)sender
{
// Get the new view controller using [segue destinationViewController].
// Pass the selected object to the new view controller.
}
*/
@end
DetailViewController.h
#import <UIKit/UIKit.h>
@interface DetailViewController : UIViewController
<UITableViewDelegate,UITableViewDataSource>
{
UITableView* _tableView;
NSArray* provinceArr;
NSArray* cityArray;
NSString* cityName;
NSMutableArray* ditailName;
NSString* ditialPlaceName;
NSDictionary *dicForPlist;
}
@end
DetailViewController.m
#import "DetailViewController.h"
static int rowNumber;
@interface DetailViewController ()
@end
@implementation DetailViewController
- (id)initWithNibName:(NSString *)nibNameOrNil bundle:(NSBundle *)nibBundleOrNil
{
self = [super initWithNibName:nibNameOrNil bundle:nibBundleOrNil];
if (self) {
// Custom initialization
}
return self;
}
- (void)viewDidLoad
{
[super viewDidLoad];
// Do any additional setup after loading the view.
//传过来的城市名字
cityName = self.title;
//tableView显示行数
rowNumber = 20;
//tableView
_tableView = [[UITableView alloc] initWithFrame:CGRectMake(0, 0, 320, 460 ) style:UITableViewStyleGrouped];
_tableView.delegate = self;
_tableView.dataSource = self;
[self.view addSubview:_tableView];
NSMutableArray* cityComparearr = [[NSMutableArray alloc] init];
ditailName = [[NSMutableArray alloc] init];
//城市的plist文件
dicForPlist = [NSDictionary dictionaryWithContentsOfFile:[[NSBundle mainBundle] pathForResource:@"cityName" ofType:@"plist"]];
//北京所有数据
provinceArr = [dicForPlist objectForKey:cityName];
for (int j = 0; j < [provinceArr count]; j++) {//遍历省的所有数据
cityArray = [provinceArr objectAtIndex:j];//取出每一个小数组
for (int i = 0; i < [cityArray count]; i++) {//遍历小数组
NSString* strstr = [cityArray objectAtIndex:i]; //得到小数组内容
if ([strstr isEqualToString:cityName] && j + 1 < [provinceArr count]) {
cityComparearr = [provinceArr objectAtIndex:j + 1];
if (![[cityArray objectAtIndex:i + 1] isEqualToString:[cityComparearr objectAtIndex:i + 1]]) {
[ditailName addObject:[cityArray objectAtIndex:i + 1]];
} else {
}
}
if ([strstr isEqualToString:cityName] && j + 1 == [provinceArr count]){
NSLog(@"last one?");
}
}
}
}
#pragma -mark -UITableViewDelegate
- (UITableViewCell *)tableView:(UITableView *)tableView cellForRowAtIndexPath:(NSIndexPath *)indexPath {
UITableViewCell* cell = [tableView dequeueReusableCellWithIdentifier:@"ID"];
if (cell == nil) {
cell = [[UITableViewCell alloc] initWithStyle:UITableViewCellStyleValue1 reuseIdentifier:@"ID"];
}
if (indexPath.section == 0) {
cell.textLabel.text = [ditailName objectAtIndex:indexPath.row];
}
if (indexPath.section == 1) {
cell.textLabel.text = @"显示更多";
cell.textLabel.textAlignment = NSTextAlignmentCenter;
}
return cell;
}
- (NSInteger)tableView:(UITableView *)tableView numberOfRowsInSection:(NSInteger)section {
if (section == 0) {
if (rowNumber > [ditailName count]) {//显示到最多的时候
return [ditailName count];
}
return rowNumber;
} else
return 1;
}
- (NSInteger)numberOfSectionsInTableView:(UITableView *)tableView {
return 2;
}
- (void)tableView:(UITableView *)tableView didSelectRowAtIndexPath:(NSIndexPath *)indexPath {
if (indexPath.section == 1) {
rowNumber += 20;
[tableView reloadData];
} else {
NSLog(@"---跳转到另外一个页面----");
}
}
- (void)didReceiveMemoryWarning
{
[super didReceiveMemoryWarning];
// Dispose of any resources that can be recreated.
}
/*
#pragma mark - Navigation
// In a storyboard-based application, you will often want to do a little preparation before navigation
- (void)prepareForSegue:(UIStoryboardSegue *)segue sender:(id)sender
{
// Get the new view controller using [segue destinationViewController].
// Pass the selected object to the new view controller.
}
*/
@end
以上内容是小编给大家介绍的IOS开发之tableView点击行跳转并带有“显示”更多功能,有问题欢迎各位给我留言,我会及时和大家取得联系的,同时感谢大家一直以来对我们网站的支持。
赞 (0)

