脚本实现SSH登录邮件报警
登录保护是一个非常重要的环节,下面通过图文并茂的方式给大家详细讲解下:
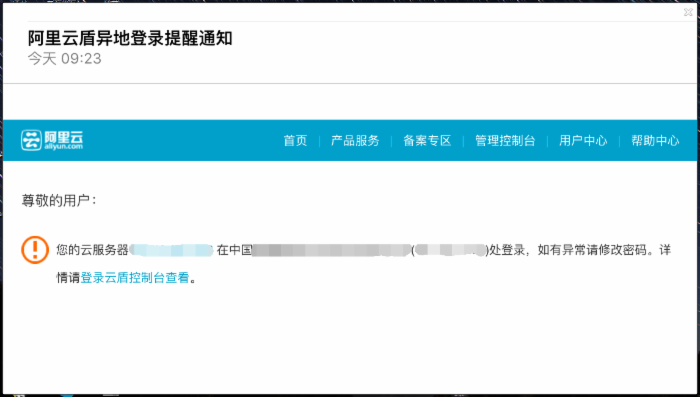
前两天@cyy 给我发了一个图

然后我就想到USHQ的ssh登录app通知功能,然后就像如果把这个部署到自用的服务器就好了。至少多一层安全系数。
首先要感谢@Legion 帮忙搞定了几个错误以及搞定了Geo2IP的JSON转换。 (P.S.此人为自动化运维大神级人物,现任职于德国一数据统计企业。)
当然,我和他相比我就是战五渣了...大家一定要多向 @Legion 学习啊~~
说下需要做的准备:
sendmail或者Postfix
php
bash
CentOS/Debian/Ubuntu
若你的生产环境中没有php sendmail Postfix等组件,请移步:
@Legion: Linux之使用shell脚本实现ssh登录报警
参考文件
首先是报警脚本文件
Shell
#!/bin/sh
#########################################################################
# File Name: Login-alert.sh
# Author: Jason
# Email: master#deamwork.com
# Created Time: Tue Jul 21 2015 21:23:16 PM CST
#########################################################################

#require jq
#wget http://stedolan.github.io/jq/download/linux64/jq -O /usr/local/bin/jq
#chmod +x /usr/local/bin/jq

#if error, please # following one
#PATH=/usr/local/nginx/sbin:/usr/local/php/bin:/usr/local/mysql/bin:/usr/local/sbin:/usr/local/bin:/usr/sbin:/usr/bin:/root/bin

#Geo2IP by Legion(http://www.dwhd.org/)
eval `curl -s "http://ip.taobao.com/service/getIpInfo.php?ip=${SSH_CLIENT%% *}" | jq . | awk -F':|[ ]+|"' '{if($3~/^(country|area|region|city|isp)$/){print $3"="$7}}'`

#html mail content
cat >> mail-no-base64.html <<EOF
#请自行准备邮件模板,以下为可能用到的变量
#输出主机名 `hostname`
#输出登录端口 ${SSH_CLIENT##* }
#输出登录来源IP ${SSH_CLIENT%% *}
#输出IP地址归属地 {country}_${area}_${region}_${city}_${isp}
#输出登录时间 `date`
EOF

#Base64 Encoding
base64 mail-no-base64.html > mail-base64.html

#使用Sendmail
#sendmail -t >/dev/null 2>&1 <<EOF
#to:example@example.com
#from:Example<example@example.com>
#subject:[`hostname`]服务器登录告警

#`cat mail-no-base64.html`

#EOF

#使用postfix
#cat >> mail.php <<EOF
#<?php
#\$to = "example@example.com";
#\$subject = "[`hostname`]服务器登录告警";
#\$message = "`cat mail-base64.html`";
#\$headers = "MIME-Version: 1.0" . "\r\n";
#\$headers .= "Content-Type: text/html; charset=\"utf-8\"" . "\r\n";
#\$headers .= "Content-Transfer-Encoding: base64" . "\r\n";
#\$headers .= 'From: Example<example@example.com>' . "\r\n";
#\$send = mail(\$to,\$subject,\$message,\$headers);
#if(\$send){echo 'Mail Send Successful.';}else{echo 'Failed.';}
#?>
#EOF

#使用 SMTP (require smtp-class.php)
cat >> mail.php <<EOF
<?php
require("smtp-class.php");
\$smtpserver = "smtp.example.com";
\$smtpserverport = 25;
\$smtpusermail = "example@example.com";
\$smtpemailto = "example@example.com";
\$smtpuser = "example";
\$smtppass = "password";
\$mailsubject = "[`hostname`]服务器登录告警";
\$mailbody = "`cat mail-base64.html`";
\$mailtype = "HTML";
\$smtp = new smtp(\$smtpserver,\$smtpserverport,true,\$smtpuser,\$smtppass);
\$smtp->debug = TRUE;
\$smtp->sendmail(\$smtpemailto, \$smtpusermail, \$mailsubject, \$mailbody, \$mailtype);
?>
EOF
php mail.php
yes y | rm mail-no-base64.html mail-base64.html mail.php
然后是如何触发这个脚本:
Shell
echo "screen -fa -d -m -S WL /etc/Login-alert.sh" >> /etc/profile
用这种方法, 新开终端或者复制终端都会触发报警
如果使用smtp方式,请保存以下文件为smtp-class.php
PHP
<?php
class smtp
{
  /* Public Variables */
  var $smtp_port;
  var $time_out;
  var $host_name;
  var $log_file;
  var $relay_host;
  var $debug;
  var $auth;
  var $user;
  var $pass;

  /* Private Variables */
  var $sock;

  /* Constractor */
  function smtp($relay_host = "", $smtp_port = 25,$auth = false,$user,$pass)
  {
    $this->debug = FALSE;
    $this->smtp_port = $smtp_port;
    $this->relay_host = $relay_host;
    $this->time_out = 30; //is used in fsockopen()
    $this->auth = $auth;//auth
    $this->user = $user;
    $this->pass = $pass;
    $this->host_name = "localhost"; //is used in HELO command
    $this->log_file = "";
    $this->sock = FALSE;
}

  /* Main Function */
  function sendmail($to, $from, $subject = "", $body = "", $mailtype, $cc = "", $bcc = "", $additional_headers = "")
  {
    $mail_from = $this->get_address($this->strip_comment($from));
    $body = ereg_replace("(^|(\r\n))(\.)", "\1.\3", $body);
    $header .= "MIME-Version:1.0\r\n";
    if($mailtype=="HTML")
    {
      $header .= "Content-Type: text/html; charset=\"utf-8\"" . "\r\n";
      $header .= "Content-Transfer-Encoding: base64" . "\r\n";
    }
    $header .= "To: ".$to."\r\n";
    if ($cc != "")
    {
      $header .= "Cc: ".$cc."\r\n";
    }
    $header .= "From: $from<".$from.">\r\n";
    $header .= "Subject: ".$subject."\r\n";
    $header .= $additional_headers;
    $header .= "Date: ".date("r")."\r\n";
    $header .= "X-Mailer:By TianhaiTech (PHP/".phpversion().")\r\n";
    list($msec, $sec) = explode(" ", microtime());
    $header .= "Message-ID: <".date("YmdHis", $sec).".".($msec*1000000).".".$mail_from.">\r\n";
    $TO = explode(",", $this->strip_comment($to));

    if ($cc != "")
    {
      $TO = array_merge($TO, explode(",", $this->strip_comment($cc)));
      }
    if ($bcc != "")
    {
      $TO = array_merge($TO, explode(",", $this->strip_comment($bcc)));
    }
    $sent = TRUE;
    foreach ($TO as $rcpt_to)
    {
      $rcpt_to = $this->get_address($rcpt_to);
      if (!$this->smtp_sockopen($rcpt_to))
      {
        $this->log_write("Error: Cannot send email to ".$rcpt_to."\n");
        $sent = FALSE;
        continue;
      }
      if ($this->smtp_send($this->host_name, $mail_from, $rcpt_to, $header, $body))
      {
        $this->log_write("E-mail has been sent to <".$rcpt_to.">\n");
      }
      else
      {
        $this->log_write("Error: Cannot send email to <".$rcpt_to.">\n");
        $sent = FALSE;
      }
      fclose($this->sock);
      $this->log_write("Disconnected from remote host\n");
    }
    return $sent;
  }

  /* Private Functions */
  function smtp_send($helo, $from, $to, $header, $body = "")
  {
    if (!$this->smtp_putcmd("HELO", $helo))
    {
      return $this->smtp_error("sending HELO command");
    }

    #auth
    if($this->auth)
    {
      if (!$this->smtp_putcmd("AUTH LOGIN", base64_encode($this->user)))
      {
        return $this->smtp_error("sending HELO command");
      }
      if (!$this->smtp_putcmd("", base64_encode($this->pass)))
      {
        return $this->smtp_error("sending HELO command");
      }
    }
    if (!$this->smtp_putcmd("MAIL", "FROM:<".$from.">"))
    {
      return $this->smtp_error("sending MAIL FROM command");
    }
    if (!$this->smtp_putcmd("RCPT", "TO:<".$to.">"))
    {
      return $this->smtp_error("sending RCPT TO command");
    }
    if (!$this->smtp_putcmd("DATA"))
    {
      return $this->smtp_error("sending DATA command");
    }
    if (!$this->smtp_message($header, $body))
    {
      return $this->smtp_error("sending message");
    }
    if (!$this->smtp_eom())
    {
      return $this->smtp_error("sending <CR><LF>.<CR><LF> [EOM]");
    }
    if (!$this->smtp_putcmd("QUIT"))
    {
      return $this->smtp_error("sending QUIT command");
    }
    return TRUE;
  }

  function smtp_sockopen($address)
  {
    if ($this->relay_host == "")
    {
      return $this->smtp_sockopen_mx($address);
    }
    else
    {
      return $this->smtp_sockopen_relay();
    }
  }

  function smtp_sockopen_relay()
  {
    $this->log_write("Trying to ".$this->relay_host.":".$this->smtp_port."\n");
    $this->sock = @fsockopen($this->relay_host, $this->smtp_port, $errno, $errstr, $this->time_out);
    if (!($this->sock && $this->smtp_ok()))
    {
      $this->log_write("Error: Cannot connenct to relay host ".$this->relay_host."\n");
      $this->log_write("Error: ".$errstr." (".$errno.")\n");
      return FALSE;
    }
    $this->log_write("Connected to relay host ".$this->relay_host."\n");
    return TRUE;;
  }

  function smtp_sockopen_mx($address)
  {
    $domain = ereg_replace("^.+@([^@]+)$", "\1", $address);
    if (!@getmxrr($domain, $MXHOSTS))
    {
      $this->log_write("Error: Cannot resolve MX \"".$domain."\"\n");
      return FALSE;
    }
    foreach ($MXHOSTS as $host)
    {
      $this->log_write("Trying to ".$host.":".$this->smtp_port."\n");
      $this->sock = @fsockopen($host, $this->smtp_port, $errno, $errstr, $this->time_out);
      if (!($this->sock && $this->smtp_ok()))
      {
        $this->log_write("Warning: Cannot connect to mx host ".$host."\n");
        $this->log_write("Error: ".$errstr." (".$errno.")\n");
        continue;
      }
      $this->log_write("Connected to mx host ".$host."\n");
      return TRUE;
    }
    $this->log_write("Error: Cannot connect to any mx hosts (".implode(", ", $MXHOSTS).")\n");
    return FALSE;
  }

  function smtp_message($header, $body)
  {
    fputs($this->sock, $header."\r\n".$body);
    $this->smtp_debug("> ".str_replace("\r\n", "\n"."> ", $header."\n> ".$body."\n> "));
    return TRUE;
  }

  function smtp_eom()
  {
    fputs($this->sock, "\r\n.\r\n");
    $this->smtp_debug(". [EOM]\n");
    return $this->smtp_ok();
  }

  function smtp_ok()
  {
    $response = str_replace("\r\n", "", fgets($this->sock, 512));
    $this->smtp_debug($response."\n");
    if (!ereg("^[23]", $response))
    {
      fputs($this->sock, "QUIT\r\n");
      fgets($this->sock, 512);
      $this->log_write("Error: Remote host returned \"".$response."\"\n");
      return FALSE;
    }
    return TRUE;
  }

  function smtp_putcmd($cmd, $arg = "")
  {
    if ($arg != "")
    {
      if($cmd=="")
      {
        $cmd = $arg;
      }
      else
      {
        $cmd = $cmd." ".$arg;
      }
    }
    fputs($this->sock, $cmd."\r\n");
    $this->smtp_debug("> ".$cmd."\n");
    return $this->smtp_ok();
  }

  function smtp_error($string)
  {
    $this->log_write("Error: Error occurred while ".$string.".\n");
    return FALSE;
  }

  function log_write($message)
  {
    $this->smtp_debug($message);
    if ($this->log_file == "")
    {
      return TRUE;
    }
    $message = date("M d H:i:s ").get_current_user()."[".getmypid()."]: ".$message;
    if (!@file_exists($this->log_file) || !($fp = @fopen($this->log_file, "a")))
    {
      $this->smtp_debug("Warning: Cannot open log file \"".$this->log_file."\"\n");
      return FALSE;;
    }
    flock($fp, LOCK_EX);
    fputs($fp, $message);
    fclose($fp);
    return TRUE;
  }

  function strip_comment($address)
  {
    $comment = "\([^()]*\)";
    while (ereg($comment, $address))
    {
      $address = ereg_replace($comment, "", $address);
    }
    return $address;
  }

  function get_address($address)
  {
    $address = ereg_replace("([ \t\r\n])+", "", $address);
    $address = ereg_replace("^.*<(.+)>.*$", "\1", $address);
    return $address;
  }

  function smtp_debug($message)
  {
    if ($this->debug)
    {
      echo $message;
    }
  }

}
?>
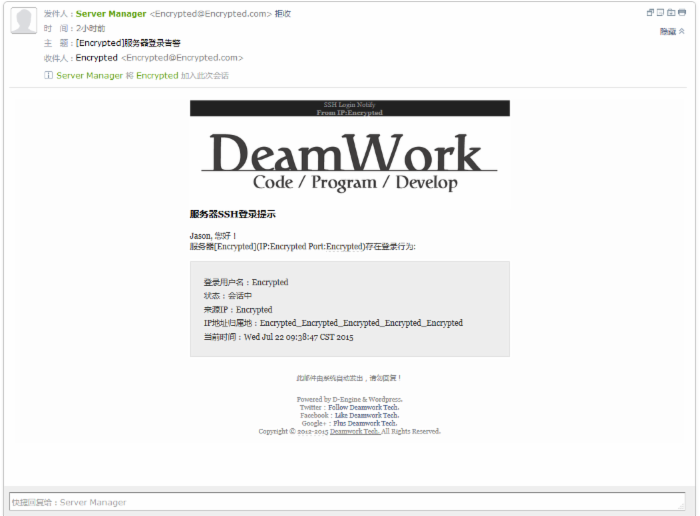
实现效果:

有需要的朋友可以参考下,希望大家能够喜欢。
赞 (0)

