Android使用URLConnection提交请求的实现
URL的openConnection()方法将返回一个URLConnection对象,该对象表示应用程序和URL之间的通信连接。程序可以通过URLConnection实例向该URL发送请求,读取URL引用的资源。
通常创建一个和URL的连接,并发送请求、读取此URL引用的资源需要如下几个步骤:
Step1: 通过调用URL对象的openConnection()方法来创建URLConnection对象;
Step2:设置URLConnection的参数和普通请求属性;
Step3:如果只是发送GET方式的请求,那么使用connect方法建立和远程资源之间的实际连接即可;如果需要发送POST方式的请求,则需要获取URLConnection实例对应的输出流来发送请求参数;
Step4:远程资源变为可用,程序可以访问远程资源的头字段,或通过流入流读取远程资源的数据。
下面的程序Demo示范了如何向Web站点发送GET请求、POST请求,并从Web站点取得响应。该程序中用到一个GET、POST请求的工具类,该类代码如下:
GetPostUtil.java逻辑代码如下:
package com.fukaimei.getposttest;

import android.util.Log;

import java.io.BufferedReader;
import java.io.IOException;
import java.io.InputStreamReader;
import java.io.PrintWriter;
import java.net.URL;
import java.net.URLConnection;
import java.util.List;
import java.util.Map;

/**
 * Created by FuKaimei on 2017/10/2.
 */

public class GetPostUtil {

  private static final String TAG = "GetPostUtil";

  /**
   * 向指定URL发送GET方式的请求
   *
   * @param url  发送请求的URL
   * @param params 请求参数,请求参数应该是name1=value1 & name2=value2的形式
   * @return URL所代表远程资源的响应
   */
  public static String sendGet(String url, String params) {
    String result = "";
    BufferedReader in = null;
    try {
      String urlName = url + "?" + params;
      URL realUrl = new URL(urlName);
      // 打开和URL之间的连接
      URLConnection conn = realUrl.openConnection();
      // 设置通用的请求属性
      conn.setRequestProperty("accept", "*/*");
      conn.setRequestProperty("connection", "Keep-Alive");
      conn.setRequestProperty("user-agent", "Mozilla/4.0 (compatible; MSIE 6.0; Windows NT 5.1; SV1)");
      // 建立实际的连接
      conn.connect();
      // 获取所有的响应头字段
      Map<String, List<String>> map = conn.getHeaderFields();
      // 遍历所有的响应头字段
      for (String key : map.keySet()) {
        Log.d(TAG, key + "---->" + map.get(key));
      }
      // 定义BufferedReader输入流来读取URL的响应
      in = new BufferedReader(new InputStreamReader(conn.getInputStream()));
      String line;
      while ((line = in.readLine()) != null) {
        result += "\n" + line;
      }
    } catch (Exception e) {
      Log.d(TAG, "发送GET请求出现异常!" + e);
      e.printStackTrace();
    } finally { // 使用finally块来关闭输入流
      try {
        if (in != null) {
          in.close();
        }
      } catch (IOException e) {
        e.printStackTrace();
      }
    }
    return result;
  }

  /**
   * 向指定URL发送POST方式的请求
   *
   * @param url  发送请求的URL
   * @param params 请求参数,请求参数应该是name1=value1 & name2=value2的形式
   * @return 所代表远程资源的响应
   */
  public static String sendPost(String url, String params) {
    PrintWriter out = null;
    BufferedReader in = null;
    String result = "";
    try {
      URL realUrl = new URL(url);
      // 打开和URL之间的连接
      URLConnection conn = realUrl.openConnection();
      // 设置通用的请求属性
      conn.setRequestProperty("accept", "*/*");
      conn.setRequestProperty("connection", "Keep-Alive");
      conn.setRequestProperty("user-agent", "Mozilla/4.0 (compatible; MSIE 6.0; Windows NT 5.1; SV1)");
      // 发送POST请求必须设置如下两行
      conn.setDoOutput(true);
      conn.setDoInput(true);
      // 获取URLConnection对象对应的输出流
      out = new PrintWriter(conn.getOutputStream());
      // 发送请求参数
      out.print(params);
      // flush输出流的缓存
      out.flush();
      // 定义BufferedReader输入流来读取URL的响应
      in = new BufferedReader(new InputStreamReader(conn.getInputStream()));
      String line;
      while ((line = in.readLine()) != null) {
        result += "\n" + line;
      }
    } catch (Exception e) {
      Log.d(TAG, "发送POST请求出现异常!" + e);
      e.printStackTrace();
    } finally { // 使用finally块来关闭输出流、输入流
      try {
        if (out != null) {
          out.close();
        }
        if (in != null) {
          in.close();
        }
      } catch (IOException e) {
        e.printStackTrace();
      }
    }
    return result;
  }
}
从上面的程序Demo可以看出,如果需要发送GET请求,只要调用URLConnection的connect()方法去建立实际的连接即可。如果需要发送POST请求,则需要获取URLConnection的OutputStream,然后再向网络中输出请求参数。
提供了上面发送GET请求、POST请求的工具类之后,接下来就可以在Activity类中通过该工具类发送请求了。该程序的界面中包含两个按钮,一个按钮用于发送GET请求,一个按钮用于发送POST请求。程序还提供了一个EditText来显示服务器的响应。
layout/activity_main.xml界面布局代码如下:
<?xml version="1.0" encoding="utf-8"?>
<LinearLayout xmlns:android="http://schemas.android.com/apk/res/android"
  android:layout_width="match_parent"
  android:layout_height="match_parent"
  android:orientation="vertical">

  <LinearLayout
    android:layout_width="match_parent"
    android:layout_height="wrap_content"
    android:gravity="center"
    android:orientation="horizontal">

    <Button
      android:id="@+id/get"
      android:layout_width="wrap_content"
      android:layout_height="wrap_content"
      android:text="发送GET请求" />

    <Button
      android:id="@+id/post"
      android:layout_width="wrap_content"
      android:layout_height="wrap_content"
      android:text="发送POST请求" />
  </LinearLayout>

  <TextView
    android:id="@+id/show"
    android:layout_width="match_parent"
    android:layout_height="match_parent"
    android:background="#ffff"
    android:gravity="top"
    android:textColor="#f000"
    android:textSize="16sp" />
</LinearLayout>
MainActivity.java逻辑代码如下:
package com.fukaimei.getposttest;

import android.os.Handler;
import android.os.Message;
import android.support.v7.app.AppCompatActivity;
import android.os.Bundle;
import android.view.View;
import android.widget.Button;
import android.widget.TextView;

public class MainActivity extends AppCompatActivity {

  Button get, post;
  TextView show;
  // 代表服务器响应的字符串
  String response;
  Handler handler = new Handler() {
    @Override
    public void handleMessage(Message msg) {
      if (msg.what == 0x123) {
        // 设置show控件服务器响应
        show.setText(response);
      }
    }
  };

  @Override
  protected void onCreate(Bundle savedInstanceState) {
    super.onCreate(savedInstanceState);
    setContentView(R.layout.activity_main);
    get = (Button) findViewById(R.id.get);
    post = (Button) findViewById(R.id.post);
    show = (TextView) findViewById(R.id.show);
    get.setOnClickListener(new View.OnClickListener() {
      @Override
      public void onClick(View v) {
        new Thread() {
          @Override
          public void run() {
            response = GetPostUtil.sendGet("https://www.mi.com/", null);
            // 发送消息通知UI线程更新UI组件
            handler.sendEmptyMessage(0x123);
          }
        }.start();
      }
    });
    post.setOnClickListener(new View.OnClickListener() {
      @Override
      public void onClick(View v) {
        new Thread() {
          @Override
          public void run() {
            response = GetPostUtil.sendPost("http://172.xx.xx.xxx:8080/fukaimei/login.jsp", "name=android&pass=123");
          }
        }.start();
        // 发送消息通知UI线程更新UI组件
        handler.sendEmptyMessage(0x123);
      }
    });
  }
}
上面程序Demo中用于发送GET请求、POST请求。从上面的代码可以发现,借助于URLConnection类的帮助,应用程序可以非常方便地与指定站点交换信息,包括发送GET请求、POST请求,并获取网站的响应等。
注意:由于该程序需要访问互联网,因此还需要在清单文件AndroidManifest.xml文件中授权访问互联网的权限:
<!-- 授权访问互联网-->
  <uses-permission android:name="android.permission.INTERNET" />
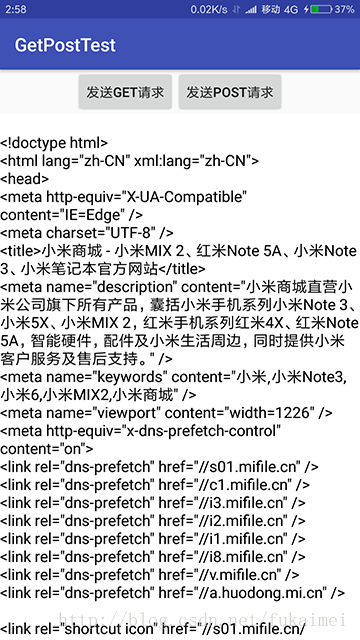
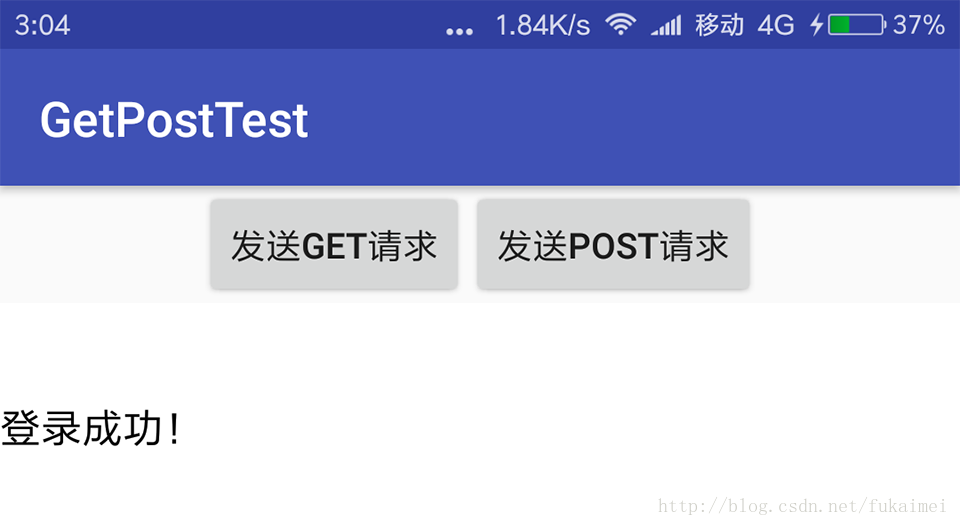
Demo程序运行效果界面截图如下:


以上就是本文的全部内容,希望对大家的学习有所帮助,也希望大家多多支持我们。

