C#使用Aforge调用摄像头拍照的方法
本文实例为大家分享了C#使用Aforge调用摄像头拍照的具体代码,供大家参考,具体内容如下
一、新建一个Winform项目
二、使用Nuget添加引用

安装下图中红色框住的两个程序包

安装完后发现安装了如下图的程序包,这是因为上述两个程序包存在对其它程序包的依赖。

三、编写程序
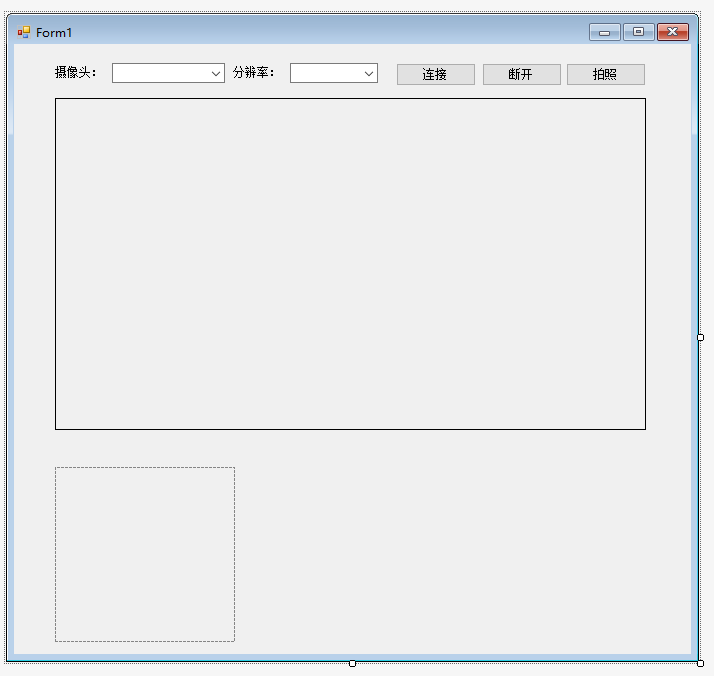
1.窗体设计,摄像头是下拉列表(cmbCamera,控件命名,下同),虽然示例只用到一个摄像头,但是该Demo可用于多个摄像头间切换场景,分辨率是下拉列表(cmbResolution),列出摄像头所支持的分辨率,一个VideoSourcePlayer控件(vispShoot),一个PictureBox控件(picbPreview)。

2.编写代码
using System;
using System.Collections.Generic;
using System.ComponentModel;
using System.Data;
using System.Drawing;
using System.Linq;
using System.Text;
using System.Windows.Forms;
using AForge.Video.DirectShow;

namespace AforgeDemo
{
  public partial class Form1 : Form
  {
    private FilterInfoCollection videoDevices;
    private VideoCaptureDevice videoDevice;
    private VideoCapabilities[] videoCapabilities;
    private VideoCapabilities[] snapshotCapabilities;
    public Form1()
    {
      InitializeComponent();
    }

    private void Form1_Load(object sender, EventArgs e)
    {
      videoDevices = new FilterInfoCollection(FilterCategory.VideoInputDevice);
      if (videoDevices.Count != 0)
      {
        foreach (FilterInfo device in videoDevices)
        {
          cmbCamera.Items.Add(device.Name);
        }
      }
      else
      {
        cmbCamera.Items.Add("没有找到摄像头");
      }

      cmbCamera.SelectedIndex = 0;
    }

    private void cmbCamera_SelectedIndexChanged(object sender, EventArgs e)
    {
      if (videoDevices.Count != 0)
      {
        videoDevice = new VideoCaptureDevice(videoDevices[cmbCamera.SelectedIndex].MonikerString);
        GetDeviceResolution(videoDevice);
      }
    }

    private void GetDeviceResolution(VideoCaptureDevice videoCaptureDevice)
    {
      cmbResolution.Items.Clear();
      videoCapabilities = videoCaptureDevice.VideoCapabilities;
      foreach (VideoCapabilities capabilty in videoCapabilities)
      {
        cmbResolution.Items.Add($"{capabilty.FrameSize.Width} x {capabilty.FrameSize.Height}");
      }
      cmbResolution.SelectedIndex = 0;
    }

    private void btnConnect_Click(object sender, EventArgs e)
    {
      if (videoDevice != null)
      {
        if ((videoCapabilities != null) && (videoCapabilities.Length != 0))
        {
          videoDevice.VideoResolution = videoCapabilities[cmbResolution.SelectedIndex];

          vispShoot.VideoSource = videoDevice;
          vispShoot.Start();
          EnableControlStatus(false);
        }
      }
    }

    private void EnableControlStatus(bool status)
    {
      cmbCamera.Enabled = status;
      cmbResolution.Enabled = status;
      btnConnect.Enabled = status;
      btnShoot.Enabled = !status;
      btnDisconnect.Enabled = !status;
    }

    private void btnDisconnect_Click(object sender, EventArgs e)
    {
      DisConnect();
      EnableControlStatus(true);
    }

    private void DisConnect()
    {
      if (vispShoot.VideoSource != null)
      {
        vispShoot.SignalToStop();
        vispShoot.WaitForStop();
        vispShoot.VideoSource = null;
      }
    }

    private void btnShoot_Click(object sender, EventArgs e)
    {
      Bitmap img = vispShoot.GetCurrentVideoFrame();
      picbPreview.Image = img;
    }

    private void Form1_FormClosing(object sender, FormClosingEventArgs e)
    {
      DisConnect();
    }
  }
}
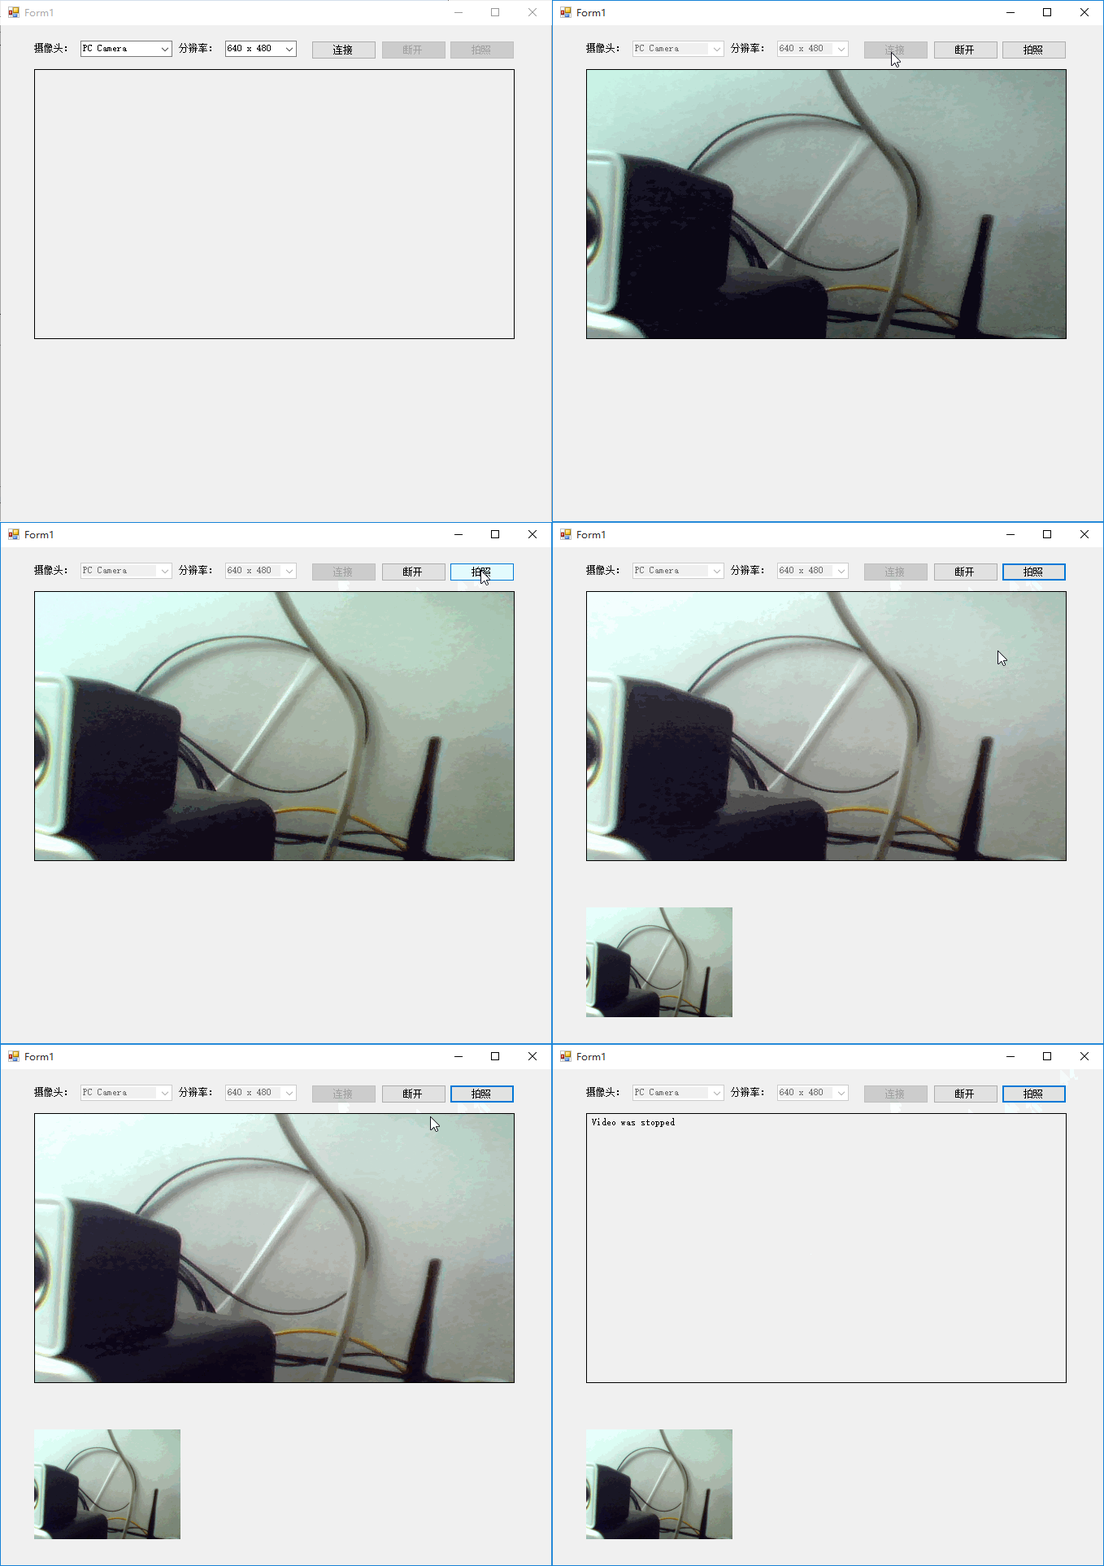
3.测试

附上窗体设计代码:
namespace AforgeDemo
{
  partial class Form1
  {
    /// <summary>
    /// 必需的设计器变量。
    /// </summary>
    private System.ComponentModel.IContainer components = null;

    /// <summary>
    /// 清理所有正在使用的资源。
    /// </summary>
    /// <param name="disposing">如果应释放托管资源,为 true;否则为 false。</param>
    protected override void Dispose(bool disposing)
    {
      if (disposing && (components != null))
      {
        components.Dispose();
      }
      base.Dispose(disposing);
    }

    #region Windows 窗体设计器生成的代码

    /// <summary>
    /// 设计器支持所需的方法 - 不要修改
    /// 使用代码编辑器修改此方法的内容。
    /// </summary>
    private void InitializeComponent()
    {
      this.label1 = new System.Windows.Forms.Label();
      this.cmbCamera = new System.Windows.Forms.ComboBox();
      this.label2 = new System.Windows.Forms.Label();
      this.cmbResolution = new System.Windows.Forms.ComboBox();
      this.vispShoot = new AForge.Controls.VideoSourcePlayer();
      this.picbPreview = new System.Windows.Forms.PictureBox();
      this.btnConnect = new System.Windows.Forms.Button();
      this.btnDisconnect = new System.Windows.Forms.Button();
      this.btnShoot = new System.Windows.Forms.Button();
      ((System.ComponentModel.ISupportInitialize)(this.picbPreview)).BeginInit();
      this.SuspendLayout();
      //
      // label1
      //
      this.label1.AutoSize = true;
      this.label1.Location = new System.Drawing.Point(39, 22);
      this.label1.Name = "label1";
      this.label1.Size = new System.Drawing.Size(53, 12);
      this.label1.TabIndex = 0;
      this.label1.Text = "摄像头:";
      //
      // cmbCamera
      //
      this.cmbCamera.FormattingEnabled = true;
      this.cmbCamera.Location = new System.Drawing.Point(98, 19);
      this.cmbCamera.Name = "cmbCamera";
      this.cmbCamera.Size = new System.Drawing.Size(113, 20);
      this.cmbCamera.TabIndex = 1;
      this.cmbCamera.SelectedIndexChanged += new System.EventHandler(this.cmbCamera_SelectedIndexChanged);
      //
      // label2
      //
      this.label2.AutoSize = true;
      this.label2.Location = new System.Drawing.Point(217, 22);
      this.label2.Name = "label2";
      this.label2.Size = new System.Drawing.Size(53, 12);
      this.label2.TabIndex = 0;
      this.label2.Text = "分辨率:";
      //
      // cmbResolution
      //
      this.cmbResolution.FormattingEnabled = true;
      this.cmbResolution.Location = new System.Drawing.Point(276, 19);
      this.cmbResolution.Name = "cmbResolution";
      this.cmbResolution.Size = new System.Drawing.Size(88, 20);
      this.cmbResolution.TabIndex = 1;
      //
      // vispShoot
      //
      this.vispShoot.Location = new System.Drawing.Point(41, 54);
      this.vispShoot.Name = "vispShoot";
      this.vispShoot.Size = new System.Drawing.Size(591, 332);
      this.vispShoot.TabIndex = 2;
      this.vispShoot.Text = "videoSourcePlayer1";
      this.vispShoot.VideoSource = null;
      //
      // picbPreview
      //
      this.picbPreview.Location = new System.Drawing.Point(41, 423);
      this.picbPreview.Name = "picbPreview";
      this.picbPreview.Size = new System.Drawing.Size(180, 175);
      this.picbPreview.SizeMode = System.Windows.Forms.PictureBoxSizeMode.Zoom;
      this.picbPreview.TabIndex = 3;
      this.picbPreview.TabStop = false;
      //
      // btnConnect
      //
      this.btnConnect.Location = new System.Drawing.Point(382, 19);
      this.btnConnect.Name = "btnConnect";
      this.btnConnect.Size = new System.Drawing.Size(80, 23);
      this.btnConnect.TabIndex = 4;
      this.btnConnect.Text = "连接";
      this.btnConnect.UseVisualStyleBackColor = true;
      this.btnConnect.Click += new System.EventHandler(this.btnConnect_Click);
      //
      // btnDisconnect
      //
      this.btnDisconnect.Enabled = false;
      this.btnDisconnect.Location = new System.Drawing.Point(468, 19);
      this.btnDisconnect.Name = "btnDisconnect";
      this.btnDisconnect.Size = new System.Drawing.Size(80, 23);
      this.btnDisconnect.TabIndex = 4;
      this.btnDisconnect.Text = "断开";
      this.btnDisconnect.UseVisualStyleBackColor = true;
      this.btnDisconnect.Click += new System.EventHandler(this.btnDisconnect_Click);
      //
      // btnShoot
      //
      this.btnShoot.Enabled = false;
      this.btnShoot.Location = new System.Drawing.Point(552, 19);
      this.btnShoot.Name = "btnShoot";
      this.btnShoot.Size = new System.Drawing.Size(80, 23);
      this.btnShoot.TabIndex = 4;
      this.btnShoot.Text = "拍照";
      this.btnShoot.UseVisualStyleBackColor = true;
      this.btnShoot.Click += new System.EventHandler(this.btnShoot_Click);
      //
      // Form1
      //
      this.AutoScaleDimensions = new System.Drawing.SizeF(6F, 12F);
      this.AutoScaleMode = System.Windows.Forms.AutoScaleMode.Font;
      this.ClientSize = new System.Drawing.Size(677, 610);
      this.Controls.Add(this.btnShoot);
      this.Controls.Add(this.btnDisconnect);
      this.Controls.Add(this.btnConnect);
      this.Controls.Add(this.picbPreview);
      this.Controls.Add(this.vispShoot);
      this.Controls.Add(this.cmbResolution);
      this.Controls.Add(this.cmbCamera);
      this.Controls.Add(this.label2);
      this.Controls.Add(this.label1);
      this.Name = "Form1";
      this.Text = "Form1";
      this.FormClosing += new System.Windows.Forms.FormClosingEventHandler(this.Form1_FormClosing);
      this.Load += new System.EventHandler(this.Form1_Load);
      ((System.ComponentModel.ISupportInitialize)(this.picbPreview)).EndInit();
      this.ResumeLayout(false);
      this.PerformLayout();

    }

    #endregion

    private System.Windows.Forms.Label label1;
    private System.Windows.Forms.ComboBox cmbCamera;
    private System.Windows.Forms.Label label2;
    private System.Windows.Forms.ComboBox cmbResolution;
    private AForge.Controls.VideoSourcePlayer vispShoot;
    private System.Windows.Forms.PictureBox picbPreview;
    private System.Windows.Forms.Button btnConnect;
    private System.Windows.Forms.Button btnDisconnect;
    private System.Windows.Forms.Button btnShoot;
  }
}
以上就是本文的全部内容,希望对大家的学习有所帮助,也希望大家多多支持我们。
赞 (0)

