详解spring boot rest例子
简介:本文将帮助您使用 Spring Boot 创建简单的 REST 服务。
你将学习
- 什么是 REST 服务?
- 如何使用 Spring Initializr 引导创建 Rest 服务应用程序?
- 如何创建获取 REST 服务以检索学生注册的课程?
- 如何为学生注册课程创建 Post REST 服务?
- 如何利用 postman 执行 rest 服务?
本教程使用的 rest 服务
在本教程中,我们将使用适当的 URI 和 HTTP 方法创建三个服务:
@GetMapping(“/ students / {studentId} / courses”):您可以使用请求方法 Get 和示例 uri / students / Student1 / courses 来查询特定学生已注册的课程。
@GetMapping(“/students/{studentId}/courses/{courseId}”):您可以使用请求方法 Get 和示例 uri / students / Student1 / courses / Course1 获取特定学生的特定课程。
@PostMapping(“/students/{studentId}/courses”) :您可以通过向 UURI /students/Student1/courses 发送 POST 请求来为学生注册一门课程
您将需要的工具
- Maven 3.0+ 是您的构建工具
- 你最喜欢的 IDE。我们使用 Eclipse。
- JDK 1.8+
完整的 spring booot rest Maven 项目代码示例子
我们的 Github 存储库包含所有代码示例 - https://github.com/in28minutes/in28minutes.github.io/tree/master/code-zip-files
带有单元和集成测试的 REST 服务
Website-springbootrestservices-simplerestserviceswithunitandintegrationtests.zip
什么是 REST?
REST 代表 REpresentational State Transfer。REST 指定了一组体系结构约束。任何满足以下这些条件的服务都称为 RESTful 服务。
RESTful Web Service 的五个重要条件:
- 客户端 - 服务器:应该有一个服务生产者和一个服务使用者。
- 接口(URL)是统一的并且暴露资源。
- 该服务是无状态的。
- 服务结果应该是可缓存的。例如 HTTP 缓存。
- 服务应该采用分层架构。客户端不应该直接连接到服务器 - 它可能从中间层获取信息 - 缓存。
理查森成熟度模型
Richardson 成熟度模型用于识别 Restful Web Service 的成熟度级别。以下是不同级别和特点:
级别 0:以 REST 风格公开 SOAP Web 服务。公开的操作使用 REST 服务(http:// server / getPosts,http:// server / deletePosts,http:// server / doThis,http:// server / doThat 等)。
级别 1:使用正确的 URI(使用名词)公开资源。例如:http:// server / accounts,http:// server / accounts / 10。但是,HTTP 方法并未使用。
级别 2:资源使用正确的 URI + HTTP 方法。例如,要更新一个账户,你需要做一个 PUT。创建一个帐户,你做一个 POST。Uri 看起来像 posts/1/comments/5 和 accounts/1/friends/1.
等级 3:HATEOAS (Hypermedia as the engine of application state)。您不仅可以了解所请求的信息,还可以了解服务消费者可以采取的下一个可能的操作。当请求有关 Facebook 用户的信息时,REST 服务可以返回用户详细信息以及有关如何获取他最近的帖子,如何获取他最近的评论以及如何检索他朋友的列表的信息。
使用适当的请求方法
始终使用 HTTP 方法。有关每种 HTTP 方法的最佳做法如下所述:
GET:不应该更新任何东西。应该是幂等的(多次调用相同的结果)。可能的返回码 200(OK)+ 404(NOT FOUND)+400(BAD REQUEST)
POST:应该创建新的资源。理想情况下返回 JSON 和链接到新创建的资源。尽可能使用相同的返回码。另外:返回码 201(创建)是可能的。
PUT:更新已知资源。例如:更新客户详细信息。可能的返回码:200(OK)
DELETE:用于删除资源。
项目结构
以下屏幕截图显示了我们将创建的项目的结构。

一些细节:
- StudentController.java - rest 控制器提供上面讨论的所有三种服务方法。
- Course.java, Student.java, StudentService.java - 应用程序的业务逻辑。StudentService 提供了一些我们从 Rest 控制器中消耗的方法。
- StudentControllerIT.java - rest 服务的集成测试。
- StudentControllerTest.java - test 服务的单元测试。
- StudentServicesApplication.java - Spring Boot 应用程序的启动器。要运行该应用程序,只需将该文件作为 Java 应用程序启动。
- pom.xml - 包含构建此项目所需的所有依赖。我们将使用 Spring Boot Starter Web。
使用 Spring Initializr 引导创建 REST 服务
用 Spring Initializr 创建一个 REST 服务是非常的容易小菜一碟。我们将使用 Spring Web MVC 作为我们的 web 层框架。
Spring Initializr http://start.spring.io/ 是引导创建 Spring Boot 项目的好工具。
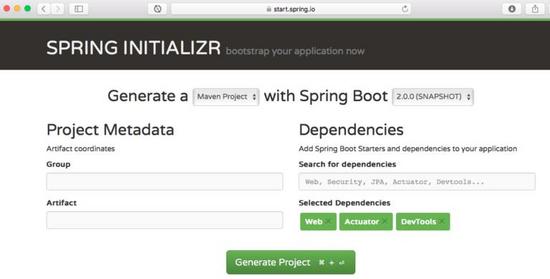
如上图所示,必须执行以下步骤
启动 Spring Initializr 并选择以下内容
选择 com.in28minutes.springboot 为 Group
选择 student-services 为 Artifact
选择以下依赖项
- Web
- Actuator
- DevTools
点击生成项目。
将项目导入 Eclipse。文件 - > 导入 - > 现有的 Maven 项目。
如果你想了解这个项目的所有文件,你可以继续向下阅读。
应用业务层实现
所有应用都需要数据。我们将使用 ArrayList 这种内存数据存储,而不是与真实数据库交互。
一名学生可以参加多门课程。课程有一个 ID,名称,说明和完成课程需要完成的步骤列表。学生有一个身份证,姓名,说明和他 / 她目前注册的课程列表。StudentService 提供以下公开方法
public List retrieveAllStudents() - 检索所有学生的详细信息
public Student retrieveStudent(String studentId) - 检索特定的学生详细信息
public List retrieveCourses(String studentId) - 检索学生注册的所有课程
public Course retrieveCourse(String studentId, String courseId) - 检索学生注册的特定课程的详细信息
public Course addCourse(String studentId, Course course) - 为现有学生添加课程
请参阅下面这些文件,具体的实现服务类 StudentService 和模型类 Course 和 Student。
- src/main/java/com/in28minutes/springboot/model/Course.java
- src/main/java/com/in28minutes/springboot/model/Student.java
- src/main/java/com/in28minutes/springboot/service/StudentService.java
添加几个 GET Rest 服务
Rest 服务 StudentController 暴露了几个 get 服务。
- @Autowired private StudentService studentService :我们使用 Spring Autowiring 将 student 服务自动注入到 StudentController。
- @GetMapping(“/students/{studentId}/courses”):以 studentId 作为路径变量公开获取服务
- @GetMapping(“/students/{studentId}/courses/{courseId}”):公开获取服务以检索学生的特定课程。
- @PathVariable String studentId:来自 uri 的 studentId 的值将映射到此参数。
package com.in28minutes.springboot.controller;
import java.util.List;
import org.springframework.beans.factory.annotation.Autowired;
import org.springframework.web.bind.annotation.GetMapping;
import org.springframework.web.bind.annotation.PathVariable;
import org.springframework.web.bind.annotation.RestController;
import com.in28minutes.springboot.model.Course;
import com.in28minutes.springboot.service.StudentService;
@RestController
public class StudentController {

	@Autowired
	private StudentService studentService;

	@GetMapping("/students/{studentId}/courses")
	public List<Course> retrieveCoursesForStudent(@PathVariable String studentId) {
		return studentService.retrieveCourses(studentId);
	}

	@GetMapping("/students/{studentId}/courses/{courseId}")
	public Course retrieveDetailsForCourse(@PathVariable String studentId,
			@PathVariable String courseId) {
		return studentService.retrieveCourse(studentId, courseId);
	}
}
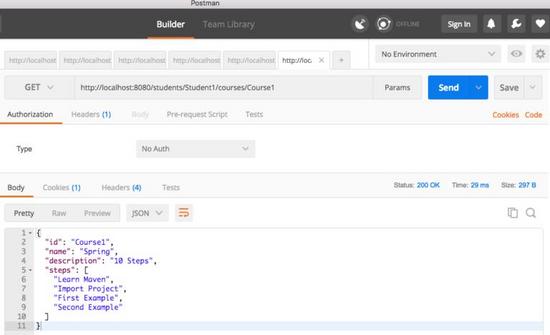
使用 Postman 执行获取服务
我们将向 http:// localhost:8080 / students / Student1 / courses / Course1 发起请求以测试该服务。回应如下所示。
{
 "id": "Course1",
 "name": "Spring",
 "description": "10 Steps",
 "steps": [
  "Learn Maven",
  "Import Project",
  "First Example",
  "Second Example"
 ]
}
下面的图片显示了我们如何执行 Postman 的 Get Service - 我最喜欢的运行 rest 服务的工具。
添加 POST Rest 服务
当资源创建成功时,POST 服务应该返回创建的状态(201)。
- @PostMapping(“/students/{studentId}/courses”):为 POST 请求映射 URL
- @RequestBody Course newCourse:使用绑定将请求正文绑定到课程对象。
- ResponseEntity.created(location).build():返回已创建的状态。还将创建资源的位置作为响应标题返回。
@PostMapping("/students/{studentId}/courses")
	public ResponseEntity<Void> registerStudentForCourse(
			@PathVariable String studentId, @RequestBody Course newCourse) {

		Course course = studentService.addCourse(studentId, newCourse);
		if (course == null)
			return ResponseEntity.noContent().build();
		URI location = ServletUriComponentsBuilder.fromCurrentRequest().path(
				"/{id}").buildAndExpand(course.getId()).toUri();
		return ResponseEntity.created(location).build();
	}
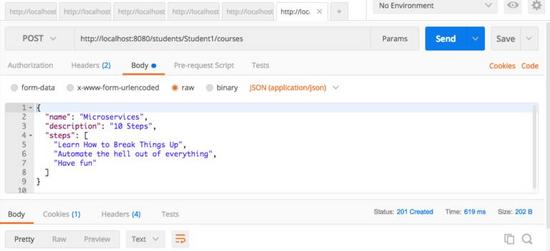
执行 POST Rest 服务
示例请求如下所示。它包含了学生注册课程的所有细节。
{
 "name": "Microservices",
 "description": "10 Steps",
 "steps": [
  "Learn How to Break Things Up",
  "Automate the hell out of everything",
  "Have fun"
 ]
}
下图显示了我们如何从 Postman 执行 Post 服务 - 我最喜欢的运行 rest 服务的工具。确保你去 Body 选项卡并选择 raw。从下拉菜单中选择 JSON。将上述请求复制到 body 中。
我们使用的 URL 是 http:// localhost:8080 / students / Student1 / courses。
完整的代码示例
pom.xml
<?xml version="1.0" encoding="UTF-8"?>
<project xmlns="http://maven.apache.org/POM/4.0.0" xmlns:xsi="http://www.w3.org/2001/XMLSchema-instance"
	xsi:schemaLocation="http://maven.apache.org/POM/4.0.0 http://maven.apache.org/xsd/maven-4.0.0.xsd">
	<modelVersion>4.0.0</modelVersion>

	<groupId>com.in28minutes.springboot</groupId>
	<artifactId>student-services</artifactId>
	<version>0.0.1-SNAPSHOT</version>
	<packaging>jar</packaging>

	<name>student-services</name>
	<description>Demo project for Spring Boot</description>

	<parent>
		<groupId>org.springframework.boot</groupId>
		<artifactId>spring-boot-starter-parent</artifactId>
		<version>1.4.4.RELEASE</version>
		<relativePath/> <!-- lookup parent from repository -->
	</parent>

	<properties>
		<project.build.sourceEncoding>UTF-8</project.build.sourceEncoding>
		<project.reporting.outputEncoding>UTF-8</project.reporting.outputEncoding>
		<java.version>1.8</java.version>
	</properties>

	<dependencies>
		<dependency>
			<groupId>org.springframework.boot</groupId>
			<artifactId>spring-boot-starter-actuator</artifactId>
		</dependency>
		<dependency>
			<groupId>org.springframework.boot</groupId>
			<artifactId>spring-boot-starter-web</artifactId>
		</dependency>

		<dependency>
			<groupId>org.springframework.boot</groupId>
			<artifactId>spring-boot-devtools</artifactId>
			<scope>runtime</scope>
		</dependency>
		<dependency>
			<groupId>org.springframework.boot</groupId>
			<artifactId>spring-boot-starter-test</artifactId>
			<scope>test</scope>
		</dependency>
	</dependencies>

	<build>
		<plugins>
			<plugin>
				<groupId>org.springframework.boot</groupId>
				<artifactId>spring-boot-maven-plugin</artifactId>
			</plugin>
		</plugins>
	</build>
</project>
src/main/java/com/in28minutes/springboot/controller/StudentController.java
import java.net.URI;
import java.util.List;
import org.springframework.beans.factory.annotation.Autowired;
import org.springframework.http.ResponseEntity;
import org.springframework.web.bind.annotation.GetMapping;
import org.springframework.web.bind.annotation.PathVariable;
import org.springframework.web.bind.annotation.PostMapping;
import org.springframework.web.bind.annotation.RequestBody;
import org.springframework.web.bind.annotation.RestController;
import org.springframework.web.servlet.support.ServletUriComponentsBuilder;

import com.in28minutes.springboot.model.Course;
import com.in28minutes.springboot.service.StudentService;

@RestController
public class StudentController {

	@Autowired
	private StudentService studentService;

	@GetMapping("/students/{studentId}/courses")
	public List<Course> retrieveCoursesForStudent(@PathVariable String studentId) {
		return studentService.retrieveCourses(studentId);
	}

	@GetMapping("/students/{studentId}/courses/{courseId}")
	public Course retrieveDetailsForCourse(@PathVariable String studentId,
			@PathVariable String courseId) {
		return studentService.retrieveCourse(studentId, courseId);
	}

	@PostMapping("/students/{studentId}/courses")
	public ResponseEntity<Void> registerStudentForCourse(
			@PathVariable String studentId, @RequestBody Course newCourse) {

		Course course = studentService.addCourse(studentId, newCourse);

		if (course == null)
			return ResponseEntity.noContent().build();

		URI location = ServletUriComponentsBuilder.fromCurrentRequest().path(
				"/{id}").buildAndExpand(course.getId()).toUri();

		return ResponseEntity.created(location).build();
	}
}
src/main/java/com/in28minutes/springboot/model/Course.java
import java.util.List;
public class Course {
	private String id;
	private String name;
	private String description;
	private List<String> steps;

	// Needed by Caused by: com.fasterxml.jackson.databind.JsonMappingException:
	// Can not construct instance of com.in28minutes.springboot.model.Course:
	// no suitable constructor found, can not deserialize from Object value
	// (missing default constructor or creator, or perhaps need to add/enable
	// type information?)
	public Course() {

	}

	public Course(String id, String name, String description, List<String> steps) {
		super();
		this.id = id;
		this.name = name;
		this.description = description;
		this.steps = steps;
	}

	public String getId() {
		return id;
	}

	public void setId(String id) {
		this.id = id;
	}

	public String getDescription() {
		return description;
	}

	public String getName() {
		return name;
	}

	public List<String> getSteps() {
		return steps;
	}

	@Override
	public String toString() {
		return String.format(
				"Course [id=%s, name=%s, description=%s, steps=%s]", id, name,
				description, steps);
	}

	@Override
	public int hashCode() {
		final int prime = 31;
		int result = 1;
		result = prime * result + ((id == null) ? 0 : id.hashCode());
		return result;
	}

	@Override
	public boolean equals(Object obj) {
		if (this == obj)
			return true;
		if (obj == null)
			return false;
		if (getClass() != obj.getClass())
			return false;
		Course other = (Course) obj;
		if (id == null) {
			if (other.id != null)
				return false;
		} else if (!id.equals(other.id))
			return false;
		return true;
	}
}
src/main/java/com/in28minutes/springboot/model/Student.java
package com.in28minutes.springboot.model;

import java.util.List;

public class Student {
	private String id;
	private String name;
	private String description;
	private List<Course> courses;

	public Student(String id, String name, String description,
			List<Course> courses) {
		super();
		this.id = id;
		this.name = name;
		this.description = description;
		this.courses = courses;
	}

	public String getId() {
		return id;
	}

	public void setId(String id) {
		this.id = id;
	}

	public String getName() {
		return name;
	}

	public void setName(String name) {
		this.name = name;
	}

	public String getDescription() {
		return description;
	}

	public void setDescription(String description) {
		this.description = description;
	}

	public List<Course> getCourses() {
		return courses;
	}

	public void setCourses(List<Course> courses) {
		this.courses = courses;
	}

	@Override
	public String toString() {
		return String.format(
				"Student [id=%s, name=%s, description=%s, courses=%s]", id,
				name, description, courses);
	}
}
src/main/java/com/in28minutes/springboot/service/StudentService.java
package com.in28minutes.springboot.service;

import java.math.BigInteger;
import java.security.SecureRandom;
import java.util.ArrayList;
import java.util.Arrays;
import java.util.List;

import org.springframework.stereotype.Component;

import com.in28minutes.springboot.model.Course;
import com.in28minutes.springboot.model.Student;

@Component
public class StudentService {

	private static List<Student> students = new ArrayList<>();

	static {
		//Initialize Data
		Course course1 = new Course("Course1", "Spring", "10 Steps", Arrays
				.asList("Learn Maven", "Import Project", "First Example",
						"Second Example"));
		Course course2 = new Course("Course2", "Spring MVC", "10 Examples",
				Arrays.asList("Learn Maven", "Import Project", "First Example",
						"Second Example"));
		Course course3 = new Course("Course3", "Spring Boot", "6K Students",
				Arrays.asList("Learn Maven", "Learn Spring",
						"Learn Spring MVC", "First Example", "Second Example"));
		Course course4 = new Course("Course4", "Maven",
				"Most popular maven course on internet!", Arrays.asList(
						"Pom.xml", "Build Life Cycle", "Parent POM",
						"Importing into Eclipse"));

		Student ranga = new Student("Student1", "Ranga Karanam",
				"Hiker, Programmer and Architect", new ArrayList<>(Arrays
						.asList(course1, course2, course3, course4)));

		Student satish = new Student("Student2", "Satish T",
				"Hiker, Programmer and Architect", new ArrayList<>(Arrays
						.asList(course1, course2, course3, course4)));

		students.add(ranga);
		students.add(satish);
	}

	public List<Student> retrieveAllStudents() {
		return students;
	}

	public Student retrieveStudent(String studentId) {
		for (Student student : students) {
			if (student.getId().equals(studentId)) {
				return student;
			}
		}
		return null;
	}

	public List<Course> retrieveCourses(String studentId) {
		Student student = retrieveStudent(studentId);

		if (student == null) {
			return null;
		}

		return student.getCourses();
	}

	public Course retrieveCourse(String studentId, String courseId) {
		Student student = retrieveStudent(studentId);

		if (student == null) {
			return null;
		}

		for (Course course : student.getCourses()) {
			if (course.getId().equals(courseId)) {
				return course;
			}
		}

		return null;
	}

	private SecureRandom random = new SecureRandom();

	public Course addCourse(String studentId, Course course) {
		Student student = retrieveStudent(studentId);

		if (student == null) {
			return null;
		}

		String randomId = new BigInteger(130, random).toString(32);
		course.setId(randomId);

		student.getCourses().add(course);

		return course;
	}
}
src/main/java/com/in28minutes/springboot/StudentServicesApplication.java
package com.in28minutes.springboot;
import org.springframework.boot.SpringApplication;
import org.springframework.boot.autoconfigure.SpringBootApplication;

@SpringBootApplication
public class StudentServicesApplication {

	public static void main(String[] args) {
		SpringApplication.run(StudentServicesApplication.class, args);
	}
}
以上就是本文的全部内容,希望对大家的学习有所帮助,也希望大家多多支持我们。
您可能感兴趣的文章:
- SpringBoot构建Restful service完成Get和Post请求
- Spring Boot(四)之使用JWT和Spring Security保护REST API
- Spring Boot集成springfox-swagger2构建restful API的方法教程
- SpringBoot集成Swagger2实现Restful(类型转换错误解决办法)
- 详解Spring Boot实战之Rest接口开发及数据库基本操作
- 详解使用Spring Boot开发Restful程序
- 详解SpringBoot restful api的单元测试
- Spring Boot 实现Restful webservice服务端示例代码
- 使用SpringBoot开发Restful服务实现增删改查功能
相关推荐
-
SpringBoot构建Restful service完成Get和Post请求
一个基本的RESTfule service最进场向外提供的请求Method就是Get和Post. 在Get中,常用的都会在请求上带上参数,或者是路径参数.响应Json. 在Post中,常用的会提交form data或者json data作为参数,响应Json. 1. Get请求,url传参,返回json. 先准备一个请求后,响应的对象. package com.example.demo; public class Echo { private final long id; private fin
-
Spring Boot 实现Restful webservice服务端示例代码
1.Spring Boot configurations application.yml spring: profiles: active: dev mvc: favicon: enabled: false datasource: driver-class-name: com.mysql.jdbc.Driver url: jdbc:mysql://localhost:3306/wit_neptune?createDatabaseIfNotExist=true&useUnicode=true&
-
SpringBoot集成Swagger2实现Restful(类型转换错误解决办法)
pom.xml增加依赖包 <dependency> <groupId>io.springfox</groupId> <artifactId>springfox-swagger2</artifactId> <version>2.2.2</version> </dependency> <dependency> <groupId>io.springfox</groupId> <
-

详解使用Spring Boot开发Restful程序
一.简介 Spring Boot是由Pivotal团队提供的全新框架,其设计目的是用来简化新spring应用的初始搭建以及开发过程.该框架使用了特定的方式来进行配置,从而使开发人员不再需要定义样板化的配置.通过这种方式,Boot致力于在蓬勃发展的快速应用开发领域(rapid application development)成为领导者. 多年以来,Spring IO平台饱受非议的一点就是大量的XML配置以及复杂的依赖管理.在去年的SpringOne 2GX会议上,Pivotal的CTO Adria
-
详解SpringBoot restful api的单元测试
现在我们来利用Spring Boot来构建一个RestFul API,具体如下: 1.添加Springboot测试注解 @RunWith(SpringRunner.class) @SpringBootTest public class UserControllerTest { } 2.伪造mvc环境 // 注入Spring 工厂 @Autowired private WebApplicationContext wac; //伪造mvc环境 private MockMvc mockMvc; @Be
-
Spring Boot(四)之使用JWT和Spring Security保护REST API
通常情况下,把API直接暴露出去是风险很大的,不说别的,直接被机器攻击就喝一壶的.那么一般来说,对API要划分出一定的权限级别,然后做一个用户的鉴权,依据鉴权结果给予用户开放对应的API.目前,比较主流的方案有几种: 用户名和密码鉴权,使用Session保存用户鉴权结果. 使用OAuth进行鉴权(其实OAuth也是一种基于Token的鉴权,只是没有规定Token的生成方式) 自行采用Token进行鉴权 第一种就不介绍了,由于依赖Session来维护状态,也不太适合移动时代,新的项目就不要采用了.
-
Spring Boot集成springfox-swagger2构建restful API的方法教程
前言 之前跟大家分享了Spring MVC集成springfox-swagger2构建restful API,简单写了如何在springmvc中集成swagger2.这边记录下在springboot中如何集成swagger2.其实使用基本相同. 方法如下: 首先还是引用相关jar包.我使用的maven,在pom.xml中引用相关依赖(原来我使用的是2.2.0的,现在使用2.4.0的): <dependency> <groupId>io.springfox</groupId&g
-
使用SpringBoot开发Restful服务实现增删改查功能
在去年的时候,在各种渠道中略微的了解了SpringBoot,在开发web项目的时候是如何的方便.快捷.但是当时并没有认真的去学习下,毕竟感觉自己在Struts和SpringMVC都用得不太熟练.不过在看了很多关于SpringBoot的介绍之后,并没有想象中的那么难,于是开始准备学习SpringBoot. 在闲暇之余的时候,看了下SpringBoot实战以及一些大神关于SpringBoot的博客之后,开始写起了我的第一个SpringBoot的项目.在能够对SpringBoot进行一些简单的开发Re
-
详解Spring Boot实战之Rest接口开发及数据库基本操作
本文介绍了Spring Boot实战之Rest接口开发及数据库基本操作,分享给大家 1.修改pom.xml,添加依赖库,本文使用的是mysql <dependency> <groupId>org.springframework.boot</groupId> <artifactId>spring-boot-starter-data-jpa</artifactId> </dependency> <dependency> <
-
详解spring boot rest例子
简介:本文将帮助您使用 Spring Boot 创建简单的 REST 服务. 你将学习 什么是 REST 服务? 如何使用 Spring Initializr 引导创建 Rest 服务应用程序? 如何创建获取 REST 服务以检索学生注册的课程? 如何为学生注册课程创建 Post REST 服务? 如何利用 postman 执行 rest 服务? 本教程使用的 rest 服务 在本教程中,我们将使用适当的 URI 和 HTTP 方法创建三个服务: @GetMapping("/ students
-
详解Spring Boot中使用Flyway来管理数据库版本
如果没有读过上面内容的读者,有兴趣的可以一阅.在上面的使用JdbcTemplate一文中,主要通过spring提供的JdbcTemplate实现对用户表的增删改查操作.在实现这个例子的时候,我们事先在MySQL中创建了用户表.创建表的过程我们在实际开发系统的时候会经常使用,但是一直有一个问题存在,由于一个系统的程序版本通过git得到了很好的版本控制,而数据库结构并没有,即使我们通过Git进行了语句的版本化,那么在各个环境的数据库中如何做好版本管理呢?下面我们就通过本文来学习一下在Spring B
-
详解Spring Boot 访问Redis的三种方式
目录 前言 开始准备 RedisTemplate JPA Repository Cache 总结 前言 最近在极客时间上面学习丁雪丰老师的<玩转 Spring 全家桶>,其中讲到访问Redis的方式,我专门把他们抽出来,在一起对比下,体验一下三种方式开发上面的不同, 分别是这三种方式 RedisTemplate JPA Repository Cache 开始准备 开始之前我们需要有Redis安装,我们采用本机Docker运行Redis, 主要命令如下 docker pull redis doc
-
详解spring boot starter redis配置文件
spring-boot-starter-Redis主要是通过配置RedisConnectionFactory中的相关参数去实现连接redis service. RedisConnectionFactory是一个接口,有如下4个具体的实现类,我们通常使用的是JedisConnectionFactory. 在spring boot的配置文件中redis的基本配置如下: # Redis服务器地址 spring.redis.host=192.168.0.58 # Redis服务器连接端口 spring.
-
实例详解Spring Boot实战之Redis缓存登录验证码
本章简单介绍redis的配置及使用方法,本文示例代码在前面代码的基础上进行修改添加,实现了使用redis进行缓存验证码,以及校验验证码的过程. 1.添加依赖库(添加redis库,以及第三方的验证码库) <dependency> <groupId>org.springframework.boot</groupId> <artifactId>spring-boot-starter-redis</artifactId> </dependency&
-
详解Spring boot Admin 使用eureka监控服务
前言 最近刚好有空,来学习一下如何搭建spring boot admin环境.其中遇到很多的坑. 网上大多都是使用admin-url的方式直接来监控的,感觉一点也不灵活,这不是我想要的结果,所以本篇介绍借助eureka服务注册和发现功能来灵活监控程序. 本文主要记录spring boot admin的搭建过程,希望能有所帮助.其实非常的简单,不要被使用常规方式的误导! 环境介绍 IDE:intellij idea jdk: java8 maven:3.3.9 spring boot:1.5.6
-
详解spring boot jpa整合QueryDSL来简化复杂操作
前言 使用过spring data jpa的同学,都很清楚,对于复杂的sql查询,处理起来还是比较复杂的,而本文中的QueryDSL就是用来简化JPA操作的. Querydsl定义了一种常用的静态类型语法,用于在持久域模型数据之上进行查询.JDO和JPA是Querydsl的主要集成技术.本文旨在介绍如何使用Querydsl与JPA组合使用.JPA的Querydsl是JPQL和Criteria查询的替代方法.QueryDSL仅仅是一个通用的查询框架,专注于通过Java API构建类型安全的SQL查
-
详解Spring Boot 目录文件结构
1.目录结构 src/main/java:存放代码 src/main/resources resources:(Spring Boot 默认的)存放资源文件 static:(Spring Boot 默认的)存放静态文件,比如 css.js.image, (访问方式 http://localhost:8080/js/main.js) public:(Spring Boot 默认的)存放公共文件 templates:(用户自己定义的,可以随便取名,但这里使用公认的文件名)存放静态页面,比如 jsp.
-
详解Spring Boot 打包分离依赖JAR 和配置文件
1:自定义路径 <properties> <!--自定义路径--> <directory>d:/im/</directory> </properties> 2:把配置文件打包出来 <build> <plugins> <!--上线部署 JAR启动分离依赖lib和配置--> <!--打包jar--> <plugin> <groupId>org.apache.maven.plugi
-
详解Spring Boot使用系统参数表提升系统的灵活性
目录 一.使用系统参数表的好处 二.系统参数表的表结构 三.系统参数表在项目中的使用 3.1.Entity类 3.2.Dao类 3.3.Service类 3.4.ServiceImpl类 3.5.全局配置服务类 3.6.启动时加载 3.7.在服务实现类中访问系统参数 一.使用系统参数表的好处 以数据库表形式存储的系统参数表比配置文件(.properties文件或.yaml文件)要更灵活,因为无需重启系统就可以动态更新. 系统参数表可用于存储下列数据: 表字段枚举值,如下列字段: `ques