SpringBoot整合Mybatis与thymleft实现增删改查功能详解
首先我们先创建项目 注意:创建SpringBoot项目时一定要联网不然会报错


项目创建好后我们首先对 application.yml 进行编译

#指定端口号
server:
port: 8888
#配置mysql数据源
spring:
datasource:
driver-class-name: com.mysql.cj.jdbc.Driver
url: jdbc:mysql://localhost:3306/nba?serverTimezone=Asia/Shanghai
username: root
password: root
#配置模板引擎 thymeleaf
thymeleaf:
mode: HTML5
cache: false
suffix: .html
prefix: classpath:/templates/
mybatis:
mapper-locations: classpath:/mapper/*.xml
type-aliases-package: com.bdqn.springboot #放包名
注意:在 :后一定要空格,这是他的语法,不空格就会运行报错
接下来我们进行对项目的构建 创建好如下几个包 可根据自己实际需要创建其他的工具包之类的
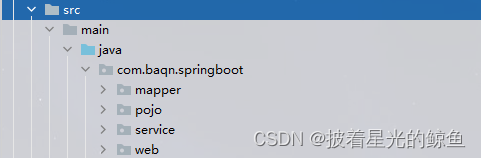
mapper:用于存放dao层接口
pojo:用于存放实体类
service:用于存放service层接口,以及service层实现类
web:用于存放controller控制层
接下来我们开始编写代码
首先是实体类,今天做的是一个两表的简单增删改查
package com.baqn.springboot.pojo;
import lombok.Data;
@Data
public class Clubs {
    private int cid;
    private String cname;
    private String city;
}
package com.baqn.springboot.pojo;
import lombok.Data;
@Data
public class Players {
    private int pid;
    private String pname;
    private String birthday;
    private int height;
    private int weight;
    private String position;
    private int cid;
    private String cname;
    private String city;
}
使用@Data注解可以有效减少实体类中的代码数量,缩减了对于get/set和toString的编写
然后是mapper层
package com.baqn.springboot.mapper;
import com.baqn.springboot.pojo.Players;
import org.apache.ibatis.annotations.Mapper;
import org.apache.ibatis.annotations.Param;
import org.springframework.stereotype.Repository;
import java.util.List;
@Mapper
@Repository
public interface PlayersMapper {
    /**
     * 查询所有
     * @return
     */
    List<Players> findAll();
    /**
     * 根据ID查询
     * @return
     */
    Players findById(Integer id);
    /**
     * 新增
     * @param players
     * @return
     */
    Integer add(Players players);
    /**
     * 删除
     * @param pid
     * @return
     */
    Integer delete(Integer pid);
    /**
     * 修改
     * @param players
     * @return
     */
    Integer update(Players players);
}
使用@mapper后,不需要在spring配置中设置扫描地址,通过mapper.xml里面的namespace属性对应相关的mapper类,spring将动态的生成Bean后注入到Servicelmpl中。
然后是service层
package com.baqn.springboot.service;
import com.baqn.springboot.pojo.Players;
import org.apache.ibatis.annotations.Param;
import java.util.List;
public interface PlayersService {
    List<Players> findAll();
    Players findById(Integer pid);
    Integer add(Players players);
    Integer delete(Integer pid);
    Integer update(Players players);
}
package com.baqn.springboot.service;
import com.baqn.springboot.mapper.PlayersMapper;
import com.baqn.springboot.pojo.Players;
import org.springframework.beans.factory.annotation.Autowired;
import org.springframework.stereotype.Service;
import java.util.List;
@Service
public class PlayersServiceImpl implements  PlayersService{
    @Autowired
    private PlayersMapper mapper;
    @Override
    public List<Players> findAll() {
        return mapper.findAll();
    }
    @Override
    public Players findById(Integer pid) {
        return mapper.findById(pid);
    }
    @Override
    public Integer add(Players players) {
        return mapper.add(players);
    }
    @Override
    public Integer delete(Integer pid) {
        return mapper.delete(pid);
    }
    @Override
    public Integer update(Players players) {
        return mapper.update(players);
    }
}
最后是web层的controller控制类
package com.baqn.springboot.web;
import com.baqn.springboot.pojo.Players;
import com.baqn.springboot.service.PlayersServiceImpl;
import org.springframework.beans.factory.annotation.Autowired;
import org.springframework.stereotype.Controller;
import org.springframework.ui.Model;
import org.springframework.web.bind.annotation.PathVariable;
import org.springframework.web.bind.annotation.RequestMapping;
import java.util.List;
@Controller
public class PlayersController {
    @Autowired
    private PlayersServiceImpl service;
    @RequestMapping("/findAll")
    public String findAll(Model model) {
        List<Players> allList = service.findAll();
        model.addAttribute("allList",allList);
        return "index";
    }
    @RequestMapping("/findById/{pid}")
    public String findById(Model model,@PathVariable("pid") Integer pid) {
        Players list = service.findById(pid);
        //System.out.println("---------------"+list.toString());
        model.addAttribute("list",list);
        return "update.html";
    }
    @RequestMapping("/add")
    public String add(Model model, Players players){
        Integer count = service.add(players);
        if (count>0){
            return "redirect:/findAll";
        }
        return "add";
    }
    @RequestMapping("/delete/{pid}")
    public String delete(Model model,@PathVariable("pid") Integer pid){
        Integer count = service.delete(pid);
        if (count>0){
            return "redirect:/findAll";
        }
        return null;
    }
    @RequestMapping("/a1")
    public String a1(Model model, Players players){
        return "add.html";
    }
    @RequestMapping("/update")
    public String update(Model model,Players plays){
        Integer count = service.update(plays);
        if (count>0){
            return "redirect:/findAll";
        }
        return null;
    }
}
注意:a1方法仅仅是用于跳转页面,并没有其他作用,如果有更好的跳转方法可以给我留言哦
现在准备工作都做完了,可以开始编写SQL语句了

mapper.xml可以写在下面resources里面也可以写在上面的mapper层里
如果写在上面的话需要在pom里面写一个资源过滤器,有兴趣的话可以去百度
<?xml version="1.0" encoding="UTF-8" ?>
<!DOCTYPE mapper
        PUBLIC "-//mybatis.org//DTD Mapper 3.0//EN"
        "http://mybatis.org/dtd/mybatis-3-mapper.dtd">
<!--namespace=绑定一个对应的Dao/Mapper接口-->
<mapper namespace="com.baqn.springboot.mapper.PlayersMapper">
    <select id="findAll" resultType="com.baqn.springboot.pojo.Players">
        select * from clubs c , players p
        where c.cid = p.cid
    </select>
    <select id="findById" resultType="com.baqn.springboot.pojo.Players">
        select * from clubs c , players p
        where c.cid = p.cid and p.pid=#{pid}
    </select>
    <insert id="add" parameterType="com.baqn.springboot.pojo.Players">
        INSERT INTO `nba`.`players`(pname, birthday, height, weight, position, cid)
        VALUES (#{pname}, #{birthday}, #{height}, #{weight}, #{position}, #{cid});
    </insert>
    <delete id="delete" parameterType="int">
        delete from players where pid = #{pid}
    </delete>
    <update id="update" parameterType="com.baqn.springboot.pojo.Players">
        UPDATE `nba`.`players`
        <set>
            <if test="pname != null">pname=#{pname},</if>
            <if test="birthday != null">birthday=#{birthday},</if>
            <if test="height != null">height=#{height},</if>
            <if test="weight != null">weight=#{weight},</if>
            <if test="position != null">position=#{position},</if>
            <if test="cid != null">cid=#{cid}</if>
        </set>
        WHERE `pid` = #{pid};
    </update>
</mapper>
注意:mapper.xml中的id里对应的是mapper层接口的方法,一定不能写错
到现在为止我们的后端代码就已经完全搞定了,前端页面如下
主页 index.html
<html>
<head>
    <title>Title</title>
</head>
<body>
<div align="center">
    <table border="1">
        <h1>美国职业篮球联盟(NBA)球员信息</h1>
        <a th:href="@{/a1}" rel="external nofollow" >新增</a>
        <tr>
            <th>球员编号</th>
            <th>球员名称</th>
            <th>出生时间(yyyy-MM-dd)</th>
            <th>球员身高(cm)</th>
            <th>球员体重(kg)</th>
            <th>球员位置</th>
            <th>所属球队</th>
            <th>相关操作</th>
        </tr>
        <!--/*@thymesVar id="abc" type=""*/-->
        <tr th:each="list : ${allList}">
                <td th:text="${list.pid}"></td>
                <td th:text="${list.pname}"></td>
                <td th:text="${list.birthday}"></td>
                <td th:text="${list.height}">${list.height}</td>
                <td th:text="${list.weight}"></td>
                <td th:text="${list.position}"></td>
                <td th:text="${list.cname}"></td>
                <td>
                    <a th:href="@{'/findById/'+${list.pid}}" rel="external nofollow" >修改</a>
                    <a th:href="@{'/delete/'+${list.pid}}" rel="external nofollow" >删除</a>
                </td>
            </tr>
        </c:forEach>
    </table>
</div>
</body>
</html>
新增页 add.html
<!DOCTYPE html>
<html>
      <head>
      <title>Title</title>
</head>
<body>
<div align="center">
  <h3 align="center">新增球员</h3>
  <form action="/add">
    <p>
      球员名称:
      <input name="pname" id="pname">
    </p >
    <p>
      出生日期:
      <input name="birthday" id="birthday">
    </p >
    <p>
      球员升高:
      <input name="height" id="height">
    </p >
    <p>
      球员体重:
      <input name="weight" id="weight">
    </p >
    <p>
      球员位置:
      <input type="radio"  name="position" value="控球后卫"/>控球后卫
      <input type="radio"  name="position" value="得分后卫"/>得分后卫
      <input type="radio"  name="position" value="小前锋" />小前锋
      <input type="radio"  name="position" value="大前锋" />大前锋
      <input type="radio"  name="position" value="中锋"/>中锋
    </p >
    <p>
      所属球队:
      <select name="cid">
        <option value="1">热火队</option>
        <option value="2">奇才队</option>
        <option value="3">魔术队</option>
        <option value="4">山猫队</option>
        <option value="5">老鹰队</option>
      </select>
    </p >
    <input type="submit" value="保存">
    <input type="reset" value="重置">
  </form>
</div>
</body>
</html>
修改页 update.html
<!DOCTYPE html>
<html  xmlns:th="http://www.thymeleaf.org">
<head>
  <meta charset="UTF-8">
  <title>Title</title>
</head>
<body class="container">
    <div align="center">
      <h1>修改球员信息</h1>
      <br/>
      <form action="/update" method="get" id="form2">
        <table>
          <tr>
            <td colspan="2"></td>
          </tr>
          <tr>
            <td>球员编号:</td>
            <td><input type="text" name="pid"
                                    id="pid" th:value="${list.pid}"/></td>
          </tr>
          <tr>
            <td>球员姓名:</td>
            <td><input type="text" name="pname"
                                    id="pname" th:value="${list.pname}"/></td>
          </tr>
          <tr>
            <td>出身日期:</td>
            <td><input type="text" name="birthday"
                                    id="birthday" th:value="${list.birthday}"/></td>
          </tr>
          <tr>
            <td>球员身高:</td>
            <td><input type="text" name="height"
                                    id="height" th:value="${list.height}"/></td>
          </tr>
          <tr>
            <td>球员体重:</td>
            <td><input type="text" name="weight"
                                    id="weight" th:value="${list.weight}"/></td>
          </tr>
          <tr>
            <td>球员位置:</td>
            <td><input type="text" name="position"
                                    id="position" th:value="${list.position}"/></td>
          </tr>
          <tr>
            <td>所属球队:</td>
            <td>
              <select name="cid" id="cid" th:value="${list.cid}"/>
              <option value="">--请选择球队--</option>
              <option value="1">热火队</option>
              <option value="2">奇才队</option>
              <option value="3">魔术队</option>
              <option value="4">山猫队</option>
              <option value="5">老鹰队</option>
              </select></td>
          </tr>
          <tr>
            <td colspan="2"><input type="submit" id="btn2" value="保存"/>
              <input type="reset" id="wrap-clera" value="重置"/>
              <a th:href="@{/index.html}" rel="external nofollow" ><input type="button" id="btn1" value="返回"/></a>
            </td>
          </tr>
        </table>
      </form>
    </div>
</body>
</html>
数据库创建源码 -- 注意:我用的是MySQL数据库
create table clubs(
		cid int primary key auto_increment,
		cname varchar(50) not null,
		city varchar(50) not null
)
create table players(
		pid int primary key auto_increment,
		pname varchar(50) not null,
		birthday datetime not null,
		height int not null,
		weight int not null,
		position varchar(50) not null,
		cid int not null
)
alter  table  players  add  constraint  players_cid
foreign key(cid)  references  clubs(cid);
insert into clubs values
(1,'热火队','迈阿密'),
(2,'奇才队','华盛顿'),
(3,'魔术队','奥兰多'),
(4,'山猫队','夏洛特'),
(5,'老鹰队','亚特兰大')
insert into players values
(4,'多多','1989-08-08',213,186,'前锋',1),
(5,'西西','1987-10-16',199,162,'中锋',1),
(6,'南南','1990-01-23',221,184,'后锋',1)
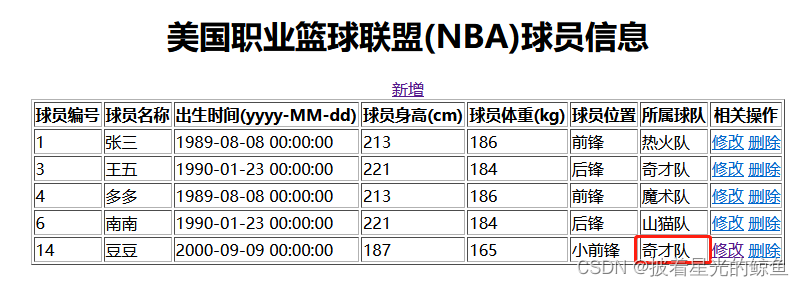
最后给大家看一下页面展示
在地址栏输入:http://localhost:8888/findAll 进入到查询所有方法再跳转到idnex.html进行显示

点击新增跳转到新增页面
输入参数

然后点击保存 添加成功后跳转到idnex.html并显示数据

前端数据显示表面成功添加
点击修改 根据findById方法找到数据,并跳转到update.htnl页面进行显示

我们修改所属球队为 奇才队 点击保存
跳转到index.html页面并且数据成功修改
到此这篇关于SpringBoot整合Mybatis与thymleft实现增删改查功能详解的文章就介绍到这了,更多相关SpringBoot Mybatis thymleft实现增删改查内容请搜索我们以前的文章或继续浏览下面的相关文章希望大家以后多多支持我们!
相关推荐
-

SpringBoot整合Mybatis简单实现增删改查
目录 前言 第一:创建MySQL数据库 第二:创建SpringBoot项目,引入需要的依赖包 第三:创建程序目录和配置核心application.xml文件 第四:依次编写Entity.Dao.Service.Controller层,还有创建mapper.xml文件 第五:测试结果(这里我用的postman来进行接口测试) 第六:总结 前言 为什么要学SpringBoot和Mybatis呢,我觉得作为一个合格的后端程序员增删改查(CRUD)肯定是要会的,而且是最基本的一项技能,不然怎么完成给你分
-
SpringBoot + Mybatis增删改查实战记录
简介 SpringBoot和Mybatis是啥请自行百度,作者这里也是花了几天时间入门了这个框架用来完成任务,并且也算符合要求的完成了任务,期间也各种百度但是没找到自己想要的那种简单易懂的教程,所以踩了很多坑,写这个博客的目的就是为了让大家少踩一点坑,开始. 创建一个SpringBoot项目https://start.spring.io/ 点开这个网站,创建一个Springboot项目,如下图,这里用的是2.1.5,学技术嘛,就是要学新的. 选择依赖,点击左下角的Dependencies Web
-
SpringBoot整合MybatisPlus实现增删改查功能
目录 1.概述 2.引入依赖 3.配置连接信息 4.新建两个表 5.在项目中创建相应的实体类 5.1 创建基础实体类 5.2 SysDictType实体类 5.3 SysDictData实体类 6.创建DAO继承MybatisPlus增强接口 6.1 SysDictTypeMapper 6.2 SysDictDataMapper 7.进一步封装到Service层 7.1 定义Service接口中的抽象方法 7.2 实现Service接口中的方法 8.在控制层上进行增删改查操作 8.1 SysDi
-
SpringBoot整合Mybatis与thymleft实现增删改查功能详解
首先我们先创建项目 注意:创建SpringBoot项目时一定要联网不然会报错 项目创建好后我们首先对 application.yml 进行编译 #指定端口号server: port: 8888#配置mysql数据源spring: datasource: driver-class-name: com.mysql.cj.jdbc.Driver url: jdbc:mysql://localhost:3306/nba?serverTimezone=Asia/Shanghai use
-
PyQt5实现数据的增删改查功能详解
通过这个布局思路来做一个简单的后台管理系统也是OK的,大家可以参考一下啦! 话不多说,还是先来梳理一下需要的第三方模块. PyQ5 的UI界面布局部分,同样是还是使用这三个模块就够了. from PyQt5.QtGui import * from PyQt5.QtWidgets import * from PyQt5.QtCore import * 将sys模块导入到代码块中,用于main函数里面的主体循环时使用. import sys add_dialog是一个自己写的添加数据的弹框. fro
-
Vue用户管理的增删改查功能详解
目录 1.向api请求发出查询用户列表数据,渲染表单数据 2.通过v-model绑定查询数据,进行表单信息查询 3.通过改变布尔值,来控制打开取消添加用户对话框 4.通过动态绑定current-page和page-size,再绑定触发事件,查询指定多少条数据,进行数据分页 总结 1.向api请求发出查询用户列表数据,渲染表单数据 1.定义查询参数列表对象queryInfo:{} queryInfo: { query: '', // 查询 pagenum: 1, // 当前页数 pagesize:
-
IntelliJ Idea SpringBoot 数据库增删改查实例详解
SpringBoot 是 SpringMVC 的升级,对于编码.配置.部署和监控,更加简单 微服务 微服务是一个新兴的软件架构,就是把一个大型的单个应用程序和服务拆分为数十个的支持微服务.一个微服务的策略可以让工作变得更为简便,它可扩展单个组件而不是整个的应用程序堆栈,从而满足服务等级协议. Spring 为 微服务提供了一整套的组件-SpringClound , SpirngBoot 就是该基础. 第一个SpringBoot程序 这里使用的开发软件是IntelliJ Idea,和Eclipse
-
Mybatis 条件查询 批量增删改查功能
模糊查询: @Select({ "SELECT * FROM account where account like CONCAT('%',#{query},'%') or email like CONCAT('%',#{query},'%')" }) Account findAccountByAccountOrMail(@Param("query") String query); 批量添加: @Insert({ "<script>"
-
微信小程序本地缓存数据增删改查实例详解
微信小程序本地缓存数据增删改查实例详解 数据如: var user = { name: 'Lion', sex: 'guy' } CRUD: // 添加 wx.setStorageSync('user', user); // 查询 var developer = (wx.getStorageSync('user') || []); // 更改 developer.name = 'Lion01'; wx.setStorageSync('user', user); // 删除 wx.removeSt
-
Android利用Dom对XML进行增删改查操作详解
1. 概述 平常我们一般是使用JSON与服务器做数据通信,JSON的话,直接用GSON或者其他库去解析很简单.但是,其他有些服务器会返回XML格式的文件,这时候就需要去读取XML文件了. XML的解析有三种方式,在Android中提供了三种解析XML的方式:DOM(Document Objrect Model) , SAX(Simple API XML) ,以及Android推荐的Pull解析方式,他们也各有弊端,而这里来看看使用DOM的方式. 2. Dom解析 DOM解析器在解析XML文档时,
-
java中JDBC增删改查操作详解
目录 前言 一.增删改操作 1.1 PreparedStatement介绍 1.2 增删改操作 1.3 测试 二.查操作 2.1 通用对不同表进行一条数据查询操作 2.2 通用对不同表进行多条数据查询操作 总结 前言 在上一篇博客我们介绍了JDBC的概念以及连接数据库的五种方式JDBC概述及数据库连接方式(数据库连接方式推荐使用第五种),那么我们既然连接上数据库了,那就要对数据进行操作了,那么这一篇我们就来介绍常规的增删改 查操作. 我们先看一遍步骤:
-
MySQL筑基篇之增删改查操作详解
目录 一.增加表中数据 1.无自增列时 2.有自增列时 二.删除表中数据 1.使用delete 2.使用truncate 三.修改表中数据 四.*查询操作 1.简单查询 2.条件查询 3.排序 一.增加表中数据 1.无自增列时 1.指定字段添加数据 给表中的部分列添加数据:值的顺序必须跟指定列的顺序保持一致 语法:insert into 表名(列1,列2,...) values(值1,值2,...) 2.默认添加数据 向表中的所有列添加数据:值的顺序必须跟字段顺序保持一致 语法:insert i
-
springboot整合mybatis将sql打印到日志的实例详解
在前台请求数据的时候,sql语句一直都是打印到控制台的,有一个想法就是想让它打印到日志里,该如何做呢? 见下面的mybatis配置文件: <?xml version="1.0" encoding="UTF-8" ?> <!DOCTYPE configuration PUBLIC "-//mybatis.org//DTD Config 3.0//EN" "http://mybatis.org/dtd/mybatis-3-