SecureCRTSecure7.0查看连接密码的步骤
整体分为两步:
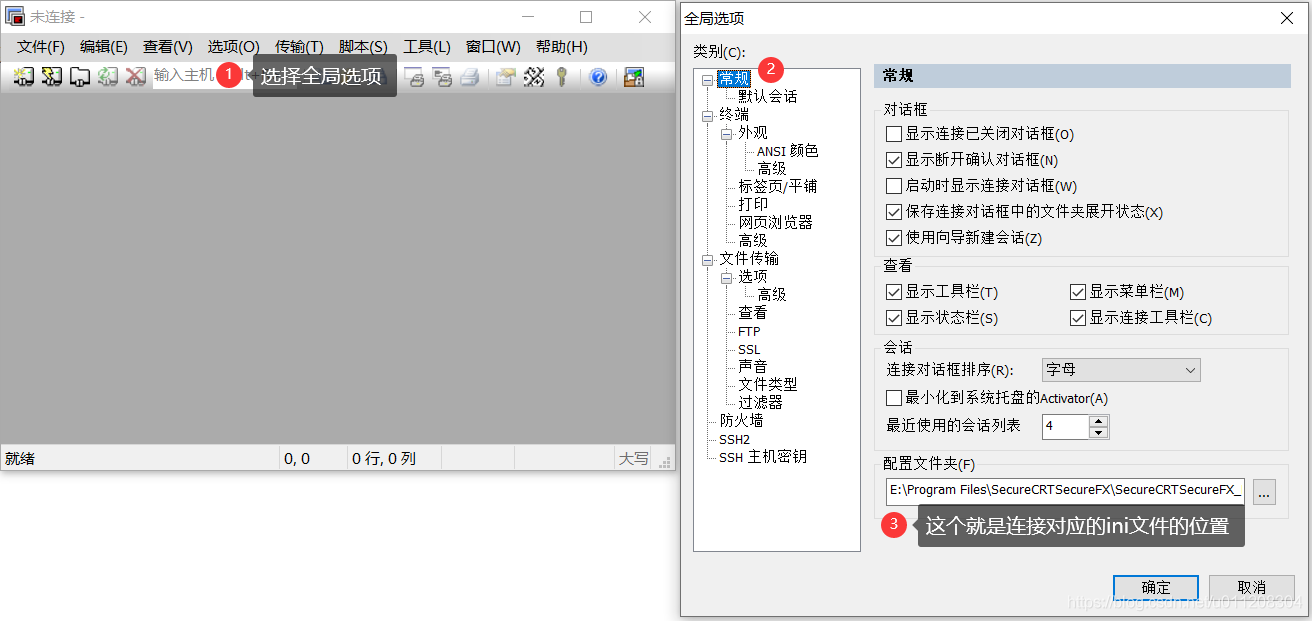
第一步:查看系统保存的连接的ini文件(大概位置:F:\SecureCRTSecureFX_HH_x64_7.0.0.326\Data\Settings\Config\Sessions)
ini文件的格式样例:
--ip地址
S:"Hostname"=192.168.0.145
--登录用户
S:"Username"=root
--端口,加密
D:"[SSH2] 端口"=00000016
--密码,加密,解密需要u之后的字符串
S:"Password"=u2c7d50aae53e14eb94ef0cb377c247a77c2dbcea95333365
第二步:破解加密之后的密码,这个使用python3,具体脚本如下:
#!/usr/bin/env python3
import os
from Crypto.Hash import SHA256
from Crypto.Cipher import AES, Blowfish

class SecureCRTCrypto:

    def __init__(self):
        '''
        Initialize SecureCRTCrypto object.
        '''
        self.IV = b'\x00' * Blowfish.block_size
        self.Key1 = b'\x24\xA6\x3D\xDE\x5B\xD3\xB3\x82\x9C\x7E\x06\xF4\x08\x16\xAA\x07'
        self.Key2 = b'\x5F\xB0\x45\xA2\x94\x17\xD9\x16\xC6\xC6\xA2\xFF\x06\x41\x82\xB7'

    def Encrypt(self, Plaintext : str):
        '''
        Encrypt plaintext and return corresponding ciphertext.
        Args:
            Plaintext: A string that will be encrypted.
        Returns:
            Hexlified ciphertext string.
        '''
        plain_bytes = Plaintext.encode('utf-16-le')
        plain_bytes += b'\x00\x00'
        padded_plain_bytes = plain_bytes + os.urandom(Blowfish.block_size - len(plain_bytes) % Blowfish.block_size)

        cipher1 = Blowfish.new(self.Key1, Blowfish.MODE_CBC, iv = self.IV)
        cipher2 = Blowfish.new(self.Key2, Blowfish.MODE_CBC, iv = self.IV)
        return cipher1.encrypt(os.urandom(4) + cipher2.encrypt(padded_plain_bytes) + os.urandom(4)).hex()

    def Decrypt(self, Ciphertext : str):
        '''
        Decrypt ciphertext and return corresponding plaintext.
        Args:
            Ciphertext: A hex string that will be decrypted.
        Returns:
            Plaintext string.
        '''

        cipher1 = Blowfish.new(self.Key1, Blowfish.MODE_CBC, iv = self.IV)
        cipher2 = Blowfish.new(self.Key2, Blowfish.MODE_CBC, iv = self.IV)
        ciphered_bytes = bytes.fromhex(Ciphertext)
        if len(ciphered_bytes) <= 8:
            raise ValueError('Invalid Ciphertext.')

        padded_plain_bytes = cipher2.decrypt(cipher1.decrypt(ciphered_bytes)[4:-4])

        i = 0
        for i in range(0, len(padded_plain_bytes), 2):
            if padded_plain_bytes[i] == 0 and padded_plain_bytes[i + 1] == 0:
                break
        plain_bytes = padded_plain_bytes[0:i]

        try:
            return plain_bytes.decode('utf-16-le')
        except UnicodeDecodeError:
            raise(ValueError('Invalid Ciphertext.'))

class SecureCRTCryptoV2:

    def __init__(self, ConfigPassphrase : str = ''):
        '''
        Initialize SecureCRTCryptoV2 object.
        Args:
            ConfigPassphrase: The config passphrase that SecureCRT uses. Leave it empty if config passphrase is not set.
        '''
        self.IV = b'\x00' * AES.block_size
        self.Key = SHA256.new(ConfigPassphrase.encode('utf-8')).digest()

    def Encrypt(self, Plaintext : str):
        '''
        Encrypt plaintext and return corresponding ciphertext.
        Args:
            Plaintext: A string that will be encrypted.
        Returns:
            Hexlified ciphertext string.
        '''
        plain_bytes = Plaintext.encode('utf-8')
        if len(plain_bytes) > 0xffffffff:
            raise OverflowError('Plaintext is too long.')

        plain_bytes = \
            len(plain_bytes).to_bytes(4, 'little') + \
            plain_bytes + \
            SHA256.new(plain_bytes).digest()
        padded_plain_bytes = \
            plain_bytes + \
            os.urandom(AES.block_size - len(plain_bytes) % AES.block_size)
        cipher = AES.new(self.Key, AES.MODE_CBC, iv = self.IV)
        return cipher.encrypt(padded_plain_bytes).hex()

    def Decrypt(self, Ciphertext : str):
        '''
        Decrypt ciphertext and return corresponding plaintext.
        Args:
            Ciphertext: A hex string that will be decrypted.
        Returns:
            Plaintext string.
        '''
        cipher = AES.new(self.Key, AES.MODE_CBC, iv = self.IV)
        padded_plain_bytes = cipher.decrypt(bytes.fromhex(Ciphertext))

        plain_bytes_length = int.from_bytes(padded_plain_bytes[0:4], 'little')
        plain_bytes = padded_plain_bytes[4:4 + plain_bytes_length]
        if len(plain_bytes) != plain_bytes_length:
            raise ValueError('Invalid Ciphertext.')

        plain_bytes_digest = padded_plain_bytes[4 + plain_bytes_length:4 + plain_bytes_length + SHA256.digest_size]
        if len(plain_bytes_digest) != SHA256.digest_size:
            raise ValueError('Invalid Ciphertext.')

        if SHA256.new(plain_bytes).digest() != plain_bytes_digest:
            raise ValueError('Invalid Ciphertext.')

        return plain_bytes.decode('utf-8')

if __name__ == '__main__':
    import sys

    def Help():
        print('Usage:')
        print('    SecureCRTCipher.py <enc|dec> [-v2] [-p ConfigPassphrase] <plaintext|ciphertext>')
        print('')
        print('    <enc|dec>              "enc" for encryption, "dec" for decryption.')
        print('                           This parameter must be specified.')
        print('')
        print('    [-v2]                  Encrypt/Decrypt with "Password V2" algorithm.')
        print('                           This parameter is optional.')
        print('')
        print('    [-p ConfigPassphrase]  The config passphrase that SecureCRT uses.')
        print('                           This parameter is optional.')
        print('')
        print('    <plaintext|ciphertext> Plaintext string or ciphertext string.')
        print('                           NOTICE: Ciphertext string must be a hex string.')
        print('                           This parameter must be specified.')
        print('')

    def EncryptionRoutine(UseV2 : bool, ConfigPassphrase : str, Plaintext : str):
        try:
            if UseV2:
                print(SecureCRTCryptoV2(ConfigPassphrase).Encrypt(Plaintext))
            else:
                print(SecureCRTCrypto().Encrypt(Plaintext))
            return True
        except:
            print('Error: Failed to encrypt.')
            return False

    def DecryptionRoutine(UseV2 : bool, ConfigPassphrase : str, Ciphertext : str):
        try:
            if UseV2:
                print(SecureCRTCryptoV2(ConfigPassphrase).Decrypt(Ciphertext))
            else:
                print(SecureCRTCrypto().Decrypt(Ciphertext))
            return True
        except:
            print('Error: Failed to decrypt.')
            return False

    def Main(argc : int, argv : list):
        if 3 <= argc and argc <= 6:
            bUseV2 = False
            ConfigPassphrase = ''

            if argv[1].lower() == 'enc':
                bEncrypt = True
            elif argv[1].lower() == 'dec':
                bEncrypt = False
            else:
                Help()
                return -1

            i = 2
            while i < argc - 1:
                if argv[i].lower() == '-v2':
                    bUseV2 = True
                    i += 1
                elif argv[i].lower() == '-p' and i + 1 < argc - 1:
                    ConfigPassphrase = argv[i + 1]
                    i += 2
                else:
                    Help()
                    return -1

            if bUseV2 == False and len(ConfigPassphrase) != 0:
                print('Error: ConfigPassphrase is not supported if "-v2" is not specified')
                return -1

            if bEncrypt:
                return 0 if EncryptionRoutine(bUseV2, ConfigPassphrase, argv[-1]) else -1
            else:
                return 0 if DecryptionRoutine(bUseV2, ConfigPassphrase, argv[-1]) else -1
        else:
            Help()

    exit(Main(len(sys.argv), sys.argv))
将上面的python代码保存为:SecureCRTCipher.py,使用分为两种情况:
第一种:
密码的格式如下:
S:"PasswordV2"=02:7b9f594a1f39bb36bbaa0d9688ee38b3d233c67b338e20e2113f2ba4d328b6fc8c804e3c02324b1eaad57a5b96ac1fc5cc1ae0ee2930e6af2e5e644a28ebe3fc
执行脚本:
python SecureCRTCipher.py dec -v2 7b9f594a1f39bb36bbaa0d9688ee38b3d233c67b338e20e2113f2ba4d328b6fc8c804e3c02324b1eaad57a5b96ac1fc5cc1ae0ee2930e6af2e5e644a28ebe3fc
第二种:
密码的格式如下:
S:"Password"=uc71bd1c86f3b804e42432f53247c50d9287f410c7e59166969acab69daa6eaadbe15c0c54c0e076e945a6d82f9e13df2
执行脚本:注意密码的字符串去掉u
python SecureCRTCipher.py dec c71bd1c86f3b804e42432f53247c50d9287f410c7e59166969acab69daa6eaadbe15c0c54c0e076e945a6d82f9e13df2
执行上述脚本,python需要安装pycryptodome模块,安装脚本:
pip install pycryptodome
以上就是SecureCRTSecure7.0连接密码查看的详细内容,更多关于SecureCRTSecure7密码查看的资料请关注我们其它相关文章!
相关推荐
-
基于SecureCRT向远程Linux主机上传下载文件步骤图解
有时候直接在Linux服务器上通过 wget 或 curl 工具下截比较大的网络文件时会比较慢,这时我们通常会改用在Windows平台通过迅雷等更加现代化的下载功具下好目标文件(迅雷开会员才能更高速的恶心操作是题外话哈,话说我也送了不少钱给迅雷~~~),这时就面临要把Windows平台下的文件传送到远程Linux服务器上的问题了. 把Windows平台下的文件传送到远程Linux服务器上的方法有很多,这里简单记录下在当前流行的Linux远程管理工具SecureCRT下如何操作及注意事项! 先使用
-
Linux SecureCRT显示乱码解决方案
下面来看看SecureCRT的显示出现乱码这种情况.比如: 现在我们重新设置一下 设置下图中的配置 1.选择字符编码为UTF-8. 2.设置字符集为GB2312后保存好后确认退出. 3.再次测试一下. 以上就是本文的全部内容,希望对大家的学习有所帮助,也希望大家多多支持我们.
-

SecureCRT中文显示乱码问题的解决方法
环境:SecureCRT登陆REDHAT5.3 LINUX系统 问题:vi编辑器编辑文件时文件中的内容中文显示乱码,但是直接使用linux系统terminal打开此文件时中文显示正常,确诊问题出现在客户端即SecureCRT的显示问题 解决方法: 1.修改远程linux机器的配置 [root@rhel ~]#vi /etc/sysconfig/i18n 把LANG改成支持UTF-8的字符集 如: LANG="zh_CN.UTF-8″ 或者是 LANG="en_US.UTF-8″ 本文
-
浅谈ubuntu 使用securecrt vi编辑出现的问题
在Ubuntu下,初始使用vi的时候有点问题,就是在编辑模式下使用方向键的时候,并不会使光标移动,而是在命令行中出现[A [B [C [D之类的字母,而且编辑错误的话,就连平时关于的退格键(Backspace键)都使用不了,只能用Delete来删除.针对这个问题,网上的答案有很多,例如是安装完整版的vim啊,编辑/etc/vim/vimrc.tiny等方法,很杂很乱,在这里我就做个详细的总结吧: 一.编辑/etc/vim/vimrc.tiny 由于/etc/vim/vimrc.tiny的拥有者是
-
SecureCRTSecure7.0查看连接密码的步骤
整体分为两步: 第一步:查看系统保存的连接的ini文件(大概位置:F:\SecureCRTSecureFX_HH_x64_7.0.0.326\Data\Settings\Config\Sessions) ini文件的格式样例: --ip地址 S:"Hostname"=192.168.0.145 --登录用户 S:"Username"=root --端口,加密 D:"[SSH2] 端口"=00000016 --密码,加密,解密需要u之后的字符串 S
-
Windows7下安装使用MySQL8.0.16修改密码、连接Navicat问题
在安装MySQL时遇到几个问题,网上查找的答案大同小异,并没有很好的解决我的问题,完成之余记录下来方便以后查看. 1.官网下载8.0.16版本MySQL 2.解压缩并将解压的文件放在C:\Program Files\MySQL下 3.配置环境变量,将C:\Program Files\MySQL\bin 添加到系统变量path中 4.添加配置文件,在MySQL根目录下创建my.ini 文件内容如下,修改'basedir='.'datadir='地址 [mysqld] # 设置3306端口 port
-
JS写XSS cookie stealer来窃取密码的步骤详解
JavaScript是web中最常用的脚本开发语言,js可以自动执行站点组件,管理站点内容,在web业内实现其他有用的函数.JS可以有很多的函数可以用做恶意用途,包括窃取含有密码等内容的用户cookie. Cookie是站点请求和保持特定访问页面的信息.Cookie含有访问的方式.时间.用户名密码等认证信息等.当用户访问给定站点时,必须使用cookie:如果攻击者可以拦截cookie,就可以利用cookie窃取用户的一些信息.对某个特定的域名,使用JS可以保存或修改用户的cookie.也就是说,
-
mysql8.0.19忘记密码的完美解决方法
推荐阅读:MySQL 8.0.19支持输入3次错误密码锁定账户功能(例子) 1.打开cmd窗口(最好以管理员身份打开),net stop mysql 停止mysql服务 2.开启跳过验证密码的mysql服务 mysqld --console --skip-grant-tables --shared-memory 3.打开一个新的cmd窗口,启动mysql服务 mysql -u root -p 4.输入密码直接空格键跳过 5.将密码置空 use mysql update user set aut
-
如何使用pycharm连接Databricks的步骤详解
在本地使用pycharm连接databricks,大致步骤如下: 首先,为了让本地环境能够识别远端的databricks集群环境,需要收集databricks的基本信息和自己databricks的token,这些信息能够让本地环境识别databricks:接着,需要使用到工具 anaconda创建一个虚拟环境,连接databricks:最后,将虚拟环境导入pycharm. (下面的图渣渣,因为直接拖进来的) 第0步:检查 检查java版本,需要时1.8开头的版本,如果不是,请到这里下载:http
-
Mac下mysql 8.0.22 找回密码的方法
Mac 最新版 MySQL 8.0.22 找回密码大全 问题描述: 昨天心血来潮, 想在Mac上体验一下最新版的MySQL的更改密码的流程, 一下子手贱用mysql_native_password替代caching_sha2_password改了plugin之后, 再用UPDATE SET來修改authentication_string, 还不记得加password('new password')函数, 从而导致了 ERROR 1045 (28000): Access denied for us
-
springboot整合druid连接池的步骤
使用springboot默认的连接池 导入springboot data-jdbc依赖 <dependency> <groupId>org.springframework.boot</groupId> <artifactId>spring-boot-starter-data-jdbc</artifactId> </dependency> 配置文件配置连接池 spring: datasource: username: root pass
-
SpringBoot Admin2.0 集成Arthas的实现步骤
项目最初使用 Arthas 主要有两个目的: 通过 arthas 解决实现测试环境.性能测试环境以及生产环境性能问题分析工具的问题. 通过使用 jad.mc.redefine 功能组合实现生产环境部分节点代码热更新的能力. 技术选型相关 因为公司还未能建立起较为统一的生产微服务配置以及状态管理的能力,各自系统的研发运维较为独立.现在项目使用了 Spring Cloud 以及 Eureka 的框架结构,和 SBA 的基础支撑能力较为匹配,同时,SBA 已经可以提供服务感知,日志级别配置管理,以及基
-
Xshell远程连接linux详细步骤(小白必备)
目录 环境: 前提 权限 查看端口 关防火墙 连接 Linux IP 打开Xshell创建连接 结束 环境: Linux服务器我使用的是CentOS虚拟机 , IP: 192.168.50.224 OK,废话不多说直接走流程 前提 权限 首先打开Linux服务器,打开命令终端,切换成root权限注意:密码输入这里是不显示的,所以一定要输入正确 这一步很关键!!!!因为我在权限这里碰了很多灰,不是root权限连不上Xshell...(小伙伴们也可以试一下,有好方法及时留言) 查看端口 第二步,查看
-
非常详细的Django连接mysql数据库步骤记录
目录 一.修改数据库连接 二.安装数据库驱动 三.创建表并同步到mysql数据库: 总结 一.修改数据库连接 打开项目,在settings.py文件中是否有以下内容: 以上内容是创建django项目的时候是自动创建的.这个是告诉你,django默认连接sqllite.ENGINE:是指连接数据库驱动的名称,NAME是指要连接什么库,什么文件.ENGINE有以下几种情况: 1.django.db.backends.postgresql 连接 PostgreSQL 2.django.db.backe