Tensorflow tf.nn.depthwise_conv2d如何实现深度卷积的
实验环境:tensorflow版本1.2.0,python2.7
介绍
depthwise_conv2d来源于深度可分离卷积:
Xception: Deep Learning with Depthwise Separable Convolutions
tf.nn.depthwise_conv2d(input,filter,strides,padding,rate=None,name=None,data_format=None)
除去name参数用以指定该操作的name,data_format指定数据格式,与方法有关的一共五个参数:
input:
指需要做卷积的输入图像,要求是一个4维Tensor,具有[batch, height, width, in_channels]这样的shape,具体含义是[训练时一个batch的图片数量, 图片高度, 图片宽度, 图像通道数]
filter:
相当于CNN中的卷积核,要求是一个4维Tensor,具有[filter_height, filter_width, in_channels, channel_multiplier]这样的shape,具体含义是[卷积核的高度,卷积核的宽度,输入通道数,输出卷积乘子],同理这里第三维in_channels,就是参数value的第四维
strides:
卷积的滑动步长。
padding:
string类型的量,只能是”SAME”,”VALID”其中之一,这个值决定了不同边缘填充方式。
rate:
这个参数的详细解释见【Tensorflow】tf.nn.atrous_conv2d如何实现空洞卷积?
结果返回一个Tensor,shape为[batch, out_height, out_width, in_channels * channel_multiplier],注意这里输出通道变成了in_channels * channel_multiplier
实验
为了形象的展示depthwise_conv2d,我们必须要建立自定义的输入图像和卷积核
img1 = tf.constant(value=[[[[1],[2],[3],[4]],[[1],[2],[3],[4]],[[1],[2],[3],[4]],[[1],[2],[3],[4]]]],dtype=tf.float32)
img2 = tf.constant(value=[[[[1],[1],[1],[1]],[[1],[1],[1],[1]],[[1],[1],[1],[1]],[[1],[1],[1],[1]]]],dtype=tf.float32)
img = tf.concat(values=[img1,img2],axis=3)
filter1 = tf.constant(value=0, shape=[3,3,1,1],dtype=tf.float32)
filter2 = tf.constant(value=1, shape=[3,3,1,1],dtype=tf.float32)
filter3 = tf.constant(value=2, shape=[3,3,1,1],dtype=tf.float32)
filter4 = tf.constant(value=3, shape=[3,3,1,1],dtype=tf.float32)
filter_out1 = tf.concat(values=[filter1,filter2],axis=2)
filter_out2 = tf.concat(values=[filter3,filter4],axis=2)
filter = tf.concat(values=[filter_out1,filter_out2],axis=3)
建立好了img和filter,就可以做卷积了
out_img = tf.nn.conv2d(input=img, filter=filter, strides=[1,1,1,1], padding='VALID')
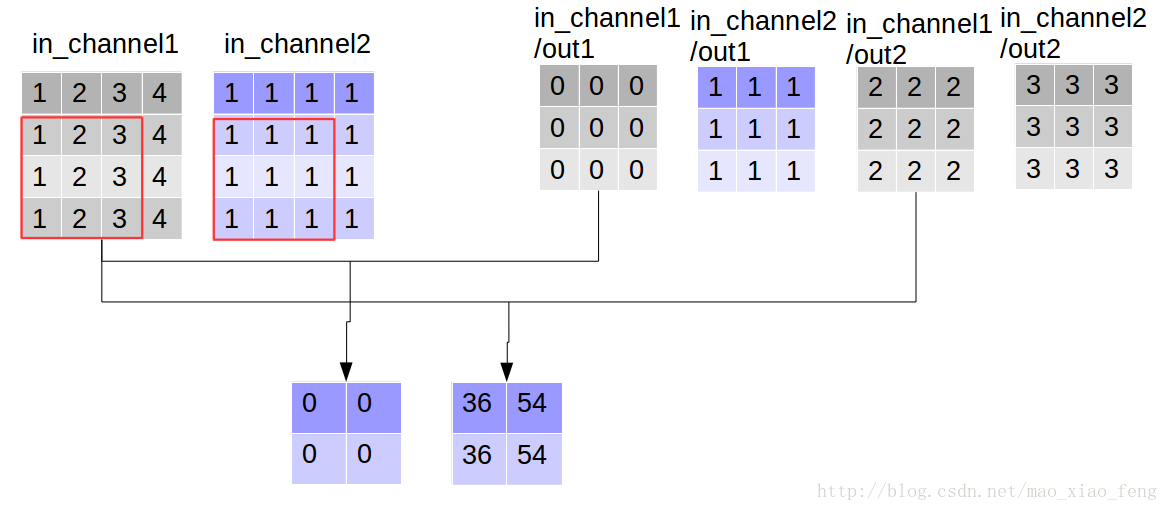
好了,用一张图来详细展示这个过程


这是普通的卷积过程,我们再来看深度卷积。
out_img = tf.nn.depthwise_conv2d(input=img, filter=filter, strides=[1,1,1,1], rate=[1,1], padding='VALID')
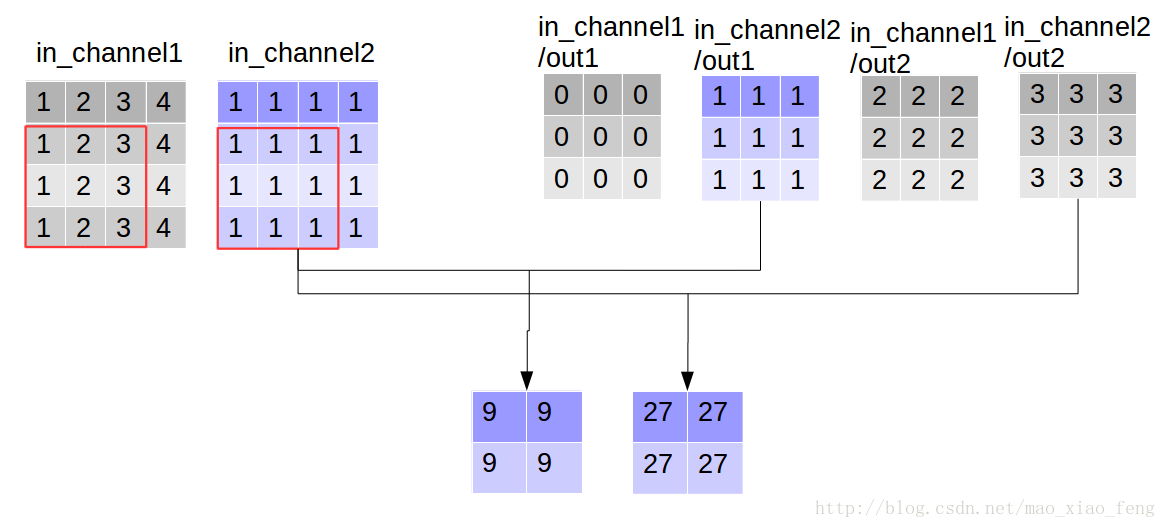
现在我们可以形象的解释一下depthwise_conv2d卷积了。看普通的卷积,我们对卷积核每一个out_channel的两个通道分别和输入的两个通道做卷积相加,得到feature map的一个channel,而depthwise_conv2d卷积,我们对每一个对应的in_channel,分别卷积生成两个out_channel,所以获得的feature map的通道数量可以用in_channel* channel_multiplier来表达,这个channel_multiplier,就可以理解为卷积核的第四维。
代码清单
import tensorflow as tf

img1 = tf.constant(value=[[[[1],[2],[3],[4]],[[1],[2],[3],[4]],[[1],[2],[3],[4]],[[1],[2],[3],[4]]]],dtype=tf.float32)
img2 = tf.constant(value=[[[[1],[1],[1],[1]],[[1],[1],[1],[1]],[[1],[1],[1],[1]],[[1],[1],[1],[1]]]],dtype=tf.float32)
img = tf.concat(values=[img1,img2],axis=3)
filter1 = tf.constant(value=0, shape=[3,3,1,1],dtype=tf.float32)
filter2 = tf.constant(value=1, shape=[3,3,1,1],dtype=tf.float32)
filter3 = tf.constant(value=2, shape=[3,3,1,1],dtype=tf.float32)
filter4 = tf.constant(value=3, shape=[3,3,1,1],dtype=tf.float32)
filter_out1 = tf.concat(values=[filter1,filter2],axis=2)
filter_out2 = tf.concat(values=[filter3,filter4],axis=2)
filter = tf.concat(values=[filter_out1,filter_out2],axis=3)

out_img = tf.nn.depthwise_conv2d(input=img, filter=filter, strides=[1,1,1,1], rate=[1,1], padding='VALID')
输出:
rate=1, VALID mode result:
[[[[ 0. 36. 9. 27.]
[ 0. 54. 9. 27.]][[ 0. 36. 9. 27.]
[ 0. 54. 9. 27.]]]]
到此这篇关于Tensorflow tf.nn.depthwise_conv2d如何实现深度卷积的的文章就介绍到这了,更多相关Tensorflow tf.nn.depthwise_conv2d深度卷积内容请搜索我们以前的文章或继续浏览下面的相关文章希望大家以后多多支持我们!
相关推荐
-
TensorFlow tf.nn.softmax_cross_entropy_with_logits的用法
在计算loss的时候,最常见的一句话就是tf.nn.softmax_cross_entropy_with_logits,那么它到底是怎么做的呢? 首先明确一点,loss是代价值,也就是我们要最小化的值 tf.nn.softmax_cross_entropy_with_logits(logits, labels, name=None) 除去name参数用以指定该操作的name,与方法有关的一共两个参数: 第一个参数logits:就是神经网络最后一层的输出,如果有batch的话,它的大小就是[bat
-
TensorFlow tf.nn.max_pool实现池化操作方式
max pooling是CNN当中的最大值池化操作,其实用法和卷积很类似 有些地方可以从卷积去参考[TensorFlow] tf.nn.conv2d实现卷积的方式 tf.nn.max_pool(value, ksize, strides, padding, name=None) 参数是四个,和卷积很类似: 第一个参数value:需要池化的输入,一般池化层接在卷积层后面,所以输入通常是feature map,依然是[batch, height, width, channels]这样的shape 第
-
TensorFlow tf.nn.conv2d实现卷积的方式
实验环境:tensorflow版本1.2.0,python2.7 介绍 惯例先展示函数: tf.nn.conv2d(input, filter, strides, padding, use_cudnn_on_gpu=None, name=None) 除去name参数用以指定该操作的name,与方法有关的一共五个参数: input: 指需要做卷积的输入图像,它要求是一个Tensor,具有[batch, in_height, in_width, in_channels]这样的shape,具体含义是[
-
对tensorflow中tf.nn.conv1d和layers.conv1d的区别详解
在用tensorflow做一维的卷积神经网络的时候会遇到tf.nn.conv1d和layers.conv1d这两个函数,但是这两个函数有什么区别呢,通过计算得到一些规律. 1.关于tf.nn.conv1d的解释,以下是Tensor Flow中关于tf.nn.conv1d的API注解: Computes a 1-D convolution given 3-D input and filter tensors. Given an input tensor of shape [batch, in_wi
-
Tensorflow tf.nn.depthwise_conv2d如何实现深度卷积的
实验环境:tensorflow版本1.2.0,python2.7 介绍 depthwise_conv2d来源于深度可分离卷积: Xception: Deep Learning with Depthwise Separable Convolutions tf.nn.depthwise_conv2d(input,filter,strides,padding,rate=None,name=None,data_format=None) 除去name参数用以指定该操作的name,data_format指定
-
Tensorflow tf.nn.atrous_conv2d如何实现空洞卷积的
实验环境:tensorflow版本1.2.0,python2.7 介绍 关于空洞卷积的理论可以查看以下链接,这里我们不详细讲理论: 1.Long J, Shelhamer E, Darrell T, et al. Fully convolutional networks for semantic segmentation[C]. Computer Vision and Pattern Recognition, 2015. 2.Yu, Fisher, and Vladlen Koltun. "Mu
-
TensorFlow tf.nn.conv2d_transpose是怎样实现反卷积的
今天来介绍一下Tensorflow里面的反卷积操作,网上反卷积的用法的介绍比较少,希望这篇教程可以帮助到各位 反卷积出自这篇论文:Deconvolutional Networks,有兴趣的同学自行了解 首先无论你如何理解反卷积,请时刻记住一点,反卷积操作是卷积的反向 如果你随时都记住上面强调的重点,那你基本就理解一大半了,接下来通过一些函数的介绍为大家强化这个观念 conv2d_transpose(value, filter, output_shape, strides, padding="SA
-

python人工智能tensorflow函数tf.nn.dropout使用方法
目录 前言 tf.nn.dropout函数介绍 例子 代码 keep_prob = 0.5 keep_prob = 1 前言 神经网络在设置的神经网络足够复杂的情况下,可以无限逼近一段非线性连续函数,但是如果神经网络设置的足够复杂,将会导致过拟合(overfitting)的出现,就好像下图这样. 看到这个蓝色曲线,我就知道: 很明显蓝色曲线是overfitting的结果,尽管它很好的拟合了每一个点的位置,但是曲线是歪歪曲曲扭扭捏捏的,这个的曲线不具有良好的鲁棒性,在实际工程实验中,我们更希望得到
-
tf.nn.conv2d与tf.layers.conv2d的区别及说明
目录 tf.nn.conv2d与tf.layers.conv2d的区别 tf.nn.conv2d tf.layers.conv2d tf.nn.conv2d和tf.layers.conv2d的学习 总结 tf.nn.conv2d与tf.layers.conv2d的区别 在写CNN中注意到tensorflow目前有tf.nn.conv2d和tf.layers.conv2d这两个很相似的API. tf.nn.conv2d, 需要自行传入初始化好的filter(四个维度),在初始化filter或者说W
-
使用 tf.nn.dynamic_rnn 展开时间维度方式
对于单个的 RNNCell , 使用色的 call 函数进行运算时 ,只是在序列时间上前进了一步 . 如使用 x1. ho 得到此h1, 通过 x2 . h1 得到 h2 等 . tf.nn.dynamic_rnn的作用: 如果序列长度为n,要调用n次call函数,比较麻烦.对此,TensorFlow提供了一个tf.nn.dynamic_mn函数,使用该函数相当于调用了n次call函数.通过{ho, x1 , x2,-, xn} 直接得到{h1 , h2,-, hn} . 具体来说,设输入数据的