Swift实现倒计时5秒功能

一般在项目的“引导页”有个功能,倒计时5秒结束后,然后可以允许用户点击跳过按钮跳过引导页。同样在“登录”和“注册”页面也有类似功能,发送验证码后,计时60秒后才允许用户再次请求重新发送验证码。

计时方式一(sleep + performSelector)

通过调用sleep(1)阻塞线程的方式来达到目的

import UIKit

class GAPublishViewController: GABaseViewController {

 var jumpBut = UIButton(frame: CGRect(x: 15, y: 64, width: 80, height: 40));
 var limitTime: Int = 5+1;

 override func viewDidLoad() {
  super.viewDidLoad()
  setupJumpButton();
  startCountDown();
 }

 func setupJumpButton() {
  view.addSubview(jumpBut);
  jumpBut.setTitle("跳过(5S)", for: .normal);
  jumpBut.setTitleColor(UIColor.red, for: .normal);
  jumpBut.addTarget(self, action: #selector(tapJumpAction(sender:)), for: .touchUpInside);
 }

 @objc func tapJumpAction(sender: Any) {
  let but = sender as! UIButton;
  let text = but.titleLabel?.text ?? "";
  if (text == "跳过") {
   print("点击“跳过”");
  }
 }

 // MARK: 定时方式一

 func startCountDown() {
  performSelector(inBackground: #selector(countDownThread), with: nil)
 }

 @objc func countDownThread() {
  let timeCount = limitTime;
  for _ in 0..<timeCount {
   limitTime = limitTime - 1;
   self.performSelector(onMainThread: #selector(updateJumpBtn), with: self, waitUntilDone: true)
   sleep(1);
  }
 }

 @objc func updateJumpBtn() {
  if (limitTime <= 0) {
   jumpBut.setTitle("跳过", for: .normal);
  } else {
   jumpBut.setTitle("跳过" + "(\(limitTime)S)", for: .normal);
  }
 }

}

计时方式二(sleep + GCD)

与上面的方式一类似

 // MARK: 定时方式二

 func startCountDown() {
  // 将任务添加到队列,以异步的方式执行
  DispatchQueue.global().async { [weak self] in
   self?.countDownThread();
  }
 }

 func countDownThread() {
  let timeCount = limitTime;
  for _ in 0..<timeCount {
   limitTime = limitTime - 1;
   // 主线程刷新UI
   DispatchQueue.main.async { [weak self] in
    self?.updateJumpBtn();
   }
   sleep(1);
  }
 }

 func updateJumpBtn() {
  if (limitTime <= 0) {
   jumpBut.setTitle("跳过", for: .normal);
  } else {
   jumpBut.setTitle("跳过" + "(\(limitTime)S)", for: .normal);
  }
 }

计时方式三(Timer)

// MARK: 定时方式三

 var limitTime: Int = 5;
 var timer: Timer?;

 func startCountDown() {
  // 初始化定时器
  timer = Timer.scheduledTimer(timeInterval: 1.0, target: self, selector: #selector(updateJumpBtn), userInfo: nil, repeats: true);

  /*
  // 避免timer在列表时,滑动时timer会暂停。 将timer放在另外一个线程中,然后开启这个线程的runloop。
  DispatchQueue.global().async { [weak self] in
   self?.timer = Timer.scheduledTimer(timeInterval: 1.0, target: self as Any, selector: #selector(self?.countDownThread), userInfo: nil, repeats: true);
   RunLoop.current.run();
  }
   */
 }

 @objc func countDownThread() {
  // 主线程刷新UI
  DispatchQueue.main.async { [weak self] in
   self?.updateJumpBtn();
  }
 }

 @objc func updateJumpBtn() {
  limitTime = limitTime - 1;
  if (limitTime <= 0) {
   jumpBut.setTitle("跳过", for: .normal);
   /*
   // 暂停定时器
   timer?.fireDate = Date.distantFuture;
   // 继续定时
   timer?.fireDate = NSDate.init() as Date;
   // 暂停定时器3秒
   timer?.fireDate = Date.init(timeIntervalSinceNow: 3.0);
    */
   // 停止定时器
   timer?.invalidate();
  } else {
   jumpBut.setTitle("跳过" + "(\(limitTime)S)", for: .normal);
  }
 }

计时方式四(GCD)

// MARK: 定时方式四

 var limitTime: Int = 5+1;
 // 在global线程里创建一个时间源
 let codeTimer = DispatchSource.makeTimerSource(queue: DispatchQueue.global());

 func startCountDown() {
  // 设定这个时间源是每秒循环一次,立即开始
  codeTimer.schedule(deadline: .now(), repeating: .seconds(1));
  // 设定时间源的触发事件
  codeTimer.setEventHandler(handler: {
   // 主线程刷新UI
   DispatchQueue.main.async { [weak self] in
    self?.updateJumpBtn();
   }
  })
  // 判断是否取消,如果已经取消了避免调用resume()方法导致的崩溃
  if codeTimer.isCancelled {
   return;
  }
  // 启动时间源
  codeTimer.resume();
 }

 func updateJumpBtn() {
  limitTime = limitTime - 1;
  if (limitTime <= 0) {
   jumpBut.setTitle("跳过", for: .normal);
   // 暂停计时。暂停之后,再次开始计时(startCountDown())接着上次暂停进行计时
   codeTimer.suspend();
   // 取消计时。取消之后,再次开始计时(startCountDown())不会再计时
   //codeTimer.cancel();
  } else {
   jumpBut.setTitle("跳过" + "(\(limitTime)S)", for: .normal);
  }
 }

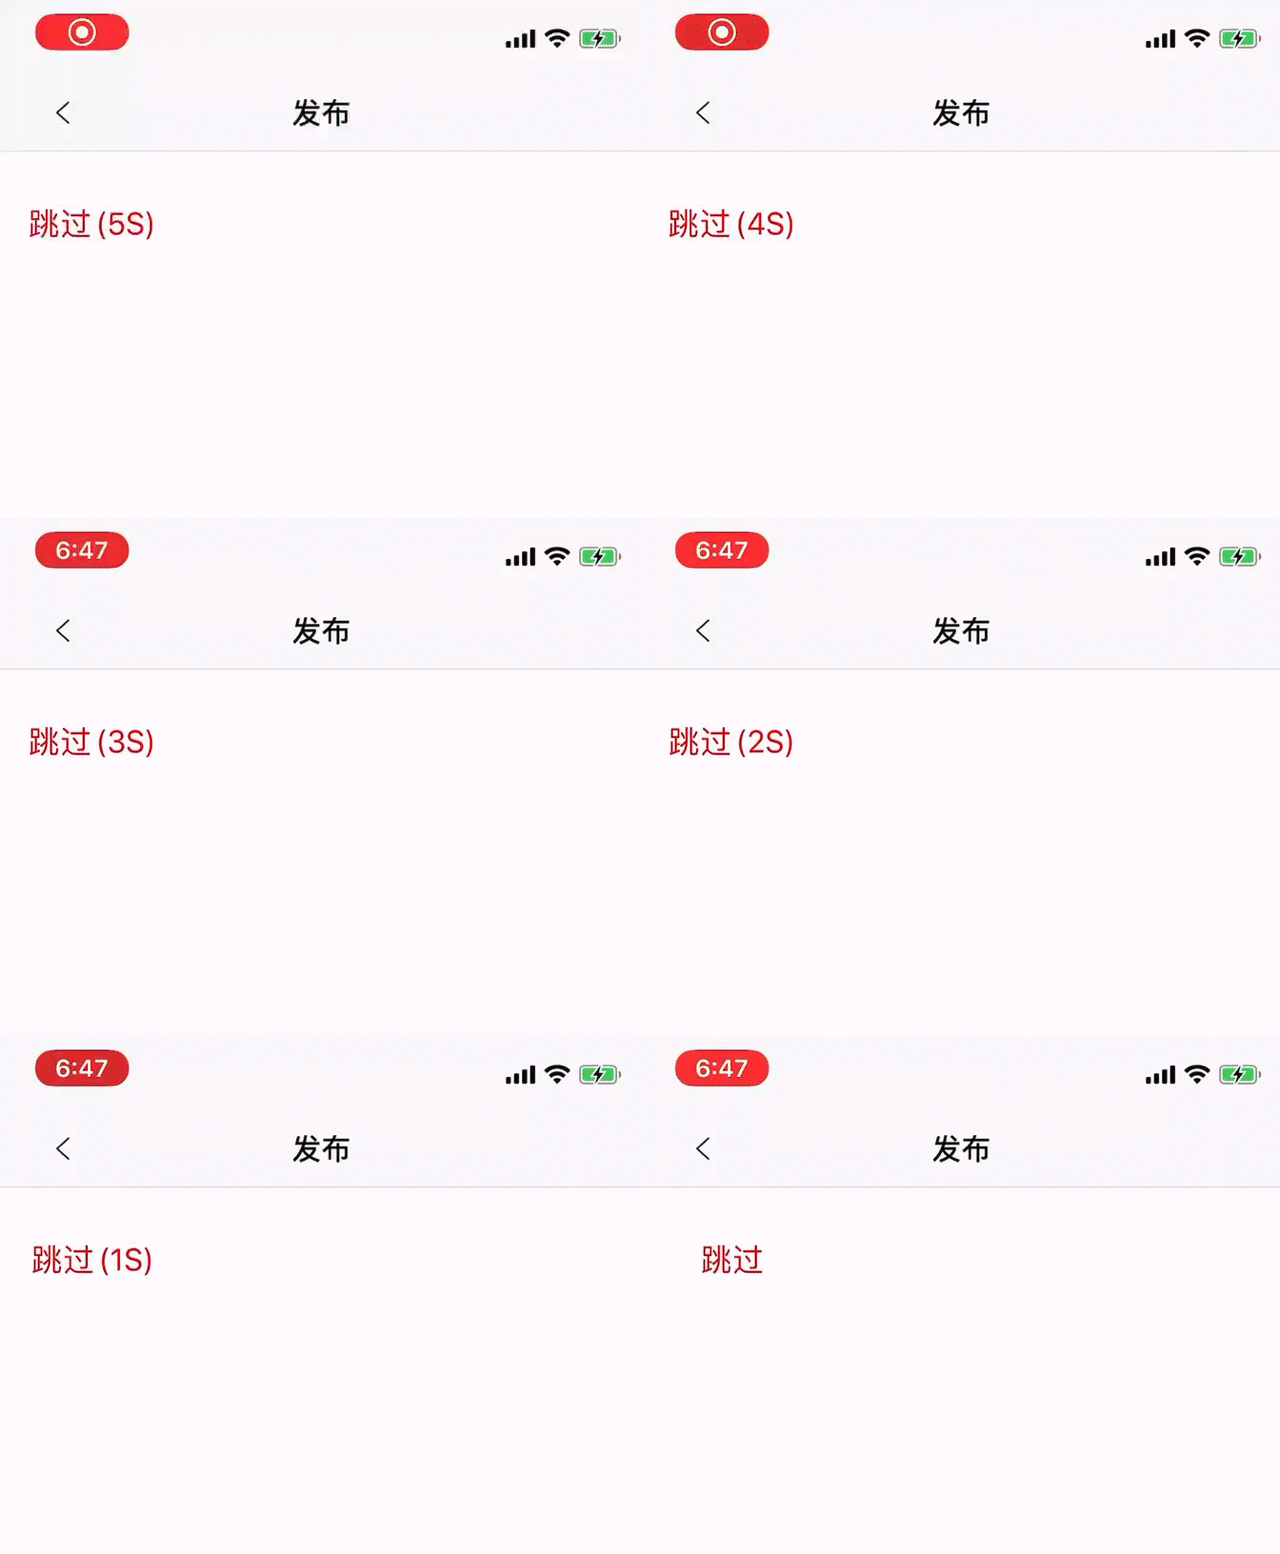
示意图
以上就是本文的全部内容,希望对大家的学习有所帮助,也希望大家多多支持我们。

(0)

相关推荐

  • Swift4使用GCD实现计时器

    开发过程中,我们可能会经常使用到计时器.苹果为我们提供了Timer.但是在平时使用过程中会发现使用Timer会有许多的不便 1:必须保证在一个活跃的runloop,我们知道主线程的runloop是活跃的,但是在其他异步线程runloop就需要我们自己去开启,非常麻烦. 2:Timer的创建和销毁必须在同一个线程.跨线程就操作不了 3:内存问题.可能循环引用造成内存泄露 由于存在上述问题,我们可以采用GCD封装来解决. import UIKit typealias ActionBlock = ()

  • Swift实现iOS应用中短信验证码倒计时功能的实例分享

    在开始之前,我们先来了解一个概念 属性观测器(Property Observers): 属性观察器监控和响应属性值的变化,每次属性被设置值的时候都会调用属性观察器,甚至新的值和现在的值相同的时候也不例外. 可以为属性添加如下的一个或全部观察器: willSet在新的值被设置之前调用 didSet在新的值被设置之后立即调用 接下来开始我们的教程,先展示一下最终效果: 首先声明一个发送按钮: 复制代码 代码如下: var sendButton: UIButton! 在viewDidLoad方法中给发

  • swift 3.0 实现短信验证码倒计时功能

    下面一段代码给大家分享swift 3.0 实现短信验证码倒计时功能,具体实例代码如下所示: class TCCountDown { private var countdownTimer: Timer? var codeBtn = UIButton() private var remainingSeconds: Int = 0 { willSet { codeBtn.setTitle("重新获取\(newValue)秒", for: .normal) if newValue <=

  • Swift免费短信验证码实现及动态倒计时功能

    今天给大家带来一个简单的免费短信验证码实现demo,采用mob的短信验证码SDK,到目前为止还是免费的,只需要简单的注册-->添加个人应用-->获取appkey集apSecret 即可实现. 具体怎么申请,添加个人应用这里就不累赘了,相信能搜索到本文的必然有能力完成上面的操作. 1.下载mob的免费短信验证SDK,解压后复制SMS_SDK到你的工程,因为此SDK采用OC编写的,在与Swift结合时,需要添加桥接文件,具体操作如下: 右键你的Swift工程,新建一个OC文件,名字随便起,这时会弹

  • Swift实现倒计时5秒功能

    一般在项目的"引导页"有个功能,倒计时5秒结束后,然后可以允许用户点击跳过按钮跳过引导页.同样在"登录"和"注册"页面也有类似功能,发送验证码后,计时60秒后才允许用户再次请求重新发送验证码. 计时方式一(sleep + performSelector) 通过调用sleep(1)阻塞线程的方式来达到目的 import UIKit class GAPublishViewController: GABaseViewController { var j

  • Angular.js实现获取验证码倒计时60秒按钮的简单方法

    前言 本文主要介绍了关于Angular.js实现获取验证码倒计时60秒按钮的相关内容,关于这个功能相信不用多介绍,大家都不陌生,所以下面话不多说了,来一起看看实现的方法吧. 一.controller中代码 angular.module('controllers') .controller('LoginCtrl', function ($scope, $location,$ionicLoading,$rootScope,$interval,$timeout) { $scope.timer = fa

  • JS自动倒计时30秒后按钮才可用(两种场景)

    展示效果图: WEB开发中经常会用到倒计时来限制用户对表单的操作,比如希望用户在一定时间内看完相关协议信息才允许用户继续下一步操作,又比如在收取手机验证码时允许用户在一定时间过后(未收到验证码的情况下)再次获取验证码.那么今天我来给大家介绍下如何使用Javascript来实现这一简单应用. 查看演示 下载源码 应用场景1:用户注册时阅读完相关协议信息后才能激活按钮 某些网站注册时要求用户同意所谓的用户协议之类的信息,如果协议内容非常重要,有些网站会要求新注册的用户一定要阅读完相关协议信息才能激活

  • python实现windows倒计时锁屏功能

    python实现windows倒计时锁屏功能 # 倒计时锁屏 import time from ctypes import * def closewindows(closetime): while closetime>0: print(closetime) time.sleep(1) closetime-=1 user32 = windll.LoadLibrary('user32.dll') user32.LockWorkStation() if __name__ == "__main__

  • Swift缩放并填充图片功能的实现

    摘要 直接操作图片来实现它的缩放或者填充多余空间,首选 UIGraphicsBeginImageContext 函数来实现,它就相当于一个画布,你甚至可以用它来涂鸦. 最近有一个需求,就是将图片先等比例缩放到指定大小,然后将空余出来空间填充为黑色,返回指定大小的图片. 这种直接操作图片的需求,就要考虑使用 UIGraphicsBeginImageContext 函数实现.它可以理解为一个画布,我们只需要把图片放在画布的对应位置,把画布的多余地方全部涂成黑色就完成. 实现 先看代码,然后再分析:

  • jQuery 实现倒计时天,时,分,秒功能

    1.HTML部分 <span class="joind">135</span>天<span class="joinh">7</span>时<span class="joinm">46</span>分<span class="joins">25</span>秒 2.js部分 <script src="https://c

  • Android实现倒计时30分钟功能

    以30分钟为例写的一个倒计时: 直接上代码 public class MainActivity extends AppCompatActivity { private int minute = 30;//这是分钟 private int second = 0;//这是分钟后面的秒数.这里是以30分钟为例的,所以,minute是30,second是0 private TextView timeView; private Timer timer; private TimerTask timerTas

  • 微信小程序实现倒计时补零功能

    微信小程序中 "倒计时自动补零" 的一点代码,方法比较简单粗暴,想着以后怎么也能用到,就先总结出来了. 代码: js: //index.js var num = 10//计时 var strH = '' var strM = '' var strS = '' var timer = '' Page({ data: { timeText:''//展示 }, onLoad: function () { this.move() //计时开始 后面的1000是毫秒 每1000毫秒跳一次 tim

  • Android自定义view倒计时60秒

    一个简单的自定义view.在里面封装了时间的倒计时,以及距离现在时间的时间计算 public class TimerTextView extends LinearLayout{ // 时间变量 private long second; private TextView tv_Time; private TextView tv_Unit; RefreshCallBack refreshCallBack; public TimerTextView(Context context, Attribute

  • javascript实现倒计时N秒后网页自动跳转代码

    复制代码 代码如下: <title>JS倒计时网页自动跳转代码</title>   <script language="JavaScript" type="text/javascript">     function delayURL(url) {         var delay = document.getElementById("time").innerHTML;         if(delay &g

随机推荐