Spring WebClient实战示例
目录
- WebClient实战
- 服务端性能对比
- Spring WebFlux
- Spring MVC
- 客户端性能比较
- webclient
- resttemplate(不带连接池)
- resttemplate(带连接池)
- webclient连接池
- webclient 的HTTP API
- 小结
WebClient实战
本文代码地址:https://github.com/bigbirditedu/webclient
Spring Webflux 是 Spring Framework 5.0 的新特性,是随着当下流行的 Reactive Programming 而诞生的高性能框架。传统的 Web 应用框架,比如我们所熟知的 Struts2,Spring MVC 等都是基于 Servlet API 和 Servlet 容器之上运行的,本质上都是阻塞式的。Servlet 直到 3.1 版本之后才对异步非阻塞进行了支持。而 WebFlux天生就是一个典型的异步非阻塞框架,其核心是基于 Reactor 相关 API 实现的。相比传统的 Web 框架,WebFlux 可以运行在例如 Netty、Undertow 以及 Servlet 3.1 容器之上,其运行环境比传统 Web 框架更具灵活性。
WebFlux 的主要优势有:
- 非阻塞性:WebFlux 提供了一种比 Servlet 3.1 更完美的异步非阻塞解决方案。非阻塞的方式可以使用较少的线程以及硬件资源来处理更多的并发。
- 函数式编程:函数式编程是 Java 8 重要的特性,WebFlux 完美支持。
webclient的HTTP API请参考:https://github.com/bigbirditedu/webclient
服务端性能对比
比较的是Spring MVC 与 Spring WebFlux 作为HTTP 应用框架谁的性能更好。
Spring WebFlux
先看看Spring WebFlux
引入pom依赖
        <dependency>
            <groupId>org.springframework.boot</groupId>
            <artifactId>spring-boot-starter-webflux</artifactId>
        </dependency>
编写http接口
@RestController
@RequestMapping("/webflux")
public class WebFluxController {

    public static AtomicLong COUNT = new AtomicLong(0);

    @GetMapping("/hello/{latency}")
    public Mono<String> hello(@PathVariable long latency) {
        System.out.println("Start:" + LocalDateTime.now().format(DateTimeFormatter.ofPattern("yyyy-MM-dd HH:mm:ss.SSS")));
        System.out.println("Page count:" + COUNT.incrementAndGet());
        Mono<String> res = Mono.just("welcome to Spring Webflux").delayElement(Duration.ofSeconds(latency));//阻塞latency秒,模拟处理耗时
        System.out.println("End:  " + LocalDateTime.now().format(DateTimeFormatter.ofPattern("yyyy-MM-dd HH:mm:ss.SSS")));
        return res;
    }
}
启动服务器
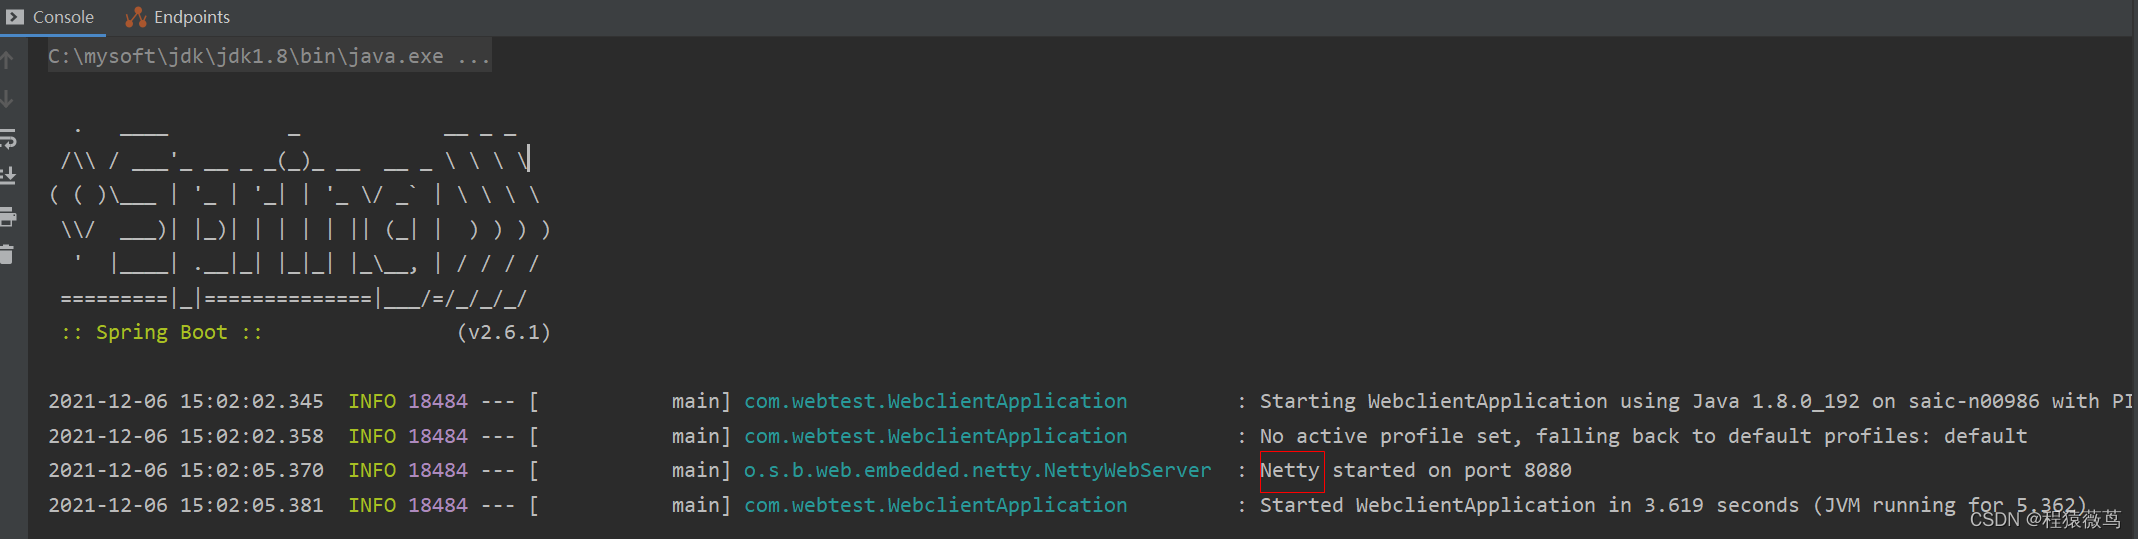
可以看到webflux 默认选择Netty作为服务器
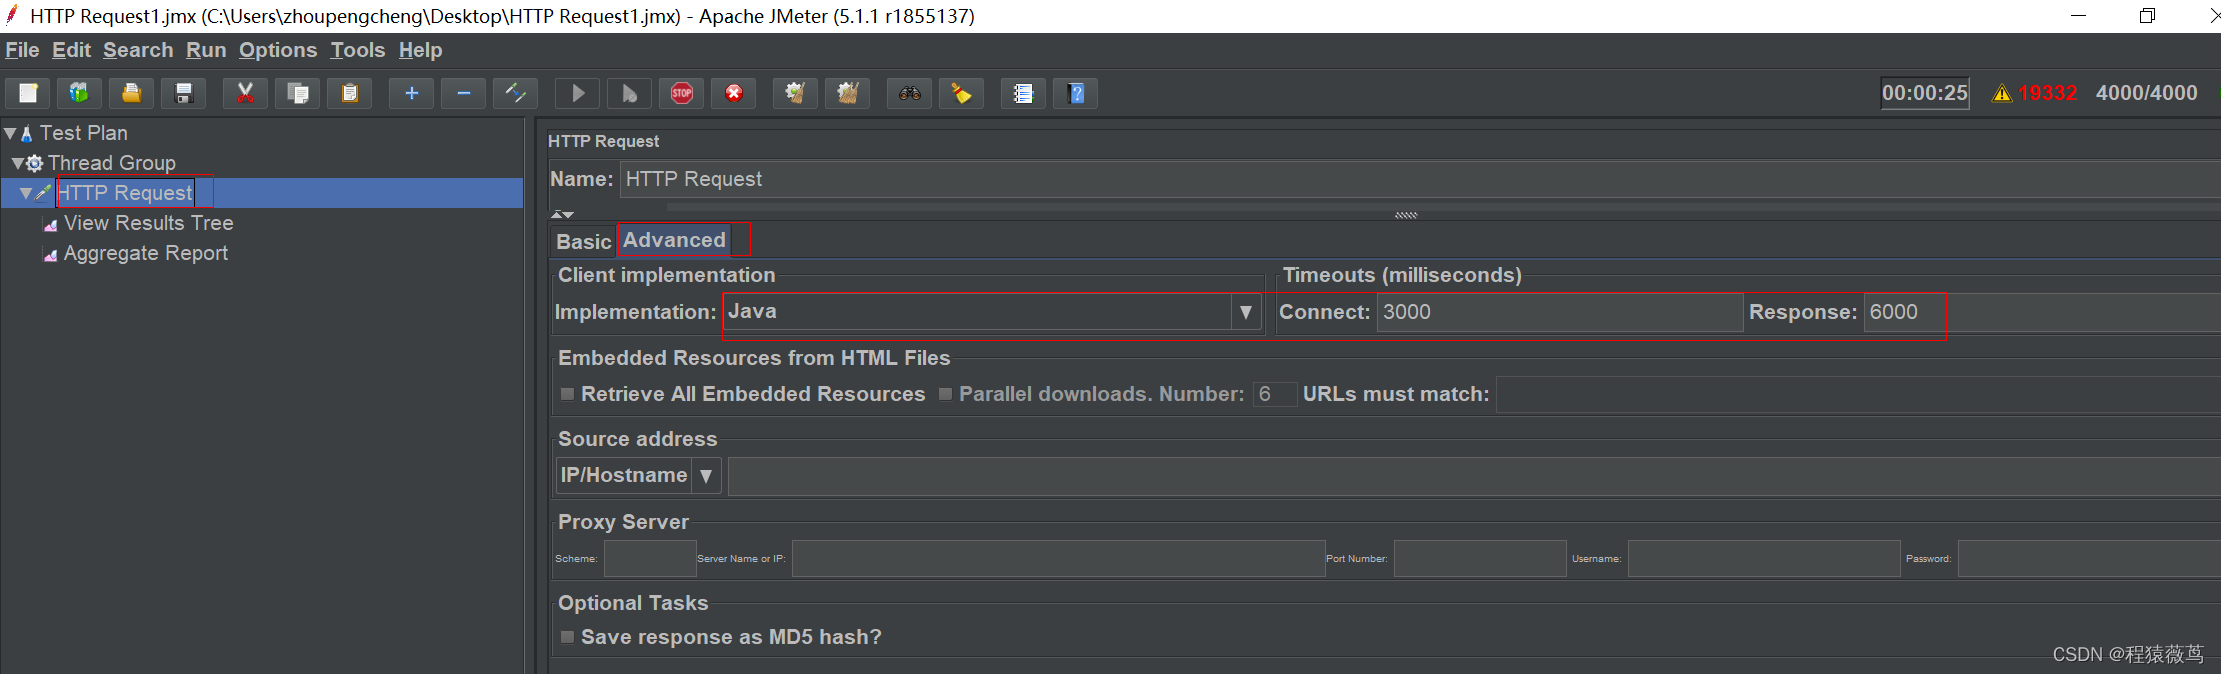
使用JMeter进行压测:File->新建测试计划->添加用户线程组->在线程组上添加一个取样器,选择Http Request
配置Http请求,并在HTTP Request上添加监听器;这里不做复杂的压测分析,选择结果树和聚合报告即可

设置http请求超时时间
设置并发用户数,60秒内全部启起来;
不断调整进行测试;每次开始前先Clear All清理一下旧数据,再点save保存一下,再点Start开始

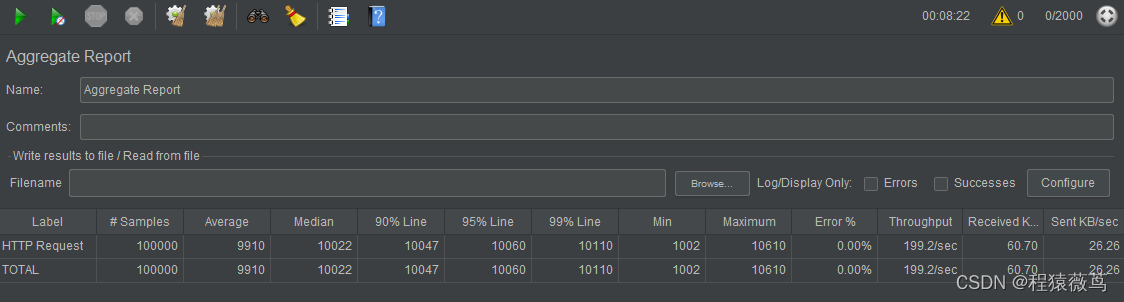
1000用户,99线大约24毫秒的延迟

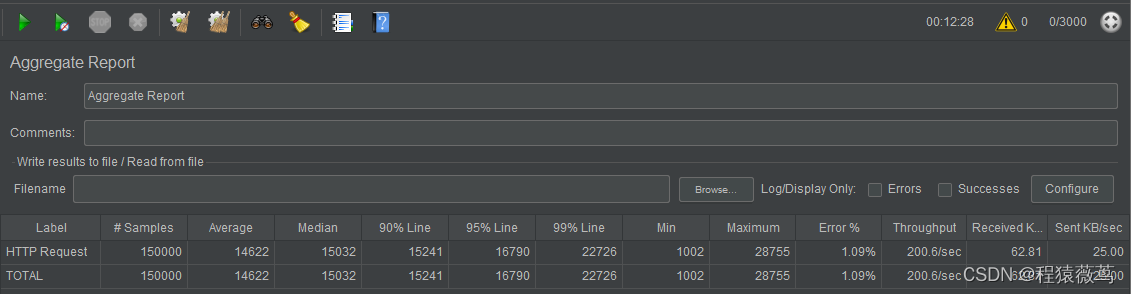
2000用户,99线大约59毫秒的延迟

3000用户,99线大约89毫秒的延迟

4000用户
webflux到4000并发用户时还是很稳

Spring MVC
再来看看SpringMVC的性能
引入pom文件
        <dependency>
            <groupId>org.springframework.boot</groupId>
            <artifactId>spring-boot-starter-web</artifactId>
        </dependency>
编写http接口
@RestController
@RequestMapping("/springmvc")
public class SpringMvcController {

    public static AtomicLong COUNT = new AtomicLong(0);

    @GetMapping("/hello/{latency}")
    public String hello(@PathVariable long latency) {
        System.out.println("Start:" + LocalDateTime.now().format(DateTimeFormatter.ofPattern("yyyy-MM-dd HH:mm:ss.SSS")));
        System.out.println("Page count:" + COUNT.incrementAndGet());
        try {
            //阻塞latency秒,模拟处理耗时
            TimeUnit.SECONDS.sleep(latency);
        } catch (InterruptedException e) {
            e.printStackTrace();
            return "Exception during thread sleep";
        }
        System.out.println("End:" + LocalDateTime.now().format(DateTimeFormatter.ofPattern("yyyy-MM-dd HH:mm:ss.SSS")));
        return "welcome to Spring MVC";
    }
}
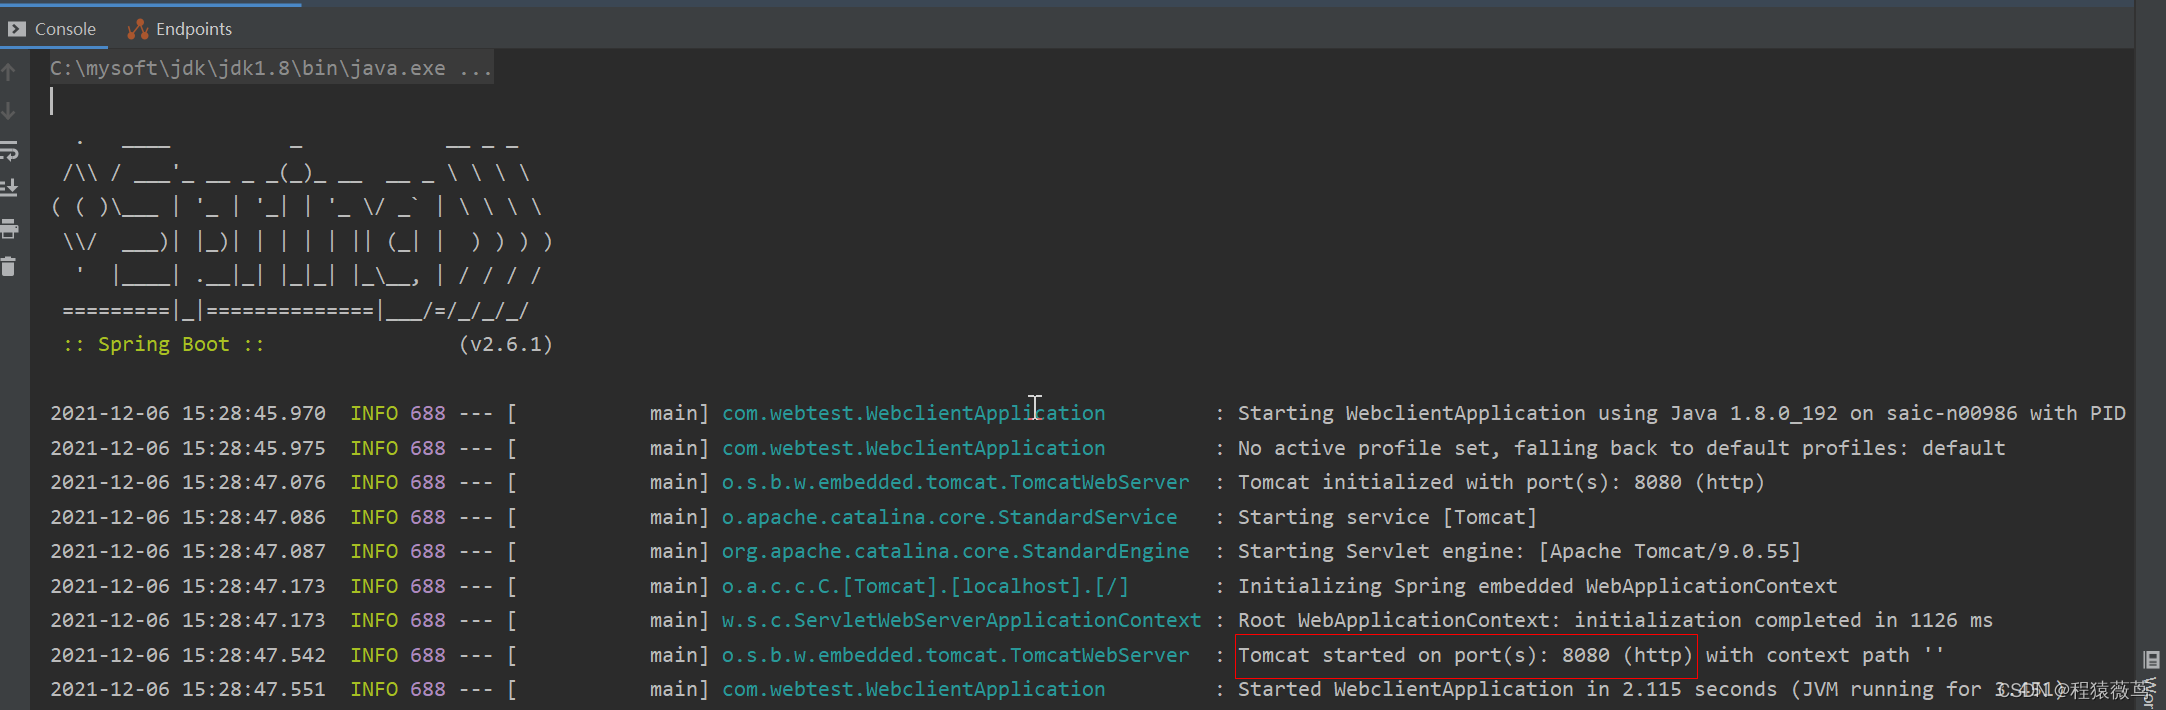
启动服务器。可以看到SpringMVC默认选择Tomcat作为服务器
设置请求路径

100用户

200用户

300用户
从300用户开始,响应时间就开始增加

400用户

500用户

550用户
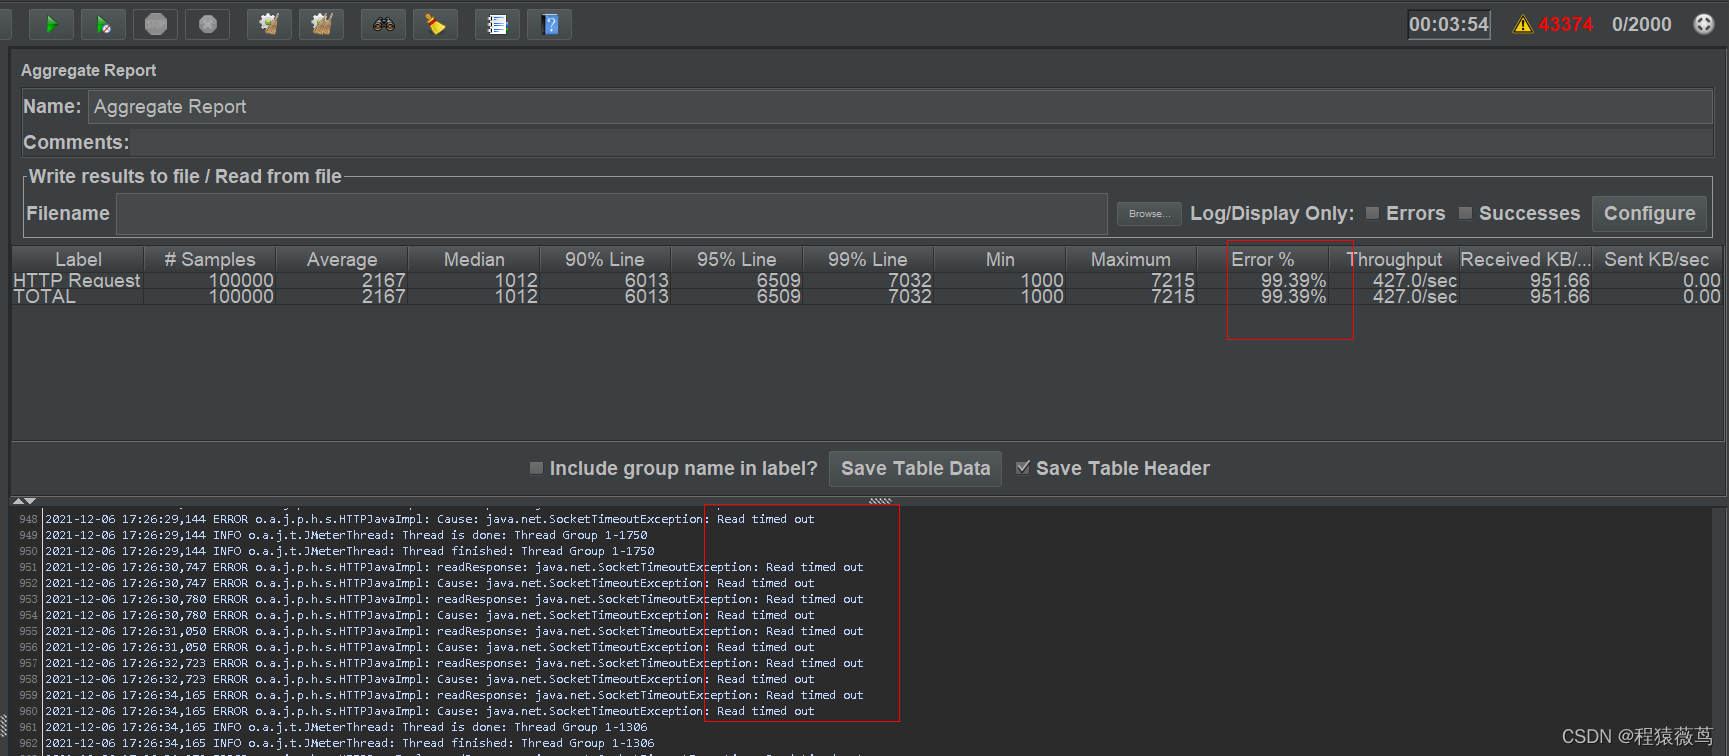
本例中,传统Web技术(Tomcat+SpringMVC)在处理550用户并发时,就开始有超时失败的

600用户
在处理600用户并发时,失败率就已经很高;用户并发数更高时几乎都会处理不过来,接近100%的请求超时。

1000用户

2000用户
3000用户

4000用户

客户端性能比较
我们来比较一下HTTP客户端的性能。
先建一个单独的基于Springboot的Http Server工程提供标准的http接口供客户端调用。
/**
 * Http服务提供方接口;模拟一个基准的HTTP Server接口
 */
@RestController
public class HttpServerController {

    @RequestMapping("product")
    public Product getAllProduct(String type, HttpServletRequest request, HttpServletResponse response) throws InterruptedException {
        long start = System.currentTimeMillis();
        System.out.println("Start:" + LocalDateTime.now().format(DateTimeFormatter.ofPattern("yyyy-MM-dd HH:mm:ss.SSS")));

        //输出请求头
        Enumeration<String> headerNames = request.getHeaderNames();
        while (headerNames.hasMoreElements()) {
            String head = headerNames.nextElement();
            System.out.println(head + ":" + request.getHeader(head));
        }

        System.out.println("cookies=" + request.getCookies());

        Product product = new Product(type + "A", "1", 56.67);
        Thread.sleep(1000);

        //设置响应头和cookie
        response.addHeader("X-appId", "android01");
        response.addCookie(new Cookie("sid", "1000101111"));
        System.out.println("End:" + LocalDateTime.now().format(DateTimeFormatter.ofPattern("yyyy-MM-dd HH:mm:ss.SSS")));
        System.out.println("cost:" + (System.currentTimeMillis() - start) + product);

        return product;
    }

    @RequestMapping("products")
    public List<Product> getAllProducts(String type) throws InterruptedException {
        long start = System.currentTimeMillis();
        List<Product> products = new ArrayList<>();
        products.add(new Product(type + "A", "1", 56.67));
        products.add(new Product(type + "B", "2", 66.66));
        products.add(new Product(type + "C", "3", 88.88));
        Thread.sleep(1000);
        System.out.println("cost:" + (System.currentTimeMillis() - start) + products);
        return products;
    }

    @RequestMapping("product/{pid}")
    public Product getProductById(@PathVariable String pid, @RequestParam String name, @RequestParam double price) throws InterruptedException {
        long start = System.currentTimeMillis();
        Product product = new Product(name, pid, price);
        Thread.sleep(1000);
        System.out.println("cost:" + (System.currentTimeMillis() - start) + product);
        return product;
    }

    @RequestMapping("postProduct")
    public Product postProduct(@RequestParam String id, @RequestParam String name, @RequestParam double price) throws InterruptedException {
        long start = System.currentTimeMillis();
        Product product = new Product(name, id, price);
        Thread.sleep(1000);
        System.out.println("cost:" + (System.currentTimeMillis() - start) + product);
        return product;
    }

    @RequestMapping("postProduct2")
    public Product postProduct(@RequestBody Product product) throws InterruptedException {
        long start = System.currentTimeMillis();
        Thread.sleep(1000);
        System.out.println("cost:" + (System.currentTimeMillis() - start) + product);
        return product;
    }

    @RequestMapping("uploadFile")
    public String uploadFile(MultipartFile file, int age) throws InterruptedException {
        long start = System.currentTimeMillis();
        System.out.println("age=" + age);
        String filePath = "";
        try {
            String filename = file.getOriginalFilename();
            //String extension = FilenameUtils.getExtension(file.getOriginalFilename());
            String dir = "D:\\files";
            filePath = dir + File.separator + filename;
            System.out.println(filePath);
            if (!Files.exists(Paths.get(dir))) {
                new File(dir).mkdirs();
            }
            file.transferTo(Paths.get(filePath));
        } catch (IOException e) {
            e.printStackTrace();
        }
        Thread.sleep(1000);
        System.out.println("cost:" + (System.currentTimeMillis() - start));
        return filePath;
    }
}
Tip
其它客户端代码请访问:https://github.com/bigbirditedu/webclient
webclient
和测试服务端时单独依赖不同的服务器相比,这次同时引入两个依赖。
   <dependency>
            <groupId>org.springframework.boot</groupId>
            <artifactId>spring-boot-starter-webflux</artifactId>
   </dependency>

   <dependency>
            <groupId>org.springframework.boot</groupId>
            <artifactId>spring-boot-starter-web</artifactId>
   </dependency>
引入starter-web是为了启动Tomcat服务器,测试时统一使用Tomcat服务器跑http客户端应用程序;
引入starter-webflux是为了单独使用webclient api,而不是为了使用Netty作为Http服务器;
500用户(超时时间设置6秒)

1000用户(超时时间设置6秒)

1100用户(超时时间设置6秒)
可以看到已经开始有响应超时的了

1200用户(超时时间设置10秒)

resttemplate(不带连接池)
500用户(超时时间设置6秒)

1000用户并发(超时时间设置6秒)

1100用户并发(超时时间设置6秒)

1200用户(超时时间设置10秒),有少量响应超时

resttemplate(带连接池)
        <dependency>
            <groupId>org.apache.httpcomponents</groupId>
            <artifactId>httpclient</artifactId>
            <version>4.5.6</version>
        </dependency>
500用户(超时时间设置6秒)

1000用户(超时时间设置6秒)

1100用户(超时时间设置6秒)
和 不带连接池相比,错误率减少

1200用户(超时时间设置10秒),效果比不带连接池的resttemplate好点,但是响应耗时普遍还是比带连接池的webclient高

综合来看,是否使用http连接池对于单个接口影响有限,池的效果不明显;在多http地址、多接口路由时连接池的效果可能更好。
webclient连接池
默认情况下,WebClient使用连接池运行。池的默认设置是最大500个连接和最大1000个等待请求。如果超过此配置,就会抛异常。
reactor.netty.internal.shaded.reactor.pool.PoolAcquirePendingLimitException: Pending acquire queue has reached its maximum size of 1000
报错日志显示已经达到了默认的挂起队列长度限制1000,因此我们可以自定义线程池配置,以获得更高的性能。
关于Reactor Netty连接池请参考Netty官方和Spring官方的文档:
https://projectreactor.io/docs/netty/snapshot/reference/index.html#_connection_pool_2
1000用户(超时时间设置6秒)

1100用户(超时时间设置6秒)
带连接池的效果好些,没有出现失败的

1200用户(超时时间设置10秒),响应延迟比默认配置的webclient好些

webclient阻塞方式获取结果;不自定义webclient线程池配置,2000用户(JMeter不配置超时时间)

webclient+CompletableFuture方式获取结果;不自定义webclient线程池配置,2000用户(JMeter不配置超时时间)

虽然测试效果几乎没有差别,但是我们要清楚地知道调用block方法是会引发实时阻塞的,会一定程度上增加对CPU的消耗;
实际开发中通常是为了使用异步特性才用webclient,如果用block方式就白瞎了webclient了,还不如直接用restTemplate。
2000用户性能比较
pooled webclient

rest

pooled rest
3000用户性能比较
pooled webclient

rest
pooled rest

webclient 的HTTP API
WebClient 作为一个 HTTP 客户端工具,其提供了标准 HTTP 请求方式,支持 Get、Post、Put、Delete、Head 等方法,可以作为替代 resttemplate 的一个强有力的工具。
API演示代码地址:https://github.com/bigbirditedu/webclient
小结
使用webClient在等待远程响应的同时不会阻塞本地正在执行的线程 ;本地线程处理完一个请求紧接着可以处理下一个,能够提高系统的吞吐量;而restTemplate 这种方式是阻塞的,会一直占用当前线程资源,直到http返回响应。如果等待的请求发生了堆积,应用程序将创建大量线程,直至耗尽线程池所有可用线程,甚至出现OOM。另外频繁的CPU上下文切换,也会导致性能下降。
但是作为上述两种方式的调用方(消费者)而言,其最终获得http响应结果的耗时并未减少。比如文章案例中,通过浏览器访问后端的的两个接口(SpringMVC、SpringWebFlux)时,返回数据的耗时相同。即最终获取(消费)数据的地方还会等待。
使用webclient替代restTemplate的好处是可以异步等待http响应,使得线程不需要阻塞;单位时间内有限资源下支持更高的并发量。但是建议webclient和webflux配合使用,使整个流程全异步化;如果单独使用webclient,笔者实测,和resttemplate差别不大!欢迎留言指教!
到此这篇关于Spring WebClient实战示例的文章就介绍到这了,更多相关Spring WebClient 内容请搜索我们以前的文章或继续浏览下面的相关文章希望大家以后多多支持我们!
相关推荐
-
spring boot使用WebClient调用HTTP服务代码示例
这篇文章主要介绍了spring boot使用WebClient调用HTTP服务代码示例,文中通过示例代码介绍的非常详细,对大家的学习或者工作具有一定的参考学习价值,需要的朋友可以参考下 WebClient的请求模式属于异步非阻塞,能够以少量固定的线程处理高并发的HTTP请求 WebClient是Spring WebFlux模块提供的一个非阻塞的基于响应式编程的进行Http请求的客户端工具,从Spring5.0开始提供 在Spring Boot应用中 1.添加Spring WebFlux依赖 <d
-
Spring5中的WebClient使用方法详解
前言 Spring5带来了新的响应式web开发框架WebFlux,同时,也引入了新的HttpClient框架WebClient.WebClient是Spring5中引入的执行 HTTP 请求的非阻塞.反应式客户端.它对同步和异步以及流方案都有很好的支持,WebClient发布后,RestTemplate将在将来版本中弃用,并且不会向前添加主要新功能. WebClient与RestTemplate比较 WebClient是一个功能完善的Http请求客户端,与RestTemplate相比,WebCl
-
spring5 webclient使用指南详解
之前写了一篇restTemplate使用实例,由于spring 5全面引入reactive,同时也有了restTemplate的reactive版webclient,本文就来对应展示下webclient的基本使用. 请求携带header 携带cookie @Test public void testWithCookie(){ Mono<String> resp = WebClient.create() .method(HttpMethod.GET) .uri("http://baid
-

Spring WebClient实战示例
目录 WebClient实战 服务端性能对比 Spring WebFlux Spring MVC 客户端性能比较 webclient resttemplate(不带连接池) resttemplate(带连接池) webclient连接池 webclient 的HTTP API 小结 WebClient实战 本文代码地址:https://github.com/bigbirditedu/webclient Spring Webflux 是 Spring Framework 5.0 的新特性,是随着当
-
详解Spring Boot实战之Filter实现使用JWT进行接口认证
本文介绍了spring Boot实战之Filter实现使用JWT进行接口认证,分享给大家 jwt(json web token) 用户发送按照约定,向服务端发送 Header.Payload 和 Signature,并包含认证信息(密码),验证通过后服务端返回一个token,之后用户使用该token作为登录凭证,适合于移动端和api jwt使用流程 本文示例接上面几篇文章中的代码进行编写,请阅读本文的同时可以参考前面几篇文章 1.添加依赖库jjwt,本文中构造jwt及解析jwt都使用了jjwt库
-
详解Spring Boot实战之单元测试
本文介绍使用Spring测试框架提供的MockMvc对象,对Restful API进行单元测试 Spring测试框架提供MockMvc对象,可以在不需要客户端-服务端请求的情况下进行MVC测试,完全在服务端这边就可以执行Controller的请求,跟启动了测试服务器一样. 测试开始之前需要建立测试环境,setup方法被@Before修饰.通过MockMvcBuilders工具,使用WebApplicationContext对象作为参数,创建一个MockMvc对象. MockMvc对象提供一组工具
-
实例详解Spring Boot实战之Redis缓存登录验证码
本章简单介绍redis的配置及使用方法,本文示例代码在前面代码的基础上进行修改添加,实现了使用redis进行缓存验证码,以及校验验证码的过程. 1.添加依赖库(添加redis库,以及第三方的验证码库) <dependency> <groupId>org.springframework.boot</groupId> <artifactId>spring-boot-starter-redis</artifactId> </dependency&
-
spring boot实战之内嵌容器tomcat配置
本文介绍了spring boot实战之内嵌容器tomcat配置,分享给大家,具体如下: 默认容器 spring boot默认web程序启用tomcat内嵌容器tomcat,监听8080端口,servletPath默认为 / 通过需要用到的就是端口.上下文路径的修改,在spring boot中其修改方法及其简单: 在资源文件中配置: server.port=9090 server.contextPath=/lkl 启动spring boot 2015-10-04 00:06:55.768 INFO
-
Redis 抽奖大转盘的实战示例
目录 1. 项目介绍 2. 项目演示 3. 表结构 4. 项目搭建 4.1 依赖 4.2 YML配置 4.3 代码生成 4.4 Redis 配置 4.5 常量管理 4.6 业务代码 4.7 总结 5. 项目地址 1. 项目介绍 这是一个基于Spring boot + Mybatis Plus + Redis 的简单案例. 主要是将活动内容.奖品信息.记录信息等缓存到Redis中,然后所有的抽奖过程全部从Redis中做数据的操作. 大致内容很简单,具体操作下面慢慢分析. 2. 项目演示 话不多说,
-
SpringBoot Security从入门到实战示例教程
目录 前言 入门 测试接口 增加依赖 自定义配置 配置密码加密方式 配置AuthenticationManagerBuilder 认证用户.角色权限 配置HttpSecurity Url访问权限 自定义successHandler 自定义failureHandler 自定义未认证处理 自定义权限不足处理 自定义注销登录 前后端分离场景 提供登录接口 自定义认证过滤器 鉴权 1.注解鉴权 2.自定义Bean动态鉴权 3.扩展默认方法自定义扩展根对象SecurityExpressionRoot 登出
-
spring结合hibernate示例详解
单纯Hibernate程序 1.首先是导入hibernate的jar包. 2. 建立用户和用户操作记录实体,Log.Java和User.java.代码如下所示. Log.java import java.util.Date; public class Log { private int id; //日志的类别.日志一般起到一个不可否认性. //操作日志 安全日志 事件日志. private String type; private String detail; private Date time
-
详解Spring Boot实战之Rest接口开发及数据库基本操作
本文介绍了Spring Boot实战之Rest接口开发及数据库基本操作,分享给大家 1.修改pom.xml,添加依赖库,本文使用的是mysql <dependency> <groupId>org.springframework.boot</groupId> <artifactId>spring-boot-starter-data-jpa</artifactId> </dependency> <dependency> <
-
Spring 缓存抽象示例详解
Spring缓存抽象概述 Spring框架自身并没有实现缓存解决方案,但是从3.1开始定义了org.springframework.cache.Cache和org.springframework.cache.CacheManager接口,提供对缓存功能的声明,能够与多种流行的缓存实现集成. Cache接口为缓存的组件规范定义,包含缓存的各种操作集合: Cache接口下Spring提供了各种xxxCache的实现:如RedisCache,EhCacheCache , ConcurrentMapCa