详解SpringBoot配置连接池
内置的连接池
目前spring Boot中默认支持的连接池有dbcp,dbcp2, tomcat, hikari三种连接池。
数据库连接可以使用DataSource池进行自动配置。
- 由于Tomcat数据源连接池的性能和并发,在tomcat可用时,我们总是优先使用它。
- 如果HikariCP可用,我们将使用它。
- 如果Commons DBCP可用,我们将使用它,但在生产环境不推荐使用它。
- 最后,如果Commons DBCP2可用,我们将使用它。
以上的几种连接池,可以通过在配置application文件中配置。
spring.datasource.url=jdbc:mysql://localhost/test
spring.datasource.username=dbuser
spring.datasource.password=dbpass
spring.datasource.driver-class-name=com.mysql.jdbc.Driver
Spring Boot能够从大多数数据库的url上推断出driver-class-name,你就不需要再指定它了。对于一个将要创建的DataSource连接池,我们需要能够验证Driver是否可用,所以我们会在做任何事情之前检查它。比如,如果你设置spring.datasource.driverClassName=com.MySQL.jdbc.Driver,然后这个类就会被加载。
配置Druid连接池
在SpringBoot 的1.5.2版本中不在支持自动配druid,,即无法通过配置项直接支持相应的连接池;这里列出的这些配置项可以通过定制化DataSource来实现。
druid介绍
Druid是一个JDBC组件,它包括三部分:
- DruidDriver 代理Driver,能够提供基于Filter-Chain模式的插件体系。
- DruidDataSource 高效可管理的数据库连接池。
- SQLParser
Druid可以做什么
- 可以监控数据库访问性能,Druid内置提供了一个功能强大的StatFilter插件,能够详细统计SQL的执行性能,这对于线上分析数据库访问性能有帮助。
- 替换DBCP和C3P0。Druid提供了一个高效、功能强大、可扩展性好的数据库连接池。
- 数据库密码加密。直接把数据库密码写在配置文件中,这是不好的行为,容易导致安全问题。DruidDruiver和DruidDataSource都支持PasswordCallback。
- SQL执行日志,Druid提供了不同的LogFilter,能够支持Common-Logging、Log4j和JdkLog,你可以按需要选择相应的LogFilter,监控你应用的数据库访问情况。
- 扩展JDBC,如果你要对JDBC层有编程的需求,可以通过Druid提供的Filter-Chain机制,很方便编写JDBC层的扩展插件。
项目地址: https://github.com/alibaba/druid
Spring Boot与Druid的集成
MySQL Driver驱动包:
    <dependency>
      <groupId>mysql</groupId>
      <artifactId>mysql-connector-java</artifactId>
      <scope>runtime</scope>
    </dependency>
阿里系的Druid依赖包:
    <dependency>
      <groupId>com.alibaba</groupId>
      <artifactId>druid</artifactId>
      <version>1.0.25</version>
    </dependency>
application.properties配置信息
# 驱动配置信息
spring.datasource.type=com.alibaba.druid.pool.DruidDataSource
spring.datasource.url = jdbc:mysql://127.0.0.1:3306/test?useUnicode=true&characterEncoding=utf-8
spring.datasource.username = root
spring.datasource.password = adminter
spring.datasource.driverClassName = com.mysql.jdbc.Driver

#连接池的配置信息
## 初始化大小,最小,最大
spring.druid.initialSize=5
spring.druid.minIdle=5
spring.druid.maxActive=20
## 配置获取连接等待超时的时间
spring.druid.maxWait=60000
# 配置间隔多久才进行一次检测,检测需要关闭的空闲连接,单位是毫秒
spring.druid.timeBetweenEvictionRunsMillis=60000
# 配置一个连接在池中最小生存的时间,单位是毫秒
spring.druid.minEvictableIdleTimeMillis=300000
spring.druid.validationQuery=SELECT 1 FROM DUAL
spring.druid.testWhileIdle=true
spring.druid.testOnBorrow=false
spring.druid.testOnReturn=false
spring.druid.poolPreparedStatements=true
spring.druid.maxPoolPreparedStatementPerConnectionSize=20
# 配置监控统计拦截的filters,去掉后监控界面sql无法统计,'wall'用于防火墙
spring.druid.filters=stat,wall,log4j
# 通过connectProperties属性来打开mergeSql功能;慢SQL记录
spring.druid.connectionProperties=druid.stat.mergeSql=true;druid.stat.slowSqlMillis=5000
DruidSource配置信息的定制
package com.lf.datasource;

import com.alibaba.druid.pool.DruidDataSource;
import org.springframework.boot.context.properties.ConfigurationProperties;
import org.springframework.context.annotation.Bean;
import org.springframework.context.annotation.Primary;

import javax.sql.DataSource;
import java.sql.SQLException;

/**
 * Created by LF on 2017/4/18.
 */
@ConfigurationProperties(prefix = "spring.druid")
public class DruidSource {

  private String dbUrl;

  private String username;

  private String password;

  private String driverClassName;

  private int initialSize;

  private int minIdle;

  private int maxActive;

  private int maxWait;

  private int timeBetweenEvictionRunsMillis;

  private int minEvictableIdleTimeMillis;
  private String validationQuery;

  private boolean testWhileIdle;
  private boolean testOnBorrow;

  private boolean testOnReturn;

  private boolean poolPreparedStatements;

  private int maxPoolPreparedStatementPerConnectionSize;

  private String filters;

  private String connectionProperties;

  public String getDbUrl() {
    return dbUrl;
  }

  public void setDbUrl(String dbUrl) {
    this.dbUrl = dbUrl;
  }

  public String getUsername() {
    return username;
  }

  public void setUsername(String username) {
    this.username = username;
  }

  public String getPassword() {
    return password;
  }

  public void setPassword(String password) {
    this.password = password;
  }

  public String getDriverClassName() {
    return driverClassName;
  }

  public void setDriverClassName(String driverClassName) {
    this.driverClassName = driverClassName;
  }

  public int getInitialSize() {
    return initialSize;
  }

  public void setInitialSize(int initialSize) {
    this.initialSize = initialSize;
  }

  public int getMinIdle() {
    return minIdle;
  }

  public void setMinIdle(int minIdle) {
    this.minIdle = minIdle;
  }

  public int getMaxActive() {
    return maxActive;
  }

  public void setMaxActive(int maxActive) {
    this.maxActive = maxActive;
  }

  public int getMaxWait() {
    return maxWait;
  }

  public void setMaxWait(int maxWait) {
    this.maxWait = maxWait;
  }

  public int getTimeBetweenEvictionRunsMillis() {
    return timeBetweenEvictionRunsMillis;
  }

  public void setTimeBetweenEvictionRunsMillis(int timeBetweenEvictionRunsMillis) {
    this.timeBetweenEvictionRunsMillis = timeBetweenEvictionRunsMillis;
  }

  public int getMinEvictableIdleTimeMillis() {
    return minEvictableIdleTimeMillis;
  }

  public void setMinEvictableIdleTimeMillis(int minEvictableIdleTimeMillis) {
    this.minEvictableIdleTimeMillis = minEvictableIdleTimeMillis;
  }

  public String getValidationQuery() {
    return validationQuery;
  }

  public void setValidationQuery(String validationQuery) {
    this.validationQuery = validationQuery;
  }

  public boolean isTestWhileIdle() {
    return testWhileIdle;
  }

  public void setTestWhileIdle(boolean testWhileIdle) {
    this.testWhileIdle = testWhileIdle;
  }

  public boolean isTestOnBorrow() {
    return testOnBorrow;
  }

  public void setTestOnBorrow(boolean testOnBorrow) {
    this.testOnBorrow = testOnBorrow;
  }

  public boolean isTestOnReturn() {
    return testOnReturn;
  }

  public void setTestOnReturn(boolean testOnReturn) {
    this.testOnReturn = testOnReturn;
  }

  public boolean isPoolPreparedStatements() {
    return poolPreparedStatements;
  }

  public void setPoolPreparedStatements(boolean poolPreparedStatements) {
    this.poolPreparedStatements = poolPreparedStatements;
  }

  public int getMaxPoolPreparedStatementPerConnectionSize() {
    return maxPoolPreparedStatementPerConnectionSize;
  }

  public void setMaxPoolPreparedStatementPerConnectionSize(int maxPoolPreparedStatementPerConnectionSize) {
    this.maxPoolPreparedStatementPerConnectionSize = maxPoolPreparedStatementPerConnectionSize;
  }

  public String getFilters() {
    return filters;
  }

  public void setFilters(String filters) {
    this.filters = filters;
  }

  public String getConnectionProperties() {
    return connectionProperties;
  }

  public void setConnectionProperties(String connectionProperties) {
    this.connectionProperties = connectionProperties;
  }

  @Bean   //声明其为Bean实例
  @Primary //在同样的DataSource中,首先使用被标注的DataSource
  public DataSource dataSource() throws SQLException {
    DruidDataSource datasource = new DruidDataSource();

    datasource.setUrl(this.dbUrl);
    datasource.setUsername(username);
    datasource.setPassword(password);
    datasource.setDriverClassName(driverClassName);

    //configuration
    datasource.setInitialSize(initialSize);
    datasource.setMinIdle(minIdle);
    datasource.setMaxActive(maxActive);
    datasource.setMaxWait(maxWait);
    datasource.setTimeBetweenEvictionRunsMillis(timeBetweenEvictionRunsMillis);
    datasource.setMinEvictableIdleTimeMillis(minEvictableIdleTimeMillis);
    datasource.setValidationQuery(validationQuery);
    datasource.setTestWhileIdle(testWhileIdle);
    datasource.setTestOnBorrow(testOnBorrow);
    datasource.setTestOnReturn(testOnReturn);
    datasource.setPoolPreparedStatements(poolPreparedStatements);
    datasource.setMaxPoolPreparedStatementPerConnectionSize(maxPoolPreparedStatementPerConnectionSize);

    datasource.setFilters(filters);

    return datasource;
  }
}
基于注解的配置StatView的Servlet
Filter的实现类:
package com.lf.config;

import com.alibaba.druid.support.http.WebStatFilter;

import javax.servlet.annotation.WebFilter;
import javax.servlet.annotation.WebInitParam;

/**
 * Created by LF on 2017/4/18.
 */
@WebFilter(filterName = "druidWebStatFilter", urlPatterns = "/*",
    initParams = {
        @WebInitParam(name = "exclusions", value = "*.js,*.gif,*.jpg,*.bmp,*.png,*.css,*.ico,/druid/*")//忽略资源
    }
)
public class DruidStatFilter extends WebStatFilter {
}
StatViewServlet:
package com.lf.config;

import com.alibaba.druid.support.http.StatViewServlet;

import javax.servlet.annotation.WebInitParam;
import javax.servlet.annotation.WebServlet;

/**
 * Created by LF on 2017/4/18.
 */

@WebServlet(urlPatterns = "/druid/*",
    initParams = {
        @WebInitParam(name = "allow", value = "127.0.0.1,192.168.163.1"),// IP白名单(没有配置或者为空,则允许所有访问)
        @WebInitParam(name = "deny", value = "192.168.1.73"),// IP黑名单 (存在共同时,deny优先于allow)
        @WebInitParam(name = "loginUsername", value = "admin"),// 用户名
        @WebInitParam(name = "loginPassword", value = "123456"),// 密码
        @WebInitParam(name = "resetEnable", value = "false")// 禁用HTML页面上的“Reset All”功能
    })
public class DruidStatViewServlet extends StatViewServlet {
  private static final long serialVersionUID = -2688872071445249539L;
}
在启动类上加入@ServletComponentScan注解
基于Java的配置StatView的Servlet
package com.lf.config;

import com.alibaba.druid.support.http.StatViewServlet;
import com.alibaba.druid.support.http.WebStatFilter;
import org.springframework.boot.web.servlet.FilterRegistrationBean;
import org.springframework.boot.web.servlet.ServletRegistrationBean;
import org.springframework.context.annotation.Bean;
import org.springframework.context.annotation.Configuration;

/**
 * Created by LF on 2017/4/18.
 */
@Configuration
public class DruidConfig {
  @Bean
  public ServletRegistrationBean registrationBean() {
    ServletRegistrationBean servletRegistrationBean = new ServletRegistrationBean(new StatViewServlet());    //添加初始化参数:initParams
    servletRegistrationBean.addUrlMappings("/druid/*");
    //白名单:
    servletRegistrationBean.addInitParameter("allow", "127.0.0.1");
    //IP黑名单 (存在共同时,deny优先于allow) : 如果满足deny的话提示:Sorry, you are not permitted to view this page.
    servletRegistrationBean.addInitParameter("deny", "192.168.1.73");
    //登录查看信息的账号密码.
    servletRegistrationBean.addInitParameter("loginUsername", "admin");
    servletRegistrationBean.addInitParameter("loginPassword", "123456");
    //是否能够重置数据.
    servletRegistrationBean.addInitParameter("resetEnable", "false");
    return servletRegistrationBean;
  }

  @Bean
  public FilterRegistrationBean filterRegistrationBean() {
    FilterRegistrationBean filterRegistrationBean = new FilterRegistrationBean(new WebStatFilter());
    //添加过滤规则.
    filterRegistrationBean.addUrlPatterns("/*");
    //添加不需要忽略的格式信息.
    filterRegistrationBean.addInitParameter("exclusions", "*.js,*.gif,*.jpg,*.png,*.css,*.ico,/druid/*");
    return filterRegistrationBean;
  }
}
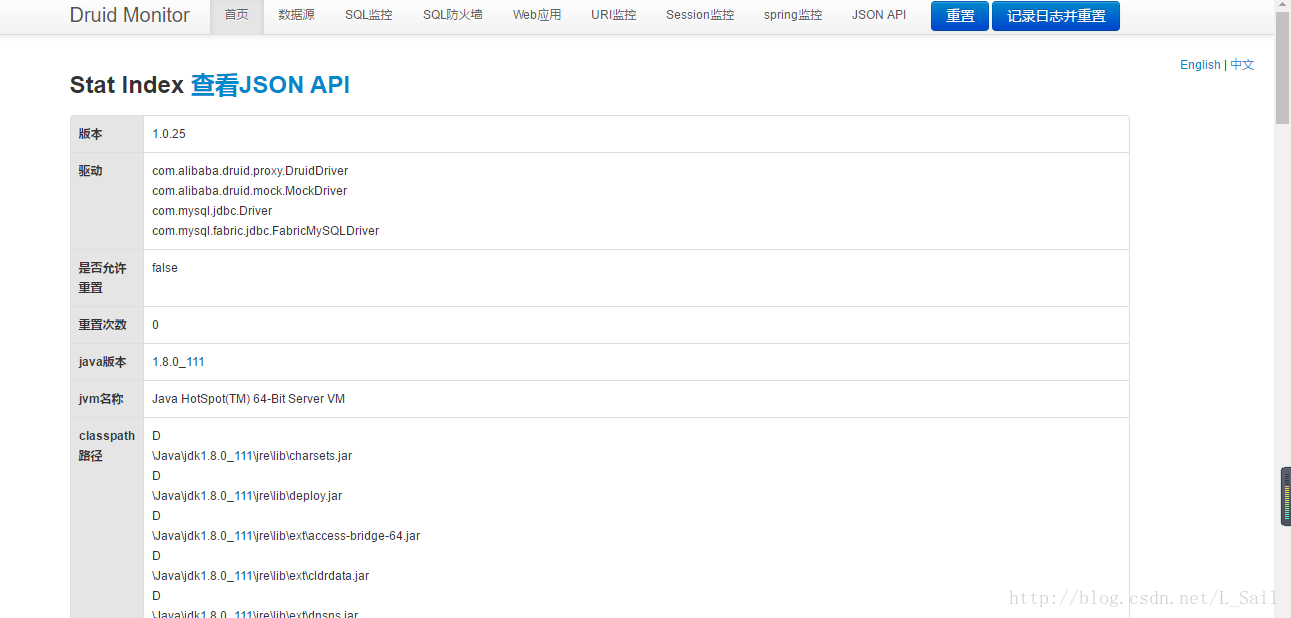
运行界面以及介绍
访问地址: http://192.168.163.1:8080/druid/index.html

账号和密码为在servlet中配置的

以上就是本文的全部内容,希望对大家的学习有所帮助,也希望大家多多支持我们。

