教你使用Apache搭建Http下载服务器
目录
- 前言
- Apache快速上手
- 修改端口号
- 设置访问限制
- 配置文件参数详解
- 限制连接量
- 封禁ip
- 设置账号密码访问
- 参考
前言
前段时间因为某些原因,几大主流网盘都无法使用,正好手头上有台闲置的云服务器,于是就想来搭建一个文件下载服务,用户只需通过一个链接就能下载软件。
Apache快速上手
经过调研,发现Ubuntu采用Apache2这个软件就可以快速满足我的需求。
安装Apache2
apt-get install apache2
安装好之后,启动Apache2服务:
/etc/init.d/apache2 start
查看启动状态:
/etc/init.d/apache2 status
然后,访问服务器的公网ip或域名,就可以看到如下界面,此时说明Apache正常工作:

最后在/var/www/html路径下,删除index.html,上传自己想要被下载的文件,再次访问,就可以进行下载了。
(注:如果是云服务器,还需要在安全组开放80和443端口号)
同时,也可以通过域名/文件名的方式直接给别人一个链接,进行下载。

如果有一台单独的服务器用于临时文件的分享,这样很快就搞定了。
下面来继续进行深入研究,考虑更现实的场景。
修改端口号
Apache2默认采用的是80端口号,因此直接通过公网ip或域名就能访问。现实中,很多服务器本身就部署了许多其它服务,80端口号往往被占用,因此就需要将Apache2改成其它访问端口。
修改端口,首先需要修改/etc/apache2/ports.conf这个文件:
这里吧80改成其它不冲突的端口号,我这里以1024为例
#Listen 80
Listen 1024
<IfModule ssl_module>
        Listen 443
</IfModule>
<IfModule mod_gnutls.c>
        Listen 443
</IfModule>
然后修改/etc/apache2/sites-available/000-default.conf
#<VirtualHost *:80>
<VirtualHost *:1024>
        # The ServerName directive sets the request scheme, hostname and port that
        # the server uses to identify itself. This is used when creating
注:这个文件中还有一个DocumentRoot,修改该参数可以调整文件系统的根路径。
修改完成之后,重启apache2:
/etc/init.d/apache2 restart
此时,就可以通过访问域名:1024的形式访问到同样内容,例如我的服务器访问url为http://xdxsb.top:1024
设置访问限制
个人服务器很容易遭到别人的攻击,如果有人开好多线程来反复请求下载,这就将导致流量带宽消耗巨大,甚至会让服务器宕机。因此,长期提供下载服务的服务器必须设置访问限制。
配置文件参数详解
访问限制主要涉及到/etc/apache2/apache2.conf这个配置文件,首先来对该文件进行解读。
这个文件内容如下:
# This is the main Apache server configuration file. It contains the
# configuration directives that give the server its instructions.
# See http://httpd.apache.org/docs/2.4/ for detailed information about
# the directives and /usr/share/doc/apache2/README.Debian about Debian specific
# hints.
#
#
# Summary of how the Apache 2 configuration works in Debian:
# The Apache 2 web server configuration in Debian is quite different to
# upstream's suggested way to configure the web server. This is because Debian's
# default Apache2 installation attempts to make adding and removing modules,
# virtual hosts, and extra configuration directives as flexible as possible, in
# order to make automating the changes and administering the server as easy as
# possible.
# It is split into several files forming the configuration hierarchy outlined
# below, all located in the /etc/apache2/ directory:
#
# /etc/apache2/
# |-- apache2.conf
# | `-- ports.conf
# |-- mods-enabled
# | |-- *.load
# | `-- *.conf
# |-- conf-enabled
# | `-- *.conf
# `-- sites-enabled
# `-- *.conf
#
#
# * apache2.conf is the main configuration file (this file). It puts the pieces
# together by including all remaining configuration files when starting up the
# web server.
#
# * ports.conf is always included from the main configuration file. It is
# supposed to determine listening ports for incoming connections which can be
# customized anytime.
#
# * Configuration files in the mods-enabled/, conf-enabled/ and sites-enabled/
# directories contain particular configuration snippets which manage modules,
# global configuration fragments, or virtual host configurations,
# respectively.
#
# They are activated by symlinking available configuration files from their
# respective *-available/ counterparts. These should be managed by using our
# helpers a2enmod/a2dismod, a2ensite/a2dissite and a2enconf/a2disconf. See
# their respective man pages for detailed information.
#
# * The binary is called apache2. Due to the use of environment variables, in
# the default configuration, apache2 needs to be started/stopped with
# /etc/init.d/apache2 or apache2ctl. Calling /usr/bin/apache2 directly will not
# work with the default configuration.
# Global configuration
#
#
# ServerRoot: The top of the directory tree under which the server's
# configuration, error, and log files are kept.
#
# NOTE! If you intend to place this on an NFS (or otherwise network)
# mounted filesystem then please read the Mutex documentation (available
# at <URL:http://httpd.apache.org/docs/2.4/mod/core.html#mutex>);
# you will save yourself a lot of trouble.
#
# Do NOT add a slash at the end of the directory path.
#
#ServerRoot "/etc/apache2"
#
# The accept serialization lock file MUST BE STORED ON A LOCAL DISK.
#
#Mutex file:${APACHE_LOCK_DIR} default
#
# The directory where shm and other runtime files will be stored.
#
DefaultRuntimeDir ${APACHE_RUN_DIR}
#
# PidFile: The file in which the server should record its process
# identification number when it starts.
# This needs to be set in /etc/apache2/envvars
#
PidFile ${APACHE_PID_FILE}
#
# Timeout: The number of seconds before receives and sends time out.
#
Timeout 300
#
# KeepAlive: Whether or not to allow persistent connections (more than
# one request per connection). Set to "Off" to deactivate.
#
KeepAlive On
#
# MaxKeepAliveRequests: The maximum number of requests to allow
# during a persistent connection. Set to 0 to allow an unlimited amount.
# We recommend you leave this number high, for maximum performance.
#
MaxKeepAliveRequests 100
#
# KeepAliveTimeout: Number of seconds to wait for the next request from the
# same client on the same connection.
#
KeepAliveTimeout 5
# These need to be set in /etc/apache2/envvars
User ${APACHE_RUN_USER}
Group ${APACHE_RUN_GROUP}
#
# HostnameLookups: Log the names of clients or just their IP addresses
# e.g., www.apache.org (on) or 204.62.129.132 (off).
# The default is off because it'd be overall better for the net if people
# had to knowingly turn this feature on, since enabling it means that
# each client request will result in AT LEAST one lookup request to the
# nameserver.
#
HostnameLookups Off
# ErrorLog: The location of the error log file.
# If you do not specify an ErrorLog directive within a <VirtualHost>
# container, error messages relating to that virtual host will be
# logged here. If you *do* define an error logfile for a <VirtualHost>
# container, that host's errors will be logged there and not here.
#
ErrorLog ${APACHE_LOG_DIR}/error.log
#
# LogLevel: Control the severity of messages logged to the error_log.
# Available values: trace8, ..., trace1, debug, info, notice, warn,
# error, crit, alert, emerg.
# It is also possible to configure the log level for particular modules, e.g.
# "LogLevel info ssl:warn"
#
LogLevel warn
# Include module configuration:
IncludeOptional mods-enabled/*.load
IncludeOptional mods-enabled/*.conf
# Include list of ports to listen on
Include ports.conf
# Sets the default security model of the Apache2 HTTPD server. It does
# not allow access to the root filesystem outside of /usr/share and /var/www.
# The former is used by web applications packaged in Debian,
# the latter may be used for local directories served by the web server. If
# your system is serving content from a sub-directory in /srv you must allow
# access here, or in any related virtual host.
<Directory />
Options FollowSymLinks
AllowOverride None
Require all denied
</Directory>
<Directory /usr/share>
AllowOverride None
Require all granted
</Directory>
<Directory /var/www/>
Options Indexes FollowSymLinks
AllowOverride None
Require all granted
</Directory>
#<Directory /srv/>
# Options Indexes FollowSymLinks
# AllowOverride None
# Require all granted
#</Directory>
# AccessFileName: The name of the file to look for in each directory
# for additional configuration directives. See also the AllowOverride
# directive.
#
AccessFileName .htaccess
#
# The following lines prevent .htaccess and .htpasswd files from being
# viewed by Web clients.
#
<FilesMatch "^\.ht">
Require all denied
</FilesMatch>
#
# The following directives define some format nicknames for use with
# a CustomLog directive.
#
# These deviate from the Common Log Format definitions in that they use %O
# (the actual bytes sent including headers) instead of %b (the size of the
# requested file), because the latter makes it impossible to detect partial
# requests.
#
# Note that the use of %{X-Forwarded-For}i instead of %h is not recommended.
# Use mod_remoteip instead.
#
LogFormat "%v:%p %h %l %u %t \"%r\" %>s %O \"%{Referer}i\" \"%{User-Agent}i\"" vhost_combined
LogFormat "%h %l %u %t \"%r\" %>s %O \"%{Referer}i\" \"%{User-Agent}i\"" combined
LogFormat "%h %l %u %t \"%r\" %>s %O" common
LogFormat "%{Referer}i -> %U" referer
LogFormat "%{User-agent}i" agent
# Include of directories ignores editors' and dpkg's backup files,
# see README.Debian for details.
# Include generic snippets of statements
IncludeOptional conf-enabled/*.conf
# Include the virtual host configurations:
IncludeOptional sites-enabled/*.conf
# vim: syntax=apache ts=4 sw=4 sts=4 sr noet
参数解释:
- PidFile:记录服务器启动进程号的文件
- Timeout:接收和发送前超时秒数
- KeepAlive:是否允许稳固的连接(每个连接有多个请求),设为"Off"则停用
- MaxKeepAliveRequests:在稳固连接期间允许的最大请求数,设为0表示无限制接入
- KeepAliveTimeout:在同一个连接上从同一台客户上接收请求的秒数
- User/Group:运行的用户和组
- HostnameLookups:指定记录用户端的名字还是IP地址
例如,本指令为on时记录主机名,如www.apache.org;为off时记录IP地址,204.62.129.132。默认值为off,这要比设为on好得多,因为如果设为on则每个用户端请求都将会至少造成对 nameserver 进行一次查询。 - ErrorLog:错误日志文件定位
- LogLevel:控制记录在错误日志文件中的日志信息
可选值:debug,info,notice,warn,error,crit,alert,emerg - Directory:在标签对里面可以设置各文件夹属性
- Options:控制在特定目录中将使用哪些服务器特性
- All:除MultiViews之外的所有特性,这是默认设置
- ExecCG:允许使用mod_cgi执行CGI脚本
- FollowSymLinks:服务器允许在此目录中使用符号连接,如果此配置位于配置段中,则会被忽略
- Includes:允许使用mod_include提供的服务器端包含
- IncludesNOEXEC:允许服务器端包含,但禁用"#exec cmd"和"#exec cgi",但仍可以从ScriptAlias目录使用"#include virtual"虚拟CGI脚本
- Indexes:如果一个映射到目录的URL被请求,而此目录中又没有DirectoryIndex(例如:index.html),那么服务器会返回由mod_autoindex生成的一个格式化后的目录列表
- MultiViews:允许使用mod_negotiation提供内容协商的"多重视图"(MultiViews)
- SymLinksIfOwnerMatch:服务器仅在符号连接与其目的目录或文件的拥有者具有相同的uid时才使用它。 如果此配置出现在配置段中,则将被忽略
- AllowOverride:确定允许存在于.htaccess文件中的指令类型
语法:AllowOverride All|None|directive-type [directive-type]
如果此指令被设置为None ,那么.htaccess文件将被完全忽略。
directive-type可以是下列各组指令之一:- AuthConfig : 允许使用与认证授权相关的指令
- FileInfo : 允许使用控制文档类型的指令、控制文档元数据的指令、mod_rewrite中的指令、mod_actions中的Action指令
- Indexes : 允许使用控制目录索引的指令
- Limit : 允许使用控制主机访问的指令
- Order:控制默认的访问状态与Allow和Deny指令生效的顺序
- Deny,Allow : Deny指令在Allow指令之前被评估。默认允许所有访问。任何不匹配Deny指令或者匹配Allow指令的客户都被允许访问
- Allow,Deny : Allow指令在Deny指令之前被评估。默认拒绝所有访问。任何不匹配Allow指令或者匹配Deny指令的客户都将被禁止访问
- Mutual-failure : 只有出现在Allow列表并且不出现在Deny列表中的主机才被允许访问。这种顺序与"Order Allow,Deny"具有同样效果
- Allow:控制哪些主机可以访问服务器的该区域。可以根据主机名、IP地址、 IP地址范围或其他环境变量中捕获的客户端请求特性进行控制。
语法:Allow from all|host|env=env-variable [host|env=env-variable] - Deny:控制哪些主机被禁止访问服务器的该区域。可以根据主机名、IP地址、 IP地址范围或其他环境变量中捕获的客户端请求特性进行控制。
语法:Deny from all|host|env=env-variable [host|env=env-variable] - Require:访问限制
- all granted:表示允许所有主机访问
- all denied:表示拒绝所有主机访问
- local:表示仅允许本地主机访问
- [not] host <主机名或域名列表>:表示允许或拒绝指定主机或域名访问
- [not] ip <IP地址或网段列表>:表示允许或拒绝指定的IP地址或网段访问
- Options:控制在特定目录中将使用哪些服务器特性
- AccessFileName:设置分布式配置文件的名字,默认为.htaccess
如果为某个目录启用了分布式配置文件功能,那么在向客户端返回其中的文档时,服务器将在这个文档所在的各级目录中查找此配置文件 - <FilesMatch"^.ht">:拒绝对.ht开头文件的访问,以保护.htaccess文件
- LogFormat:定义访问日志的格式
限制连接量
通过上面对配置文件参数的研究,注意到MaxKeepAliveRequests这个参数限制了对于单个连接最大的访问量为100,因此无需担心单线程脚本反复频繁请求的问题。
那么对于高并发的请求,Apache是否有默认设置的策略呢?也是有的,从2.0开始,apache引入了MPM(Multi-Processing Module,多进程处理模块),MPM有prefork, worker和event这三种模式[4],可以通过下面的命令查看当前apache所采用的模式:
apachectl -V | grep -i mpm
默认采用的应该是event模式。
这个模式的配置文件位于/etc/apache2/mods-availablempm_event.conf
默认参数:
<IfModule mpm_event_module>
        StartServers             2
        MinSpareThreads          25
        MaxSpareThreads          75
        ThreadLimit              64
        ThreadsPerChild          25
        MaxRequestWorkers        150
        MaxConnectionsPerChild   0
</IfModule>
参数解释:
- StartServers:启动时进程数
- MinSpareThreads:最小空闲线程数
- MaxSpareThreads:最大空闲线程数
- ThreadLimit:每个进程可以启动的线程数量上限值
- ThreadsPerChild:每个进程可以启动的线程数量
- MaxRequestWorkers:线程数量最大值
- MaxConnectionsPerChild:最大连接数限制
我这里没去调整,先用JMeter来进行一个多线程并发测试:
JMeter下载地址:https://jmeter.apache.org/download_jmeter.cgi

解压之后,运行apache-jmeter-5.5/bin/jmeter.bat,即可启动。
创建一个线程组,我这设置了1000个线程数,时间设为0.01秒

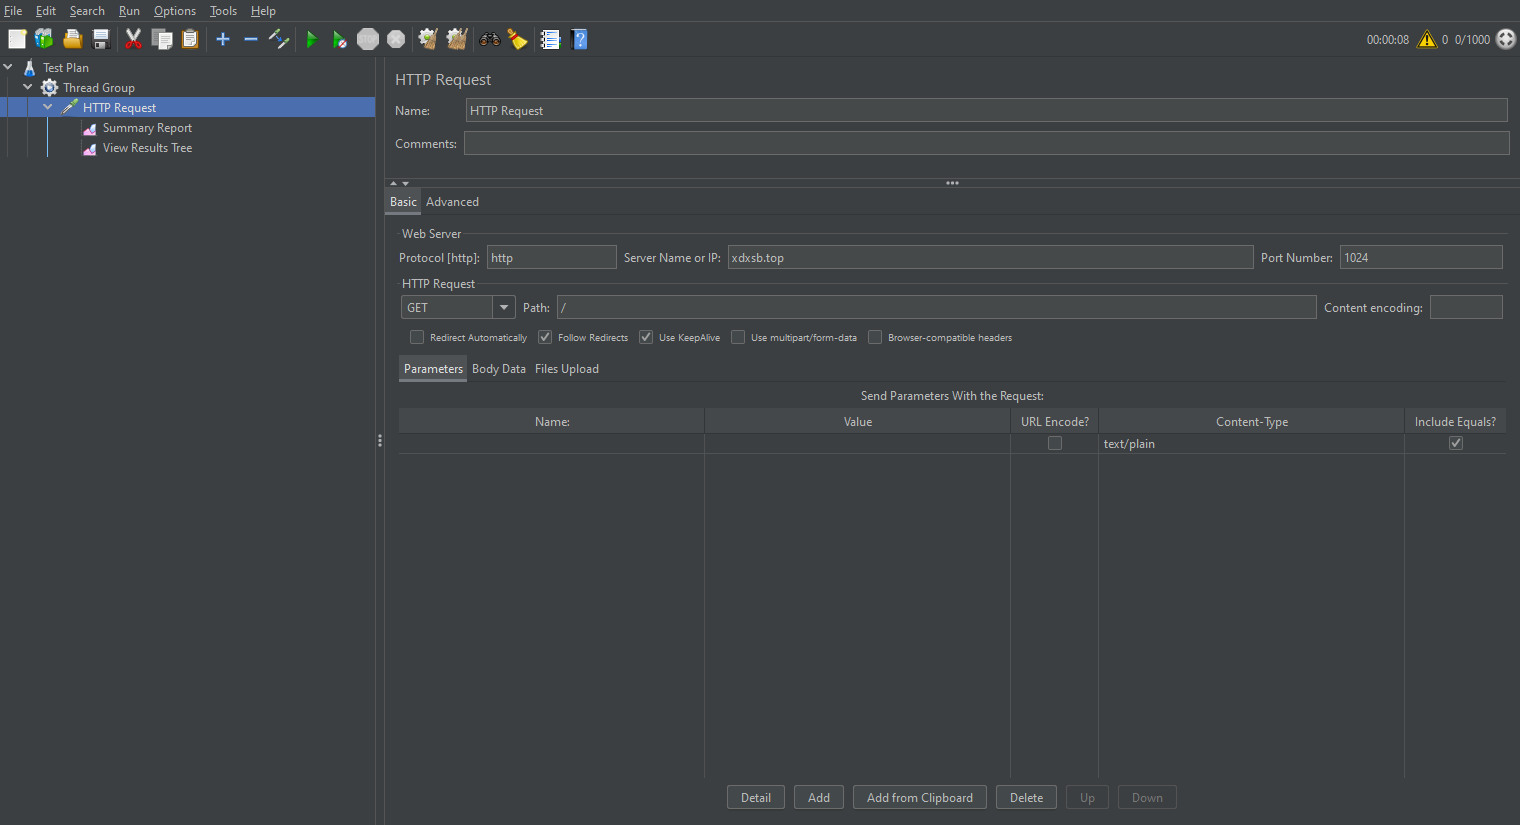
再设置HTTP请求,填写请求域名,端口号,文件路径
测试结果显示,请求失败率为16%,因此我这小破服务器,基本上1000个并发请求都难以满足。

封禁ip
如果面对恶意攻击,那最快解决问题的办法无疑是封禁它的ip,这里尝试一下封禁本机ip,看看是否有效。
首先查询本机ip,直接在百度搜索ip,即可查询到公网ip,注意这里一定要是公网ip,通过ipconfig查询出的是内网ip。
修改配置文件:
vim /etc/apache2/apache2.conf
修改/var/www/文件内容:
<Directory /var/www/>
        Options Indexes FollowSymLinks
        AllowOverride None
        <RequireAll>
                Require all granted
                Require not ip 111.11.81.152
        </RequireAll>
</Directory>
重启服务:
/etc/init.d/apache2 restart
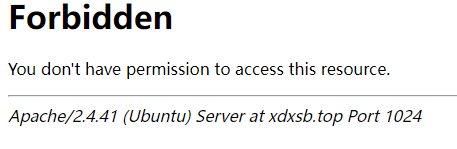
再次访问,发现权限受限,说明设置成功。
拓展:如果只允许某个固定ip访问,那么可以这样修改:
<Directory /var/www/>
        Options Indexes FollowSymLinks
        AllowOverride None
        # Require all granted
        Require ip 111.11.82.8
</Directory>
设置账号密码访问
对于某些私密文件,可以进一步配置账号密码进行身份验证。
首先创建一个文件夹用来保存用户信息:
mkdir -p /usr/local/conf
然后创建用户:
htpasswd -c /usr/local/conf/.usr zstar
zstar是我创建的用户名
输入密码后,Apache会以密文方式存储密码,可以通过下面的方式查看用户名和密码密文:
cat /usr/local/conf/.usr
再次修改配置文件:
vim /etc/apache2/apache2.conf
修改内容:
<Directory /var/www/>
        Options Indexes FollowSymLinks
        AllowOverride All
        AuthName "apache"
        AuthType Basic
        AuthUserFile "/usr/local/conf/.usr"
        Require user zstar
</Directory>
重启服务:
/etc/init.d/apache2 restart
再次访问,成功弹出登录验证,说明配置成功。

参考
[1]ubuntu搭建http服务器用于下载ubuntu文件:https://blog.csdn.net/yy1695990107/article/details/116976994
[2]Apache2 httpd.conf 配置详解:https://blog.csdn.net/assassinice/article/details/78854139
[3]Apache的访问控制:https://blog.csdn.net/m0_54434140/article/details/122249712
[4]apache2三种模式及参数调优:https://blog.csdn.net/zhihui1017/article/details/54959194
到此这篇关于教你使用Apache搭建Http下载服务器的文章就介绍到这了,更多相关Apache搭建Http下载服务器内容请搜索我们以前的文章或继续浏览下面的相关文章希望大家以后多多支持我们!
相关推荐
-
使用Apache打造完美限制的HTTP下载服务器
一开始本来准备选择使用FTP作为下载服务器的,不过过了几天就发现很多都是通过盗链的方式来FTP下载.这下服务器在持续性全速提供上传,但是网站的页面浏览量却少得可怜.因为FTP天生不能放盗链的特性所以只能考虑放弃使用,最后决定用HTTP下载来替代. 直接用HTTP服务器下载也不是很容易的事.最开始在IIS里面配置,IIS只能设定最大下载速度和最大连接数,这对于一些使用下载工具一来就开50+线程霸道下载的朋友明显是防不住的.网上搜了N久就发现一个用Delphi写的看不懂的ISAPI Filter以及
-
阿里云服务器apache配置SSL证书成功开启Https(记录趟过的各种坑)
环境: 阿里云云服务器 Windows Server 2008 标准版 SP2 中文版(趁1212优惠买的一年的水货配置) 阿里云购买的域名(已备案.已解析) 服务器:phpstudy:php5.4.45+Apache(因为是phpstudy集成的,所以没找到apache的版本,我感觉应该是2.4.8之前的版本) SSL证书 (配置过程中,我申请了2个不同机构的证书,第一个GG了,是在 https://www.trustasia.com/ 申请的1年免费证书.成功的是用的第二个,在
-

详解为新版Apache服务器开启HTTP/2支持的方法
HTTP 2.0简介 HTTP 2.0即超文本传输协议 2.0,是下一代HTTP协议.是由互联网工程任务组(IETF)的Hypertext Transfer Protocol Bis (httpbis)工作小组进行开发.是自1999年http1.1发布后的首个更新.HTTP 2.0在2013年8月进行首次合作共事性测试.在开放互联网上HTTP 2.0将只用于https://网址,而 http://网址将继续使用HTTP/1,目的是在开放互联网上增加使用加密技术,以提供强有力的保护去遏制主动攻击.
-
分享apache http服务器设置虚拟主机的方法
在apache http服务器上,设置虚拟主机(virtual host)的方法如下 打开apache 安装目录下面的conf/httpd.conf,加入下面两段 复制代码 代码如下: <VirtualHost *:80> ServerName fuwu.jb51.net ServerAlias fuwu.jb51.net fuwu.jb51.net DocumentRoot /fuwu JKMount /* ajp13 –如果你已经做好mod_jk的绑定,可以写上上面这行,这样可以完成一个虚
-
Apache服务器主配置文件httpd.conf详解
apache 2.2 # This is the main Apache server configuration file. It contains the # configuration directives that give the server its instructions. # See <URL:http://httpd.apache.org/docs/2.2/> for detailed information. # In particular, see # <URL:
-
Linux下SVN服务器同时支持Apache的http和svnserve独立服务器两种模式且使用相同的访问权限账号
说明: 服务器操作系统:CentOS 6.x 服务器IP:192.168.21.134 实现目的: 1.在服务器上安装配置SVN服务: 2.配置SVN服务同时支持Apache的http和svnserve独立服务器两种模式访问: 3.Apache的http和svnserve独立服务器两种模式使用相同的访问权限账号. 具体操作: 一.关闭SELINUX vi /etc/selinux/config #SELINUX=enforcing #注释掉 #SELINUXTYPE=targeted #注释掉
-
centos8使用Apache httpd2.4.37安装web服务器的步骤详解
第一步:yum install httpd -y #安装httpd服务 第二步:systemctl start httpd #启动httpd服务 第三步:systemctl enable httpd #设置httpd服务为开机启动 第四步:firewall-cmd --zone=public --add-port=80/tcp --permanent #开启防火墙的80端口,并永久生效,返回success 设置成功的意思.(-permanent为永久生效,不加此参数重启后失效) 第五步:syst
-
教你使用Apache搭建Http下载服务器
目录 前言 Apache快速上手 修改端口号 设置访问限制 配置文件参数详解 限制连接量 封禁ip 设置账号密码访问 参考 前言 前段时间因为某些原因,几大主流网盘都无法使用,正好手头上有台闲置的云服务器,于是就想来搭建一个文件下载服务,用户只需通过一个链接就能下载软件. Apache快速上手 经过调研,发现Ubuntu采用Apache2这个软件就可以快速满足我的需求. 安装Apache2 apt-get install apache2 安装好之后,启动Apache2服务: /etc/init.
-
VPS搭建离线下载服务器(后网盘时代)
动机 由于学习的需要,在国外某服务器厂商购买了vps服务(至于是哪个厂商就不说啦).但是呢,就算用作梯子,一个月1T的流量总是用不完.最经觉得自己营养充足,想找点电影看看. 无奈现在百度网盘的速度真的感人,一年的百度网盘超级会员贵得不要不要的,并且百度的离线下载并不是真的离线,他只是把自己服务器上有的文件拉给你而已.如果想找点稀缺的资源,百度网盘就是个鸡肋啊,摔! 诶,那能不能利用vps来搭建自己的离线下载服务器呢?这样既能利用多余的带宽资源,又能提高下载速度,岂不美哉!带着这个疑问,我在某个寂
-
教你如何搭建一个时间服务器
目录 1.环境要求(客户端和服务器都要安装chrony) 2.寻找一个可靠的时间服务器地址 3.编辑服务端的chrony配置文件 1.环境要求(客户端和服务器都要安装chrony) 需要两台或多台虚拟机来充当服务端和客户端,都必须有yum 源,然后分别安装ntp,因为我用的CentOS8,所以下载命令为:yum install -y chrony**注意:**我在安装yum源时出现了很多问题,我执着与用一种方式去安装yum源从而浪费了很多时间也没有安装成功,后来借用同学的方法就成功了,在此处记录
-
Android搭建本地Tomcat服务器及相关配置
在Android中我们时常会与服务器打交道,为了方便测试代码,我们有必要搭建本地的服务器,其实搭建本地的Tomcat服务器也是很简单: Tomcat的下载 环境配置 Eclipse中新建Web工程 一. Tomcat的下载 在Tomcat官网下载http://tomcat.apache.org/,这里下载的是Tomcat7,下载到本地并解压出来. 二.Tomcat的配置 Tomcat的配置前要把Java运行环境配置好.配置电脑的环境变量,高级设置. 1,新建变量名:CATALINA_BASE,变
-
详解基于centos7搭建Nginx网站服务器(包含虚拟web主机的配置)
一 .Nginx服务基础 Nginx (engine x)专为性能优化而开发,其特点是占有内存少,它的稳定性和低系统资源消耗,以及对并发连接的高处理能力,(单台物理服务器可支持5000个并发请求).事实上nginx的并发能力确实在同类型的网页服务器中表现较好,中国大陆使用nginx网站用户有:百度.京东.新浪.网易.腾讯.淘宝等.同时也提供了IMAP/POP3/SMTP服务. Nginx的优点: *** 可以高并发连接** 官方测试Nginx能够支撑5万并发连接,实际生产环境中可以支撑2~4万并
-
使用idea搭建springboot initializer服务器的问题分析
问题描述 最近我在搭建springboot项目时,连接公司网线时发现idea一直新建不了项目,浏览器访问https://start.spring.io也访问不了,但是自己手机热点是可以正常访问的,猜想是被拦截了,所以为了方便,参考网上教程,我打算在自己的服务器上搭建服务,在这里我的服务器是Centos7.6 搭建过程 首先下载项目,终端执行 git clone https://github.com/spring-io/initializr.git 如果没有git ,那么需要先进行安装 sudo
-
Windows下快速搭建NodeJS本地服务器的步骤
本文介绍了Windows下快速搭建NodeJS本地服务器的步骤,分享给大家,具体如下: 首先我们要到Node.js官网下载对应版本的安装包 http://nodejs.cn/download/ 接着就是安装,和安装普通软件类似,直接下一步下一步就可以了. 之后我们来验证node是否安装成功,Win+R输入cmd来调出控制台并输入node -v和npm -v来查看node版本和npm(包管理工具)版本. 接着我们来创建一个server.js文件,并将下面的代码粘贴上去 var http = req
-
CentOS 7搭建Linux GPU服务器的教程
CentOS 7搭建Linux GPU服务器的步骤,供大家参考,具体内容如下 1. CUDA Toolkit的安装 到https://developer.nvidia.com/cuda-gpus查询GPU支持的CUDA版本: 到https://developer.nvidia.com/cuda-downloads,根据操作系统选择下载相应的CUDA Toolkit版本,下载的是一个.run文件,下载完成后以root用户直接运行该文件安装. 安装结束以后.运行: 复制代码 代码如下: nvidia
-
java搭建一个Socket服务器响应多用户访问
当我们搭建了一个Socket服务端,是需要去响应多用户的访问的.此时,我们就要使用多线程,为每个访问的用户建立一个线程来响应该用户的访问. 具体实现,看如下代码: package com.sun.socket; import Java.io.IOException; import java.NET.*; import java.io.*; import java.util.*; /** * Description: * 搭建一个Socket服务器响应多用户访问 * @author Lee * *