zabbix 监控mysql的方法
zabbix部署文档
zabbix部署完之后
zabbix-agent操作
1.监控mysql,首先要先安装mysql
[root@localhost ~]# yum -y install mariadb mariadb-server
2.编写mysql监控项的脚本
在zabbix-agent先授权个用户 不然测试时没有权限
[root@localhost ~]# mysql
Welcome to the MariaDB monitor. Commands end with ; or \g.
Your MariaDB connection id is 33
Server version: 5.5.65-MariaDB MariaDB Server

Copyright (c) 2000, 2018, Oracle, MariaDB Corporation Ab and others.

Type 'help;' or '\h' for help. Type '\c' to clear the current input statement.

MariaDB [(none)]> grant all on *.* to 'check'@'localhost' identified by '123';
Query OK, 0 rows affected (0.00 sec)
mysql监控的内容主要有
- 主从的状态 (得先配置主从 在下面)
- 流量检测 发送,接受常规操作 增删改查
- 某个库、某个表的大小
- tps(每秒查询处理的事务数)qps(每秒能处理多少次请求数)
[root@localhost ~]# mkdir /etc/zabbix/scipts
[root@localhost ~]# cd /etc/zabbix/scipts/
[root@localhost scipts]# vim mysql.sh
#!/bin/bash
mysql="mysql -ucheck -p123"
case $1 in
 # mysql主从状态
 slave_status)
  $mysql -e "show slave status\G" |grep "Yes" |wc -l
 ;;
 # mysql流量 接受
 Bytes_received)
  mysqladmin extended-status |grep "Bytes_received" |awk '{print $4}'
 ;;
 # mysql流量 发送
 Bytes_sent)
  mysqladmin extended-status |grep "Bytes_sent" |awk '{print $4}'
 ;;
 # mysql常规操作 增
 Com_insert)
  mysqladmin extended-status |grep -w "Com_insert" |awk '{print $4}'
 ;;
 # mysql常规操作 删
 Com_delete)
  mysqladmin extended-status |grep -w "Com_delete" |awk '{print $4}'
 ;;
 # mysql常规操作 改
 Com_update)
  mysqladmin extended-status |grep -w "Com_update" |awk '{print $4}'
		;;
 # mysql常规操作 查
 Com_select)
  mysqladmin extended-status |grep -w "Com_select" |awk '{print $4}'
 ;;
 # mysql tps
 tps)
  mysqladmin status |awk '{print $6/$2}'
 ;;
 # mysql qps=(rollback+commit)/uptime
 qps)
  rollback=$(mysqladmin extended-status |grep -w "Com_rollback" |awk '{print $4}')
  commit=$(mysqladmin extended-status |grep -w "Com_commit" |awk '{print $4}')
  uptime=$(mysqladmin status |awk '{print $2}')
  count=$[$rollback+$commit]
  echo "$count $uptime" > /tmp/a.txt
  cat /tmp/a.txt |awk '{print $1/$2}'
 ;;
 # 库大小 我们这里拿mysql库举例
 db)
  $mysql -e "select sum(data_length) from information_schema.tables where table_schema='mysql'" |sed -n '2p'
 ;;
 # 表大小 我们这里拿mysql下面的user表举例
 tb)
  $mysql -e "select sum(data_length) from information_schema.tables where table_schema='mysql' and table_name='user'" |sed -n '2p'
 ;;
esac
3.自定义键值key 重启zabbix-agent
[root@localhost scipts]# cd /etc/zabbix/zabbix_agentd.d/
[root@localhost zabbix_agentd.d]# vim mysql.conf
UserParameter=mysql[*],/etc/zabbix/scipts/mysql.sh $1
[root@localhost zabbix_agentd.d]# systemctl restart zabbix-agent
4.在zabbix-server测试 先安装zabbix-get
[root@localhost ~]# yum -y install zabbix-get

[root@localhost ~]# zabbix_get -s 192.168.27.137 -k mysql[slave_status]
2
[root@localhost ~]# zabbix_get -s 192.168.27.137 -k mysql[Bytes_received]
850970
[root@localhost ~]# zabbix_get -s 192.168.27.137 -k mysql[Bytes_sent]
224906
[root@localhost ~]# zabbix_get -s 192.168.27.137 -k mysql[Com_insert]
3001
[root@localhost ~]# zabbix_get -s 192.168.27.137 -k mysql[Com_delete]
135
[root@localhost ~]# zabbix_get -s 192.168.27.137 -k mysql[Com_update]
128
[root@localhost ~]# zabbix_get -s 192.168.27.137 -k mysql[Com_select]
19
[root@localhost ~]# zabbix_get -s 192.168.27.137 -k mysql[qps]
0.864842
[root@localhost ~]# zabbix_get -s 192.168.27.137 -k mysql[tps]
1.92936
[root@localhost ~]# zabbix_get -s 192.168.27.137 -k mysql[db]
555118
[root@localhost ~]# zabbix_get -s 192.168.27.137 -k mysql[tb]
420
报错处理
[root@localhost ~]# zabbix_get -s 192.168.27.137 -k mysql[slave_status]
sh: /etc/zabbix/scipts/mysql.sh: 权限不够

脚本执行权限不够 去zabbix-agent 加权限
[root@localhost zabbix_agentd.d]# chmod +x /etc/zabbix/scipts/mysql.sh

[root@localhost ~]# zabbix_get -s 192.168.27.137 -k mysql[slave_status]
ERROR 1227 (42000) at line 1: Access denied; you need (at least one of) the SUPER,REPLICATION CLIENT privilege(s) for this operation

是因为用户没有权限查看 去zabbix-agent 授权个用户在脚本里面加上
[root@localhost ~]# mysql
Welcome to the MariaDB monitor. Commands end with ; or \g.
Your MariaDB connection id is 33
Server version: 5.5.65-MariaDB MariaDB Server

Copyright (c) 2000, 2018, Oracle, MariaDB Corporation Ab and others.

Type 'help;' or '\h' for help. Type '\c' to clear the current input statement.

MariaDB [(none)]> grant all on *.* to 'check'@'localhost' identified by '123';
Query OK, 0 rows affected (0.00 sec)

[root@localhost scipts]# vim mysql.sh
#!/bin/bash
mysql="mysql -ucheck -p123"
case $1 in
 # mysql主从状态
 slave_status)
  $mysql -e "show slave status\G" |grep "Yes" |wc -l
 ;;
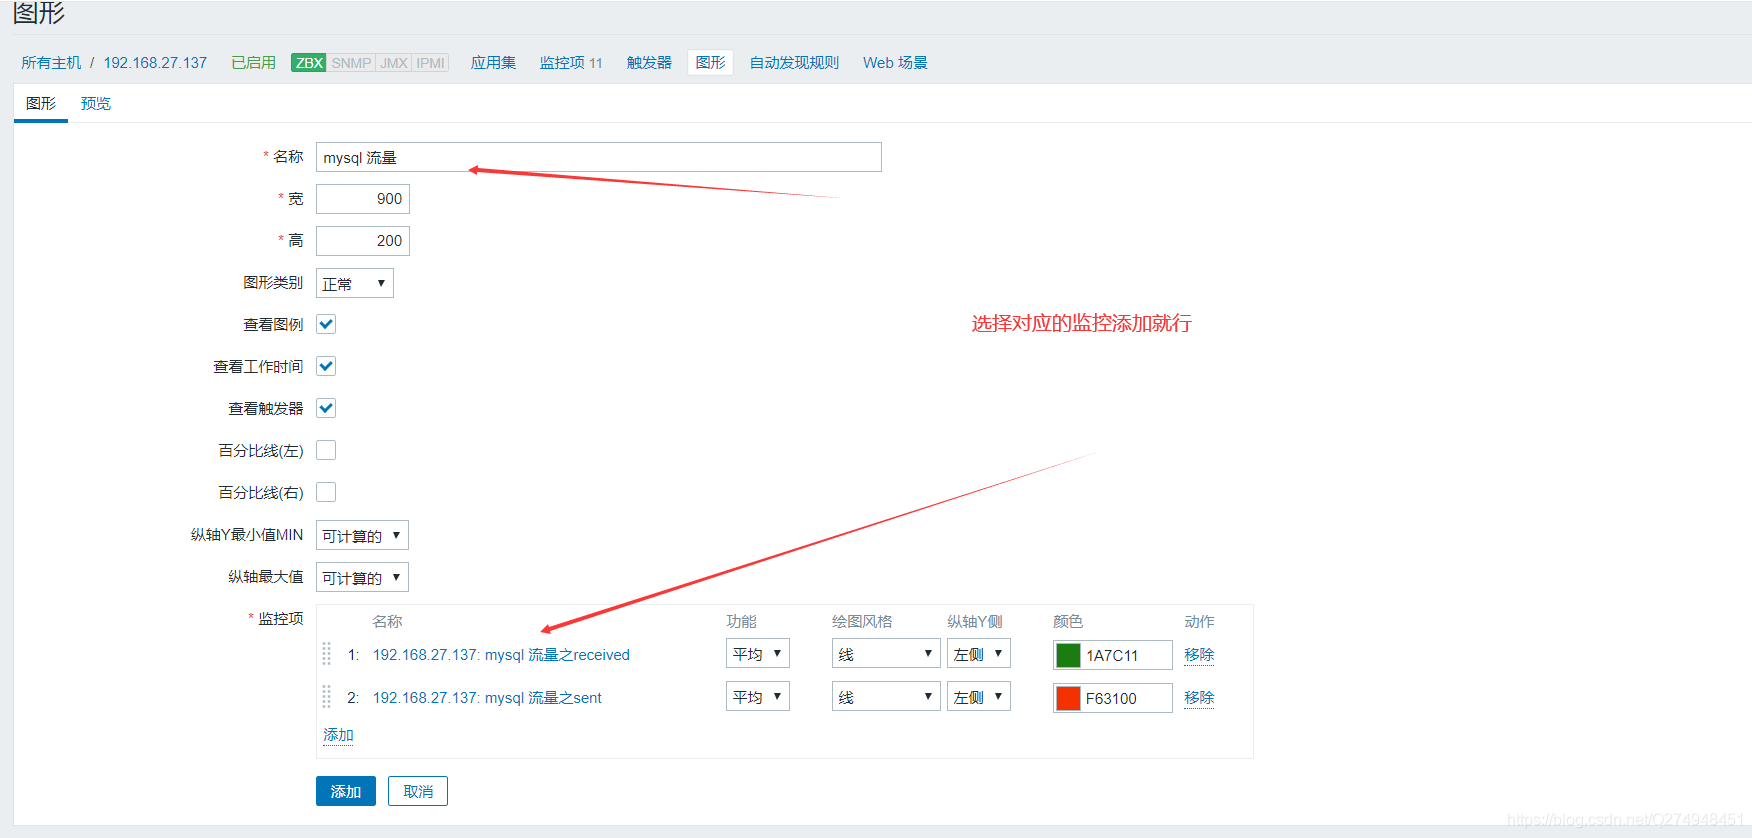
zabbix页面上添加监控项和图形


查看mysql流量数据


查看mysql qps tps

查看mysql主从状态

查看mysql常规操作

查看mysql库表大小

mysql主从配置
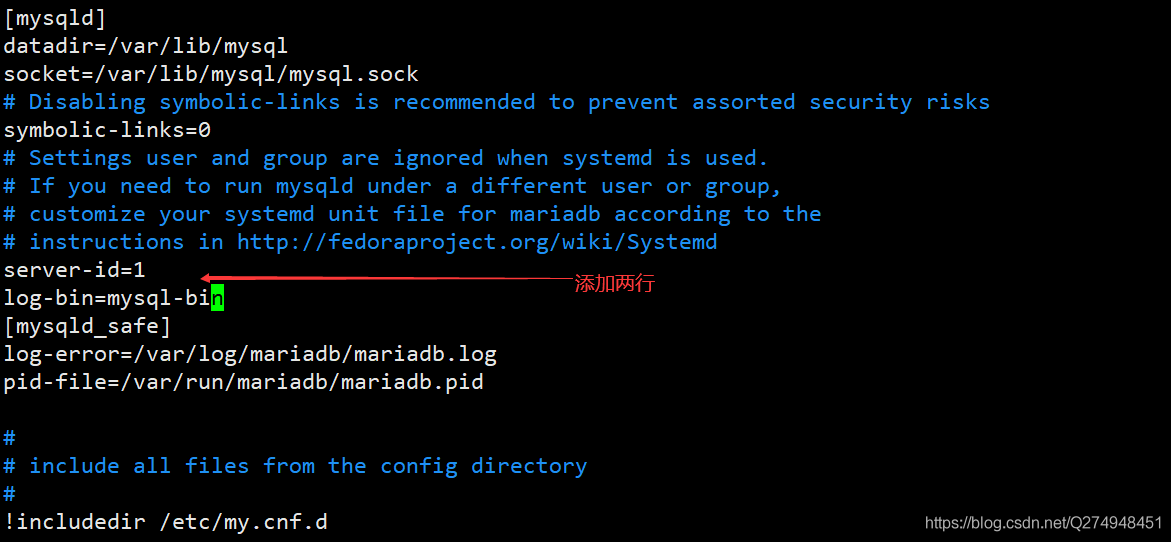
一.zabbix-server端
[root@localhost ~]# vim /etc/my.cnf

[root@localhost ~]# systemctl restart mariadb
[root@localhost ~]# mysql
Welcome to the MariaDB monitor. Commands end with ; or \g.
Your MariaDB connection id is 7
Server version: 5.5.65-MariaDB MariaDB Server

Copyright (c) 2000, 2018, Oracle, MariaDB Corporation Ab and others.

Type 'help;' or '\h' for help. Type '\c' to clear the current input statement.

MariaDB [(none)]> show master status;
+------------------+----------+--------------+------------------+
| File  | Position | Binlog_Do_DB | Binlog_Ignore_DB |
+------------------+----------+--------------+------------------+
| mysql-bin.000001 | 175170 |  |   |
+------------------+----------+--------------+------------------+
1 row in set (0.00 sec)
MariaDB [(none)]> grant all on *.* to 'tom'@'%' identified by '123';
Query OK, 0 rows affected (0.00 sec)

MariaDB [(none)]> flush privileges;
Query OK, 0 rows affected (0.00 sec)
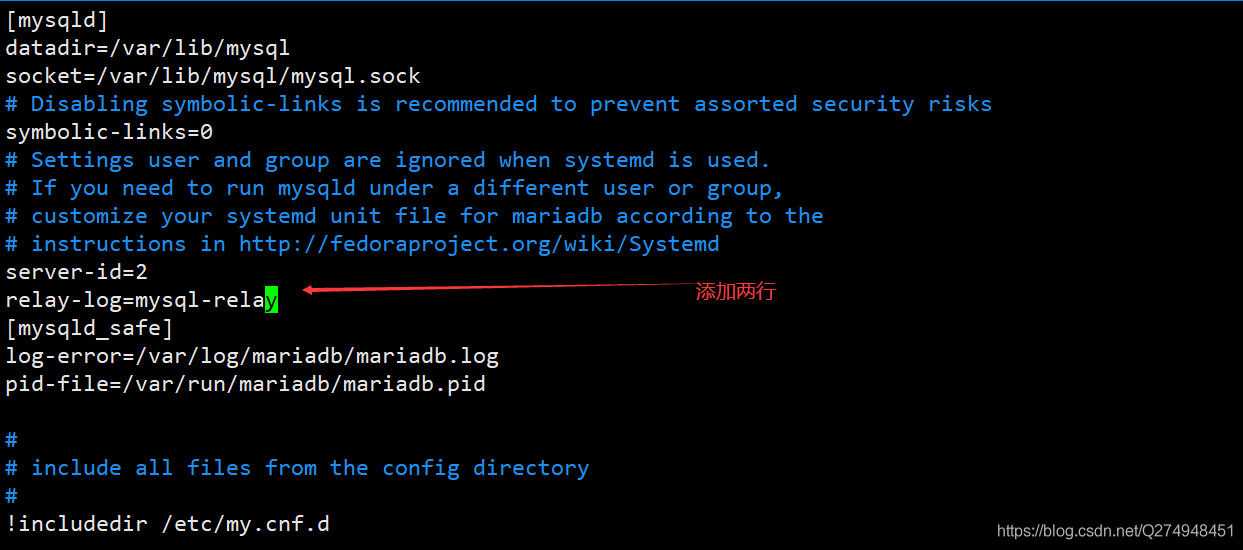
二.zabbix-agent端
[root@localhost ~]# vim /etc/my.cnf

[root@localhost ~]# systemctl restart mariadb
[root@localhost ~]# mysql
Welcome to the MariaDB monitor. Commands end with ; or \g.
Your MariaDB connection id is 2
Server version: 5.5.65-MariaDB MariaDB Server

Copyright (c) 2000, 2018, Oracle, MariaDB Corporation Ab and others.

Type 'help;' or '\h' for help. Type '\c' to clear the current input statement.

MariaDB [(none)]> change master to
 -> master_host='192.168.27.136',
 -> master_user='tom',
 -> master_password='123',
 -> master_log_file='mysql-bin.000001',
 -> master_log_pos=175170;
Query OK, 0 rows affected (0.01 sec)

MariaDB [(none)]> start slave;
Query OK, 0 rows affected (0.00 sec)

MariaDB [(none)]> show slave status \G;
*************************** 1. row ***************************
  Slave_IO_State: Waiting for master to send event
   Master_Host: 192.168.27.136
   Master_User: tom
   Master_Port: 3306
  Connect_Retry: 60
  Master_Log_File: mysql-bin.000001
  Read_Master_Log_Pos: 175170
  Relay_Log_File: mysql-relay.000004
  Relay_Log_Pos: 529
 Relay_Master_Log_File: mysql-bin.000001
  Slave_IO_Running: Yes
  Slave_SQL_Running: No
  Replicate_Do_DB:
  Replicate_Ignore_DB:
  Replicate_Do_Table:
 Replicate_Ignore_Table:
 Replicate_Wild_Do_Table:
 Replicate_Wild_Ignore_Table:
   Last_Errno: 1146
   Last_Error: Error 'Table 'zabbix.history_uint' doesn't exist' on query. Default database: 'zabbix'. Query: 'insert into history_uint (itemid,clock,ns,value) values (23287,1602301747,810415730,1)'
   Skip_Counter: 0
  Exec_Master_Log_Pos: 173424
  Relay_Log_Space: 2565
  Until_Condition: None
  Until_Log_File:
  Until_Log_Pos: 0
  Master_SSL_Allowed: No
  Master_SSL_CA_File:
  Master_SSL_CA_Path:
  Master_SSL_Cert:
  Master_SSL_Cipher:
  Master_SSL_Key:
 Seconds_Behind_Master: NULL
Master_SSL_Verify_Server_Cert: No
  Last_IO_Errno: 0
  Last_IO_Error:
  Last_SQL_Errno: 1146
  Last_SQL_Error: Error 'Table 'zabbix.history_uint' doesn't exist' on query. Default database: 'zabbix'. Query: 'insert into history_uint (itemid,clock,ns,value) values (23287,1602301747,810415730,1)'
 Replicate_Ignore_Server_Ids:
  Master_Server_Id: 1
1 row in set (0.00 sec)

ERROR: No query specified
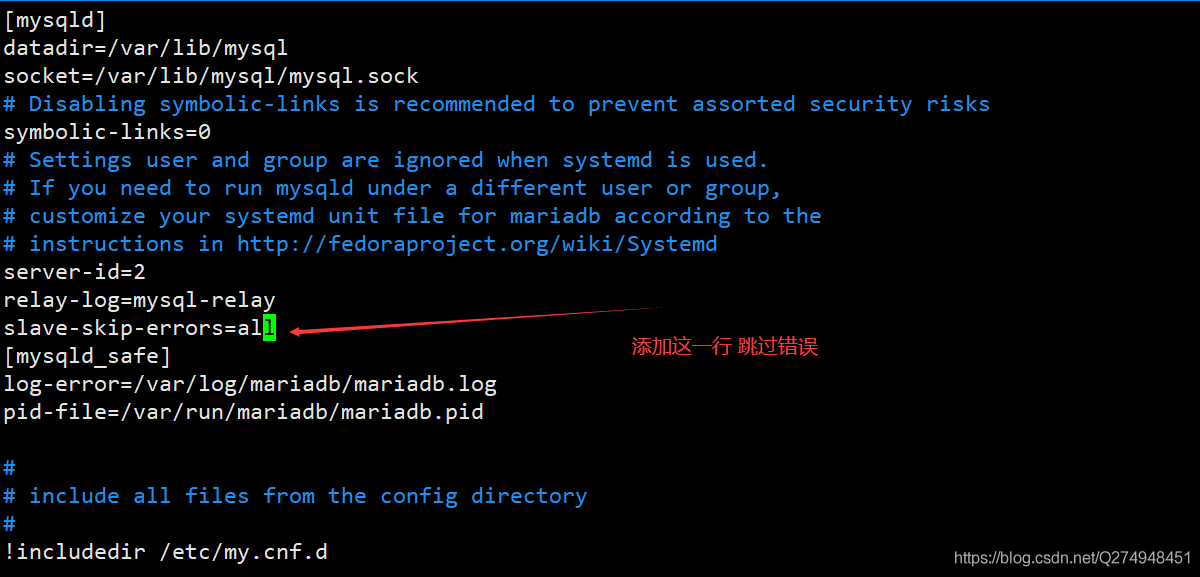
报错处理
[root@localhost ~]# vim /etc/my.cnf

[root@localhost ~]# systemctl restart mariadb
[root@localhost ~]# mysql
Welcome to the MariaDB monitor. Commands end with ; or \g.
Your MariaDB connection id is 4
Server version: 5.5.65-MariaDB MariaDB Server

Copyright (c) 2000, 2018, Oracle, MariaDB Corporation Ab and others.

Type 'help;' or '\h' for help. Type '\c' to clear the current input statement.

MariaDB [(none)]> show slave status \G;
*************************** 1. row ***************************
  Slave_IO_State: Waiting for master to send event
   Master_Host: 192.168.27.136
   Master_User: tom
   Master_Port: 3306
  Connect_Retry: 60
  Master_Log_File: mysql-bin.000001
  Read_Master_Log_Pos: 199126
  Relay_Log_File: mysql-relay.000006
  Relay_Log_Pos: 3950
 Relay_Master_Log_File: mysql-bin.000001
  Slave_IO_Running: Yes
  Slave_SQL_Running: Yes
  Replicate_Do_DB:
  Replicate_Ignore_DB:
  Replicate_Do_Table:
 Replicate_Ignore_Table:
 Replicate_Wild_Do_Table:
 Replicate_Wild_Ignore_Table:
   Last_Errno: 0
   Last_Error:
   Skip_Counter: 0
  Exec_Master_Log_Pos: 199126
  Relay_Log_Space: 4240
  Until_Condition: None
  Until_Log_File:
  Until_Log_Pos: 0
  Master_SSL_Allowed: No
  Master_SSL_CA_File:
  Master_SSL_CA_Path:
  Master_SSL_Cert:
  Master_SSL_Cipher:
  Master_SSL_Key:
 Seconds_Behind_Master: 0
Master_SSL_Verify_Server_Cert: No
  Last_IO_Errno: 0
  Last_IO_Error:
  Last_SQL_Errno: 0
  Last_SQL_Error:
 Replicate_Ignore_Server_Ids:
  Master_Server_Id: 1
1 row in set (0.00 sec)
到此这篇关于zabbix 监控mysql的方法的文章就介绍到这了,更多相关zabbix 监控mysql内容请搜索我们以前的文章或继续浏览下面的相关文章希望大家以后多多支持我们!
赞 (0)

