OpenCV实现特征检测和特征匹配方法汇总
目录
- 1.SURF
- 2.SIFT
- 3.ORB
- 4.FAST
- 5.Harris角点
一幅图像中总存在着其独特的像素点,这些点我们可以认为就是这幅图像的特征,成为特征点。计算机视觉领域中的很重要的图像特征匹配就是一特征点为基础而进行的,所以,如何定义和找出一幅图像中的特征点就非常重要。这篇文章我总结了视觉领域最常用的几种特征点以及特征匹配的方法。
在计算机视觉领域,兴趣点(也称关键点或特征点)的概念已经得到了广泛的应用, 包括目标识别、 图像配准、 视觉跟踪、 三维重建等。 这个概念的原理是, 从图像中选取某些特征点并对图像进行局部分析,而非观察整幅图像。 只要图像中有足够多可检测的兴趣点,并且这些兴趣点各不相同且特征稳定, 能被精确地定位,上述方法就十分有效。
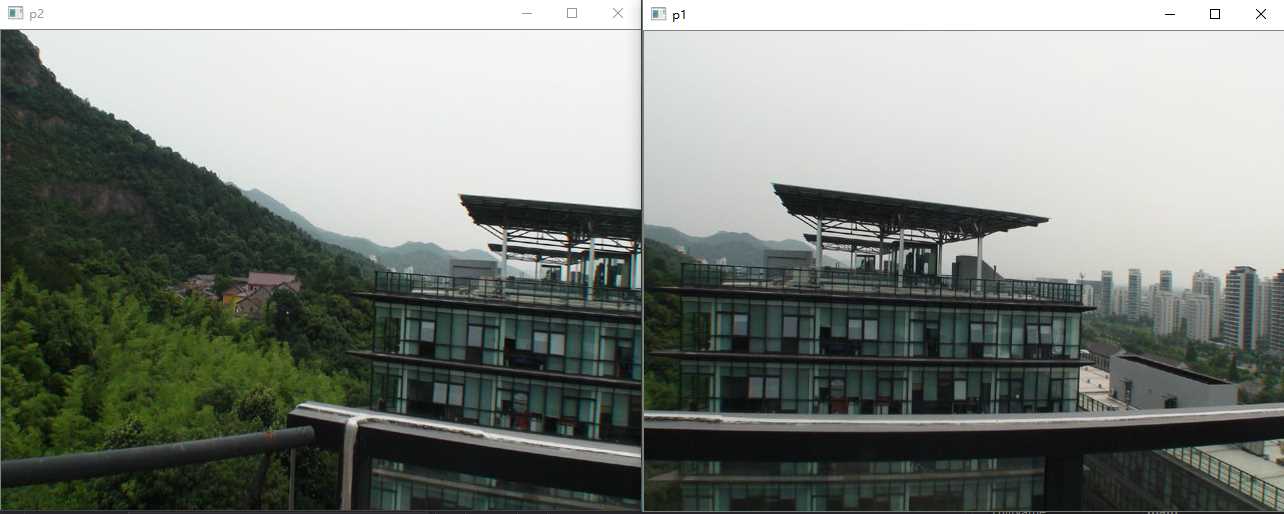
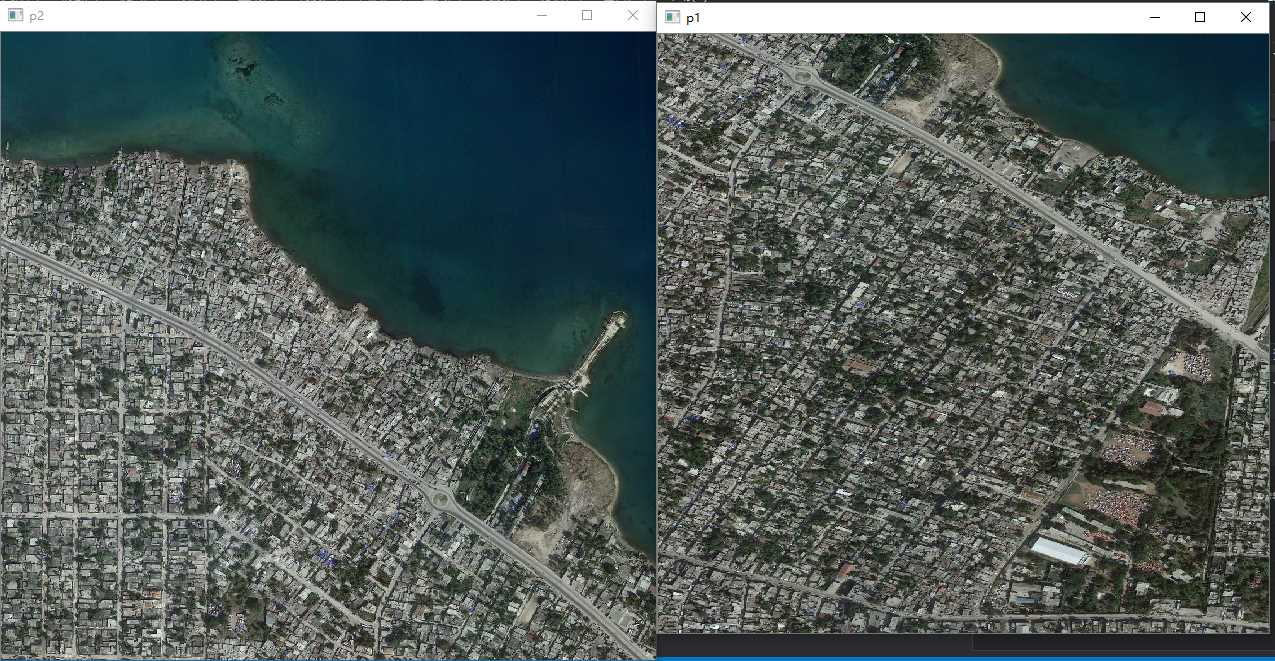
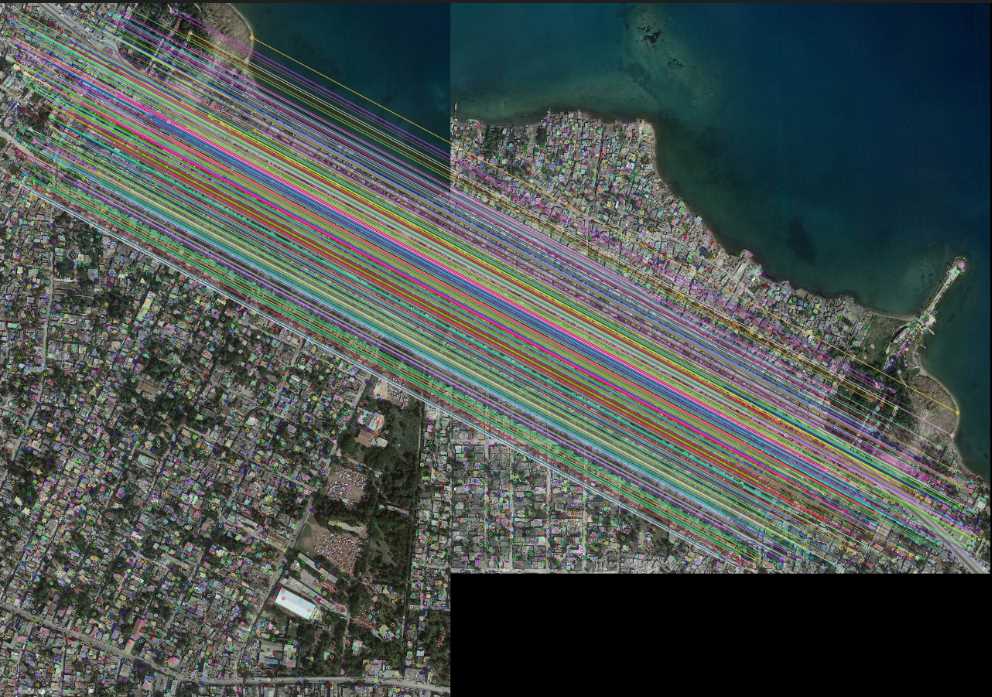
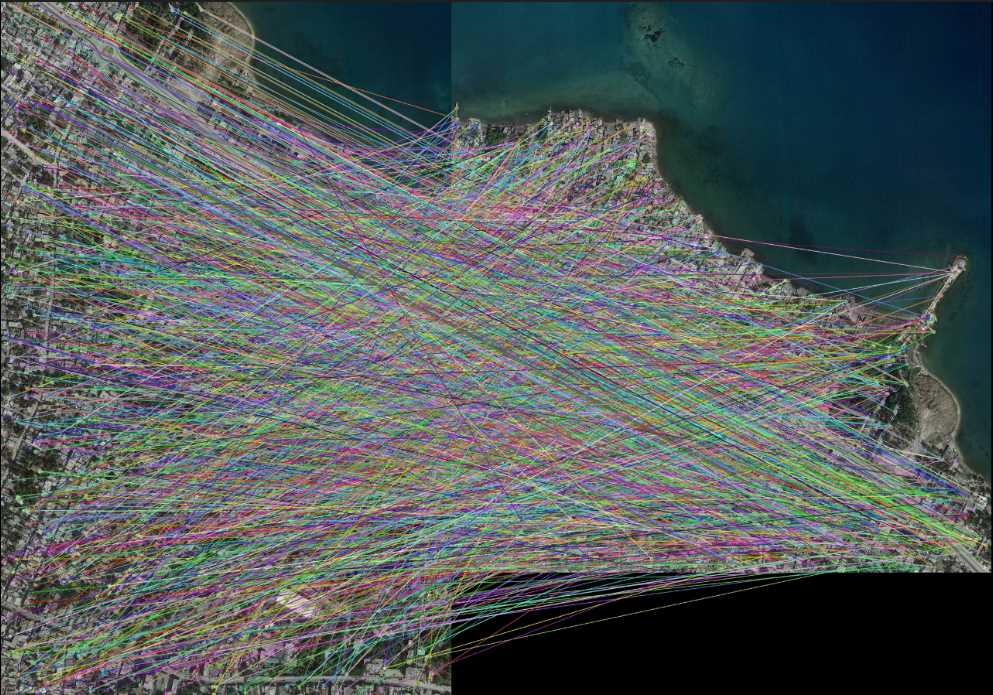
以下是实验用的图像:第一幅是手机抓拍的风景图,第二幅是遥感图像。
1.SURF
特征检测的视觉不变性是一个非常重要的概念。 但是要解决尺度不变性问题,难度相当大。 为解决这一问题,计算机视觉界引入了尺度不变特征的概念。 它的理念是, 不仅在任何尺度下拍摄的物体都能检测到一致的关键点,而且每个被检测的特征点都对应一个尺度因子。 理想情况下,对于两幅图像中不同尺度的的同一个物体点, 计算得到的两个尺度因子之间的比率应该等于图像尺度的比率。近几年, 人们提出了多种尺度不变特征,本节介绍其中的一种:SURF特征。 SURF全称为“加速稳健特征”(Speeded Up Robust Feature),我们将会看到,它们不仅是尺度不变特征,而且是具有较高计算效率的特征。
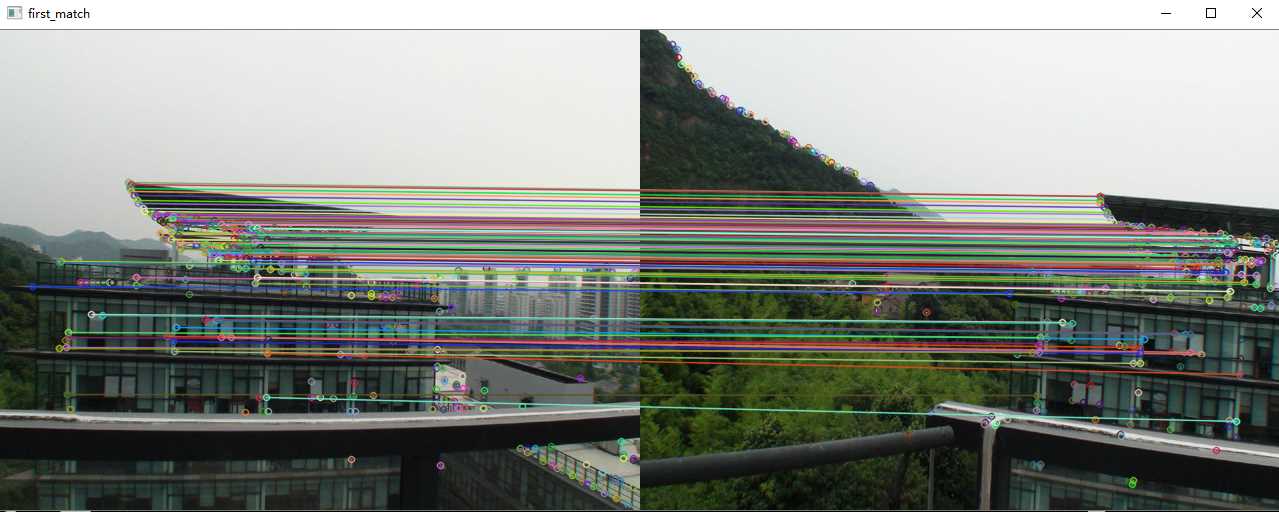
我们首先进行常规的特征提取和特征点匹配,看看效果如何。
#include "highgui/highgui.hpp"
#include "opencv2/nonfree/nonfree.hpp"
#include "opencv2/legacy/legacy.hpp"
#include <iostream>

using namespace cv;
using namespace std;

int main()
{
    Mat image01 = imread("2.jpg", 1);    //右图
    Mat image02 = imread("1.jpg", 1);    //左图
    namedWindow("p2", 0);
    namedWindow("p1", 0);
    imshow("p2", image01);
    imshow("p1", image02);

    //灰度图转换
    Mat image1, image2;
    cvtColor(image01, image1, CV_RGB2GRAY);
    cvtColor(image02, image2, CV_RGB2GRAY);

    //提取特征点
    SurfFeatureDetector surfDetector(800);  // 海塞矩阵阈值,在这里调整精度,值越大点越少,越精准
    vector<KeyPoint> keyPoint1, keyPoint2;
    surfDetector.detect(image1, keyPoint1);
    surfDetector.detect(image2, keyPoint2);

    //特征点描述,为下边的特征点匹配做准备
    SurfDescriptorExtractor SurfDescriptor;
    Mat imageDesc1, imageDesc2;
    SurfDescriptor.compute(image1, keyPoint1, imageDesc1);
    SurfDescriptor.compute(image2, keyPoint2, imageDesc2);

    //获得匹配特征点,并提取最优配对
    FlannBasedMatcher matcher;
    vector<DMatch> matchePoints;

    matcher.match(imageDesc1, imageDesc2, matchePoints, Mat());
    cout << "total match points: " << matchePoints.size() << endl;

    Mat img_match;
    drawMatches(image01, keyPoint1, image02, keyPoint2, matchePoints, img_match);
    namedWindow("match", 0);
    imshow("match",img_match);
    imwrite("match.jpg", img_match);

    waitKey();
    return 0;
}
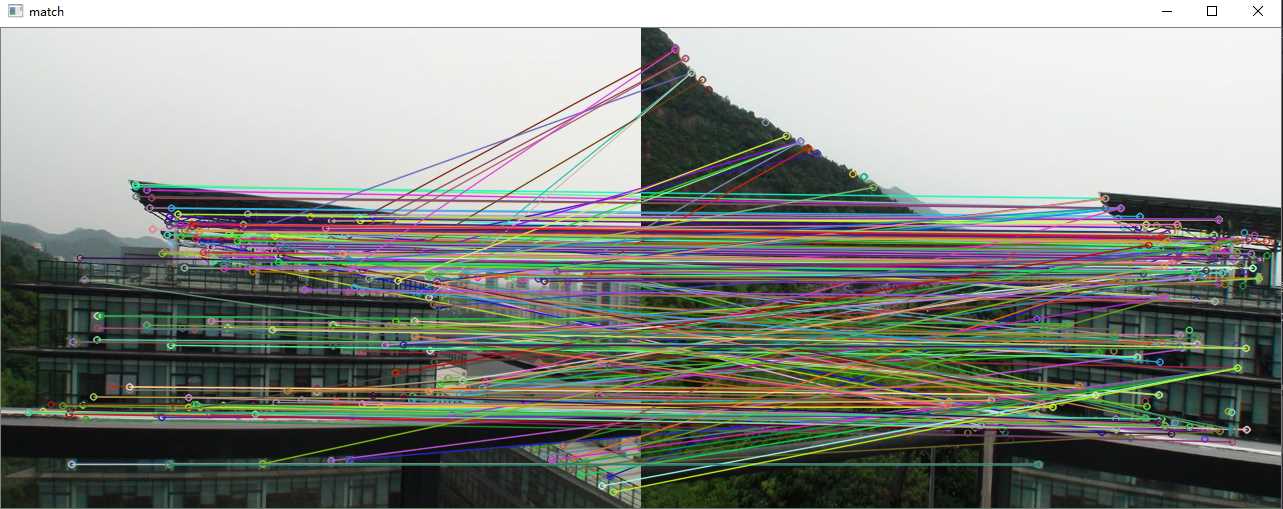
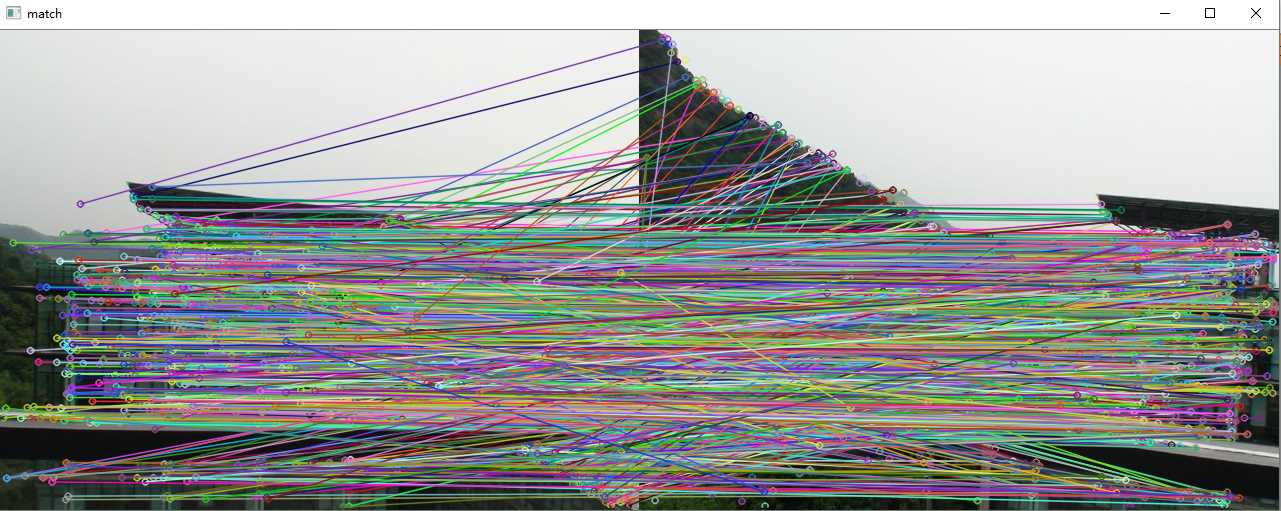
由上面的特征点匹配的效果来看,匹配的效果还是相当糟糕的,如果我们拿着这样子的匹配结果去实现图像拼接或者物体追踪,效果肯定是极差的。所以我们需要进一步筛选匹配点,来获取优秀的匹配点,这就是所谓的“去粗取精”。这里我们采用了Lowe's算法来进一步获取优秀匹配点。
为了排除因为图像遮挡和背景混乱而产生的无匹配关系的关键点,SIFT的作者Lowe提出了比较最近邻距离与次近邻距离的SIFT匹配方式:取一幅图像中的一个SIFT关键点,并找出其与另一幅图像中欧式距离最近的前两个关键点,在这两个关键点中,如果最近的距离除以次近的距离得到的比率ratio少于某个阈值T,则接受这一对匹配点。因为对于错误匹配,由于特征空间的高维性,相似的距离可能有大量其他的错误匹配,从而它的ratio值比较高。显然降低这个比例阈值T,SIFT匹配点数目会减少,但更加稳定,反之亦然。
Lowe推荐ratio的阈值为0.8,但作者对大量任意存在尺度、旋转和亮度变化的两幅图片进行匹配,结果表明ratio取值在0. 4~0. 6 之间最佳,小于0. 4的很少有匹配点,大于0. 6的则存在大量错误匹配点,所以建议ratio的取值原则如下:
ratio=0. 4:对于准确度要求高的匹配;
ratio=0. 6:对于匹配点数目要求比较多的匹配;
ratio=0. 5:一般情况下。
#include "highgui/highgui.hpp"
#include "opencv2/nonfree/nonfree.hpp"
#include "opencv2/legacy/legacy.hpp"
#include <iostream>

using namespace cv;
using namespace std;

int main()
{

    Mat image01 = imread("g2.jpg", 1);
    Mat image02 = imread("g4.jpg", 1);
    imshow("p2", image01);
    imshow("p1", image02);

    //灰度图转换
    Mat image1, image2;
    cvtColor(image01, image1, CV_RGB2GRAY);
    cvtColor(image02, image2, CV_RGB2GRAY);

    //提取特征点
    SurfFeatureDetector surfDetector(2000);  // 海塞矩阵阈值,在这里调整精度,值越大点越少,越精准
    vector<KeyPoint> keyPoint1, keyPoint2;
    surfDetector.detect(image1, keyPoint1);
    surfDetector.detect(image2, keyPoint2);

    //特征点描述,为下边的特征点匹配做准备
    SurfDescriptorExtractor SurfDescriptor;
    Mat imageDesc1, imageDesc2;
    SurfDescriptor.compute(image1, keyPoint1, imageDesc1);
    SurfDescriptor.compute(image2, keyPoint2, imageDesc2);

    FlannBasedMatcher matcher;
    vector<vector<DMatch> > matchePoints;
    vector<DMatch> GoodMatchePoints;

    vector<Mat> train_desc(1, imageDesc1);
    matcher.add(train_desc);
    matcher.train();

    matcher.knnMatch(imageDesc2, matchePoints, 2);
    cout << "total match points: " << matchePoints.size() << endl;

    // Lowe's algorithm,获取优秀匹配点
    for (int i = 0; i < matchePoints.size(); i++)
    {
        if (matchePoints[i][0].distance < 0.6 * matchePoints[i][1].distance)
        {
            GoodMatchePoints.push_back(matchePoints[i][0]);
        }
    }

    Mat first_match;
    drawMatches(image02, keyPoint2, image01, keyPoint1, GoodMatchePoints, first_match);
    imshow("first_match ", first_match);
    waitKey();
    return 0;
}
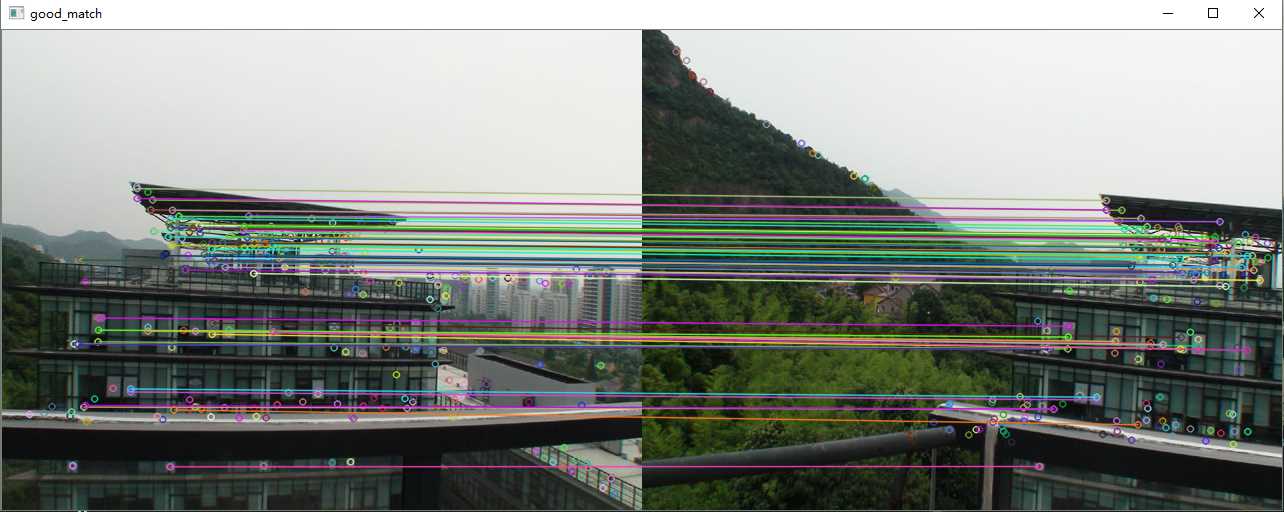
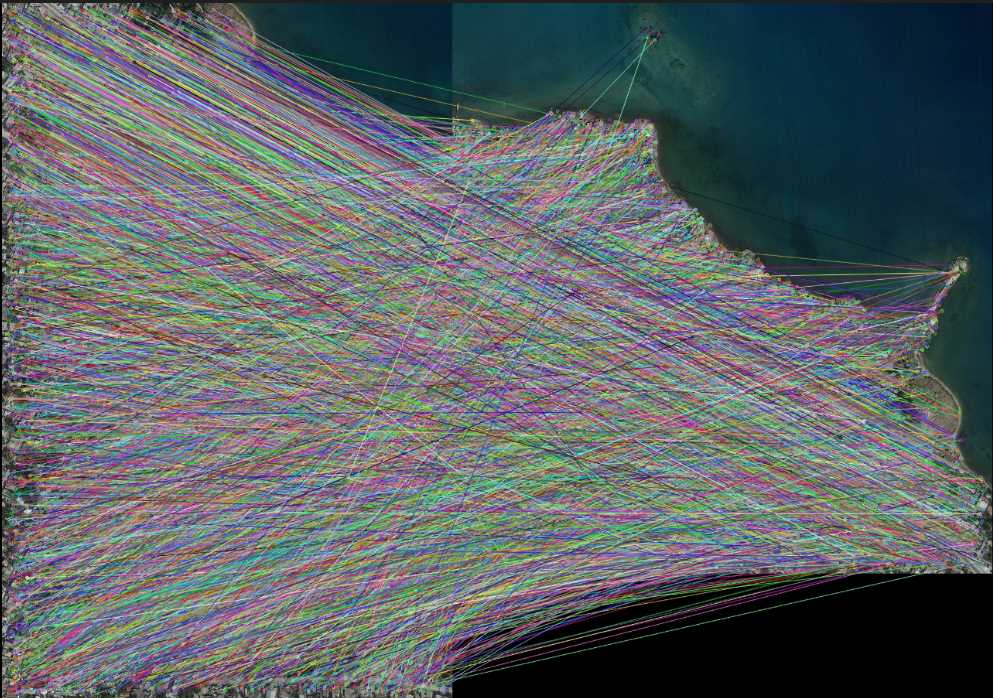
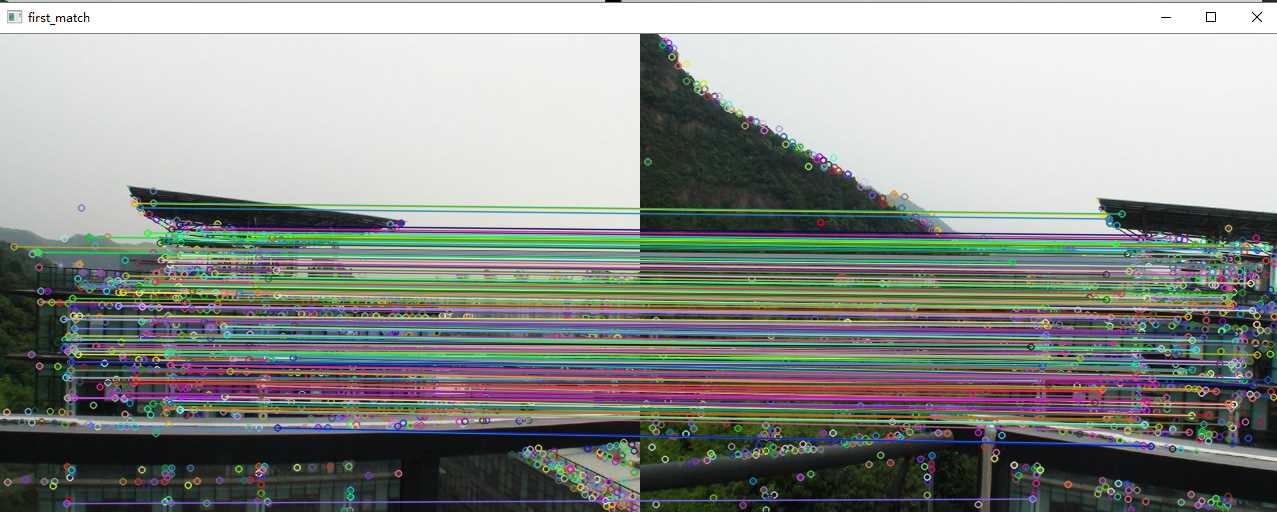
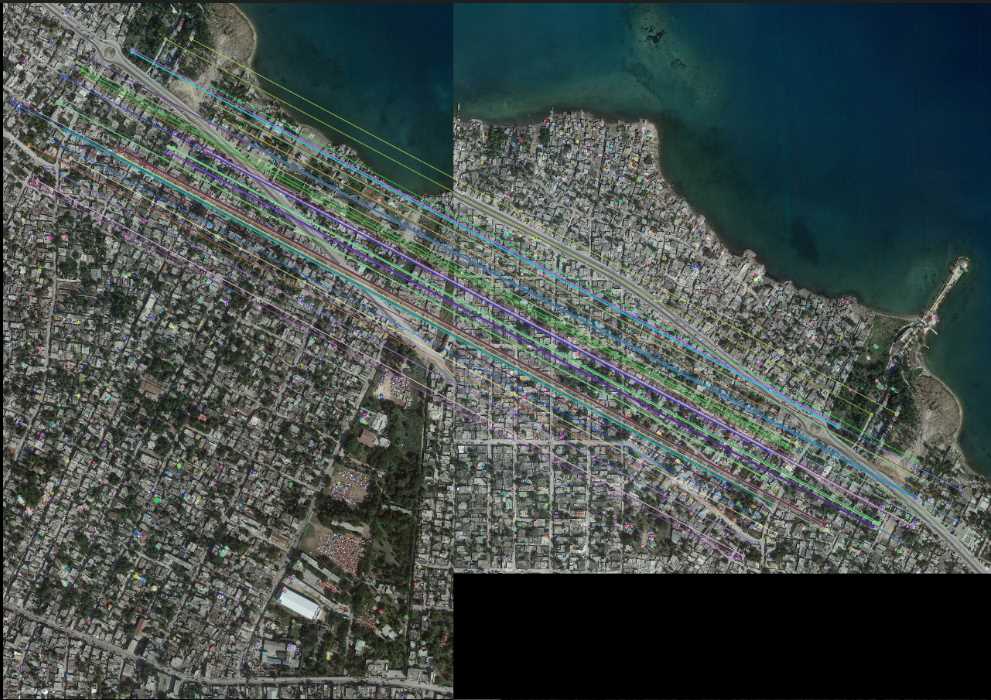
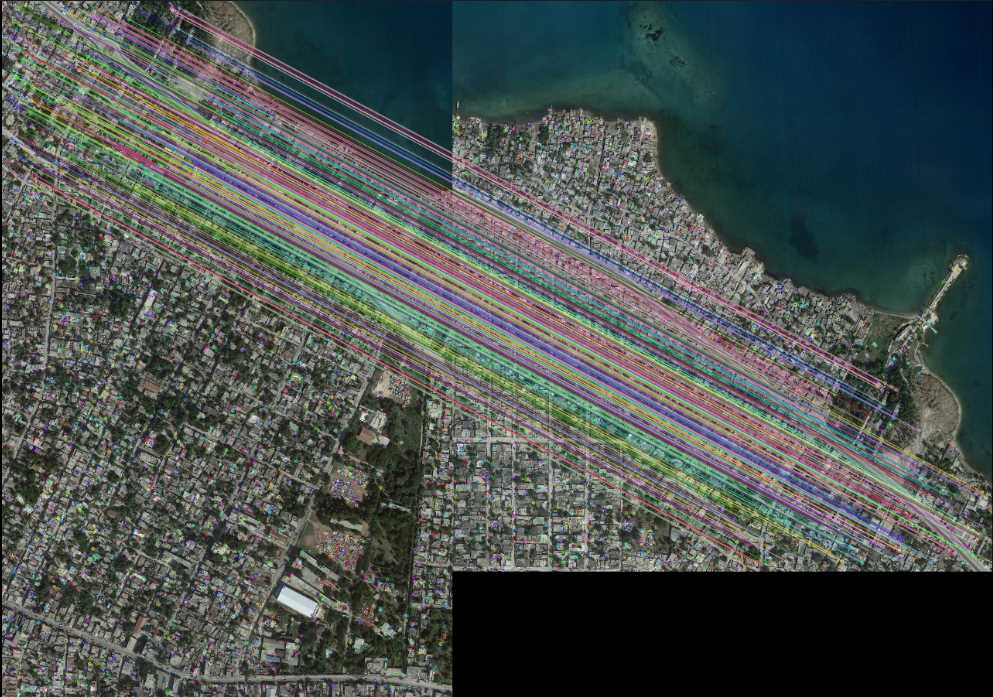
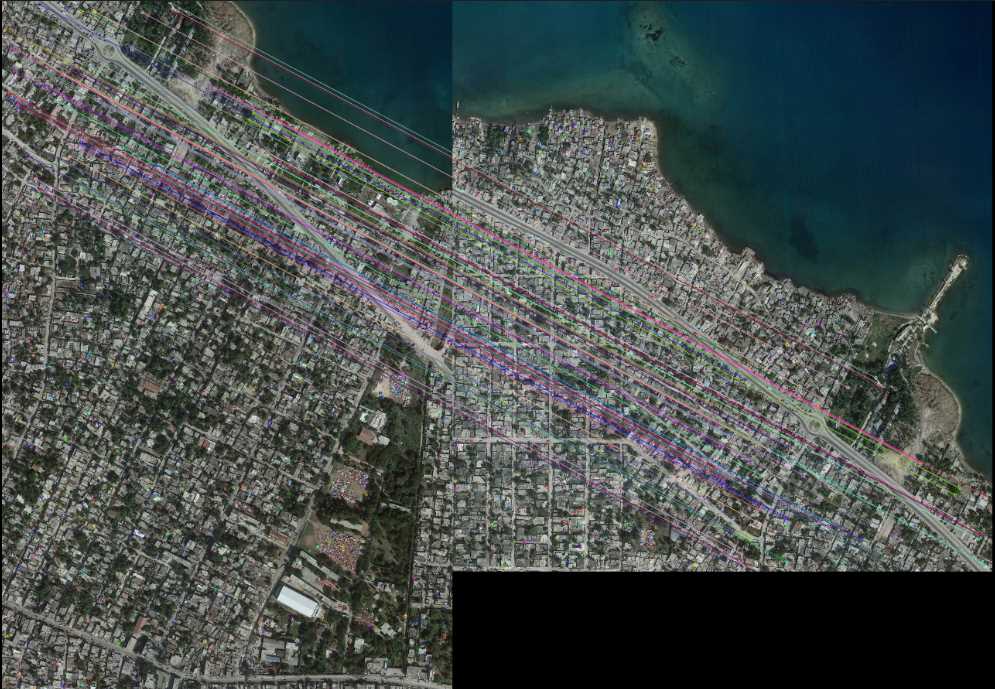
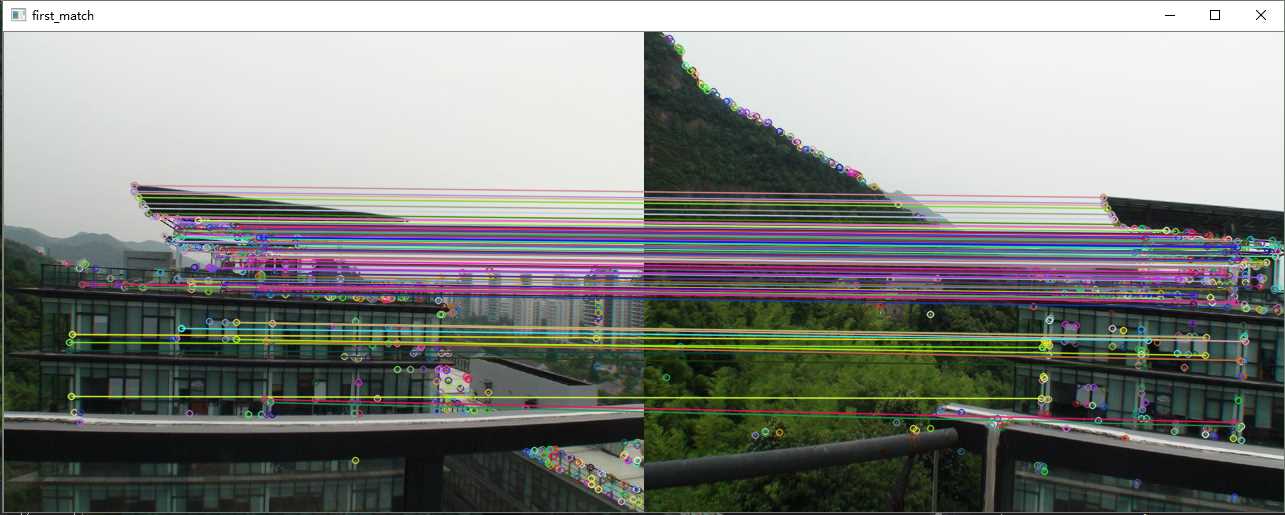
为了体现所谓的尺度不变形,我特意加入了额外一组图片来测试
由特征点匹配的效果来看,现在的特征点匹配应该是非常精准了,因为我们已经把不合格的匹配点统统移除出去了。
2.SIFT
SURF算法是SIFT算法的加速版, 而SIFT(尺度不变特征转换, ScaleInvariant Feature Transform) 是另一种著名的尺度不变特征检测法。我们知道,SURF相对于SIFT而言,特征点检测的速度有着极大的提升,所以在一些实时视频流物体匹配上有着很强的应用。而SIFT因为其巨大的特征计算量而使得特征点提取的过程异常花费时间,所以在一些注重速度的场合难有应用场景。但是SIFT相对于SURF的优点就是,由于SIFT基于浮点内核计算特征点,因此通常认为, SIFT算法检测的特征在空间和尺度上定位更加精确,所以在要求匹配极度精准且不考虑匹配速度的场合可以考虑使用SIFT算法。
SIFT特征检测的代码我们仅需要对上面的SURF代码作出一丁点修改即可。
#include "highgui/highgui.hpp"
#include "opencv2/nonfree/nonfree.hpp"
#include "opencv2/legacy/legacy.hpp"
#include <iostream>

using namespace cv;
using namespace std;

int main()
{
    Mat image01 = imread("1.jpg", 1);    //右图
    Mat image02 = imread("2.jpg", 1);    //左图
    namedWindow("p2", 0);
    namedWindow("p1", 0);
    imshow("p2", image01);
    imshow("p1", image02);

    //灰度图转换
    Mat image1, image2;
    cvtColor(image01, image1, CV_RGB2GRAY);
    cvtColor(image02, image2, CV_RGB2GRAY);

    //提取特征点
    SiftFeatureDetector siftDetector(2000);  // 海塞矩阵阈值,在这里调整精度,值越大点越少,越精准
    vector<KeyPoint> keyPoint1, keyPoint2;
    siftDetector.detect(image1, keyPoint1);
    siftDetector.detect(image2, keyPoint2);

    //特征点描述,为下边的特征点匹配做准备
    SiftDescriptorExtractor SiftDescriptor;
    Mat imageDesc1, imageDesc2;
    SiftDescriptor.compute(image1, keyPoint1, imageDesc1);
    SiftDescriptor.compute(image2, keyPoint2, imageDesc2);

    //获得匹配特征点,并提取最优配对
    FlannBasedMatcher matcher;
    vector<DMatch> matchePoints;

    matcher.match(imageDesc1, imageDesc2, matchePoints, Mat());
    cout << "total match points: " << matchePoints.size() << endl;

    Mat img_match;
    drawMatches(image01, keyPoint1, image02, keyPoint2, matchePoints, img_match);

    imshow("match",img_match);
    imwrite("match.jpg", img_match);

    waitKey();
    return 0;
}
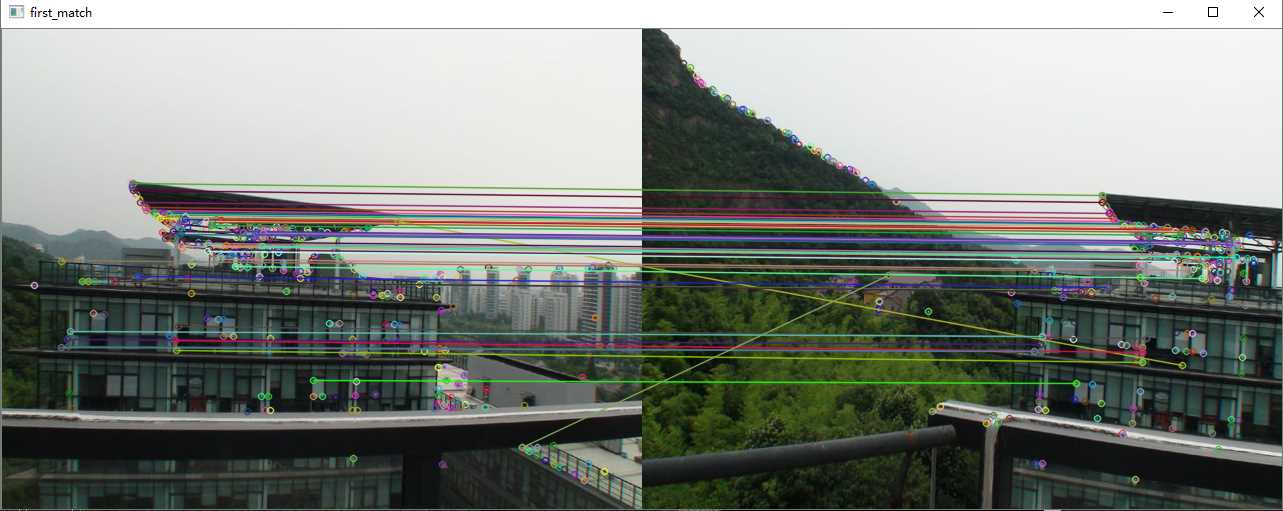
没有经过点筛选的匹配效果同样糟糕。下面继续采用Lowe‘s的算法选出优秀匹配点。
#include "highgui/highgui.hpp"
#include "opencv2/nonfree/nonfree.hpp"
#include "opencv2/legacy/legacy.hpp"
#include <iostream>

using namespace cv;
using namespace std;

int main()
{

    Mat image01 = imread("1.jpg", 1);
    Mat image02 = imread("2.jpg", 1);
    imshow("p2", image01);
    imshow("p1", image02);

    //灰度图转换
    Mat image1, image2;
    cvtColor(image01, image1, CV_RGB2GRAY);
    cvtColor(image02, image2, CV_RGB2GRAY);

    //提取特征点
    SiftFeatureDetector siftDetector(800);  // 海塞矩阵阈值,在这里调整精度,值越大点越少,越精准
    vector<KeyPoint> keyPoint1, keyPoint2;
    siftDetector.detect(image1, keyPoint1);
    siftDetector.detect(image2, keyPoint2);

    //特征点描述,为下边的特征点匹配做准备
    SiftDescriptorExtractor SiftDescriptor;
    Mat imageDesc1, imageDesc2;
    SiftDescriptor.compute(image1, keyPoint1, imageDesc1);
    SiftDescriptor.compute(image2, keyPoint2, imageDesc2);

    FlannBasedMatcher matcher;
    vector<vector<DMatch> > matchePoints;
    vector<DMatch> GoodMatchePoints;

    vector<Mat> train_desc(1, imageDesc1);
    matcher.add(train_desc);
    matcher.train();

    matcher.knnMatch(imageDesc2, matchePoints, 2);
    cout << "total match points: " << matchePoints.size() << endl;

    // Lowe's algorithm,获取优秀匹配点
    for (int i = 0; i < matchePoints.size(); i++)
    {
        if (matchePoints[i][0].distance < 0.6 * matchePoints[i][1].distance)
        {
            GoodMatchePoints.push_back(matchePoints[i][0]);
        }
    }

    Mat first_match;
    drawMatches(image02, keyPoint2, image01, keyPoint1, GoodMatchePoints, first_match);
    imshow("first_match ", first_match);
    imwrite("first_match.jpg", first_match);
    waitKey();
    return 0;
}

3.ORB
ORB是ORiented Brief的简称,是brief算法的改进版。ORB算法比SIFT算法快100倍,比SURF算法快10倍。在计算机视觉领域有种说法,ORB算法的综合性能在各种测评里较其他特征提取算法是最好的。
ORB算法是brief算法的改进,那么我们先说一下brief算法有什么去缺点。
BRIEF的优点在于其速度,其缺点是:
- 不具备旋转不变性
- 对噪声敏感
- 不具备尺度不变性
而ORB算法就是试图解决上述缺点中1和2提出的一种新概念。值得注意的是,ORB没有解决尺度不变性。
#include "highgui/highgui.hpp"
#include "opencv2/nonfree/nonfree.hpp"
#include "opencv2/legacy/legacy.hpp"
#include <iostream>

using namespace cv;
using namespace std;

int main()
{

    Mat image01 = imread("g2.jpg", 1);
    Mat image02 = imread("g4.jpg", 1);
    imshow("p2", image01);
    imshow("p1", image02);

    //灰度图转换
    Mat image1, image2;
    cvtColor(image01, image1, CV_RGB2GRAY);
    cvtColor(image02, image2, CV_RGB2GRAY);

    //提取特征点
    OrbFeatureDetector OrbDetector(1000);  // 在这里调整精度,值越小点越少,越精准
    vector<KeyPoint> keyPoint1, keyPoint2;
    OrbDetector.detect(image1, keyPoint1);
    OrbDetector.detect(image2, keyPoint2);

    //特征点描述,为下边的特征点匹配做准备
    OrbDescriptorExtractor OrbDescriptor;
    Mat imageDesc1, imageDesc2;
    OrbDescriptor.compute(image1, keyPoint1, imageDesc1);
    OrbDescriptor.compute(image2, keyPoint2, imageDesc2);

    flann::Index flannIndex(imageDesc1, flann::LshIndexParams(12, 20, 2), cvflann::FLANN_DIST_HAMMING);

    vector<DMatch> GoodMatchePoints;

    Mat macthIndex(imageDesc2.rows, 2, CV_32SC1), matchDistance(imageDesc2.rows, 2, CV_32FC1);
    flannIndex.knnSearch(imageDesc2, macthIndex, matchDistance, 2, flann::SearchParams());

    // Lowe's algorithm,获取优秀匹配点
    for (int i = 0; i < matchDistance.rows; i++)
    {
        if (matchDistance.at<float>(i,0) < 0.6 * matchDistance.at<float>(i, 1))
        {
            DMatch dmatches(i, macthIndex.at<int>(i, 0), matchDistance.at<float>(i, 0));
            GoodMatchePoints.push_back(dmatches);
        }
    }

    Mat first_match;
    drawMatches(image02, keyPoint2, image01, keyPoint1, GoodMatchePoints, first_match);
    imshow("first_match ", first_match);
    imwrite("first_match.jpg", first_match);
    waitKey();
    return 0;
}

4.FAST
FAST(加速分割测试获得特征, Features from Accelerated Segment Test) 。 这种算子专门用来快速检测兴趣点, 只需要对比几个像素,就可以判断是否为关键点。
跟Harris检测器的情况一样, FAST算法源于对构成角点的定义。FAST对角点的定义基于候选特征点周围的图像强度值。 以某个点为中心作一个圆, 根据圆上的像素值判断该点是否为关键点。 如果存在这样一段圆弧, 它的连续长度超过周长的3/4, 并且它上面所有像素的强度值都与圆心的强度值明显不同(全部更黑或更亮) , 那么就认定这是一个关键点。
用这个算法检测兴趣点的速度非常快, 因此十分适合需要优先考虑速度的应用。 这些应用包括实时视觉跟踪、 目标识别等, 它们需要在实
时视频流中跟踪或匹配多个点。
我们使用FastFeatureDetector 进行特征点提取,因为opencv没有提供fast专用的描述子提取器,所以我们借用SiftDescriptorExtractor 来实现描述子的提取。
#include "highgui/highgui.hpp"
#include "opencv2/nonfree/nonfree.hpp"
#include "opencv2/legacy/legacy.hpp"
#include <iostream>

using namespace cv;
using namespace std;

int main()
{

    Mat image01 = imread("1.jpg", 1);
    Mat image02 = imread("2.jpg", 1);
    imshow("p2", image01);
    imshow("p1", image02);

    //灰度图转换
    Mat image1, image2;
    cvtColor(image01, image1, CV_RGB2GRAY);
    cvtColor(image02, image2, CV_RGB2GRAY);

    //提取特征点
    FastFeatureDetector Detector(50);  //阈值
    vector<KeyPoint> keyPoint1, keyPoint2;
    Detector.detect(image1, keyPoint1);
    Detector.detect(image2, keyPoint2);

    //特征点描述,为下边的特征点匹配做准备
    SiftDescriptorExtractor   Descriptor;
    Mat imageDesc1, imageDesc2;
    Descriptor.compute(image1, keyPoint1, imageDesc1);
    Descriptor.compute(image2, keyPoint2, imageDesc2);

    BruteForceMatcher< L2<float> > matcher;
    vector<vector<DMatch> > matchePoints;
    vector<DMatch> GoodMatchePoints;

    vector<Mat> train_desc(1, imageDesc1);
    matcher.add(train_desc);
    matcher.train();

    matcher.knnMatch(imageDesc2, matchePoints, 2);
    cout << "total match points: " << matchePoints.size() << endl;

    // Lowe's algorithm,获取优秀匹配点
    for (int i = 0; i < matchePoints.size(); i++)
    {
        if (matchePoints[i][0].distance < 0.6 * matchePoints[i][1].distance)
        {
            GoodMatchePoints.push_back(matchePoints[i][0]);
        }
    }

    Mat first_match;
    drawMatches(image02, keyPoint2, image01, keyPoint1, GoodMatchePoints, first_match);
    imshow("first_match ", first_match);
    imwrite("first_match.jpg", first_match);
    waitKey();
    return 0;
}
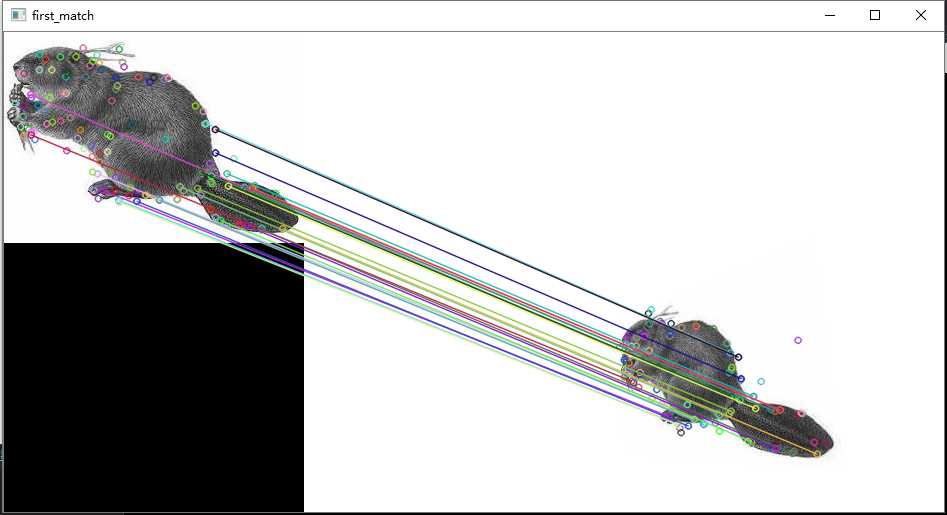
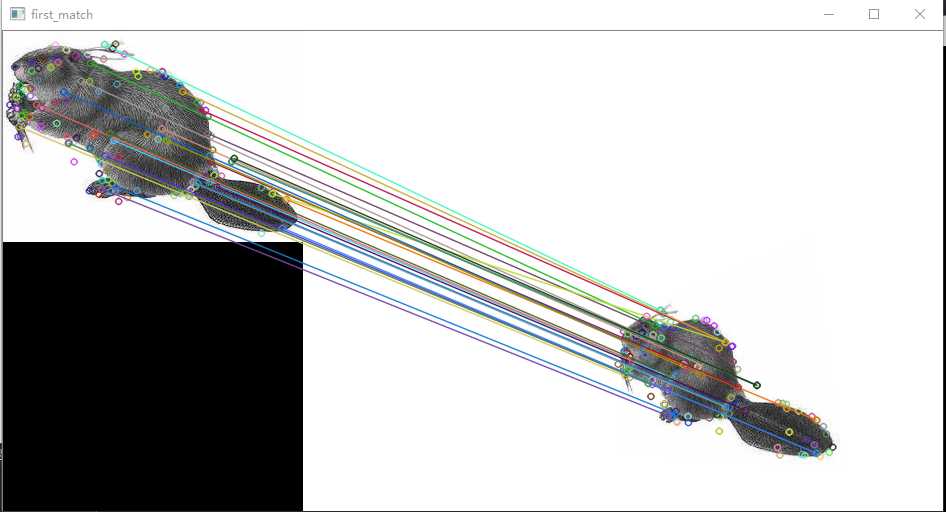
如果我们把描述子换成SurfDescriptorExtractor,即FastFeatureDetector + SurfDescriptorExtractor的组合,看看效果

可以看出,这种组合下的特征点匹配并不精确。
如果我们把描述子换成SurfDescriptorExtractor,即FastFeatureDetector + BriefDescriptorExtractor 的组合,看看效果
速度虽快,但是精度却差强人意。
看到这里可能很多人会有疑惑:为什么FAST特征点可以用所以我们借用SiftDescriptorExtractor或者其他描述子提取器进行提取?
在这里我说一下自己的理解。要完成特征点的匹配第一个步骤就是找出每幅图像的特征点,这叫做特征检测,比如我们使用FastFeatureDetector、SiftFeatureDetector都是特征检测的模块。我们得到这些图像的特征点后,我们就对这些特征点进行进一步的分析,用一些数学上的特征对其进行描述,如梯度直方图,局部随机二值特征等。所以在这一步我们可以选择其他描述子提取器对这些点进行特征描述,进而完成特征点的精确匹配。
在opencv中,SURF,ORB,SIFT既包含FeatureDetector,又包含 DescriptorExtractor,所以我们使用上述三种算法做特征匹配时,都用其自带的方法配套使用。
除此之外,如果我们相用FAST角点检测并作特征点匹配该怎么办?此时可以使用上述的FastFeatureDetector + BriefDescriptorExtractor 的方式,这种组合方式其实就是著名的ORB算法。所以特征点检测和特征点匹配是两种不同的步骤,我们只需根据自己项目的需求对这两个步骤的方法随意组合就好。
5.Harris角点
在图像中搜索有价值的特征点时,使用角点是一种不错的方法。 角点是很容易在图像中定位的局部特征, 并且大量存在于人造物体中(例如墙壁、 门、 窗户、 桌子等产生的角点)。 角点的价值在于它是两条边缘线的接合点, 是一种二维特征,可以被精确地定位(即使是子像素级精度)。 与此相反的是位于均匀区域或物体轮廓上的点以及在同一物体的不同图像上很难重复精确定位的点。 Harris特征检测是检测角点的经典方法。
这里仅展示GoodFeaturesToTrackDetector + SiftDescriptorExtractor的组合方式的代码,其他组合不再演示。
#include "highgui/highgui.hpp"
#include "opencv2/nonfree/nonfree.hpp"
#include "opencv2/legacy/legacy.hpp"
#include <iostream>

using namespace cv;
using namespace std;

int main()
{

    Mat image01 = imread("1.jpg", 1);
    Mat image02 = imread("2.jpg", 1);
    imshow("p2", image01);
    imshow("p1", image02);

    //灰度图转换
    Mat image1, image2;
    cvtColor(image01, image1, CV_RGB2GRAY);
    cvtColor(image02, image2, CV_RGB2GRAY);

    //提取特征点
    GoodFeaturesToTrackDetector Detector(500);  //最大点数,值越大,点越多
    vector<KeyPoint> keyPoint1, keyPoint2;
    Detector.detect(image1, keyPoint1);
    Detector.detect(image2, keyPoint2);

    //特征点描述,为下边的特征点匹配做准备
    SiftDescriptorExtractor  Descriptor;
    Mat imageDesc1, imageDesc2;
    Descriptor.compute(image1, keyPoint1, imageDesc1);
    Descriptor.compute(image2, keyPoint2, imageDesc2);

    BruteForceMatcher< L2<float> > matcher;
    vector<vector<DMatch> > matchePoints;
    vector<DMatch> GoodMatchePoints;

    vector<Mat> train_desc(1, imageDesc1);
    matcher.add(train_desc);
    matcher.train();

    matcher.knnMatch(imageDesc2, matchePoints, 2);
    cout << "total match points: " << matchePoints.size() << endl;

    // Lowe's algorithm,获取优秀匹配点
    for (int i = 0; i < matchePoints.size(); i++)
    {
        if (matchePoints[i][0].distance < 0.6 * matchePoints[i][1].distance)
        {
            GoodMatchePoints.push_back(matchePoints[i][0]);
        }
    }

    Mat first_match;
    drawMatches(image02, keyPoint2, image01, keyPoint1, GoodMatchePoints, first_match);
    imshow("first_match ", first_match);
    imwrite("first_match.jpg", first_match);
    waitKey();
    return 0;
}
匹配相当精准
计算机视觉领域其实还有了很多特征检测的方法,比如HOG、Harr、LBP等,这里就不再叙述了,因为方法都是类似,我们根据自己的需求挑选相应的方法就好了。
到此这篇关于OpenCV实现特征检测和特征匹配方法汇总的文章就介绍到这了,更多相关OpenCV 特征检测和特征匹配内容请搜索我们以前的文章或继续浏览下面的相关文章希望大家以后多多支持我们!
相关推荐
-

C语言container of()函数案例详解
在linux 内核编程中,会经常见到一个宏函数container_of(ptr,type,member), 但是当你通过追踪源码时,像我们这样的一般人就会绝望了(这一堆都是什么呀? 函数还可以这样定义??? 怎么还有0呢??? 哎,算了,还是放弃吧...). 这就是内核大佬们厉害的地方,随便两行代码就让我们怀疑人生,凡是都需要一个过程,慢慢来吧. 其实,原理很简单: 已知结构体type的成员member的地址ptr,求解结构体type的起始地址.
-
解决SpringBoot加载application.properties配置文件的坑
SpringBoot加载application.properties配置文件的坑 事情的起因是这样的 一次,本人在现场升级程序,升级完成后进行测试,结果接口调用都报了这么个错误: 大概意思是https接口需要证书校验,这就奇怪了,项目启动加载的是包外的application.properties配置文件,配置文件里没有配置使用https啊.本人马上检查了下包内的application.properties配置文件,发现包内确实配置了https相关的配置项: 明明包外的配置文件优先级高于包内的,为
-
C++使用WideCharToMultiByte函数生成UTF-8编码文件的方法
WideCharToMultiByte函数映射一个unicode字符串到一个多字节字符串. 函数原型: int WideCharToMultiByte UINT CodePage, //指定执行转换的代码页 DWORD dwFlags, //允许你进行额外的控制,它会影响使用了读音符号(比如重音)的字符 LPCWSTR lpWideCharStr, //指定要转换为宽字节字符串的缓冲区 int cchWideChar, //指定由参数lpWideCharStr指向的缓冲区的字符个数 LPSTR
-
Android选择与上传图片之Matisse教程
效果图: 就目前效果图来看,好像也没什么毛病哈,其实我这个集成的过程是有点坎坷的. 而且,功能也不算是很齐全吧-主要体现在以下几个点 没有回调之后的预览 选择之后不能删除已选 已选择的图片再次选择不能带过去 剪裁 压缩 权限 Glide版本过低 但是,也是有特点的 MD风格 白天模式和夜间模式 其他与同类相比也真的没什么了,唯一背书 就是知乎团队出的呗.. 相比之下,昨天出的Android选择与上传图片之PictureSelector教程就更加友好和人性化了. 下面来说说集成遇到的问题以及解决方
-
SpringCloud2020.0.x版UnderTow AccessLog相关配置简介
目录 01.accesslog相关配置 02.日志文件rotate目前只能按照日期 03.access占位符 总结 本系列代码地址:https://github.com/HashZhang/spring-cloud-scaffold/tree/master/spring-cloud-iiford 01.accesslog相关配置 server: undertow: # access log相关配置 accesslog: # 存放目录,默认为 logs dir: ./log # 是否开启 enab
-
gaussdb 200安装 data studio jdbc idea链接保姆级安装步骤
安装步骤 所使用linux为:openEuler-20.03-LTS-x86_64 openEuler下载地址 修改本机的ip地址 vi /etc/sysconfig/network-scripts/ifcfg-ens33 TYPE=Ethernet PROXY_METHOD=none BROWSER_ONLY=no BOOTPROTO=static DEFROUTE=yes IPV4_FAILURE_FATAL=no IPV6INIT=yes IPV6_AUTOCONF=yes IPV6_DE
-
easycom模式开发UNI-APP组件调用必须掌握的实用技巧
本文旨在抛砖引玉,具体文档和easycom规范请移步uni-app官网.[传送门]easycom模式说明 easycom组件模式介绍 自HBuilderX 2.5.5起支持easycom组件模式.若HBuiderX版本较低,请先检查更新! uni-app基于VUE开发,通常组件的使用都是先安装,然后全局或者局部引入,注册.然后方可在页面中使用相应的组件.过程较为繁琐,而uni-app使用easycom组件模式对上述三个步骤进行了简化,使得用户在使用组件的时候无需引用和注册直接可在页面中使用组件.
-
Android选择与上传图片之ImagePicker教程
效果图: 后来又出了两篇,也可以看一下 Android选择与上传图片之PictureSelector教程 Android选择与上传图片之Matisse教程 添加依赖: 选择图片:compile 'com.lzy.widget:imagepicker:0.5.4' github地址:https://github.com/jeasonlzy/ImagePicker 上传文件:compile 'com.zhy:okhttputils:2.6.2' github地址:https://github.com
-
C语言MultiByteToWideChar和WideCharToMultiByte案例详解
目录 注意: 一.函数简单介绍 ( 1 ) MultiByteToWideChar() ( 2 ) WideCharToMultiByte() 二.使用方法 ( 1 ) 将多字节字符串转为宽字符串: ( 2 ) 从宽字节转为窄字节字符串 三.MultiByteToWideChar()函数乱码的问题 注意: 这两个函数是由Windows提供的转换函数,不具有通用性 C语言提供的转换函数为mbstowcs()/wcstombs() 一.函数简单介绍 涉及到的头文件: 函数所在头文件:windows.
-
Android选择与上传图片之PictureSelector教程
效果图: [注意]Demo已更新到最新版本,并稍作调整. 之前出过一篇 Android选择与上传图片之ImagePicker教程,这个是okgo作者出的,就一般需求来讲是够了,但是没有压缩,需要自己去搞. 后来业务需求提升,页面要美,体验要好,便不是那么满足需求了,所幸在github上找到PictureSelector(然后当时没多久Matisse就开源了-可以看这里 Android选择与上传图片之Matisse教程),也不用自己再撸一个了,下面来介绍介绍PictureSelector gith