SpringMVC用XML方式实现AOP的方法示例
1.首先创建web工程,之后导入Spring jar包,目录如下


2.文件代码
2.1AfterAdvice
package com.niit.aop;

import java.lang.reflect.Method;

import org.springframework.aop.AfterReturningAdvice;
/*
 * 后置通知
 * havingClass方法执行之后才执行。
 * 输出日记
 * */
public class AfterAdvice implements AfterReturningAdvice {

	@Override
	public void afterReturning(Object arg0, Method arg1, Object[] arg2, Object arg3) throws Throwable {
		// TODO Auto-generated method stub
		System.out.println("后置拦截:下课之后写作业");
	}
}
2.2BeforeAdvice
package com.niit.aop;
import java.lang.reflect.Method;
import org.springframework.aop.MethodBeforeAdvice;
public class BeforeAdvice implements MethodBeforeAdvice {
/*
 * 前置通知
 * 在havingClass切入点方法执行之前通知
 * 用于验证用户的合法性。/判断一些数据是否存在。适用于检索。注册判断用户名是否存在。
 * */
	@Override
	public void before(Method arg0, Object[] arg1, Object arg2) throws Throwable {
		// TODO Auto-generated method stub
		System.out.println("前面拦截:上课之前要点名!在调用havingClass方法之前调用");

	}
}
2.3StudentIntercepter
package com.niit.aop;
import org.aopalliance.intercept.MethodInterceptor;
import org.aopalliance.intercept.MethodInvocation;

public class StudentIntercepter implements MethodInterceptor {

	@Override
	public Object invoke(MethodInvocation method) throws Throwable {
		// TODO Auto-generated method stub
		if(method.getArguments().length>0) {
			String name=(String)method.getArguments()[0];
			if("hmq".equals(name)){
				System.out.println("中间拦截:你是hmq");
			}
			else {
				System.out.println("中间拦截:你是学生");
			}
			method.proceed();
		}
		return null;
	}
}
2.4StudentIF
package com.niit.logic;
public interface StudentIF {
	public void havingClass(String name);
	public void dohomework(String name);

}
2.5Student
package com.niit.logic;

public class Student implements StudentIF {

	//作为aop的目标方法
public void havingClass(String name) {
	System.out.println("aop的目标方法");
	System.out.println(name+"正在上课");
}
public void dohomework(String name) {
	System.out.println(name+"正在写作业");
}
}
2.6StudentLogic
package com.niit.logic;

import org.springframework.context.ApplicationContext;
import org.springframework.context.support.ClassPathXmlApplicationContext;

public class StudentLogic {
	public static void main(String[] args) {
		ApplicationContext context=new ClassPathXmlApplicationContext("applicationContext.xml");
		StudentIF s=(StudentIF)context.getBean("student");
		s.havingClass("hmq");
		System.out.println("---------------");
		s.dohomework("hmq");
		System.out.println("---------------");
		s.havingClass("abc");
		System.out.println("---------------");
		s.dohomework("abc");
		System.out.println("---------------");

	}

}
2.7applicationContext.xml
<?xml version="1.0" encoding="UTF-8"?>
<beans xmlns="http://www.springframework.org/schema/beans"
  xmlns:context="http://www.springframework.org/schema/context"
  xmlns:xsi="http://www.w3.org/2001/XMLSchema-instance" xmlns:aop="http://www.springframework.org/schema/aop"
  xmlns:tx="http://www.springframework.org/schema/tx" xmlns:p="http://www.springframework.org/schema/p"
  xmlns:util="http://www.springframework.org/schema/util" xmlns:jdbc="http://www.springframework.org/schema/jdbc"
  xmlns:cache="http://www.springframework.org/schema/cache"
  xsi:schemaLocation="
  http://www.springframework.org/schema/context
  http://www.springframework.org/schema/context/spring-context.xsd
  http://www.springframework.org/schema/beans
  http://www.springframework.org/schema/beans/spring-beans.xsd
  http://www.springframework.org/schema/tx
  http://www.springframework.org/schema/tx/spring-tx.xsd
  http://www.springframework.org/schema/jdbc
  http://www.springframework.org/schema/jdbc/spring-jdbc-3.1.xsd
  http://www.springframework.org/schema/cache
  http://www.springframework.org/schema/cache/spring-cache-3.1.xsd
  http://www.springframework.org/schema/aop
  http://www.springframework.org/schema/aop/spring-aop.xsd
  http://www.springframework.org/schema/util
  http://www.springframework.org/schema/util/spring-util.xsd">

  <!-- 自动扫描web包,将带有注解的类 纳入spring容器管理 -->
  <!-- <context:component-scan base-package="com.niit.beans">
  </context:component-scan> -->
  <!-- 定义通知 -->
  <bean id="BeforeAdvice" class="com.niit.aop.BeforeAdvice"></bean>
   <bean id="AfterAdvice" class="com.niit.aop.AfterAdvice"></bean>

  <!-- 定义拦截器 -->
  <bean id="StudentIntercepter" class="com.niit.aop.StudentIntercepter"> </bean>
  <!-- 定义目标 -->
<bean id="target" class="com.niit.logic.Student"></bean>
<!-- 切入点 哪些方法会被aop影响 可选 -->
<bean id="pointcut" class="org.springframework.aop.support.JdkRegexpMethodPointcut">
<!-- 模式 -->
<property name="pattern" value=".*dohomework.*" >
</property>

</bean>
<!-- 通知器advisor 连接通知和切入点 可选-->
<bean id="advisor" class="org.springframework.aop.support.DefaultPointcutAdvisor">
<property name="advice" ref="BeforeAdvice"/>
<property name="pointcut" ref="pointcut"/>
</bean>
<!-- 定义代理 -->
<bean id="student" class="org.springframework.aop.framework.ProxyFactoryBean">
<!-- 注入目标 -->
<property name="target" ref="target"></property>
<!-- 设置拦截器 -->
<property name="interceptorNames">
<list>
<value>BeforeAdvice</value>
<value>AfterAdvice</value>
<value>StudentIntercepter</value>
</list>
</property>
<!-- 定义代理接口 -->
<property name="proxyInterfaces" value="com.niit.logic.StudentIF"></property>

</bean>
</beans>
2.8SpringMVC.xml
<?xml version="1.0" encoding="UTF-8"?>
<beans xmlns="http://www.springframework.org/schema/beans"
  xmlns:xsi="http://www.w3.org/2001/XMLSchema-instance"
  xmlns:context="http://www.springframework.org/schema/context"
  xmlns:mvc="http://www.springframework.org/schema/mvc"
  xsi:schemaLocation="http://www.springframework.org/schema/beans
    http://www.springframework.org/schema/beans/spring-beans.xsd
    http://www.springframework.org/schema/context
    http://www.springframework.org/schema/context/spring-context.xsd
    http://www.springframework.org/schema/mvc
    http://www.springframework.org/schema/mvc/spring-mvc.xsd
    ">

    <!-- 包扫描:扫描注解所在的包controller类所在的包 -->
    <context:component-scan base-package="com.niit.controller"></context:component-scan>
     <context:component-scan base-package="com.niit.service" />
     <context:component-scan base-package="com.niit.dao" />
    <!-- 开启注解驱动AnnotationHandlerMapping -->
    <mvc:annotation-driven/>

  <!-- 配置视图解析器 -->
  <bean class="org.springframework.web.servlet.view.InternalResourceViewResolver">
    <property name="prefix" value="/WEB-INF/view/"/>
    <property name="suffix" value=".jsp"/>
  </bean>
  <!--SimpleMappingExceptionResolver(异常类与 View 的对应关系) -->
  <bean
    class="org.springframework.web.servlet.handler.SimpleMappingExceptionResolver">
    <!-- 定义默认的异常处理页面,当该异常类型注册时使用 -->
    <property name="defaultErrorView" value="error"></property>
    <!-- 定义异常处理页面用来获取异常信息的变量名,默认名为exception -->
    <property name="exceptionAttribute" value="ex"></property>
    <!-- 定义需要特殊处理的异常,用类名或完全路径名作为key,异常页名作为值 -->
    <property name="exceptionMappings">
      <props>
        <prop key="exception.MyException">my-error</prop>
        <prop key="java.sql.SQLException">sql-error</prop>
        <prop key="exception.KeyWordNotFoundException">my-error</prop>
        <!-- 在这里还可以继续扩展对不同异常类型的处理 -->
      </props>
    </property>
  </bean>
   <!--托管MyExceptionHandler-->
  <!--<bean class="com.niit.exception.MyExceptionHandler"/> -->
</beans>
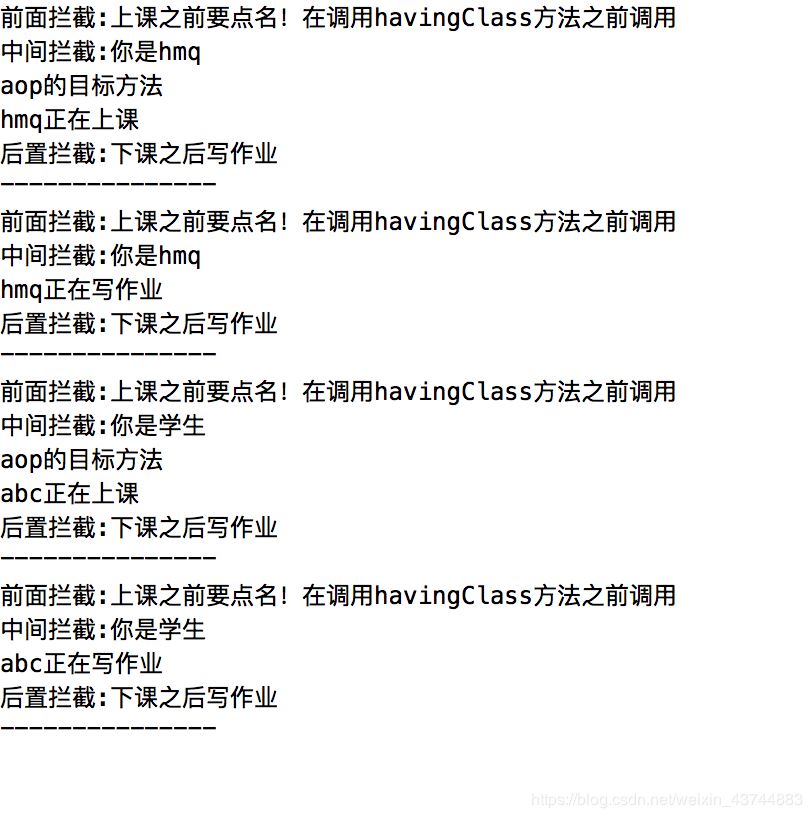
4效果图
到此这篇关于SpringMVC用XML方式实现AOP的方法示例的文章就介绍到这了,更多相关SpringMVC XML实现AOP内容请搜索我们以前的文章或继续浏览下面的相关文章希望大家以后多多支持我们!
相关推荐
-
Spring使用AspectJ注解和XML配置实现AOP
本文演示的是Spring中使用AspectJ注解和XML配置两种方式实现AOP 下面是使用AspectJ注解实现AOP的Java Project 首先是位于classpath下的applicationContext.xml文件 <?xml version="1.0" encoding="UTF-8"?> <beans xmlns="http://www.springframework.org/schema/beans" xmln
-

详解Spring Aop实例之xml配置
AOP的配置方式有2种方式:xml配置和AspectJ注解方式.今天我们就来实践一下xml配置方式. 我采用的jdk代理,所以首先将接口和实现类代码附上 package com.tgb.aop; public interface UserManager { public String findUserById(int userId); } package com.tgb.aop; public class UserManagerImpl implements UserManager { publ
-
spring中aop的xml配置方法实例详解
前言 AOP:即面向切面编程,是一种编程思想,OOP的延续.在程序开发中主要用来解决一些系统层面上的问题,比如日志,事务,权限等等. aop,面向切面编程的目标就是分离关注点,比如:一个骑士只需要关注守护安全,或者远征,而骑士辉煌一生的事迹由谁来记录和歌颂呢,当然不会是自己了,这个完全可以由诗人去歌颂,比如当骑士出征的时候诗人可以去欢送,当骑士英勇牺牲的时候,诗人可以写诗歌颂骑士的一生.那么骑士只需要关注怎么打仗就好了.而诗人也只需要关注写诗歌颂和欢送就好了,那么这样就把功能分离了.所以可以把诗
-
SpringMVC用XML方式实现AOP的方法示例
1.首先创建web工程,之后导入Spring jar包,目录如下 2.文件代码 2.1AfterAdvice package com.niit.aop; import java.lang.reflect.Method; import org.springframework.aop.AfterReturningAdvice; /* * 后置通知 * havingClass方法执行之后才执行. * 输出日记 * */ public class AfterAdvice implements After
-
PHP实现使用DOM将XML数据存入数组的方法示例
本文实例讲述了PHP实现使用DOM将XML数据存入数组的方法.分享给大家供大家参考,具体如下: <?php $doc = new DOMDocument('1.0','utf-8'); $doc->load("config.xml"); $roots=$doc->documentElement;//获取根节点也就是config(仅有一个) $childs=$roots->childNodes;//获取根节点下所有子节点也就是 db smarty for($i=0
-
jQuery实现遍历XML节点和属性的方法示例
本文实例讲述了jQuery实现遍历XML节点和属性的方法.分享给大家供大家参考,具体如下: 用jquery遍历xml网上已经有很多, 但是看了好多文章, 对于不指定属性名称的遍历方法却没有 研究了一下, 好像jquery没有attributes. 还是要借助于原生态的JS 以下是JS代码 <script type="text/javascript" src="js/jquery.min.js"></script> <div id=&qu
-
nodejs实现解析xml字符串为对象的方法示例
本文实例讲述了nodejs实现解析xml字符串为对象的方法.分享给大家供大家参考,具体如下: var xmlreader = require("xmlreader"); var fs = require("fs"); var xml_string = '<response id="1" shop="aldi">' + 'This is some other content' + '<who name=&quo
-
如何通过XML方式配置AOP过程解析
第一步:把通知类用 bean 标签配置起来 <bean id="txManager" class="com.atguigu.account.utils.TransactionManager"> <!-- 注入ConnectionUtils --> <property name="connectionUtils" ref="connectionUtils" /> </bean> 第
-
Python中用post、get方式提交数据的方法示例
前言 最近在使用Python的过程中,发现网上很少提到在使用post方式时,怎么传一个数组作为参数的示例,此处根据自己的实践经验,给出相关示例,下面话不多说了,来一起跟着小编学习学习吧. 示例如下: 单纯的post请求: def http_post(): url = "http://152.1.12.11:8080/web" postdata = dict(d=2, p=10) post = [] post.append(postdata) req = urllib2.Request(
-
Android平台基于Pull方式对XML文件解析与写入方法详解
本文详细讲述了Android平台基于Pull方式对XML文件解析与写入方法.分享给大家供大家参考,具体如下: XML技术在跨平台的情况下的数据交互中得到了广泛的应用,假如我们需要开发一个Android应用程序,需要同服务器端进行数据交互,通过XML文件可以很方便的在Android平台和服务器之间进行数据传输,具体实现涉及到对XML文件进行解析及写入的技术.本文实现在Android平台上基于Pull方式对XML文件解析的技术. XmlPullParser是一个Java实现的开源API包(源码下载地
-
利用Spring AOP记录方法的执行时间
一.前言 对于spring aop这个我就不多介绍了,网上一搜一大把,使用过spring的人都知道spring的ioc和aop.ioc我们常用,但在我们自己的系统中,aop的使用几乎为零,除了这个监控的小功能应用到了,其他的基本上没有使用到.下面小编就给大家整理下利用Spring AOP记录方法执行时间的解决方案,有需要的一起看看吧. 二.解决方案 1.传统方法 最简单.粗暴的方法是给各个需要统计的方法开始和结尾处加的时间戳,然后差值计算结果即可,代码如下: long startTime = S
-
Spring实战之使用XML方式管理声明式事务操作示例
本文实例讲述了Spring实战之使用XML方式管理声明式事务操作.分享给大家供大家参考,具体如下: 一 配置文件 <?xml version="1.0" encoding="GBK"?> <beans xmlns:xsi="http://www.w3.org/2001/XMLSchema-instance" xmlns="http://www.springframework.org/schema/beans"