vue 中引用gojs绘制E-R图的方法示例
首先,在vue项目中安装gojs的依赖包,并在项目中引入。

创建tablePreview.vue
<style>
 #sample{
  position: relative;
  margin: 20px;
 }
 #myOverviewDiv {
  position: absolute;
  width:225px;
  height:100px;
  top: 10px;
  left: 10px;
  background-color: aliceblue;
  z-index: 300; /* make sure its in front */
  border: solid 1px blue;
 }
 #mySearch{
  width: 60%;
  float: right;
  margin-right: 20px;
 }
 .input_button{
  margin: 20px;
 }
 #entityRelation{
  width: 100%;
  height: 700px;
  border:1px solid #cccccc;
 }
 .returnShang{
  color: #fff;
  text-underline: none;
 }
 .returnShang:hover{
  color: #fff;
  text-underline: none;
 }
</style>
<template>
 <div>
  <div class="input_button">
   <Button type="success"><router-link to="/dataSourceAdmin" class="returnShang">返回上一级</router-link></Button>
   <Button type="primary" @click="searchDiagram()" style="float: right">Search</Button>
   <Input placeholder="请输入要查询的表名" id="mySearch" v-model="searchText" @keyup.enter.native="searchDiagram()"></Input>

  </div>
  <div id="sample">
   <div id="entityRelation"></div>
   <div id="myOverviewDiv"></div>
  </div>
 </div>
</template>
<script src="./tablePreview.js"></script>
在js文件中绘制E-R图,注意:初始化方面必须放在mounted中调用。
tablePreview.js如下
export default{
 data() {
  return {
   myDiagram: '',
   searchText: '',
   tabViewList: '',
   tabRelView: ''
  }
 },
 mounted() {
  var dataSoureId = JSON.parse(sessionStorage.getItem("previewInfo")).datasourceId
  let _this = this
  _this.$ajax.post(_this.cfg.api.dataPoolAdmin.tableRelView +'?datasourceId=' + dataSoureId)
   .then(function (res) {
    if(res.data.result) {
     _this.tabViewList = res.data.data.tabViewList
     _this.tabRelView = res.data.data.tabRelViewList
     _this.init()
    }
   })

 },
 methods: {
  init() {
   var go = this.go
   if (window.goSamples) goSamples(); // init for these samples -- you don't need to call this
   var a = go.GraphObject.make; // 定义模板

   this.myDiagram =
    a(go.Diagram, 'entityRelation', // 必须命名或引用div html元素
     {
      initialContentAlignment: go.Spot.Center,
      allowDelete: false,
      allowCopy: false,
      layout: a(go.ForceDirectedLayout),
      "undoManager.isEnabled": true
     });

   // define several shared Brushes
   var bluegrad = a(go.Brush, "Linear", { 0: "rgb(150, 150, 250)", 0.5: "rgb(86, 86, 186)", 1: "rgb(86, 86, 186)" });
   var greengrad = a(go.Brush, "Linear", { 0: "rgb(158, 209, 159)", 1: "rgb(67, 101, 56)" });
   var redgrad = a(go.Brush, "Linear", { 0: "rgb(206, 106, 100)", 1: "rgb(180, 56, 50)" });
   var yellowgrad = a(go.Brush, "Linear", { 0: "rgb(254, 221, 50)", 1: "rgb(254, 182, 50)" });
   var lightgrad = a(go.Brush, "Linear", { 1: "#E6E6FA", 0: "#FFFAF0" });

   // the template for each attribute in a node's array of item data
   var itemTempl =
    a(go.Panel, "Horizontal",
     a(go.Shape,
      { desiredSize: new go.Size(10, 10) },
      new go.Binding("figure", "figure"),
      new go.Binding("fill", "color")),
     a(go.TextBlock,//items样式
      { stroke: "#333333",
       row: 0, alignment: go.Spot.Center,
       margin: new go.Margin(0, 14, 0, 2),
       font: "bold 14px sans-serif" },
      new go.Binding("text", "name"))
    );

   // define the Node template, representing an entity
   this.myDiagram.nodeTemplate =
    a(go.Node, "Auto", // the whole node panel
     { selectionAdorned: true,
      resizable: true,
      layoutConditions: go.Part.LayoutStandard & ~go.Part.LayoutNodeSized,
      fromSpot: go.Spot.AllSides,
      toSpot: go.Spot.AllSides,
      isShadowed: true,
      shadowColor: "#CCAA" },
     new go.Binding("location", "location").makeTwoWay(),
     // whenever the PanelExpanderButton changes the visible property of the "LIST" panel,
     // clear out any desiredSize set by the ResizingTool.
     new go.Binding("desiredSize", "visible", function(v) { return new go.Size(NaN, NaN); }).ofObject("LIST"),
     // define the node's outer shape, which will surround the Table
     a(go.Shape, "Rectangle",
      /*{ fill: lightgrad, stroke: "#756875", strokeWidth: 3 }),*/
      new go.Binding("fill", "isHighlighted", function(h) { return h ? "#F44336" : "#A7E7FC"; }).ofObject()),
     a(go.Panel, "Table",
      { margin: 15, stretch: go.GraphObject.Fill },
      a(go.RowColumnDefinition, { row: 0, sizing: go.RowColumnDefinition.None }),
      // the table header
      a(go.TextBlock,
       {
        row: 0, alignment: go.Spot.Center,
        margin: new go.Margin(0, 14, 0, 2), // leave room for Button
        font: "bold 16px sans-serif"
       },
       new go.Binding("text", "key")),
      // 折叠/展开按钮
      /*a("PanelExpanderButton", "LIST", // the name of the element whose visibility this button toggles
       { row: 0, alignment: go.Spot.TopRight }),*/
      // the list of Panels, each showing an attribute
      a(go.Panel, "Vertical",
       {
        name: "LIST",
        row: 1,
        padding: 0,//表名到下边框的距离
        alignment: go.Spot.TopLeft,
        defaultAlignment: go.Spot.Left,
        stretch: go.GraphObject.Horizontal,
        itemTemplate: itemTempl
       },
       new go.Binding("itemArray", "items"))
     ) // end Table Panel
    ); // end Node

   // define the Link template, representing a relationship
   this.myDiagram.linkTemplate =
    a(go.Link, // the whole link panel
     {
      selectionAdorned: true,
      layerName: "Foreground",
      reshapable: true,
      routing: go.Link.AvoidsNodes,
      corner: 5,
      curve: go.Link.JumpOver,
      toEndSegmentLength: 100
     },
     a(go.Shape, // the link shape
      { stroke: "#303B45", strokeWidth: 2.5 }),
     a(go.TextBlock, // the "from" label
      {
       textAlign: "center",
       font: "bold 14px sans-serif",
       stroke: "#1967B3",
       segmentIndex: 0,
       segmentOffset: new go.Point(NaN, NaN),
       segmentOrientation: go.Link.OrientUpright
      },
      new go.Binding("text", "text")),
     a(go.TextBlock, // the "to" label
      {
       textAlign: "center",
       font: "bold 14px sans-serif",
       stroke: "#1967B3",
       segmentIndex: -1,
       segmentOffset: new go.Point(NaN, NaN),
       segmentOrientation: go.Link.OrientUpright
      },
      new go.Binding("text", "toText"))
    );

   // create the model for the E-R diagram
   var nodeDataArray = []
   for(var i =0; i< this.tabViewList.length; i++){
    nodeDataArray.push(JSON.parse(JSON.stringify(
     { key: this.tabViewList[i].tableName,
      name: this.tabViewList[i].tableCnName,
      items: [{name: this.tabViewList[i].tableCnName, isKey: false, figure: 'Decision', color: "#2d8cf0"}]
     }
     )))
   }
   var linkDataArray = []
   for(var j =0; j< this.tabRelView.length; j++){
    linkDataArray.push(JSON.parse(JSON.stringify(
     { from: this.tabRelView[j].fromTableName, to: this.tabRelView[j].toTableName,
      text: this.tabRelView[j].fromText, toText: this.tabRelView[j].toText
     })
    ))
   }
   /*var nodeDataArray = [
    { key: this.tabViewList[].tableName,
     items: [ { name: "角色标识:BIGINT", iskey: true, figure: "Decision", color: yellowgrad },
      { name: "模块标识:BIGINT", iskey: false, figure: "Cube", color: bluegrad }] },
    { key: "角色信息表",
     items: [ { name: "标识:BIGINT", iskey: true, figure: "Decision", color: yellowgrad },
      { name: "名称:VARCHAR(100)", iskey: false, figure: "Cube1", color: bluegrad },
      { name: "描述:VARCHAR(100)", iskey: false, figure: "Cube1", color: bluegrad },
      { name: "排序:VARCHAR(100)", iskey: false, figure: "Cube1", color: bluegrad } ] },
    { key: "用户权限表",
     items: [ { name: "CategoryID", iskey: true, figure: "Decision", color: yellowgrad },
      { name: "CategoryName", iskey: false, figure: "Cube", color: bluegrad },
      { name: "Description", iskey: false, figure: "Cube", color: bluegrad },
      { name: "Picture", iskey: false, figure: "TriangleUp", color: redgrad } ] },
    { key: "用户信息表",
     items: [ { name: "OrderID", iskey: true, figure: "Decision", color: yellowgrad },
      { name: "ProductID", iskey: true, figure: "Decision", color: yellowgrad },
      { name: "UnitPrice", iskey: false, figure: "MagneticData", color: greengrad },
      { name: "Quantity", iskey: false, figure: "MagneticData", color: greengrad },
      { name: "Discount", iskey: false, figure: "MagneticData", color: greengrad } ] },
    { key: "表1",
     items: [ { name: "OrderID", iskey: true, figure: "Decision", color: yellowgrad },
      { name: "ProductID", iskey: true, figure: "Decision", color: yellowgrad },
      { name: "UnitPrice", iskey: false, figure: "MagneticData", color: greengrad },
      { name: "Quantity", iskey: false, figure: "MagneticData", color: greengrad },
      { name: "Discount", iskey: false, figure: "MagneticData", color: greengrad } ] },
    { key: "表2",
     items: [ { name: "OrderID", iskey: true, figure: "Decision", color: yellowgrad },
      { name: "ProductID", iskey: true, figure: "Decision", color: yellowgrad },
      { name: "UnitPrice", iskey: false, figure: "MagneticData", color: greengrad },
      { name: "Quantity", iskey: false, figure: "MagneticData", color: greengrad },
      { name: "Discount", iskey: false, figure: "MagneticData", color: greengrad } ] },
    { key: "表3" },
    { key: "表4",
     items: [ { name: "OrderID", iskey: true, figure: "Decision", color: yellowgrad },
      { name: "ProductID", iskey: true, figure: "Decision", color: yellowgrad },
      { name: "UnitPrice", iskey: false, figure: "MagneticData", color: greengrad },
      { name: "Quantity", iskey: false, figure: "MagneticData", color: greengrad },
      { name: "Discount", iskey: false, figure: "MagneticData", color: greengrad } ] },
   ];*/
   /*var linkDataArray = [
    { from: "角色权限表", to: "角色信息表", text: "N", toText: "1" },
    { from: "角色权限表", to: "用户权限表", text: "N", toText: "1" },
    { from: "用户信息表", to: "角色权限表", text: "N", toText: "1" },
    { from: "表1", to: "角色权限表", text: "N", toText: "1" },
    { from: "角色权限表", to: "表1", text: "N", toText: "1" },
    { from: "表2", to: "用户信息表", text: "N", toText: "1" },
    { from: "表3", to: "用户信息表", text: "N", toText: "1" },
    { from: "表4", to: "角色权限表", text: "N", toText: "1" }
   ];*/
   this.myDiagram.model = new go.GraphLinksModel(nodeDataArray, linkDataArray);
   // Overview
   var myOverview =
    a(go.Overview, "myOverviewDiv", // the HTML DIV element for the Overview
     { observed: this.myDiagram, contentAlignment: go.Spot.Center });
  },
  searchDiagram() { // called by button
   var input = document.getElementById("mySearch");
   if (!input) return;
   input.focus();
   this.myDiagram.startTransaction("highlight search");
   if (this.searchText) {
    // search four different data properties for the string, any of which may match for success
    // create a case insensitive RegExp from what the user typed
    var regex = new RegExp(this.searchText, "i");
    var results = this.myDiagram.findNodesByExample({ key: regex },{name: regex});
    this.myDiagram.highlightCollection(results);
    // try to center the diagram at the first node that was found
    if (results.count > 0) this.myDiagram.centerRect(results.first().actualBounds);
   } else { // empty string only clears highlighteds collection
    this.myDiagram.clearHighlighteds();
   }

   this.myDiagram.commitTransaction("highlight search");
  }
 }
}
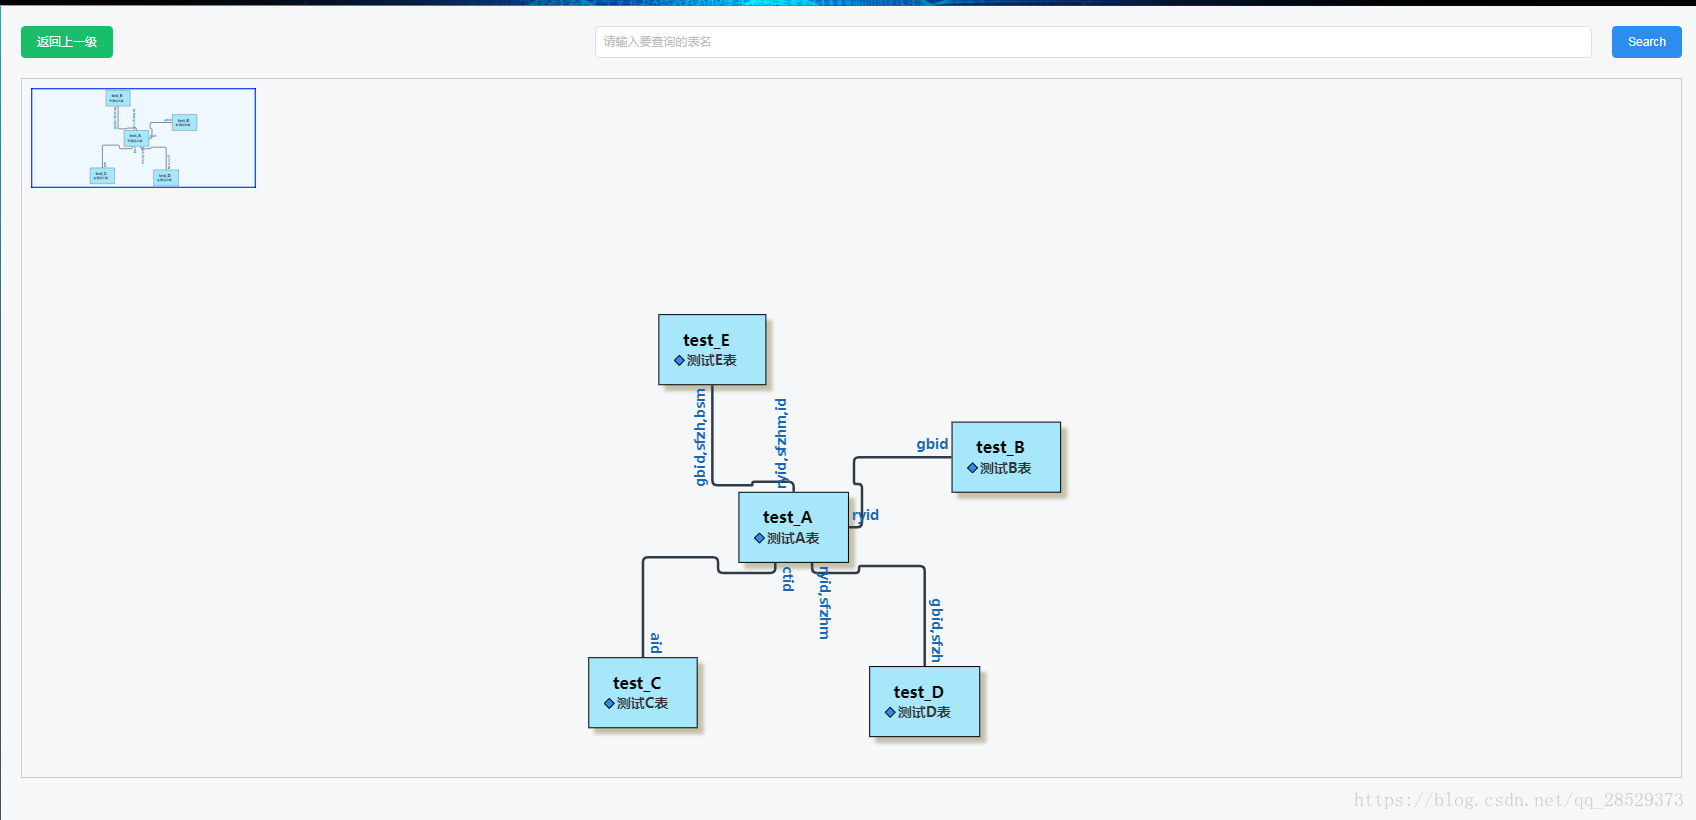
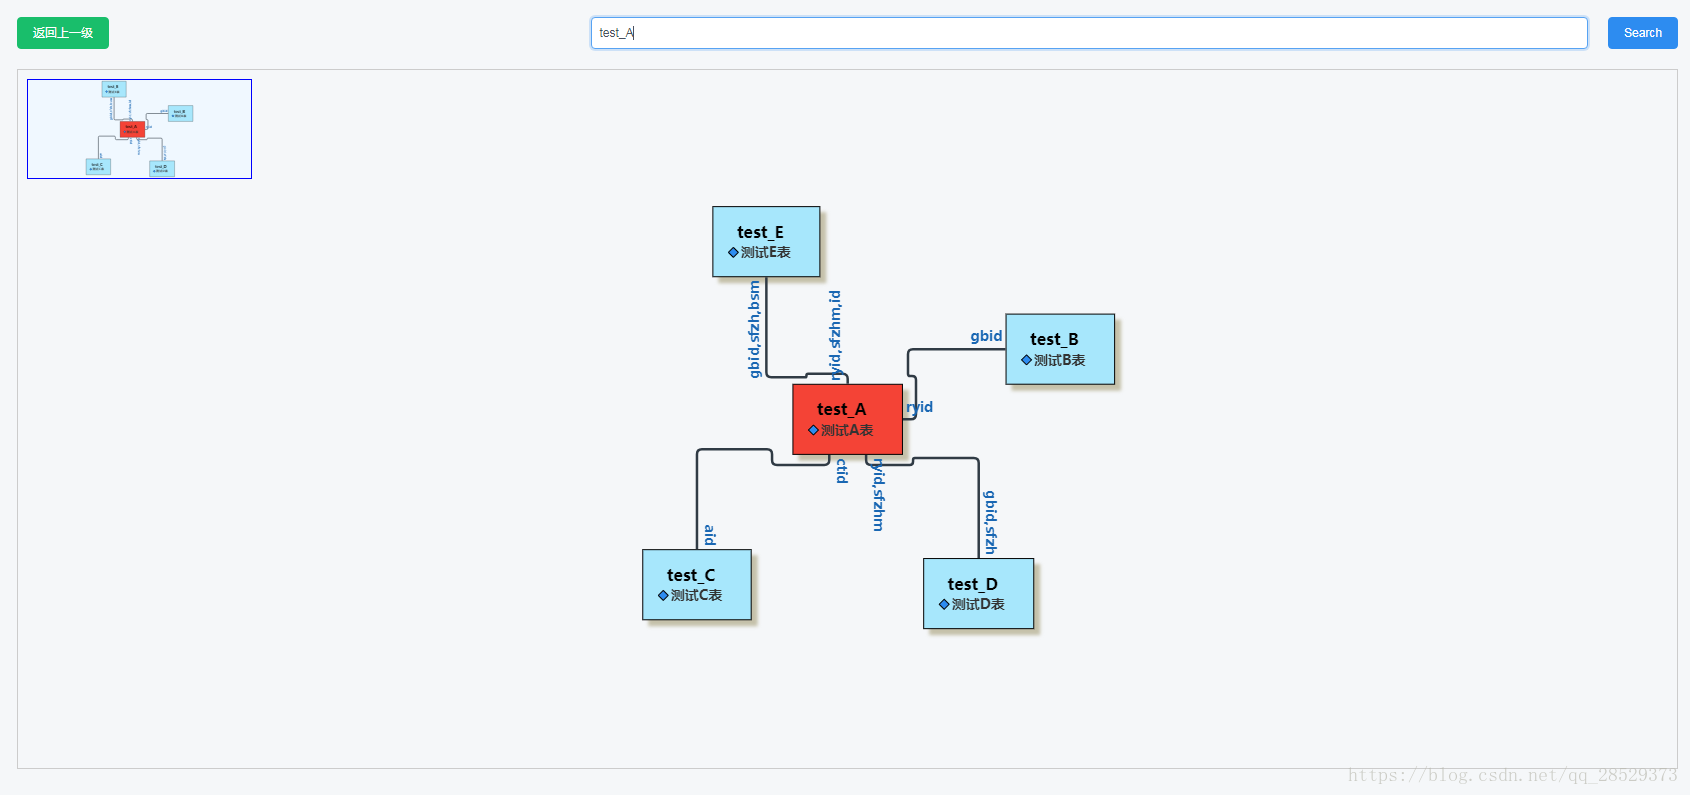
这里在gojs的EntityRelationship实例的基础上,加了遮罩图与搜索后高亮显示功能。
遮罩层的作用是当有很多数据时,可以通过拖动遮罩层来查找。

这个是遮罩层的div

这里是把之前定义好的Diagram放进遮罩层。
搜索框的作用即是更快的找到相应的数据,下图代码是设置搜索后显示高亮的数据。

效果图如下:


以上就是本文的全部内容,希望对大家的学习有所帮助,也希望大家多多支持我们。
赞 (0)

