IOS 自定义UICollectionView的头视图或者尾视图UICollectionReusableView
IOS 自定义UICollectionView的头视图或者尾视图UICollectionReusableView
其实看标题就知道是需要继承于UICollectionReusableView,实现一个满足自己需求的视图.那么如何操作了,看下面代码:
ViewController.m文件中

#import "ViewController.h"
#import "LSHControl.h"
#import "SHCollectionReusableView.h"
#import "SHCollectionViewCell.h"

#define SHCollectionViewCellIdetifiler  @"CollectionViewCell"
#define SHCollectionReusableViewHeader  @"CollectionHeader"
#define SHCollectionReusableViewFooter  @"CollectionFooter"

@interface ViewController ()<UICollectionViewDelegate,UICollectionViewDataSource>{
  NSArray *recipeImages;
  NSArray *hearderTitleArray;
}

@property(nonatomic,strong) UICollectionView *rightCollectionView;

@end

@implementation ViewController

- (void)viewDidLoad {

  [super viewDidLoad];

  NSArray *mainDishImages = [NSArray arrayWithObjects:@"egg_benedict.jpg", @"full_breakfast.jpg", @"ham_and_cheese_panini.jpg", @"ham_and_egg_sandwich.jpg", @"hamburger.jpg", @"instant_noodle_with_egg.jpg", @"japanese_noodle_with_pork.jpg", @"mushroom_risotto.jpg", @"noodle_with_bbq_pork.jpg", @"thai_shrimp_cake.jpg", @"vegetable_curry.jpg", nil];
  NSArray *drinkDessertImages = [NSArray arrayWithObjects:@"angry_birds_cake.jpg", @"creme_brelee.jpg", @"green_tea.jpg", @"starbucks_coffee.jpg", @"white_chocolate_donut.jpg", nil];
  recipeImages = [NSArray arrayWithObjects:mainDishImages, drinkDessertImages, nil];

  hearderTitleArray=@[@"分区1",@"分区2"];

  [self createCollectionView];

}

-(void)createCollectionView{

  UICollectionViewFlowLayout *flowLayout=[[UICollectionViewFlowLayout alloc] init];
  flowLayout.minimumInteritemSpacing=0.f;//item左右间隔
  flowLayout.minimumLineSpacing=5.f;//item上下间隔
  flowLayout.sectionInset=UIEdgeInsetsMake(5,15,5, 15);//item对象上下左右的距离
  flowLayout.itemSize=CGSizeMake(80, 80);//每一个 item 对象大小
  flowLayout.scrollDirection=UICollectionViewScrollDirectionVertical;//设置滚动方向,默认垂直方向.
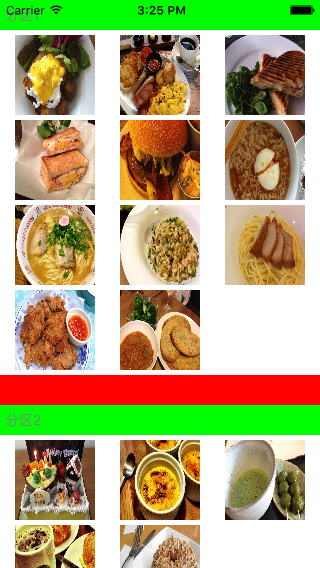
  flowLayout.headerReferenceSize=CGSizeMake(self.view.frame.size.width, 30);//头视图的大小
  flowLayout.footerReferenceSize=CGSizeMake(self.view.frame.size.width, 30);//尾视图大小

  self.rightCollectionView= [LSHControl createCollectionViewFromFrame:self.view.frame collectionViewLayout:flowLayout dataSource:self delegate:self backgroudColor:[UIColor whiteColor]];

  //自定义重用视图
  [self.rightCollectionView registerNib:[UINib nibWithNibName:@"SHCollectionViewCell" bundle:nil] forCellWithReuseIdentifier:SHCollectionViewCellIdetifiler];

  [self.rightCollectionView registerClass:[SHCollectionReusableView class] forSupplementaryViewOfKind:UICollectionElementKindSectionHeader withReuseIdentifier:SHCollectionReusableViewHeader];

  //使用原有重用视图
  [self.rightCollectionView registerClass:[UICollectionReusableView class] forSupplementaryViewOfKind:UICollectionElementKindSectionFooter withReuseIdentifier:SHCollectionReusableViewFooter ];

  [self.view addSubview:self.rightCollectionView];

}

- (NSInteger)numberOfSectionsInCollectionView:(UICollectionView *)collectionView
{
  return [recipeImages count];
}

- (NSInteger)collectionView:(UICollectionView *)collectionView numberOfItemsInSection:(NSInteger)section{
  return [[recipeImages objectAtIndex:section] count];
}

- (UICollectionReusableView *)collectionView:(UICollectionView *)collectionView viewForSupplementaryElementOfKind:(NSString *)kind atIndexPath:(NSIndexPath *)indexPath
{
  UICollectionReusableView *reusableview = nil;

  if (kind == UICollectionElementKindSectionHeader) {

    SHCollectionReusableView *headerView = [collectionView dequeueReusableSupplementaryViewOfKind:UICollectionElementKindSectionHeader withReuseIdentifier:SHCollectionReusableViewHeader forIndexPath:indexPath];
    /**
     *
     * 注意:虽然这里没有看到明显的initWithFrame方法,但是在获取重用视图的时候,系统会自动调用initWithFrame方法的.所以在initWithFrame里面进行初始化操作,是没有问题的!
     */

    [headerView getSHCollectionReusableViewHearderTitle:hearderTitleArray[indexPath.section]];

    reusableview = headerView;
  }

  if (kind == UICollectionElementKindSectionFooter) {

    UICollectionReusableView *footerview = [collectionView dequeueReusableSupplementaryViewOfKind:UICollectionElementKindSectionFooter withReuseIdentifier:SHCollectionReusableViewFooter forIndexPath:indexPath];
    /**
     *  如果头尾视图没什么很多内容,直接创建对应控件进行添加即可,无需自定义.
     */
    footerview.backgroundColor=[UIColor redColor];
    reusableview = footerview;
  }

  return reusableview;
}

- (UICollectionViewCell *)collectionView:(UICollectionView *)collectionView cellForItemAtIndexPath:(NSIndexPath *)indexPath{

  /**
   *
   *  这里自定义cell,使用xib进行布局.对于如何使用xib创建视图,不明白的,可以看我之前写的一篇文章.
   */

  SHCollectionViewCell *cell = (SHCollectionViewCell *)[collectionView dequeueReusableCellWithReuseIdentifier:SHCollectionViewCellIdetifiler forIndexPath:indexPath];

  UIImageView *recipeImageView = (UIImageView *)[cell viewWithTag:100];
  recipeImageView.image = [UIImage imageNamed:[recipeImages[indexPath.section] objectAtIndex:indexPath.row]];
  cell.backgroundView = [[UIImageView alloc] initWithImage:[UIImage imageNamed:@"photo-frame-2.png"]];

  return cell;
}

@end
自定义UICollectionViewCell,使用 xib进行布局
#import <UIKit/UIKit.h>

@interface SHCollectionViewCell : UICollectionViewCell

@property (weak, nonatomic) IBOutlet UIImageView *recipeImageView;

@end

#import "SHCollectionViewCell.h"
@implementation SHCollectionViewCell

@end
自定义UICollectionReusableView,手写代码进行布局
#import <UIKit/UIKit.h>

@interface SHCollectionReusableView : UICollectionReusableView

/**
 *  声明相应的数据模型属性,进行赋值操作,获取头视图或尾视图需要的数据.或者提供一个方法获取需要的数据.
 */

-(void)getSHCollectionReusableViewHearderTitle:(NSString *)title;

@end
#import "SHCollectionReusableView.h"
#import "LSHControl.h"

@interface SHCollectionReusableView (){

  UILabel *titleLabel;
}

@end

@implementation SHCollectionReusableView

-(id)initWithFrame:(CGRect)frame{

  self=[super initWithFrame:frame];

  if (self) {

    self.backgroundColor=[UIColor greenColor];
    [self createBasicView];
  }
  return self;

}

/**
 *  进行基本布局操作,根据需求进行.
 */
-(void)createBasicView{

 titleLabel=[LSHControl createLabelWithFrame:CGRectMake(5, 0,self.frame.size.width-50, self.frame.size.height) Font:[UIFont systemFontOfSize:14.0] Text:@"" color:[UIColor grayColor]];
 [self addSubview:titleLabel];

}

/**
 *  设置相应的数据
 *
 *  @param title
 */
-(void)getSHCollectionReusableViewHearderTitle:(NSString *)title{

  titleLabel.text=title;

}

@end
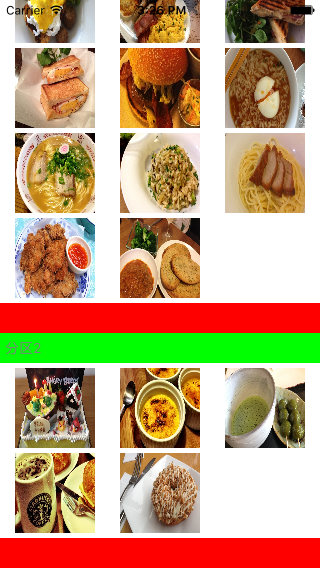
效果如下图:


感谢阅读,希望能帮助到大家,谢谢大家对本站的支持!
赞 (0)

