Tensorflow实现将标签变为one-hot形式
将数据标签变为类似MNIST的one-hot编码形式
def one_hot(indices,
 depth,
 on_value=None,
 off_value=None,
 axis=None,
 dtype=None,
 name=None):
 """Returns a one-hot tensor.

 The locations represented by indices in `indices` take value
 `on_value`,
 while all other locations take value `off_value`.

 `on_value` and `off_value` must have matching data types. If
 `dtype` is also
 provided, they must be the same data type as specified by
 `dtype`.

 If `on_value` is not provided, it will default to the value `1` with
 type
 `dtype`

 If `off_value` is not provided, it will default to the value `0` with
 type
 `dtype`

 If the input `indices` is rank `N`, the output will have rank
 `N+1`. The
 new axis is created at dimension `axis` (default: the new axis is
 appended
 at the end).

 If `indices` is a scalar the output shape will be a vector of
 length `depth`

 If `indices` is a vector of length `features`, the output shape will
 be:

 ```
 features x depth if axis == -1
 depth x features if axis == 0
 ```

 If `indices` is a matrix (batch) with shape `[batch, features]`, the
 output
 shape will be:

 ```
 batch x features x depth if axis == -1
 batch x depth x features if axis == 1
 depth x batch x features if axis == 0
 ```

 If `dtype` is not provided, it will attempt to assume the data
 type of
 `on_value` or `off_value`, if one or both are passed in. If none
 of
 `on_value`, `off_value`, or `dtype` are provided, `dtype` will
 default to the
 value `tf.float32`.

 Note: If a non-numeric data type output is desired (`tf.string`,
 `tf.bool`,
 etc.), both `on_value` and `off_value` _must_ be provided to
 `one_hot`.

 For example:

 ```python
 indices = [0, 1, 2]
 depth = 3
 tf.one_hot(indices, depth) # output: [3 x 3]
 # [[1., 0., 0.],
 # [0., 1., 0.],
 # [0., 0., 1.]]

 indices = [0, 2, -1, 1]
 depth = 3
 tf.one_hot(indices, depth,
 on_value=5.0, off_value=0.0,
 axis=-1) # output: [4 x 3]
 # [[5.0, 0.0, 0.0], # one_hot(0)
 # [0.0, 0.0, 5.0], # one_hot(2)
 # [0.0, 0.0, 0.0], # one_hot(-1)
 # [0.0, 5.0, 0.0]] # one_hot(1)

 indices = [[0, 2], [1, -1]]
 depth = 3
 tf.one_hot(indices, depth,
 on_value=1.0, off_value=0.0,
 axis=-1) # output: [2 x 2 x 3]
 # [[[1.0, 0.0, 0.0], # one_hot(0)
 # [0.0, 0.0, 1.0]], # one_hot(2)
 # [[0.0, 1.0, 0.0], # one_hot(1)
 # [0.0, 0.0, 0.0]]] # one_hot(-1)
 ```

 Args:
 indices: A `Tensor` of indices.
 depth: A scalar defining the depth of the one hot dimension.
 on_value: A scalar defining the value to fill in output when
 `indices[j]
 = i`. (default: 1)
 off_value: A scalar defining the value to fill in output when
 `indices[j]
 != i`. (default: 0)
 axis: The axis to fill (default: -1, a new inner-most axis).
 dtype: The data type of the output tensor.

 Returns:
 output: The one-hot tensor.

 Raises:
 TypeError: If dtype of either `on_value` or `off_value` don't
 match `dtype`
 TypeError: If dtype of `on_value` and `off_value` don't match
 one another
 """
 with ops.name_scope(name, "one_hot",
 [indices, depth, on_value, off_value, axis,
  dtype]) as name:
 on_exists = on_value is not None
 off_exists = off_value is not None
 on_dtype = ops.convert_to_tensor(on_value).dtype.base_dtype
  if on_exists else None
 off_dtype = ops.convert_to_tensor(off_value).dtype.
  base_dtype if off_exists else None
 if on_exists or off_exists:
  if dtype is not None:
  # Ensure provided on_value and/or off_value match dtype
  if (on_exists and on_dtype != dtype):
   raise TypeError("dtype {0} of on_value does not match "
   "dtype parameter {1}".format(on_dtype, dtype))
  if (off_exists and off_dtype != dtype):
   raise TypeError("dtype {0} of off_value does not match "
   "dtype parameter {1}".format(off_dtype, dtype))
  else:
  # dtype not provided: automatically assign it
  dtype = on_dtype if on_exists else off_dtype
 elif dtype is None:
  # None of on_value, off_value, or dtype provided. Default
  dtype to float32
  dtype = dtypes.float32
 if not on_exists:
  # on_value not provided: assign to value 1 of type dtype
  on_value = ops.convert_to_tensor(1, dtype, name="
  on_value")
  on_dtype = dtype
 if not off_exists:
  # off_value not provided: assign to value 0 of type dtype
  off_value = ops.convert_to_tensor(0, dtype, name="
  off_value")
  off_dtype = dtype
 if on_dtype != off_dtype:
  raise TypeError("dtype {0} of on_value does not match "
  "dtype {1} of off_value".format(on_dtype, off_dtype))
 return gen_array_ops._one_hot(indices, depth, on_value,
  off_value, axis,
  name)

Enter: apply completion.
 + Ctrl: remove arguments and replace current word (no Pop-
 up focus).
 + Shift: remove arguments (requires Pop-up focus).
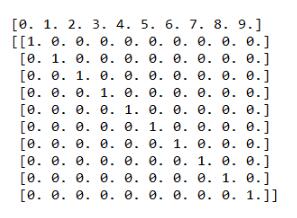
import tensorflow as tf
import numpy as np
data = np.linspace(0,9,10)
label = tf.one_hot(data,10)
with tf.Session() as sess:
 print(data)
 print(sess.run(label))
补充知识:数据清洗—制作one-hot
使用pandas进行one-hot编码
pandas.get_dummies(data, prefix=None, prefix_sep='_', dummy_na=False, columns=None, sparse=False, drop_first=False, dtype=None)
pandas中get_dummies()函数可以将字段进行编码,转换为01形式,其中prefix可以为每个新展开的列名添加前缀。
但是,笔者发现它较易使用在数据为每一列为单独的字符:

df = pd.DataFrame({'A': ['a', 'b', 'a'], 'B': ['b', 'a', 'c'], 'C': [1, 2, 3]})

## one-hot
df_dumm = pd.get_dummies(df)

my_one_hot
但是对于数据为下面形式的可就不能直接转换了,需要先预处理一下,之后转换为one-hot形式:

我的做法是:
## tqdm_notebook可以导入tqdm包来使用
def one_hot_my(dataframe, attri):
 sample_attri_list = []
 sample_attri_loc_dic = {}
 loc = 0
 dataframe[attri] = dataframe[attri].astype(str)
 for attri_id in tqdm_notebook(dataframe[attri]):
  attri_id_pro = attri_id.strip().split(',')
  for key in attri_id_pro:
   if key not in sample_attri_loc_dic.keys():
    sample_attri_loc_dic[key] = loc
    loc+=1
  sample_attri_list.append(attri_id_pro)
 print("开始完成one-hot.......")
 one_hot_attri = []
 for attri_id in tqdm_notebook(sample_attri_list):
  array = [0 for _ in range(len(sample_attri_loc_dic.keys()))]
  for key in attri_id:
   array[sample_attri_loc_dic[key]] = 1
  one_hot_attri.append(array)
 print("封装成dataframe.......")
 ## 封装成dataframe
 columns = [attri+x for x in sample_attri_loc_dic.keys()]
 one_hot_rig_id_df = pd.DataFrame(one_hot_attri,columns=columns)
 return one_hot_rig_id_df
对属性二值化可以采用:
## 对属性进行二值化
def binary_apply(key, attri, dataframe):
 key_modify = 'is_' + ''.join(lazy_pinyin(key)) + '_' + attri
 print(key_modify)
 dataframe[key_modify] = dataframe.apply(lambda x:1 if x[attri]== key else 0, axis=1)
 return dataframe
对字符进行编码,将字符转换为0,1,2…:
## 对字符进行编码
# columns = ['job', 'marital', 'education','default','housing' ,'loan','contact', 'poutcome']
def encode_info(dataframe, columns):
 for col in columns:
  print(col)
  dataframe[col] = pd.factorize(dataframe[col])[0]
 return dataframe

以上这篇Tensorflow实现将标签变为one-hot形式就是小编分享给大家的全部内容了,希望能给大家一个参考,也希望大家多多支持我们。
相关推荐
-
将keras的h5模型转换为tensorflow的pb模型操作
背景:目前keras框架使用简单,很容易上手,深得广大算法工程师的喜爱,但是当部署到客户端时,可能会出现各种各样的bug,甚至不支持使用keras,本文来解决的是将keras的h5模型转换为客户端常用的tensorflow的pb模型并使用tensorflow加载pb模型. h5_to_pb.py from keras.models import load_model import tensorflow as tf import os import os.path as osp from kera
-

在keras下实现多个模型的融合方式
在网上搜过发现关于keras下的模型融合框架其实很简单,奈何网上说了一大堆,这个东西官方文档上就有,自己写了个demo: # Function:基于keras框架下实现,多个独立任务分类 # Writer: PQF # Time: 2019/9/29 import numpy as np from keras.layers import Input, Dense from keras.models import Model import tensorflow as tf # 生成训练集 data
-
tensorflow2.0保存和恢复模型3种方法
方法1:只保存模型的权重和偏置 这种方法不会保存整个网络的结构,只是保存模型的权重和偏置,所以在后期恢复模型之前,必须手动创建和之前模型一模一样的模型,以保证权重和偏置的维度和保存之前的相同. tf.keras.model类中的save_weights方法和load_weights方法,参数解释我就直接搬运官网的内容了. save_weights( filepath, overwrite=True, save_format=None ) Arguments: filepath: String,
-
Tensorflow实现将标签变为one-hot形式
将数据标签变为类似MNIST的one-hot编码形式 def one_hot(indices, depth, on_value=None, off_value=None, axis=None, dtype=None, name=None): """Returns a one-hot tensor. The locations represented by indices in `indices` take value `on_value`, while all other l
-
TensorFlow卷积神经网络AlexNet实现示例详解
2012年,Hinton的学生Alex Krizhevsky提出了深度卷积神经网络模型AlexNet,它可以算是LeNet的一种更深更宽的版本.AlexNet以显著的优势赢得了竞争激烈的ILSVRC 2012比赛,top-5的错误率降低至了16.4%,远远领先第二名的26.2%的成绩.AlexNet的出现意义非常重大,它证明了CNN在复杂模型下的有效性,而且使用GPU使得训练在可接受的时间范围内得到结果,让CNN和GPU都大火了一把.AlexNet可以说是神经网络在低谷期后的第一次发声,确立了深
-
TensorFlow深度学习另一种程序风格实现卷积神经网络
import tensorflow as tf import numpy as np import input_data mnist = input_data.read_data_sets('data/', one_hot=True) print("MNIST ready") n_input = 784 # 28*28的灰度图,像素个数784 n_output = 10 # 是10分类问题 # 权重项 weights = { # conv1,参数[3, 3, 1, 32]分别指定了fi
-
取得父标签
取得父标签FF 下没有 event 用 arguments[0] FF 下没有 srcElement 用 target FF 下没有 parentElement 用 parentNode 复制代码 代码如下: function obj_event_onsomething(e){ var e=window.event?window.event:e; var srcEle=e.srcElement?e.srcElement:e.target; var theObjectYouWant=srcEle.
-
Mybatis的where标签使用总结梳理
目录 背景 原始的手动拼接 Mybatis where标签的使用 进阶:自定义trim标签 where语句的坑 小结 背景 在上篇文章,我们系统地学习了where 1=1 相关的知识点,大家可以回看<MySQL中where 1=1方法的使用及改进>这篇文章.文章中涉及到了Mybatis的替代方案,有好学的朋友在评论区有朋友问了基于Mybatis写法的问题. 本篇文章会将Mybatis中where标签的基本使用形式.小技巧以及容易踩到的坑进行总结梳理,方便大家更好地实践运用d 原始的手动拼接 在
-
Swift教程之控制流详解
Swift提供了所有C语言中相似的控制流结构.包括for和while循环:if和switch条件语句:break和continue跳转语句等. Swift还加入了for-in循环语句,让编程人员可以在遍历数组,字典,范围,字符串或者其它序列时更加便捷. 相对于C语言,Swift中switch语句的case语句后,不会自动跳转到下一个语句,这样就避免了C语言中因为忘记break而造成的错误.另外case语句可以匹配多种类型,包括数据范围,元组,或者特定的类型等.switch语句中已匹配的数值也可以
-
Javascript核心读书有感之语句
在javascript中,表达式是短语,那么语句(statement)就是整句或命令.正如英文语句以句号结尾,javascript以分号结尾. 表达式计算出一个值,但语句使某件事发生. "使某件事发生"的一个方法是计算带有副作用的表达式.诸如赋值和函数调用这些有副作用的表达式,是可以作为单独的语句的.这种把表达式当做语句的用法也称做表达式语句(expression statement).类似的语句还有声明语句(declaration statement),声明语句用来声明新变量或者定义
-
python构建深度神经网络(续)
这篇文章在前一篇文章:python构建深度神经网络(DNN)的基础上,添加了一下几个内容: 1) 正则化项 2) 调出中间损失函数的输出 3) 构建了交叉损失函数 4) 将训练好的网络进行保存,并调用用来测试新数据 1 数据预处理 #!/usr/bin/env python # -*- coding: utf-8 -*- # @Time : 2017-03-12 15:11 # @Author : CC # @File : net_load_data.py from numpy import
-
python构建深度神经网络(DNN)
本文学习Neural Networks and Deep Learning 在线免费书籍,用python构建神经网络识别手写体的一个总结. 代码主要包括两三部分: 1).数据调用和预处理 2).神经网络类构建和方法建立 3).代码测试文件 1)数据调用: #!/usr/bin/env python # -*- coding: utf-8 -*- # @Time : 2017-03-12 15:11 # @Author : CC # @File : net_load_data.py # @Soft
-
使用Keras中的ImageDataGenerator进行批次读图方式
ImageDataGenerator位于keras.preprocessing.image模块当中,可用于做数据增强,或者仅仅用于一个批次一个批次的读进图片数据.一开始以为ImageDataGenerator是用来做数据增强的,但我的目的只是想一个batch一个batch的读进图片而已,所以一开始没用它,后来发现它是有这个功能的,而且使用起来很方便. ImageDataGenerator类包含了如下参数:(keras中文教程) ImageDataGenerator(featurewise_cen